A story of IoT and Octopods in the far-east (or, if preferred: How to leverage EdgeX Foundry for a successful customer demonstration).
A normal day in Shinjuku: The EdgeX Foundry Cthulhu lookalike taking over the high-rise district
Last autumn we had ongoing discussions with a customer regarding their IoT efforts. Primarily the discussions had been focused around deployment and management of the edge devices from an infrastructure standpoint. Working at Dell Technologies, that part comes naturally. However, once the discussion broadened it came across the data management side. How does one best deal with the data flow from a myriad IoT devices? How would that data be stored long-term and later used for analytics? Could data be intelligently acted upon in real-time based on alerts from a sensor cluster somewhere
As the hardware management had already been taken care of by EDM (Edge Device Manager) and Edge Gateway OS status and alerting covered by VMware Pulse, we found ourselves looking to a new solution for the data management side. At the back of the room the pre-sales manager said, “Maybe we should look into EdgeX Foundry?”. At that time nobody had much information about this open source, micro-service solution for IoT, but that was about to change.
I took it upon myself to do some research and get it going. It turned out to be exactly what we had been looking for all along.
What is EdgeX Foundry?
EdgeX Foundry functionality can (very simplified) be boiled down to the following:
Ingest data from a wide variety of IoT and M2M devices as well as control them (it speaks many languages!)
Act upon sensor data in real-time (it has a rules engine that can automate actions)
Format, compress & encrypt data prior to forwarding it for storage and analytics (for example Azure)
So, Receive, Process and Forward data with optional actions taken along the way. It’s essentially the glue that holds the world of IoT devices and both internal and external cloud services together. With all its flexibility, adaptability and far-reaching access to almost any IoT device or cloud service it is plain to see why it’s represented by an Octopus 🙂
It elegantly bridges the gap between the edge and the cloud and can reside anywhere along the data path. The preferred location is close to the edge, to minimize latency and network load, but as it’s based on micro-services running in Docker containers it can (and should) be spread out across the infrastructure layer so that each service can make itself useful when and where it’s needed the most.
https://www.edgexfoundry.org/
EdgeX Foundry has two ends
Southbound: Where the IoT Edge is and the data is generated. Thanks to the many protocols it speaks it can interface with both old and new IoT devices.
Northbound: Where the external / internal cloud services reside. Where data warehousing can store the vast volumes of data created and where Machine Learning tools can be leveraged to gain insights from data over time.
In between these two the core and supporting services reside, with a temporary NoSQL data storage (30 min by default), the Scheduling service as well as the Rules Engine for actions and a command module to interface with machinery at the edge when action need to be taken in real-time.
Device templates
To make it easy to add new IoT devices there are ready-made templates which help integrate sensors with EdgeX Foundry. These are made by Dell EMC or the respective manufacturer and can be downloaded from GitHub.
The device templates play an important role in identifying the types of data being sent to EdgeX Foundry. For example, when receiving a value like “51” from an IoT device it’s important to clarify to the system what that data represents. Is it 51 degrees C? Is it 51% humidity or is it 51 vibrations / sec?
The templates also allow for commands to be sent and status codes to be exchanged. Commands like setting the sensitivity of a camera or motion detector may be important to certain IoT devices and EdgeX Foundry device templates include the valid commands for each device.
Demonstrating the solution
So, as Octopods go this one is quite capable and a great fit for our customer! The next step is to showcase this as seeing is believing and we’re all about being hands-on. After all, it’s most interesting when the rubber hits the road (or when the tentacles grab the Edge Gateways as is the case for us). How do we get this going?
Demonstration goals
Explain what EdgeX Foundry all about and show how it can be leveraged to propel their IoT efforts
Have a real microservice environment going including all the EdgeX Foundry goodness
Show real-time data collection, processing and export to external cloud services
Keep it interesting and relevant for the customer
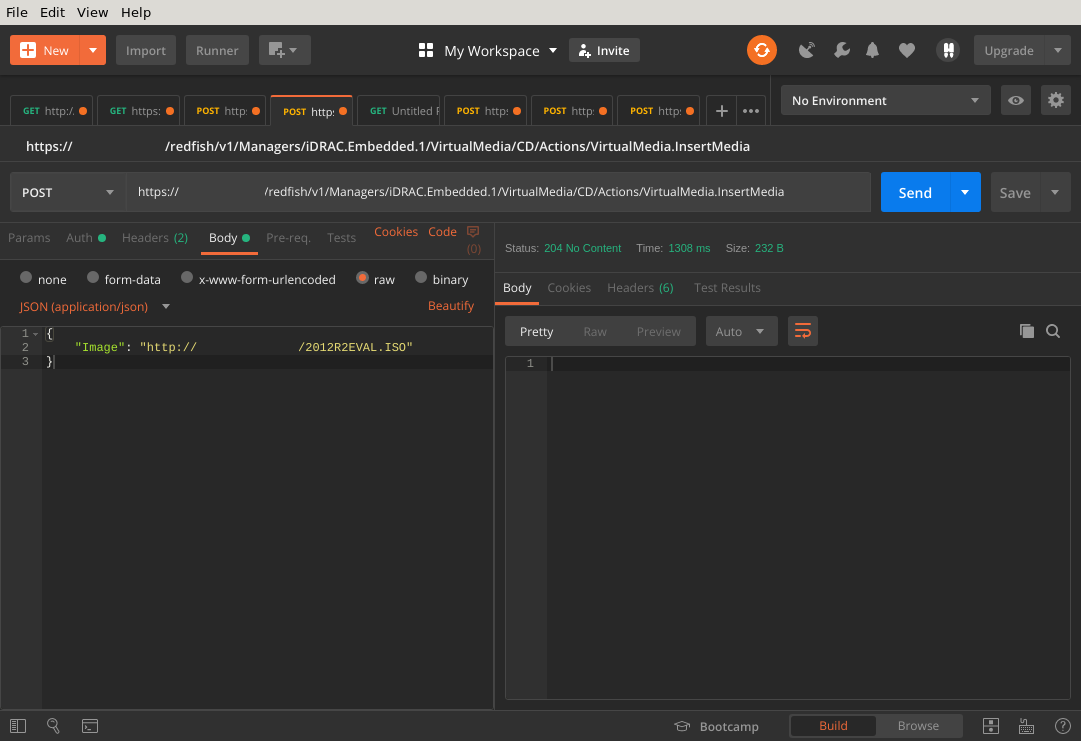
Getting the base system up and running is surprisingly easy. The EdgeX Foundry website has a happy “Get started” button and it links to a hands-on tutorial. All that’s needed is a system with Docker Compose. There’s a simple text file (yaml) which docker-compose will use to bootstrap all required Docker images and get them up and running on the same virtual network. Once that’s done the system can be interfaced with using REST clients like, for example, Postman. Most of the micro service comes with its own REST endpoint which can be interfaced with. Either to retrieve or send data as well as modifying settings.
Postman used to directly interact with the EdgeX Foundry microservice APIs
The tutorial goes through a fictional scenario with a smart-camera along with simulated data generated. While this is nice, for our demo we want real data from real sensors. As such we take the example of the fictional smart camera and modify it to fit two scenarios:
Humidity and Temperature sensors (we have no IoT devices, so we build one using a Raspberry Pi)
Smart camera powered by machine learning (we use a simple webcam + a Python script from the Tensorflow tutorial for image recognition)
Providing a graphical interface
While we’re quite happy working on the command line, it doesn’t always make for a good customer demo to just show text on a screen. We need a GUI of some sort. After talking to the creator of EdgeX Foundry – Jim White, we get introduced to Keith from IOTech in the UK.
IOTech has just what we need – a GUI for EdgeX Foundry that can be used to, among other things, display sensor data and graph it. Much easier on the eyes for our customer, so we head over to IOTech’s GitHub page where we find a Docker file for their UI. It’s quick work to build a Docker image and subsequently add it to the docker-compose.yml file used to initiate all EdgeX Foundry services.
Now it starts up along with all other micro services and can communicate across the same network. We’re excited and we’re hopeful our customer will be as well once they get to see it.
EdgeX Manager from IOTech
Generating sensor data as input
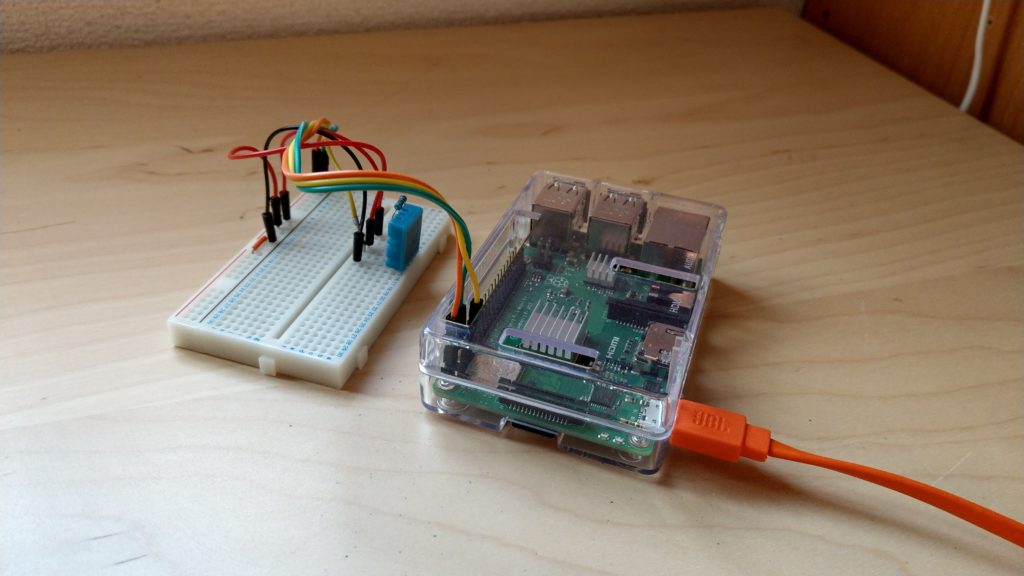
Next, we need some data input. A Raspberry Pi + a breadboard and a DHT11 sensor will provide both Humidity and Temperature data. It’s interfacing with the Raspberry Pi using the GPIO pins and a little help of AdaFruit’s DHT library. We’re a big fan of Lady Ada and her libraries.
So, now we have sensor data. However, to get it sent to EdgeX Foundry we need to use one of the many protocols supported by the EdgeX Foundry device service. Since we’ve been working with Redfish and the REST protocol for server automation and since the Dell EMC GitHub page contains plenty of examples of this (courtesy of Texas Roemer) we pull down some Python files and borrow from there.
A little tweaking later our Raspberry Pi is humming along and sending sensor data via REST every 2 seconds to the EdgeX Foundry device service. To make it interface correctly with the device service we have modified the smart camera template provided in the initial EdgeX Foundry API tutorial to match the data sent by the Raspberry Pi. Instead of counting Humans and Dogs as in the original we’re now sending “Humidity in Percent” and “Temperature in C”.
RaspberryPi with a breadboard and DHT-11 humidity and temperature sensor
Looking at the data through IOTech’s GUI we can easily graph the data and provide the customer with a visually pleasing representation of data that is generated in real-time right in front of them. This also has the added benefit that we can ask the customer to touch or breathe on the sensor to change temperature and / or humidity during the demo. This creates an impactful element which helps convey the realization that this system is live, right here, right now.
Exporting data to external cloud services
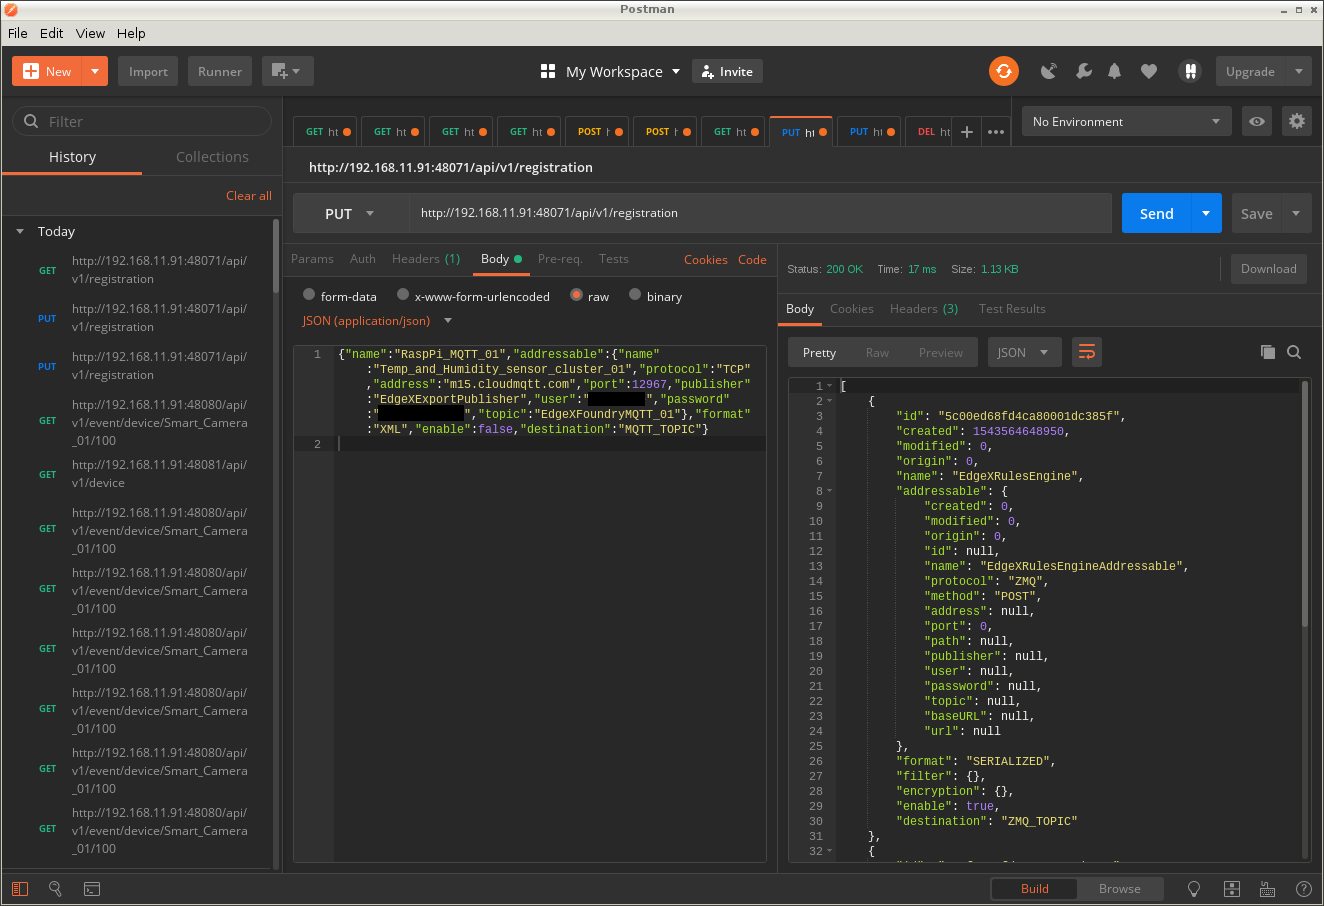
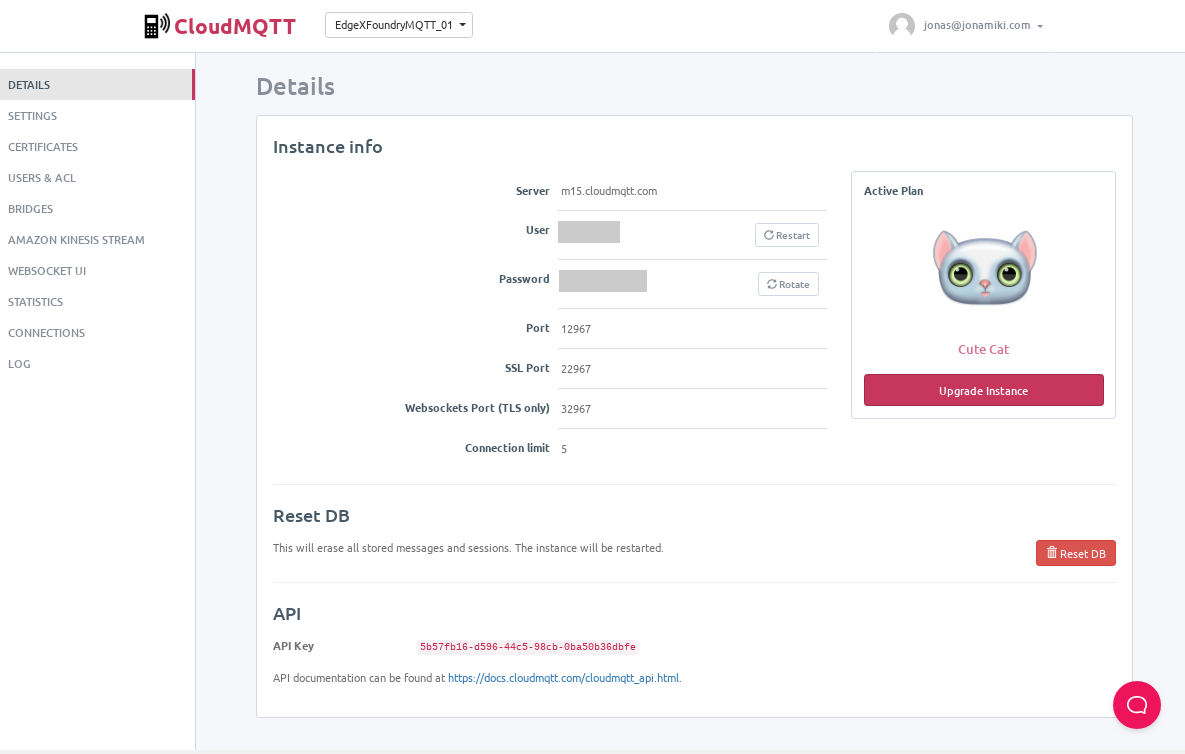
But wait. How about data export? Wasn’t EdgeX Foundry supposed to be able to export data to external services? Well, the tutorial also contains information on this topic. We create an account at CloudMQTT and configure EdgeX Foundry to export data there. CloudMQTT is essentially a MQTT broker with a live GUI where data can be seen entering the system as it happens. EdgeX Foundry authenticates with the CloudMQTT service and start forwarding on our data. We can view it as it comes in in XML format. This can easily be changed to JSON on the fly and we do this during the live demo later. Jim White provide helpful input on this topic to make sure it functions as expected.
Exporting EdgeX Foundry data stream to CloudMQTT in real-time
Adding the smart camera
This is all good and well for simple sensor data. What about our ML powered smart camera? The Tensorflow tutorials come with a GitHub repository full of useful tools. Among them the classify_image.py script which takes an image as input and then tells you what it sees in plain text. We hook it up to a web camera, run it in a loop and export the top scoring items the Tensorflow script finds after running inferencing on our live camera input. The resulting data is streamed using REST, just like the Humidity and Temperature data from the Raspberry Pi earlier, to EdgeX Foundry device service and then onward to the public cloud over MQTT where it can be viewed entering the system live.
All preparation is done and we’re ready for our demo.
Customer feedback and next steps
So the day of the demonstration came and went. What was the customer’s impression of the solution? In short: They’re very excited about the capabilities, flexibility and potential of the EdgeX Foundry system. They’re now looking to get their own environment up and running to pursue further tests which will drive the integration of EdgeX Foundry into their IoT initiative. This is done alongside Dell EMC EDM and VMware Pulse as well as their home-grown orchestration platform.
Tips for a successful setup
While the process was made fairly straight forward by the online tutorials for both EdgeX Foundry and Tensorflow as well as the Dell EMC Redfish GitHub repository there were some areas which warranted more attention to get right.
The device templates
For the demo custom device templates were created for both the Smart Camera as well as the Raspberry Pi sensors. It can be challenging to create a device template which will be accepted by the system. If the fields don’t match the data already having been sent do the metadata subsystem an upload attempt will result in errors. Carefully compare the tutorial templates with the REST API calls to ensure the fields that need to be the same, actually match.
Running the REST API calls via Postman vs. Python
Personally, I found using Postman to be handy for troubleshooting or the occasional API call but gradually becoming tedious as more calls via REST were required. Instead I made a Python script which automates the process and can be run more easily from the command line. This may simply be a matter of preference though.
The IOTech GUI
If the IOTech GUI is desired the Dockerfile can be downloaded from here:
Simply create a Docker image and add it to the docker-compose.yml file to have it start / stop with the rest of the EdgeX Foundry micro services.
Microservices and their description
Micro service
Description
iotech-manager
UI provided by IOTech in the UK
edgex-export-distro
Export Distribution microservice, receives data from Core Data, filters, transforms, and formats the data, then distributes it through REST, MQTT, or 0MQ to client endpoints of choice.
edgex-support-scheduler
Performs data housekeeping tasks, scrubs exported / stale events and data
edgex-core-command
Conduit for other services to trigger action on devices and sensors through their managing Device Services
edgex-export-client
Service doing the actual exporting of XML or JSON data to external services
edgex-support-notifications
Issues notifications via SMS, Email, REST, AMQP or MQTT. Sometimes triggered by the Rules engine noticing values out of bounds
edgex-core-metadata
Holds IoT Device information, including Device Services and Device Profiles
edgex-core-data
Central, optionally persistent, datastore
edgex-support-logging
Logging services
edgexfoundry_del_portainer
EdgeX deployment and orchestration
edgex-mongo
Persistent, NoSQL datastore
edgex-core-consul
Configuration and Registry, Key-Value store. EdgeX services report to Consul when starting up and Consul continuously monitor their status
edgex-support-rulesengine
Edge-side event triggering mechanism for quick action at the edge. Based on Drools rules engine
Photon OS is a VMware initiative to create a lightweight Linux based OS with container support. I have to admit my initial reaction to Photon OS was: “y tho?”
It’s a reasonable reaction. There are MANY Linux based OS options out there already and essentially all of them have container support. The reason for creating Photon OS would seem to be that VMware wants their own rubber-stamped Linux OS as part of an ecosystem under their control.
Photon OS’s redeeming feature is the fact that it’s really lightweight. Not as lightweight as Ubuntu Core though. Photon OS for Raspberry Pi weighs in at 512Mb while Ubuntu Core is 450Mb. Still, given the influence of VMware in virtualization and their (our) inroads into IoT / M2M with Pulse, it’s likely that Photon OS will take off eventually.
Currently the main barrier to widespread adoption of Photon OS is a lack of commercial support. At the moment it is simply available as an unsupported download from GitHub (here). This could change in the future though and in that case we may see it being utilized more broadly and also outside the lab environments it is currently inhabiting.
Note that unlike Raspbian, which is 32bit, Photon OS is a 64bit operating system. That too may be something that’ll help float the boat for some.
Getting started with Photon OS on the Raspberry Pi
Deflate the zx compressed image and save to a micro-SD card:
tar xf photon-rpi3-3.0-26156e2.tar.xz
cd rpi3/
sudo dd if=photon-rpi3-3.0-26156e2d.raw of=/dev/mmcblk0 bs=4M;sudo sync
In this example the SD card device is /dev/mmcblk0. This may differ on other systems of course. Please check with “lsblk” or so and please do be careful. Linux / Unix folks don’t refer to dd as “Disk Destroyer” for nothing.
Boot the Raspberry Pi and log in. The default credentials are: root / changeme
DHCP and SSH are both enabled by default and should make it possible to access the Pi across the network if using a wired connection (I haven’t tried though). With a Raspberry Pi it’s likely a wireless connection would be more convenient however. Configuring Wi-Fi is easy and is described in the section that follows.
Photon OS Wi-Fi configuration
There are a few steps to go through for Wi-Fi connectivity but it’s not difficult.
Start the wpa_supplicant service
systemctl start wpa_supplicant@wlan0
Enable the wpa_supplicant service (so it starts with the Pi)
systemctl enable wpa_supplicant@wlan0
Check the service status
systemctl status wpa_supplicant@wlan0
Edit the dhcp settings to get DHCP for wlan0 and not eth0
Photon OS comes in a few different sizes and in the larger ones both Docker and Kubernetes are preinstalled. Not so with the Raspberry Pi version though, so we need to install Docker manually.
Packages are installed with either “yum” or “tdnf”. Docker is available from tdnf so we’ll use that to run the install below.
Refresh the cache but don’t update the packages
We need to refresh the tdnf cache to find the docker package. However, this process can also be used to update all packages. I found that this breaks Wi-Fi. So, if you use Wi-Fi I recommend:
root@photon-rpi3 [ ~ ]# tdnf update

Then select "n" to just refresh the cache without updating any packages.
root@photon-rpi3 [ ~ ]# docker pull hello-world
Using default tag: latest
latest: Pulling from library/hello-world
3b4173355427: Pull complete
Digest: sha256:2557e3c07ed1e38f26e389462d03ed943586f744621577a99efb77324b0fe535
Status: Downloaded newer image for hello-world:latest
root@photon-rpi3 [ ~ ]# docker run hello-world

Hello from Docker!
This message shows that your installation appears to be working correctly.

To generate this message, Docker took the following steps:
 1. The Docker client contacted the Docker daemon.
 2. The Docker daemon pulled the "hello-world" image from the Docker Hub.
    (arm64v8)
 3. The Docker daemon created a new container from that image which runs the
    executable that produces the output you are currently reading.
 4. The Docker daemon streamed that output to the Docker client, which sent it
    to your terminal.

To try something more ambitious, you can run an Ubuntu container with:
 $ docker run -it ubuntu bash

Share images, automate workflows, and more with a free Docker ID:
 https://hub.docker.com/

For more examples and ideas, visit:
 https://docs.docker.com/get-started/

root@photon-rpi3 [ ~ ]#
That’s all! Photon OS is installed, Wi-Fi configured, Docker installed and verified. Ready to rock.
Disclaimer: The opinions in this article (and on this website in general) are entirely mine and not those of my employer Dell EMC. Testing has been done in a short period of time and may not accurately reflect real-world performance.
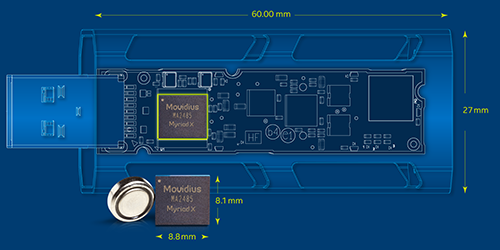
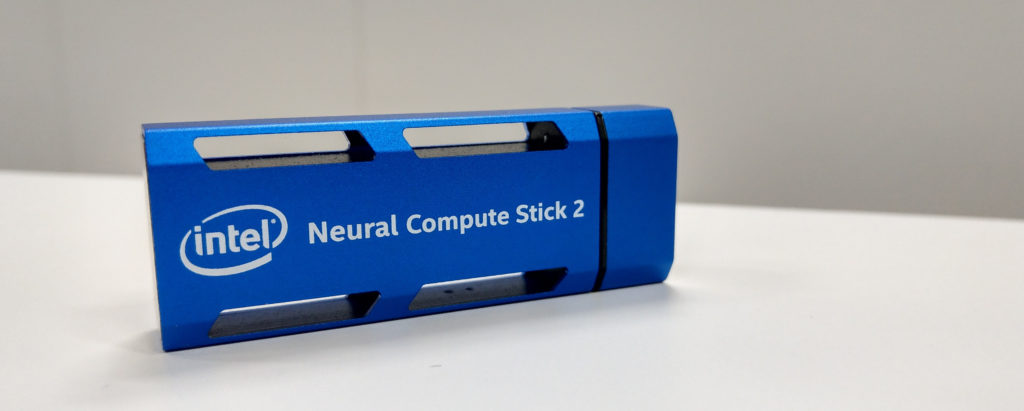
This week I’ve tested the Intel Neural Compute Stick 2 (NCS2). A USB stick for visual computing which originally comes from Movidius – a company acquired by Intel in September 2016. Intel’s landing page for the NCS2 can be found here.
The NCS2 is equipped with 16 VPU’s or Visual Processing Units which are designed specifically for image and video processing. With this it’s possible to run Machine Learning frameworks like Caffe and Tensorflow and to leverage CNN (Convolutional Neural Networks) to do inferencing on data.
So what?
What makes this really interesting is that since it comes in USB format it can simply be plugged into devices at the edge that normally lack the processing power to run machine learning frameworks. With that it becomes possible to process IoT data where it’s generated. The NCS2 has the potential to make Edge Computing a reality instead of just a buzzword.
The compound impact could be significant if the network backhaul is taken into consideration. Imagine replacing a constant stream of video data across the network with just the metadata resulting from running inferencing on the very same video stream. Massive amounts of video vs. some text data. Network savings alone could pay for this pretty quickly.
Note that the very same type of chip is sold embedded in video cameras and drones. They’re pretty expensive though. A webcam + a Raspberry Pi and one of the NCS2 sticks could be a very low-cost way to get a security camera with real-time item recognition for very little money in comparison.
Why not use a GPU?
Many edge devices lack the capabilities to host a GPU, either due to space, cost or thermal limitations (GPU’s generate a lot of heat and many edge devices are passively cooled).
Hang on – isn’t that just a devkit?
Yes and no. The USB stick can be used as a devkit to develop code for embedded versions of the Movidius chip of the kind that may be destined for cameras, drones, robots, etc. However, it can also be used as a very flexible drop-in solution for any edge devices or IoT gateways with low processing power but where the capability to do inferencing is desired.
Is it actually useful?
Yes, it looks like it might actually be able to do the job. The job being processing video directly on the edge devices. In particular it shines when plugged into platforms with low-end CPUs which would never be able to run inferencing on their own.
Functionality testing
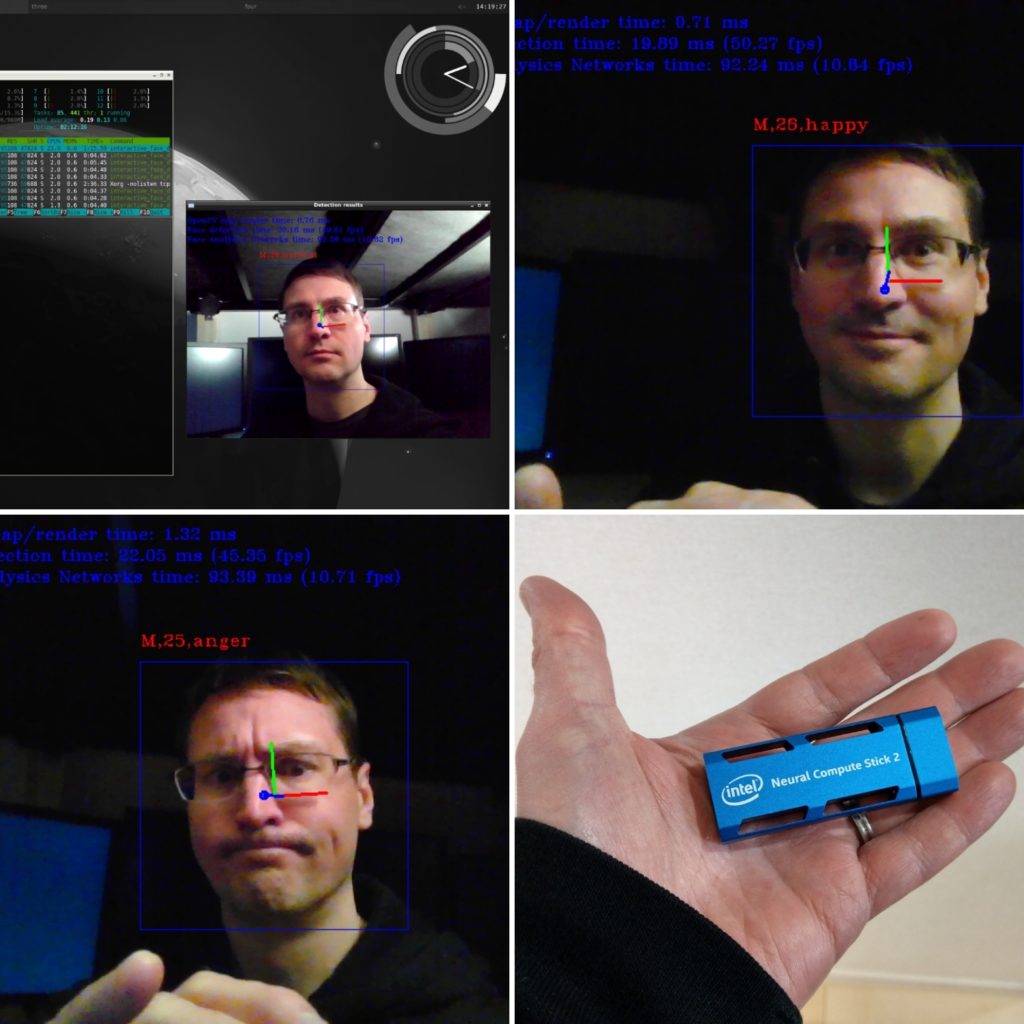
To find out if it’s powerful enough to process video real-time I used a webcam and fed the video stream to a sample application from the OpenVINO toolkit (link). This particular demo app actually does several things at the same time: Facial recognition, Age detection, Pose detection and Mood detection. All these are run stacked in one command (all details will be included hands-on post shortly). It actually performs very well, although note that the video is not in full HD. Accuracy on the age detection isn’t the best, but of course that reflects more on the algorithm / training data than the NCS2 (it thinks I’m in my 20’s which is flattering).
Facial, Age and Mood detection with Intel Neural Compute Stick 2
Performance testing
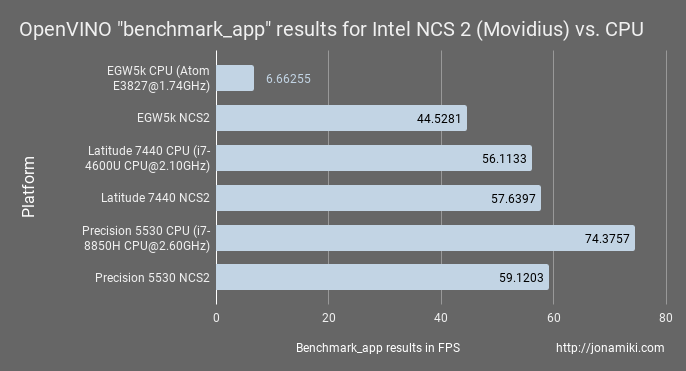
Inferencing can be done on a CPU as well. So, for the NCS2 to be useful it would have to outperform whatever CPU is already on the platform it’s plugged into. Therefore I ran a benchmark test (this one) on both the NCS2 and a number of CPUs. The CPUs it was compared to were:
Atom E3827@1.74GHz
i7-4600U CPU@2.10GHz
i7-8850H CPU@2.60GHz
When the NCS2 was being used for the benchmark I was also curious to see if the platform / computer the NCS2 was plugged into affected the benchmark results. Maybe the NCS2 performance would be affected by the host CPU, memory and storage?
The platforms where the NCS2 was tested:
Dell Edge Gateway 5000
Dell Latitude 7440
Dell Precision 5530
Edge Gateway 5000 and Movidius
Note that the floating point precision differs when running the benchmark on CPU vs the NCS2, so it’s not completely apples to apples. This is because the NCS2 only support half precision (FP16) whereas the CPU only support full, or normal, precision (FP32). This probably doesn’t make a huge difference when doing inferencing, which is the only thing the NCS2 is likely to be doing in a real-world application. For learning however, the floating point precision may cause the algorithm to learn either garbage or nothing at all. This article is summarizes the topic nicely for those interested: FP16 and FP32 difference for deep learning
Each platform was tested with CPU and with the NCS2. Three platforms x 2 tests = 6 results.
NOTE: I only ran these tests a few times, so please don’t consider it exhaustive. It would need to be run dozens of times for each and have the results balanced out to get more accurate readings. However, this is all I had time for and it’s at least an indicator of performance.
The NCS2 completely outperform the Atom CPU on the Edge Gateway 5000. This is where it was tested initially. Further testing shows that it’s more or less equal to a Gen4 Intel i7 but falls behind when compared to a Gen8 Intel i7 CPU.
This is expected of course. The NCS2 isn’t a very expensive device at $87.99 USD (Amazon.com at the time of writing). This is a pretty cheap way to add Machine Learning power on devices which have lower-end CPUs, like IoT edge gateways.
There are slight differences in results when the NCS2 is running on less powerful platforms vs. newer machines. This indicates that there are more factors that play into the results than the NCS2 itself, like the type of CPU, memory and storage on the platform the NCS2 is plugged into.
From the results it’s clear that the Movidius NCS2 can’t compete with a modern i7 CPU, but of course it’s a lot cheaper and supposedly draw a lot less power. That would make it ideal for connecting to edge devices where limiting power consumption may be desired.
Practical considerations
For those who may be interested in getting one these I’d like to point out a few things.
1. USB speeds
The NCS2 changes speeds when an app uses it for execution of a neural network. More importantly, when this happens the OS believes that the original USB 2.0 device has been removed and is being replaced with a new USB 3.0 device. This is reversed when code execution finishes.
Movidius stick plugged in:
Feb 22 06:29:33 localhost kernel: [  396.100651] usb 1-1: new high-speed USB device number 11 using xhci_hcd<br>
Feb 22 06:29:33 localhost kernel: [  396.230055] usb 1-1: New USB device found, idVendor=03e7, idProduct=2485<br>
Feb 22 06:29:33 localhost kernel: [  396.230068] usb 1-1: New USB device strings: Mfr=1, Product=2, SerialNumber=3<br>
Feb 22 06:29:33 localhost kernel: [  396.230077] usb 1-1: Product: Movidius MyriadX<br>
Feb 22 06:29:33 localhost kernel: [  396.230084] usb 1-1: Manufacturer: Movidius Ltd.<br>
Feb 22 06:29:33 localhost kernel: [  396.230091] usb 1-1: SerialNumber: 03e72485
Benchmark_app run starting
Feb 22 06:30:19 localhost kernel: [  442.564640] usb 1-1: USB disconnect, device number 11<br>
Feb 22 06:30:20 localhost kernel: [  442.993334] usb 1-1: new high-speed USB device number 12 using xhci_hcd<br>
Feb 22 06:30:20 localhost kernel: [  443.122975] usb 1-1: New USB device found, idVendor=03e7, idProduct=f63b<br>
Feb 22 06:30:20 localhost kernel: [  443.122989] usb 1-1: New USB device strings: Mfr=1, Product=2, SerialNumber=3<br>
Feb 22 06:30:20 localhost kernel: [  443.122997] usb 1-1: Product: VSC Loopback Device<br>
Feb 22 06:30:20 localhost kernel: [  443.123005] usb 1-1: Manufacturer: Intel Corporation<br>
Feb 22 06:30:20 localhost kernel: [  443.123012] usb 1-1: SerialNumber: 00000000000000000
Benchmark_app run finished
Feb 22 06:31:28 localhost kernel: [  511.851893] usb 1-1: USB disconnect, device number 12<br>
Feb 22 06:31:29 localhost kernel: [  512.126213] usb 1-1: new high-speed USB device number 13 using xhci_hcd<br>
Feb 22 06:31:29 localhost kernel: [  512.255008] usb 1-1: New USB device found, idVendor=03e7, idProduct=2485<br>
Feb 22 06:31:29 localhost kernel: [  512.255020] usb 1-1: New USB device strings: Mfr=1, Product=2, SerialNumber=3<br>
Feb 22 06:31:29 localhost kernel: [  512.255027] usb 1-1: Product: Movidius MyriadX<br>
Feb 22 06:31:29 localhost kernel: [  512.255034] usb 1-1: Manufacturer: Movidius Ltd.<br>
Feb 22 06:31:29 localhost kernel: [  512.255040] usb 1-1: SerialNumber: 03e72485
2. The NCSDK and NCSDK2 can’t be used
There are two versions of the NCSDK available. Both of these are for the original NCS and won’t work with the NCS2. This is clearly stated on the Intel webpage but if you’re like me you may miss it and make the assumption that the NCSDK2 is for the NCS2 stick. I wasted a fair bit of time on this before realizing it wasn’t working by design.
Instead use the Intel distribution of OpenVINO which is available here.
3. Can it be run in a container?
Yes, but there are no pre-written Dockerfiles for the NCS2 as there were for the original NCS. The NCSDK2 contains a Docker file but it won’t work since it’s for a different version of the neural compute stick (see the NCSDK note above).
However, it’s not hard to build a container with OpenVINO and run that. I have verified that this works. In fact, there’s an excellent Dockerfile by Mateo Guzman available here and I’ve forked it here since I wanted to make some modifications to it. Feel free to use either of them.
Additionally, if you’re impatient or short on time, I’ve made a pre-built docker image on Docker Hub which can be accessed here.
NOTE: The container has to be run in privileged mode. This is due to the NCS2 device ID changing and the USB device being re-enumerated the moment code is loaded onto it (see the USB speed changes note above). The NCSDK2 has a way to change the mode of the original NCS so it can be run in non-privileged mode but this won’t work on the NCS2. I don’t know of a workaround so far.
I’ll write a post on usage shortly which will contain more detail on how to run the demo apps, download and optimize the models for the sample apps as well as how to runt the sample apps themselves.
4. Can it be used on a Raspberry Pi?
Yes, it appears so although I haven’t tested it on the Pi yet. Intel has instructions for installing OpenVINO on the Pi here. I may post a Dockerfile or Docker image for the Pi when I’ve had a chance to test it.
5. What about heat generation and cooling?
The NCS2 is passively cooled and actually is its own heatsink. It’s made of metal and the “fins” on both sides of it allow enough airflow to keep it cool. It does get warm during testing but so far not extremely so.
Intel Movidius NCS2 heatsink
6. Size
It’s a bit broad, which can make it difficult to plug in at times. It also risks covering other USB ports or as in my case – the power inlet for my laptop. A USB extension cable or powered USB hub could easily mitigate this of course.
Conclusion
The Intel Movidius Neural Compute Stick 2 does seem like a valid option for running inferencing at the edge. While it’s not as powerful as a full-on GPU nor a modern CPU, it has the potential to excel in the niche of low-power edge devices like IoT gateways where the onboard CPU isn’t powerful enough to do inferencing on its own.