Resizing a Linux partition: Photon OS VM on vSphere

Adding disk space to a Linux VM can be a lot more complex than expected. Please find below an explanation on how to extend the size of the root partition of a Photon OS VM running on vSphere. The resize is done without unmounting the partition (but there is a reboot done initially). This is made possible in part because the filesystem is Ext4. The VM does need to be rebooted after changing the disk size in vSphere however. Otherwise it won’t realize it now has a larger disk.

Process

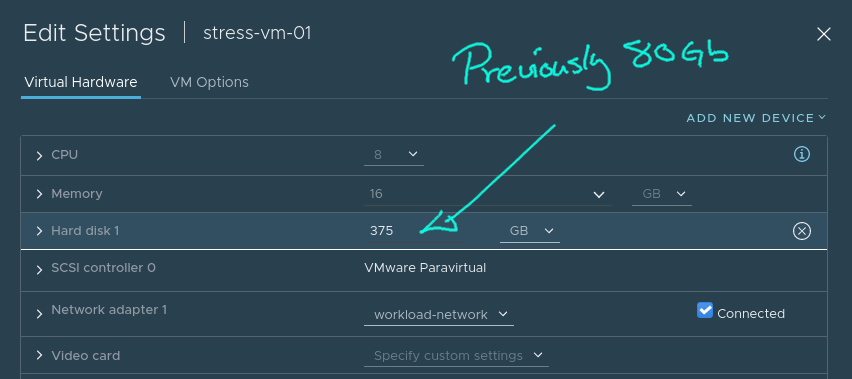
  • Increase size of disk in vSphere
  • Reboot the VM so it recognizes the new disk size
  • Use fdisk to delete and re-create the root partition
  • Use resize2fs to expand the partition size
  • Update fstab and grub with the new partition ID (or the VM won’t boot)

For Photon OS this process is extra easy as the root partition is at the end of the filesystem table and it doesn’t use an “Extended” partition. It’s possible to resize partitions with an Extended partition as well, but it takes a bit more work.

Note: These commands can easily break your system. Don’t try it on a machine where you value the data unless you have a solid backup of everything before attempting a resize.

Video covering the steps shown below

Step one is to change the disk size in vCenter

Bumped up the VM disk size from 80 to 375GB in vCenter

Reboot

In order for the Linux VM to recognize that it has a larger disk it needs to be rebooted.

root@stress-vm-01 [ ~ ]# reboot

Prior to modifying the partitions, verify which disk to modify

After rebooting, log back into the VM. We want to modify the root “/” partition and with “lsblk” we can verify that it is labeled “sda3”

root@stress-vm-01 [ ~ ]# lsblk
NAME   MAJ:MIN RM  SIZE RO TYPE MOUNTPOINT
sda      8:0    0  375G  0 disk 
├─sda1   8:1    0    4M  0 part 
├─sda2   8:2    0   10M  0 part /boot/efi
└─sda3   8:3    0   80G  0 part /

Launch fdisk

We use “fdisk” to modify the partitions and tell it to look at “/dev/sda” rather than “/dev/sda3”. This is because we want to see the entire disk, not just the partition we will modify

root@stress-vm-01 [ ~ ]# fdisk /dev/sda

Welcome to fdisk (util-linux 2.36).
Changes will remain in memory only, until you decide to write them.
Be careful before using the write command.

GPT PMBR size mismatch (167772159 != 786431999) will be corrected by write.

Command (m for help):

Print partition information

We can see that the partition we want to modify (“/dev/sda3”) is at the end of the partition table. This makes it easy as we don’t have to shift any other partitions around to make space for the new, larger partition.

Command (m for help): p

Disk /dev/sda: 375 GiB, 402653184000 bytes, 786432000 sectors
Disk model: Virtual disk    
Units: sectors of 1 * 512 = 512 bytes
Sector size (logical/physical): 512 bytes / 512 bytes
I/O size (minimum/optimal): 512 bytes / 512 bytes
Disklabel type: gpt
Disk identifier: 2C13B474-2D24-4FE6-9905-D3A52DB28C9E

Device     Start       End   Sectors Size Type
/dev/sda1   2048     10239      8192   4M BIOS boot
/dev/sda2  10240     30719     20480  10M EFI System
/dev/sda3  30720 167772126 167741407  80G Linux filesystem

Command (m for help):

Delete the last partition (number 3)

Command (m for help): d
Partition number (1-3, default 3): 

Partition 3 has been deleted.

Command (m for help):

Recreate the partition

Here we use “n” to create a new partition, starting it at the exact same place as the old partition: “307020”. Fdisk will automatically suggest we end the new partition at the end of the disk: “786431966”. Pressing enter will accept this value and create the partition.

We can also see that the partition contains an ext4 signature – this is why we can resize the partition while it still is mounted.

Command (m for help): n
Partition number (3-128, default 3): 
First sector (30720-786431966, default 30720): 
Last sector, +/-sectors or +/-size{K,M,G,T,P} (30720-786431966, default 786431966): 

Created a new partition 3 of type 'Linux filesystem' and of size 375 GiB.
Partition #3 contains a ext4 signature.

Do you want to remove the signature? [Y]es/[N]o: N

Command (m for help):

Print the updated partition table

Note that it is not yet written to disk, this is just a preview

Command (m for help): p

Disk /dev/sda: 375 GiB, 402653184000 bytes, 786432000 sectors
Disk model: Virtual disk    
Units: sectors of 1 * 512 = 512 bytes
Sector size (logical/physical): 512 bytes / 512 bytes
I/O size (minimum/optimal): 512 bytes / 512 bytes
Disklabel type: gpt
Disk identifier: 2C13B474-2D24-4FE6-9905-D3A52DB28C9E

Device     Start       End   Sectors  Size Type
/dev/sda1   2048     10239      8192    4M BIOS boot
/dev/sda2  10240     30719     20480   10M EFI System
/dev/sda3  30720 786431966 786401247  375G Linux filesystem

Command (m for help):

Writing the partition table to disk

Command (m for help): w
The partition table has been altered.
Syncing disks.

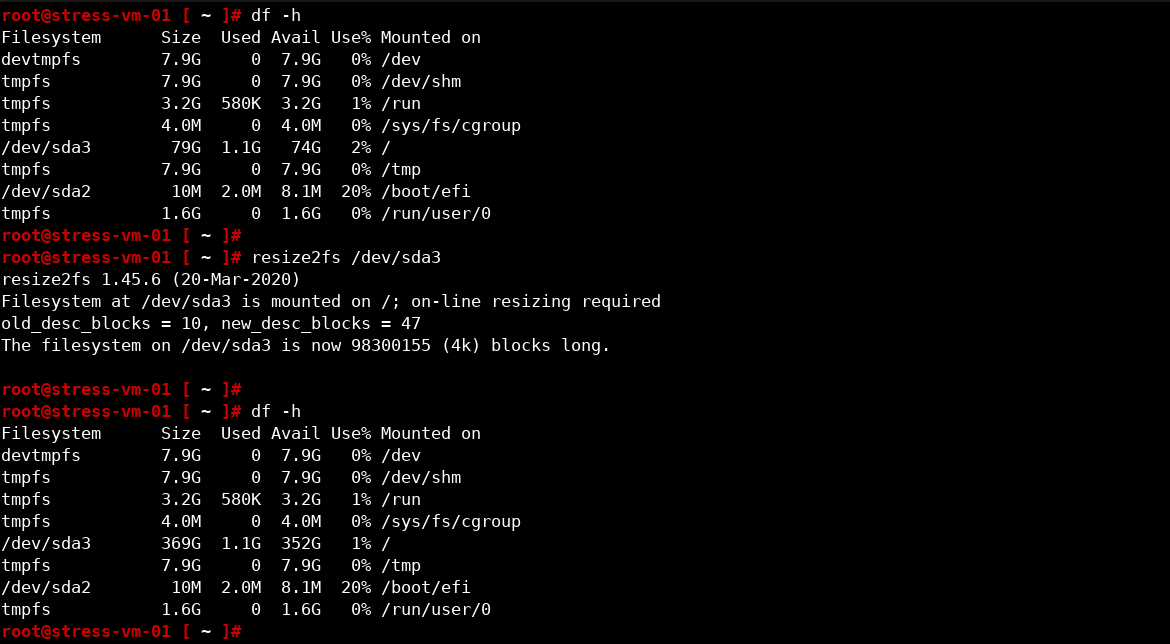
Verifying the current size of the root “/” partition

root@stress-vm-01 [ ~ ]# df -h .
Filesystem      Size  Used Avail Use% Mounted on
/dev/sda3        79G  1.1G   74G   2% /
root@stress-vm-01 [ ~ ]# 

Resizing on the fly (without unmounting)

root@stress-vm-01 [ ~ ]# resize2fs /dev/sda3
resize2fs 1.45.6 (20-Mar-2020)
Filesystem at /dev/sda3 is mounted on /; on-line resizing required
old_desc_blocks = 10, new_desc_blocks = 47
The filesystem on /dev/sda3 is now 98300155 (4k) blocks long.

Verifying the new partition size

root@stress-vm-01 [ ~ ]# df -h .
Filesystem      Size  Used Avail Use% Mounted on
/dev/sda3       369G  1.1G  352G   1% /

Verify the new partition ID (“PARTUUID”)

root@stress-vm-01 [ ~ ]# blkid
/dev/sda2: SEC_TYPE="msdos" UUID="53EC-9755" BLOCK_SIZE="512" TYPE="vfat" PARTUUID="0a2847cf-9e9d-4d1a-9393-490e1b2459bf"
/dev/sda3: UUID="9cb30e86-d563-478d-8eeb-16f2449cb608" BLOCK_SIZE="4096" TYPE="ext4" PARTUUID="5e0b1089-595c-4f42-8d4b-4b06220cd6c7"
/dev/sda1: PARTUUID="d2bf275a-1df1-4aa6-adbf-8b5f6c4cac3a"

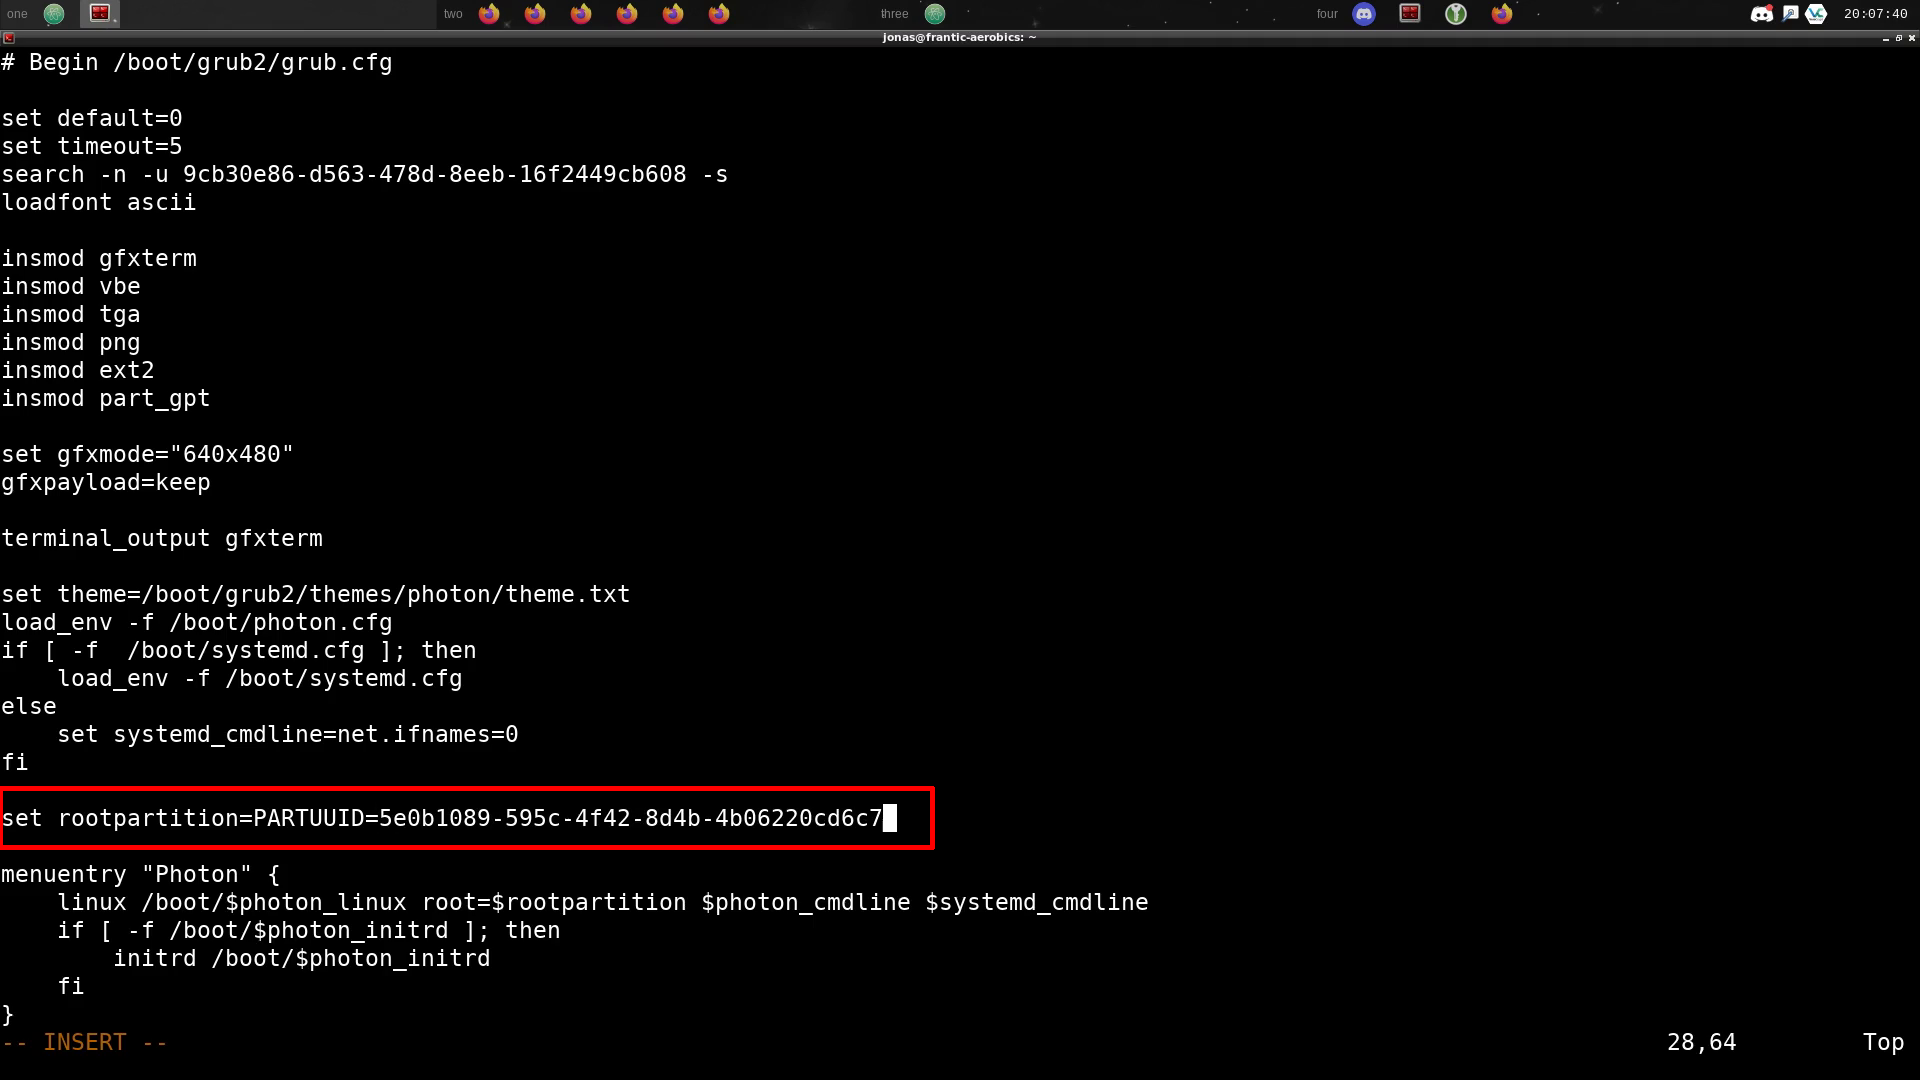
Update /etc/fstab and /boot/grub/grub.conf

Use your favorite editor (vi / vim / nano). Look for the partition UUID and update to match the new partition ID. Note that grub.conf may have a slightly different name or location if you aren’t using Photon OS.

root@stress-vm-01 [ ~ ]# vi /etc/fstab 
root@stress-vm-01 [ ~ ]# vi /boot/grub/grub.cfg 

All done!

Showing the before and after size of the root partition after a successful resize

Photon OS on Raspberry Pi 3 model B+

Introduction

Photon OS is a VMware initiative to create a lightweight Linux based OS with container support. I have to admit my initial reaction to Photon OS was: “y tho?”

It’s a reasonable reaction. There are MANY Linux based OS options out there already and essentially all of them have container support. The reason for creating Photon OS would seem to be that VMware wants their own rubber-stamped Linux OS as part of an ecosystem under their control.

Photon OS’s redeeming feature is the fact that it’s really lightweight. Not as lightweight as Ubuntu Core though. Photon OS for Raspberry Pi weighs in at 512Mb while Ubuntu Core is 450Mb. Still, given the influence of VMware in virtualization and their (our) inroads into IoT / M2M with Pulse, it’s likely that Photon OS will take off eventually.

Currently the main barrier to widespread adoption of Photon OS is a lack of commercial support. At the moment it is simply available as an unsupported download from GitHub (here). This could change in the future though and in that case we may see it being utilized more broadly and also outside the lab environments it is currently inhabiting.

Note that unlike Raspbian, which is 32bit, Photon OS is a 64bit operating system. That too may be something that’ll help float the boat for some.

Getting started with Photon OS on the Raspberry Pi

First download the image from here: http://dl.bintray.com/vmware/photon/3.0/GA/rpi3/photon-rpi3-3.0-26156e2.tar.xz

Deflate the zx compressed image and save to a micro-SD card:

tar xf photon-rpi3-3.0-26156e2.tar.xz 
cd rpi3/
sudo dd if=photon-rpi3-3.0-26156e2d.raw of=/dev/mmcblk0 bs=4M;sudo sync

In this example the SD card device is /dev/mmcblk0. This may differ on other systems of course. Please check with “lsblk” or so and please do be careful. Linux / Unix folks don’t refer to dd as “Disk Destroyer” for nothing.

Boot the Raspberry Pi and log in. The default credentials are: root / changeme

DHCP and SSH are both enabled by default and should make it possible to access the Pi across the network if using a wired connection (I haven’t tried though). With a Raspberry Pi it’s likely a wireless connection would be more convenient however. Configuring Wi-Fi is easy and is described in the section that follows.

Photon OS Wi-Fi configuration

There are a few steps to go through for Wi-Fi connectivity but it’s not difficult.

Start the wpa_supplicant service

systemctl start wpa_supplicant@wlan0

Enable the wpa_supplicant service (so it starts with the Pi)

systemctl enable wpa_supplicant@wlan0

Check the service status

systemctl status wpa_supplicant@wlan0

Edit the dhcp settings to get DHCP for wlan0 and not eth0

root@photon-rpi3 [ ~ ]# cat /etc/systemd/network/99-dhcp-en.network 
[Match]
Name=e*

[Network]
DHCP=yes
IPv6AcceptRA=no
root@photon-rpi3 [ ~ ]# 

Change “Name=e*” to “Name=w*” to capture the wlan0 interface instead of the wired eth0 interface

root@photon-rpi3 [ ~ ]# vi /etc/systemd/network/99-dhcp-en.network

It should now look something like this:

root@photon-rpi3 [ ~ ]# cat /etc/systemd/network/99-dhcp-en.network 
[Match]
Name=w*

[Network]
DHCP=yes
IPv6AcceptRA=no
root@photon-rpi3 [ ~ ]# 

Restart networking

systemctl restart systemd-networkd

Configuring the wpa supplicant

WordPress changes the “>” signs regardless of what I do. The actual command can be found here for reference: https://pastebin.com/raw/gB5FkuhC

wpa_passphrase yourSSID yourPassword >> /etc/wpa_supplicant/wpa_supplicant-wlan0.conf
reboot

Installing Docker

Photon OS comes in a few different sizes and in the larger ones both Docker and Kubernetes are preinstalled. Not so with the Raspberry Pi version though, so we need to install Docker manually.

Packages are installed with either “yum” or “tdnf”. Docker is available from tdnf so we’ll use that to run the install below.

Refresh the cache but don’t update the packages

We need to refresh the tdnf cache to find the docker package. However, this process can also be used to update all packages. I found that this breaks Wi-Fi. So, if you use Wi-Fi I recommend:

root@photon-rpi3 [ ~ ]# tdnf update

Then select "n" to just refresh the cache without updating any packages.  

Search for Docker packages

root@photon-rpi3 [ ~ ]# tdnf list | grep docker
docker.aarch64                              18.06.2-2.ph3       photon-updates
docker-doc.aarch64                          18.06.2-2.ph3       photon-updates
docker.aarch64                              18.06.1-2.ph3             photon
docker-doc.aarch64                          18.06.1-2.ph3             photon
ovn-docker.aarch64                          2.8.2-3.ph3               photon
docker-py.noarch                            3.5.0-1.ph3               photon
docker-py3.noarch                           3.5.0-1.ph3               photon
docker-pycreds.noarch                       0.3.0-1.ph3               photon
docker-pycreds3.noarch                      0.3.0-1.ph3               photon
root@photon-rpi3 [ ~ ]# 

Install Docker

root@photon-rpi3 [ ~ ]# tdnf install docker

Installing:
libapparmor                    aarch64         2.13-7.ph3           photon-updates   66.57k 68168
libsepol                       aarch64         2.8-1.ph3            photon          611.89k 626576
libselinux                     aarch64         2.8-1.ph3            photon          174.16k 178338
libseccomp                     aarch64         2.3.3-1.ph3          photon          286.28k 293153
libltdl                        aarch64         2.4.6-3.ph3          photon           35.53k 36384
device-mapper-libs             aarch64         2.02.181-1.ph3       photon          315.39k 322960
docker                         aarch64         18.06.2-2.ph3        photon-updates  154.39M 161893076

Total installed size: 155.85M 163418655
Is this ok [y/N]:y

Downloading:
libapparmor                              39330    100%
libsepol                                275180    100%
libselinux                               84756    100%
libseccomp                               80091    100%
libltdl                                  24218    100%
device-mapper-libs                      149078    100%
docker                                43826910    100%
Testing transaction
Running transaction
Installing/Updating: libsepol-2.8-1.ph3.aarch64
Installing/Updating: libselinux-2.8-1.ph3.aarch64
Installing/Updating: device-mapper-libs-2.02.181-1.ph3.aarch64
Installing/Updating: libltdl-2.4.6-3.ph3.aarch64
Installing/Updating: libseccomp-2.3.3-1.ph3.aarch64
Installing/Updating: libapparmor-2.13-7.ph3.aarch64
Installing/Updating: docker-18.06.2-2.ph3.aarch64

Complete!

Start and Enable the docker service

root@photon-rpi3 [ ~ ]# systemctl start docker
root@photon-rpi3 [ ~ ]# systemctl enable docker
Created symlink /etc/systemd/system/multi-user.target.wants/docker.service → /lib/systemd/system/docker.service.
root@photon-rpi3 [ ~ ]# 

Verify the Docker installation

root@photon-rpi3 [ ~ ]# docker pull hello-world
Using default tag: latest
latest: Pulling from library/hello-world
3b4173355427: Pull complete 
Digest: sha256:2557e3c07ed1e38f26e389462d03ed943586f744621577a99efb77324b0fe535
Status: Downloaded newer image for hello-world:latest
root@photon-rpi3 [ ~ ]# docker run hello-world

Hello from Docker!
This message shows that your installation appears to be working correctly.

To generate this message, Docker took the following steps:
 1. The Docker client contacted the Docker daemon.
 2. The Docker daemon pulled the "hello-world" image from the Docker Hub.
    (arm64v8)
 3. The Docker daemon created a new container from that image which runs the
    executable that produces the output you are currently reading.
 4. The Docker daemon streamed that output to the Docker client, which sent it
    to your terminal.

To try something more ambitious, you can run an Ubuntu container with:
 $ docker run -it ubuntu bash

Share images, automate workflows, and more with a free Docker ID:
 https://hub.docker.com/

For more examples and ideas, visit:
 https://docs.docker.com/get-started/

root@photon-rpi3 [ ~ ]# 

That’s all! Photon OS is installed, Wi-Fi configured, Docker installed and verified. Ready to rock.