Configuring iSCSI and management networks on a Dell EqualLogic PS-M4110 storage array

Quick instructions on setting up an EqualLogic PS-M4110 storage array.
In this case it’s a blade model located in a Dell M1000e chassis, slot 7 and 8.
Fabric B is the iSCSI fabric and fabric A is for management
We start by configuring fabric B, then A

Since there is no IP configured, we connect via serial.
Luckily the M1000e provides serial connectivity via the CMC as per the below:

SSH to CMC IP address:
==============================

Switch to the EQL serial interface (connect to the slot ID)
==============================

Log in (default user/pass: grpadmin/grpadmin)
==============================

Note: If creating a new group, just enter the desired group name and IP
==============================

Setting up the management network:
=====================================

The array can now be accessed via the web:
==============================
http://10.6.26.227

Nagios3 – location of config and plugin directories with Crunchbang (debian squeeze)

First:
apt-get install nagios3
apt-get install freeipmi

Access from http://localhost/nagios3/

Config files:
root@cruncher01:~# ls -l /etc/nagios3/conf.d/
total 32
-rw-r–r– 1 root root 1695 Nov  1 23:11 contacts_nagios2.cfg
-rw-r–r– 1 root root  418 Nov  1 23:11 extinfo_nagios2.cfg
-rw-r–r– 1 root root 1152 Nov  1 23:11 generic-host_nagios2.cfg
-rw-r–r– 1 root root 1803 Nov  1 23:11 generic-service_nagios2.cfg
-rw-r–r– 1 root root  678 Nov  1 23:11 hostgroups_nagios2.cfg
-rw-r–r– 1 root root 2167 Nov  1 23:11 localhost_nagios2.cfg
-rw-r–r– 1 root root  657 Nov  1 23:11 services_nagios2.cfg
-rw-r–r– 1 root root 1609 Nov  1 23:11 timeperiods_nagios2.cfg
root@cruncher01:~#

Plugin directory:
root@cruncher01:~# ls -l /usr/lib/nagios/plugins/ | head
total 3588
-rwxr-xr-x 1 root root 108904 Jun 28  2012 check_apt
-rwxr-xr-x 1 root root   7262 Jul  3  2012 check_backuppc
-rwxr-xr-x 1 root root   2242 Jun 28  2012 check_breeze
-rwxr-xr-x 1 root root  51984 Jun 28  2012 check_by_ssh
-rwxr-xr-x 1 root root   1723 Jul  3  2012 check_cert_expire
lrwxrwxrwx 1 root root      9 Jun 28  2012 check_clamd -> check_tcp
-rwxr-xr-x 1 root root  35112 Jun 28  2012 check_cluster
-rwxr-xr-x 1 root root  51536 Jun 28  2012 check_dhcp
-rwxr-xr-x 1 root root  47568 Jun 28  2012 check_dig
root@cruncher01:~#

How to enable NTP on the vCenter appliance

VMware vCenter Server Appliance 5.1.0.10200 Build 1235310
root@10.10.10.10’s password:
Last login: Mon Oct  7 17:18:29 2013 from vrtx-vcenter
vrtx-vcenter:~ # yast2 ntp-client add server=210.173.160.27

Error:
Cannot update the dynamic configuration policy.

vrtx-vcenter:~ # ls -l /etc/resolv.conf*
-rw-r–r– 1 root root  22 Oct  8  2013 /etc/resolv.conf
-rw-r–r– 1 root root 795 Oct  7 17:35 /etc/resolv.conf.netconfig
vrtx-vcenter:~ # cp -p /etc/resolv.conf /etc/resolv.conf.orig
vrtx-vcenter:~ # !ls
ls -l /etc/resolv.conf*
-rw-r–r– 1 root root  22 Oct  8  2013 /etc/resolv.conf
-rw-r–r– 1 root root 795 Oct  7 17:35 /etc/resolv.conf.netconfig
-rw-r–r– 1 root root  22 Oct  8  2013 /etc/resolv.conf.orig
vrtx-vcenter:~ # cat /etc/resolv.conf.netconfig > /etc/resolv.conf
vrtx-vcenter:~ # !ls
ls -l /etc/resolv.conf*
-rw-r–r– 1 root root 795 Oct  7 17:38 /etc/resolv.conf
-rw-r–r– 1 root root 795 Oct  7 17:35 /etc/resolv.conf.netconfig
-rw-r–r– 1 root root  22 Oct  8  2013 /etc/resolv.conf.orig
vrtx-vcenter:~ # yast2 ntp-client add server=210.173.160.27
vrtx-vcenter:~ # yast2 ntp-client enable
vrtx-vcenter:~ # sntp -P no -r 210.173.160.27
vrtx-vcenter:~ # date
Mon Oct  7 17:39:25 JST 2013
vrtx-vcenter:~ # cp -p /etc/resolv.conf.orig /etc/resolv.conf
vrtx-vcenter:~ # !ls
ls -l /etc/resolv.conf*
-rw-r–r– 1 root root  22 Oct  8  2013 /etc/resolv.conf
-rw-r–r– 1 root root 795 Oct  7 17:35 /etc/resolv.conf.netconfig
-rw-r–r– 1 root root  22 Oct  8  2013 /etc/resolv.conf.orig
vrtx-vcenter:~ #

vCenter AD authentication

When enabling Active Directory authentication on the vCenter appliance, ensure that DNS name resolution is working first. Set the DNS settings and hostname and then ensure that resolution and reverse-lookup of the FQDN works. It may be necessary to add the Host(A) record and pointer for the vCenter appliance on the DNS server itself.

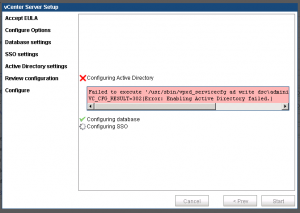
Failed AD activation (no DNS entry, and vCenter doesn’t register itself it seems):

vCenter_network_config_1

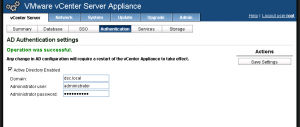
After adding host and reverse lookup records on the DNS server:

vCenter_network_config_2

vCenter appliance: “No networking detected”

If after deploying and booting the vCenter appliance, automatic network configuration fails, the vCenter console will display “No networking detected” in red. To configure networking:

1. Access the appliance VM console via the the vSphere client / web client

2. Login using “root” and “vmware” as password

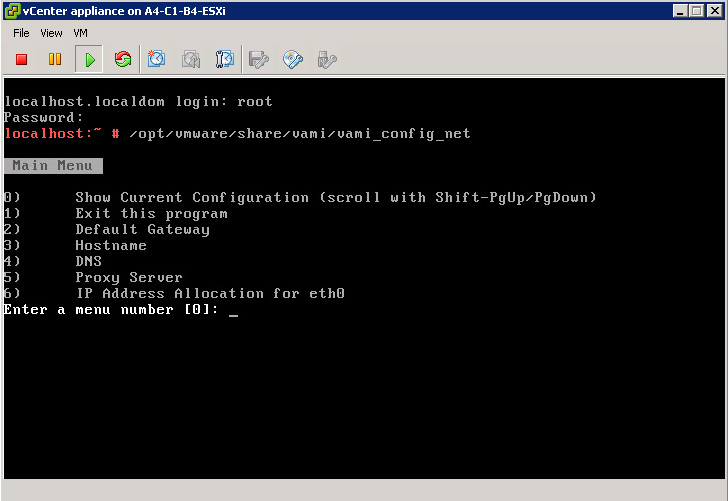
3. At the command prompt, enter “/opt/vmware/share/vami/vami_config_net”

4. The below screen will be shown, allowing for network configuration

vCenter_network_config_0