Migrate VMware VMs from an on-prem DC to VMware Cloud on AWS (VMC) using Veeam Backup and Replication

When migrating from an on-premises DC to VMware Cloud on AWS it is usually recommended to use Hybrid Cloud Extension (HCX) from VMware. However, in some cases the IT team managing the on-prem DC is already using Veeam for backup and want to use their solution also for the migration.

They may also prefer Veeam over HCX as HCX often requires professional services assistance for setup and migration planning. In addition, since HCX is primarily a tool for migrations, the customer is unlikely to have had experience setting it up in the past and while it is an excellent tool there is a learning curve to get started.

Migrating with Veeam vs. Migrating with HCX

Veeam Backup & RecoveryVMware Hybrid Cloud Extension (HCX)
Licensed (non-free) solutionFree with VMware Cloud on AWS
Arguably easy to set up and configureArguably challenging to set up and configure
Can do offline migrations of VMs, single or in bulkCan do online migrations (no downtime), offline migrations, bulk migrations and online migrations in bulk (RAV), etc.
Can not do L2 extensionCan do L2 extension of VLANs if they are connected to a vDS
Can be used for backup of VMs after they have been migratedIs primarily used for migration. Does not have backup functionality
Support for migrating from older on-prem vSphere environmentsAt time of writing, full support for on-prem vSphere 6.5 or newer. Limited support for vSphere 6.0 up to March 12th 2023

What we are building

This guide covers installing and configuring a single Veeam Backup and Recovery installation in the on-prem VMware environment and linking it to both vCenter on-prem as well as in VMware Cloud on AWS. Finally we do an offline migration of a VM to the cloud to prove it that it works.

Prerequisites

The guide assumes the following is already set up and available

  • On-premises vSphere environment with admin access (7.0 used in this example)
  • Windows Server VM to be used for Veeam install
    • Min spec here
    • Windows Server 2019 was used for this guide
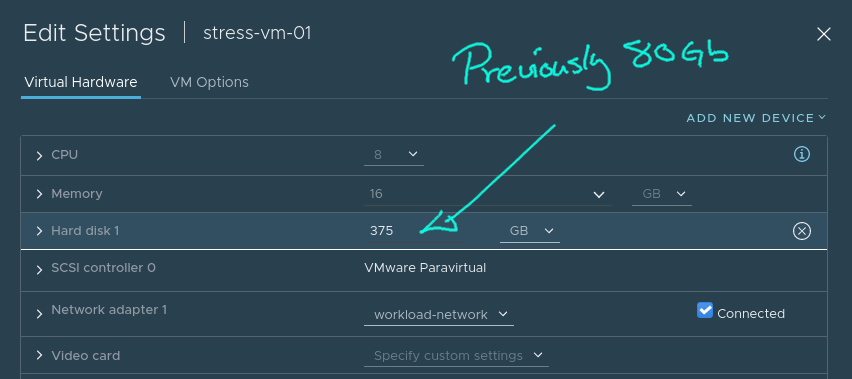
    • Note: I initially used 2 vCPU, 4GB RAM and 60 GB HDD for my Veeam VM but during the first migration the entire thing stalled and wouldn’t finish. After changing to 4 vCPU, 32Gb RAM and 170 GB HDD the migration finished quickly and with no errors. Recommend to assign as much resources as is practical to the Veeam VM to facilitate and speed up the migration
  • One VMware Cloud on AWS (VMC) Software Defined Datacenter (SDDC)
  • Private IP connectivity to the VMC SDDC
    • Use Direct Connect (DX) or VPN but it must be private IP connectivity or it won’t work
    • For this setup I used a VPN to a TGW, then a peering to a VMware Transit Connect (VTGW) which had an attachment to the SDDC, but any private connectivity setup will be OK
  • A test VM to use for migration

Downloading and installing Veeam

Unless you already have a licensed copy, sign up for a trial license and then download Veeam Backup and Recovery from here. Version 11.0.1.1216 used in this guide.

In your on-premises vSphere environment, create or select a Windows Server VM to use for the Veeam installation. The VM spec used for this install are as follows:

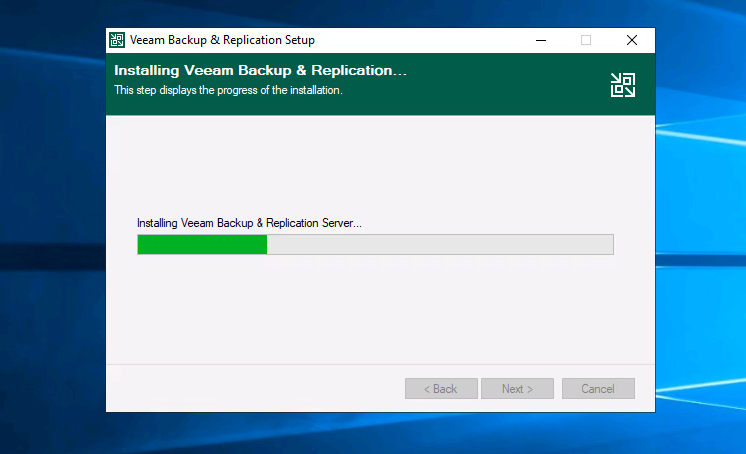
Run the install with default settings (next, next, next, etc.)

Register the on-prem vCenter in Veeam

Navigate to “Inventory” at the bottom left, then “Virtual Infrastructure” and click “Add Server” to register the on-prem vCenter server

Listing VMs in the on-prem vSphere environment after the vCenter server has been registered in the Veeam Backup & Recovery console

Switching on-prem connectivity to VMware Cloud on AWS SDDC to use private IP addresses

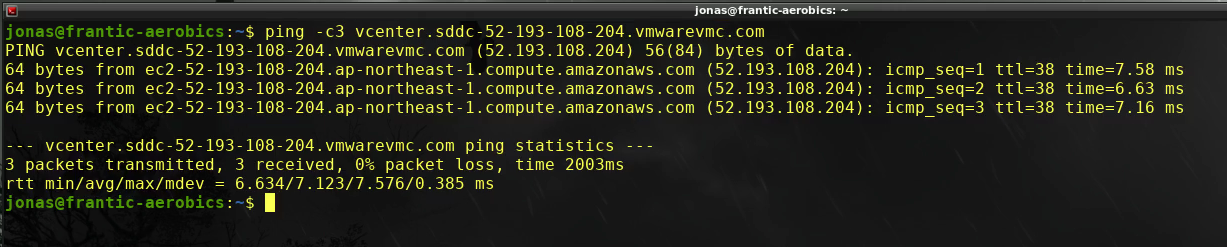
For this setup there is a VPN from the on-premises DC to the SDDC (via a TGW and VTGW in this case) but the SDDC FQDN is still configured to return the public IP address. Let’s verify by pinging the FQDN

Switching the SDDC to return the private IP is easy. In the VMware Cloud on AWS web console, navigate to “Settings” and flip the IP to return from public to private

Ping the vCenter FQDN again to verify that private IP is returned by DNS and that we can ping it successfully over the VPN

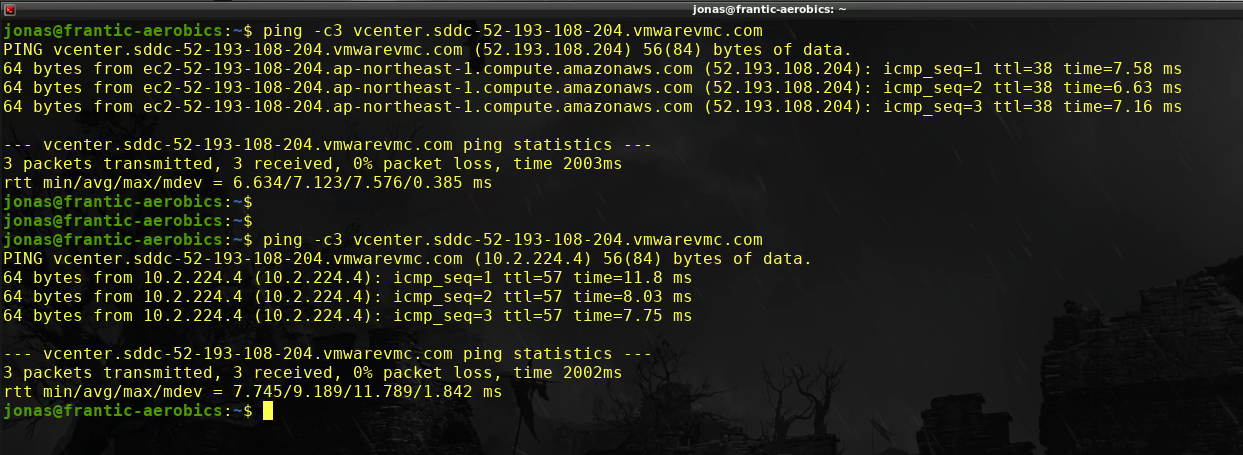
All looks good. The private IP is returned. Time to register the VMware Cloud on AWS vCenter instance in the Veeam console

Registering the VMC vCenter instance with Veeam

Just use the same method as used when adding the on-premises vCenter server: Navigate to “Inventory” at the bottom left, then “Virtual Infrastructure” and click “Add Server” to register the on-prem vCenter server with Veeam

Note: If the SDDC vCenter had not been switched to use a private IP there will be an error in listing the data stores. Subsequently when migrating a VM the target data store won’t be listed and the migration can’t be started

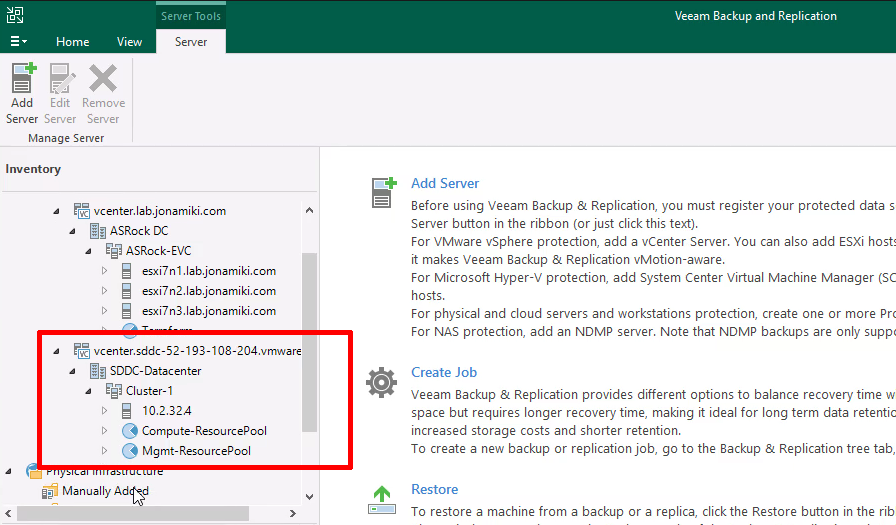
After adding the VMware Cloud on AWS SDDC vCenter the resource pools will be visible in the Veeam console

Now both vSphere environments are registered. Time to migrate a VM to the cloud!

Migrating a VM to VMware Cloud on AWS

Below is both a video and a series of screenshots describing the migration / replication job creation for the VM.

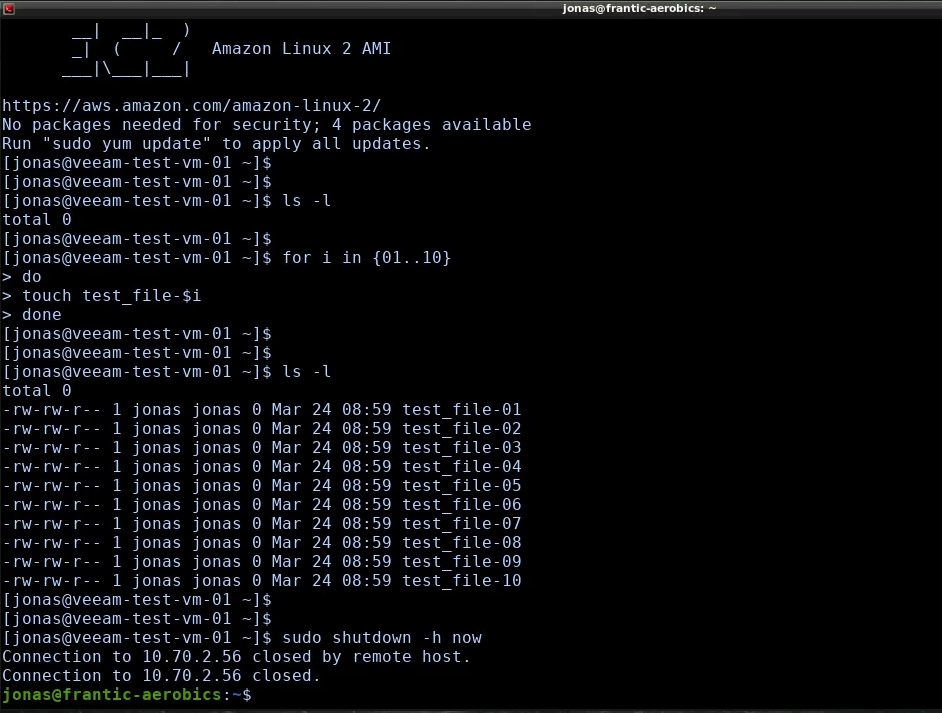
Creating some test files on the source VM to be migrated

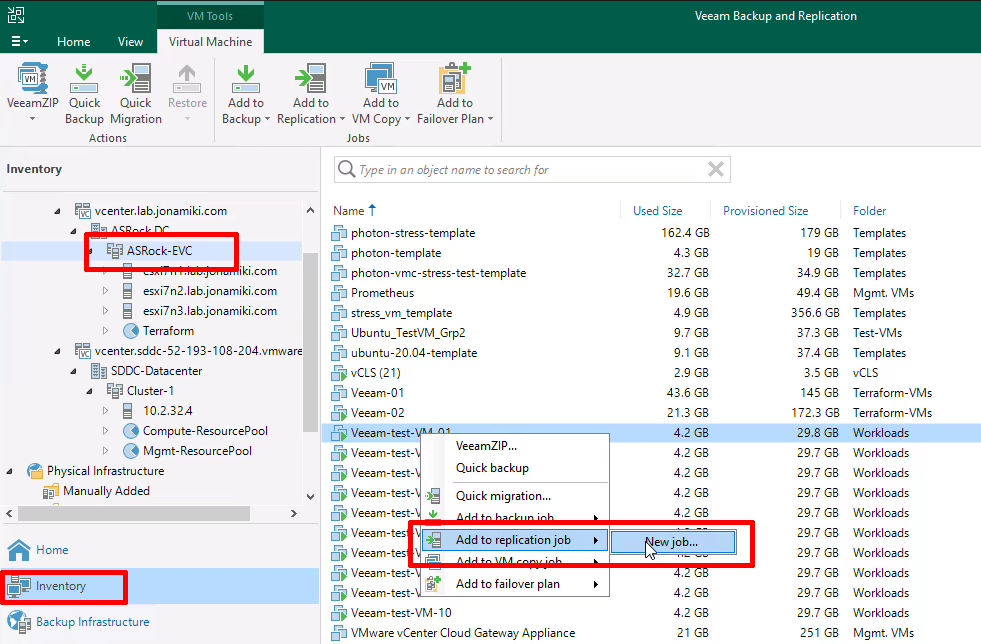
Navigate to “Inventory” using the bottom left menu, click the on-premises vCenter server / Cluster and locate a VM to migrate in the on-premises DC VM inventory. Right-click the VM to migrate and create a replication job

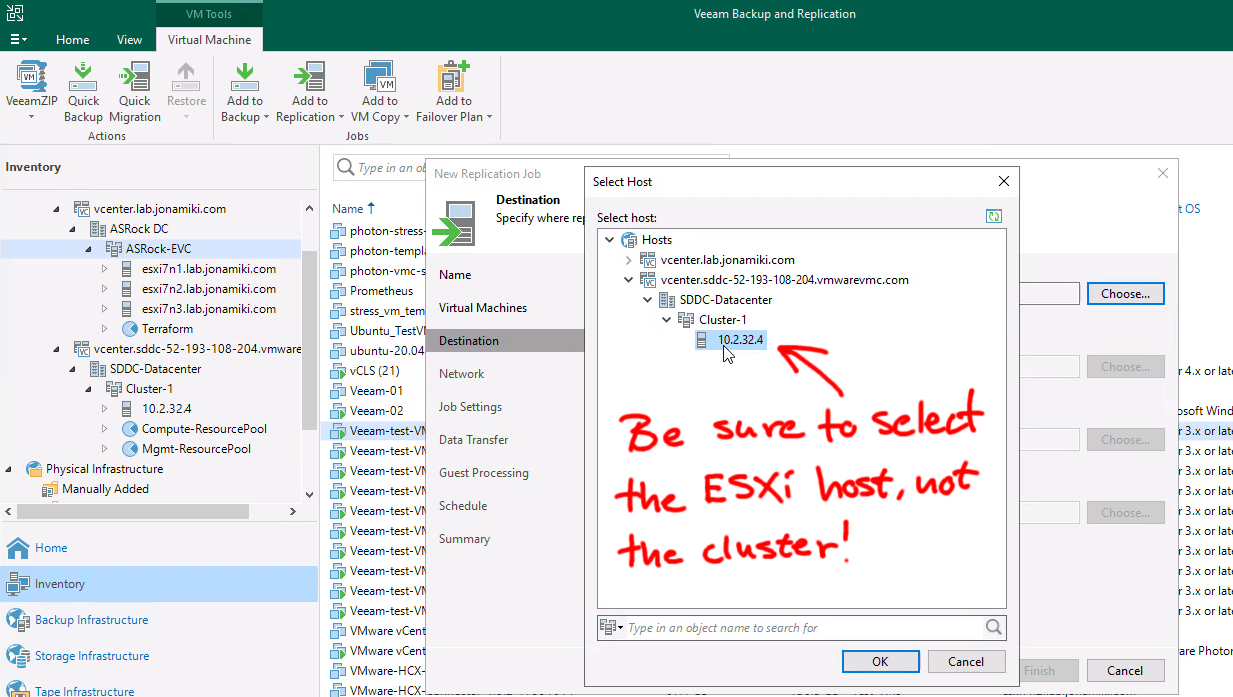
When selecting the target for the replication, be sure to expand the VMware cloud on AWS cluster and select one of the ESXi servers. Selecting the cluster is not enough to list up the required resources, like storage volumes

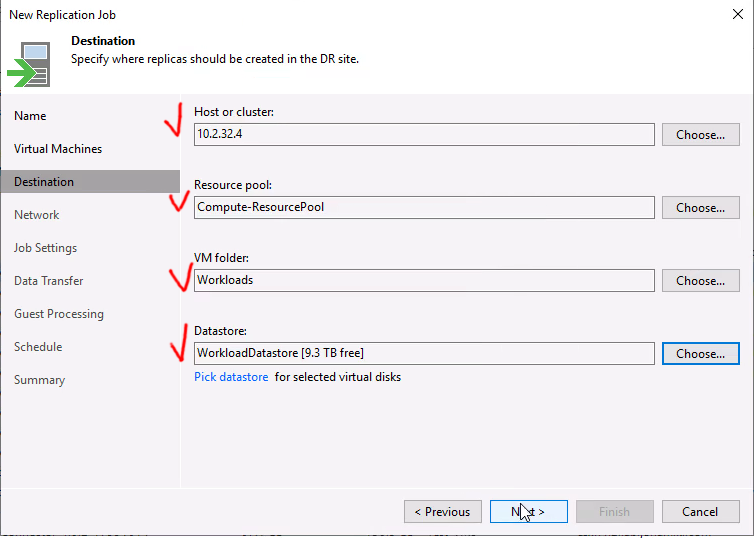
Since VMC is a managed environment we want to select the customer-side of the storage, folder and resource pools

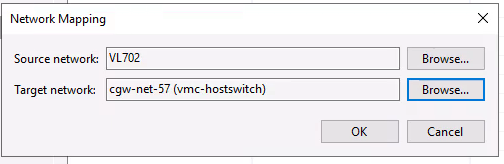
If you checked the box for remapping the network is even possible to select a target VLAN for the VM to be connected to on the cloud side!

Select to start the “Run the job when I click finish” and move to the “Home” tab to view the “Running jobs”

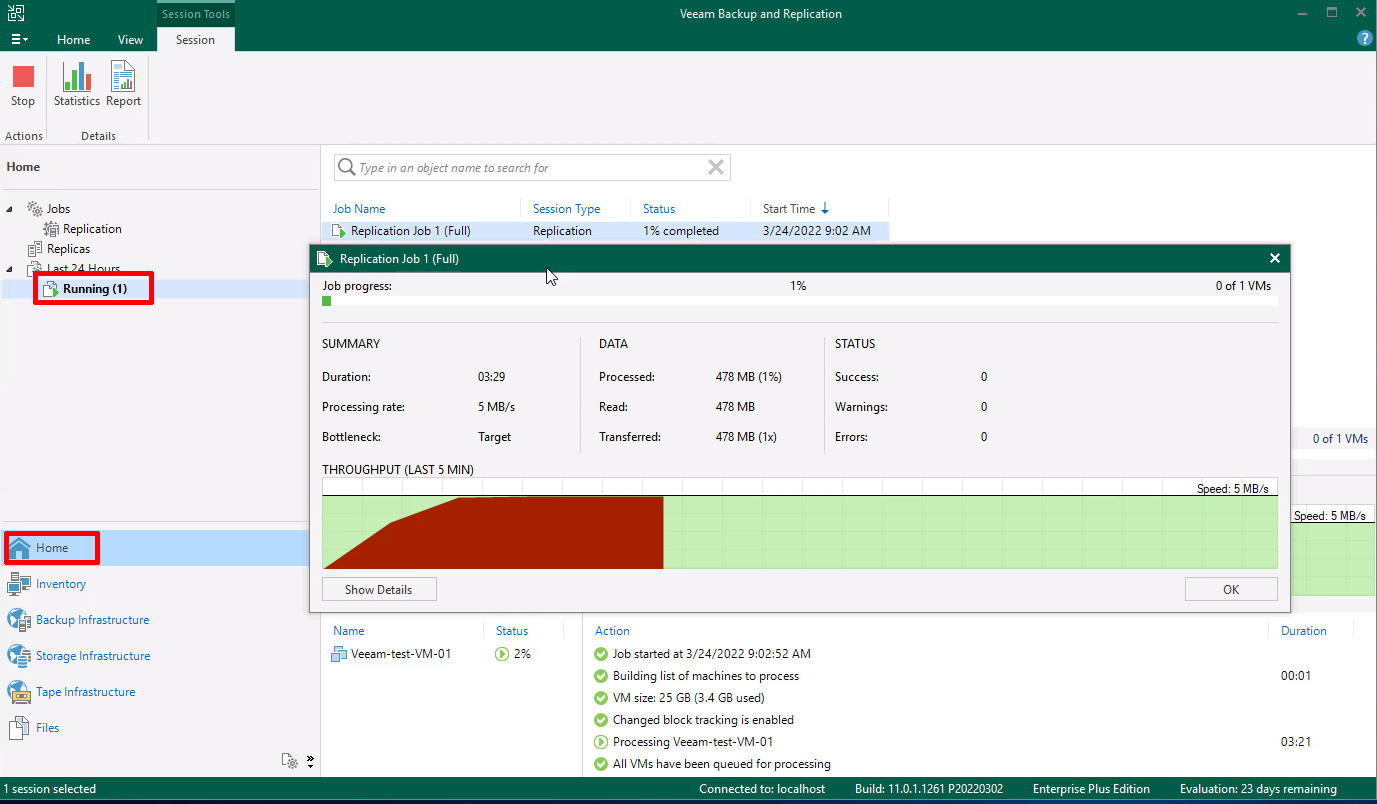
The migration of the test VM finished in less than 9 minutes

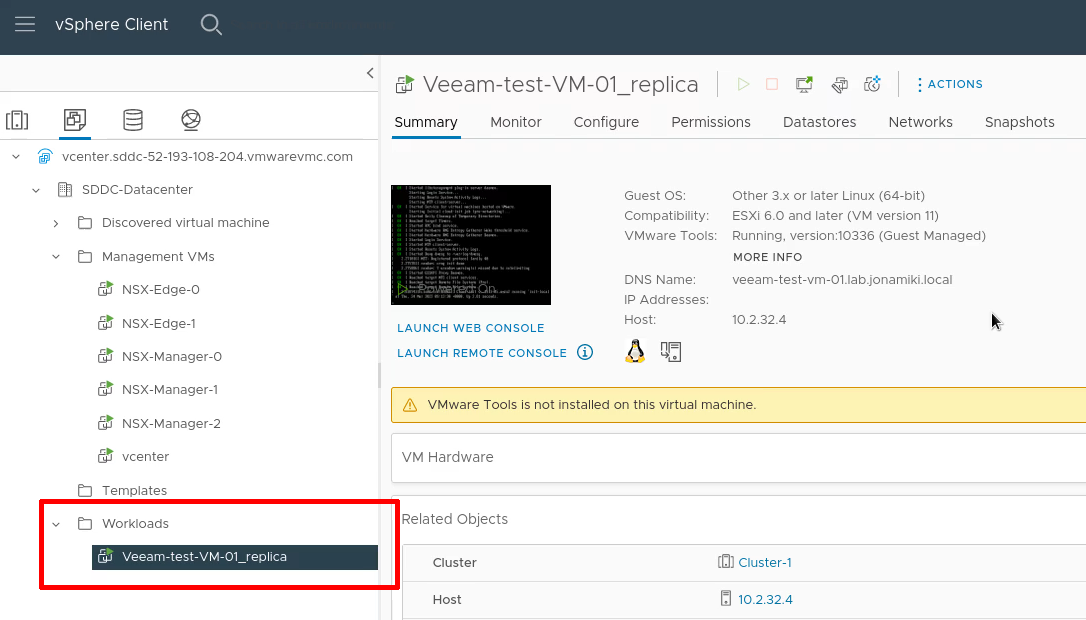
In the vCenter client for VMware Cloud on AWS we can verify that the replicated VM is present

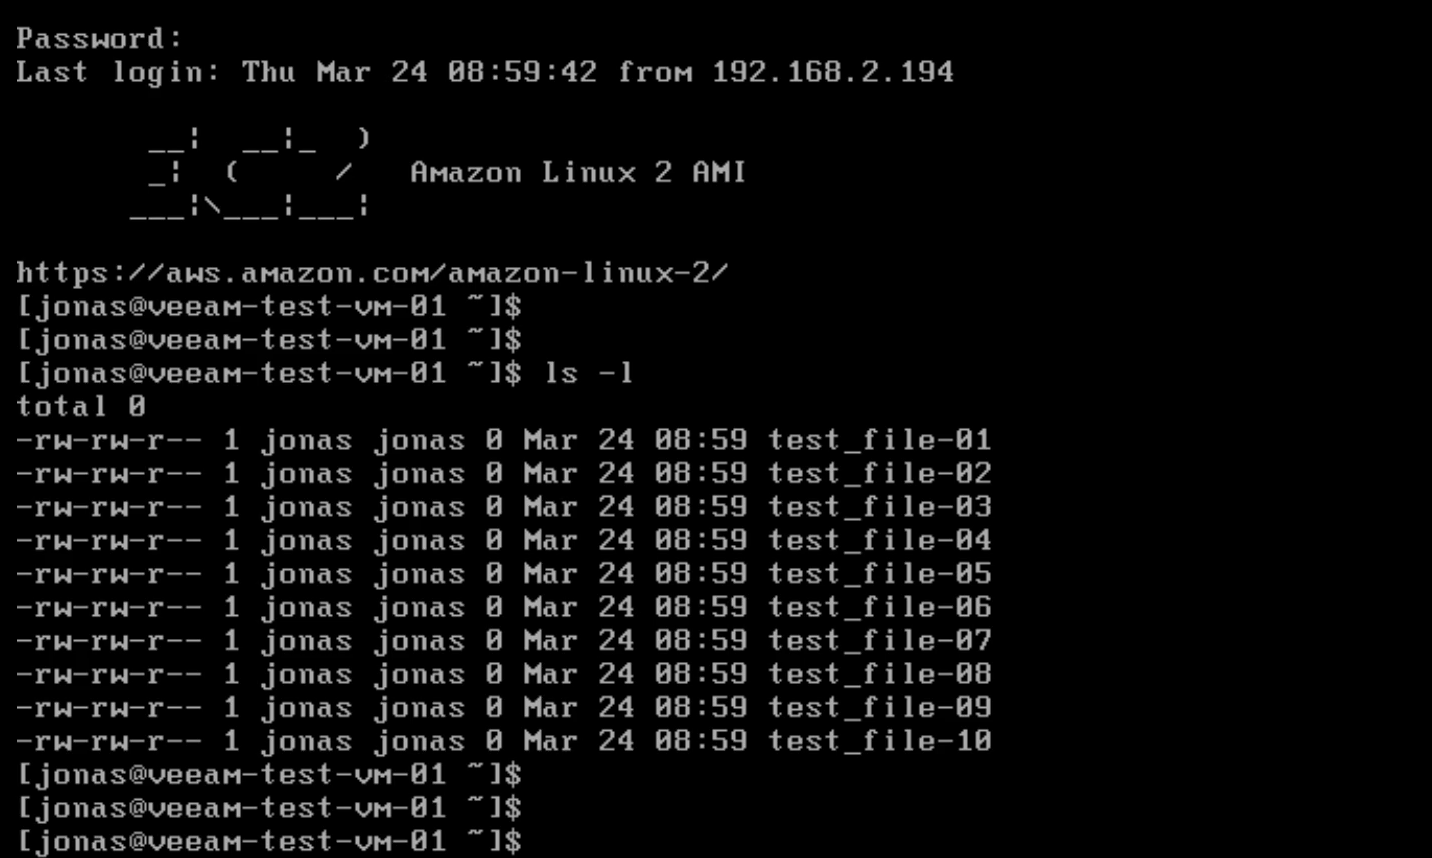
After logging in and listing the files we can verify that the VM is not only working but also have the test files present in the home directory

Thank you for reading! Hopefully this has provided an easy-to-understand summary of the steps required for a successful migration / replication of VMs to VMC using Veeam

Creating an Amazon AMI2 Linux VM in vSphere for use as a golden image in Terraform deployments

With CentOS being less than attractive to use now when Red Hat has changed how it is updated, the Amazon AMI2 Linux distribution can be an excellent alternative.

However, when deploying an Amazon AMI2 on vSphere for the first time there are a few hoops to jump through. This video shows how to create a golden image and deploy it with Terraform in less than 15 minutes

VMware home lab: 6 months with the new setup

In spring of 2021 I wanted a proper VMware lab setup at home. The primary reason was, and still is, having an environment in which to learn and experiment with the latest VMware and AWS solutions. I strongly believe that actual hands-on experience is the gateway to real knowledge, despite how well the documentation may be written.

To that end I went about listing up what would be needed to make this dream of a home lab come true. The lack of space meant that the setup would end up in my bedroom and therefore needed to be quiet. That removed most 2nd hand enterprise servers from the list. Possibly with the exception of the VRTX chassis from Dell, which I would still REALLY want for a home lab, but it’s way to expensive – even 2nd hand.

Requirements:

  • As compatible with the VMware HCL as possible (as-is or via Flings)
  • Quiet (no enterprise servers)
  • Energy efficient
  • Not too big (another nail in the coffin for full-depth 19″ servers)
  • Reasonable performance
  • Ability to run vSAN
  • 10Gbps networking

Server hardware

Initially I considered the Intel NUCs and Skull / Ghost Canyon mini-PCs as these are very popular among home-lab enthusiasts. However, the 10Gbps requirement necessitated a PCIe slot and the models supporting this from Intel are very expensive.

The SuperMicro E300-9D was also on the list but they too tend to get expensive and a bit hard to get on short notice where I live.

Therefore, going with a custom build sounded more and more in line with what would work for this setup. In the end I settled on the below. The list contain all the parts used for the ESXi nodes, minus the network cards which are listed separately in the networking section below.

PartBrandCost (JPY)
MoboASRock Intel H410M-ITX/ac I219V12,980link
CPUCore i5 10400 BOX (6c w. graphics)20,290link
RAMTEAM DDR4 2666Mhz PC4-21300 (2×32)33780link
m.2 cacheWD Black 500Gb SSD M.2-2280 SN7509,580link
2.5″ driveSanDisk 2.5″ SSD Ultra 3D 1TB13,110link
PSUThermaltake Smart 500W -STANDARD4,756link
CaseCooler Master H100 Mini Tower7,023link
Total101,519

Mainboard and case

The choice of mainboard came down to the onboard network chipset. It had to be possible to run the ESXi installer and it won’t work if it can’t find the network. Initially I only had the onboard NIC and no 10Gbps cards. Unfortunately the release of vSphere version 7.x restricted the hardware support significantly. This time I was going to make an AMD build, but most of their mainboards come with Realtek onboard NICs and they are no longer recognized by the ESXi installer. Another consideration was size and expansion options. An ITX formfactor meant that the size of the PC case could be reduced while still having a PCIe slot for a 10Gbps NIC.

The Cooler Master H100 case has a single big fan which makes it pretty quiet. Its small size also makes it an ideal case for this small-footprint lab environment. It even comes with LEDs in the fan which are hooked up to the reset button on the case to switch between colors (or to turn it off completely).

CPU

Due to the onboard NIC support the build was restricted to an Intel CPU. Gen 11 had been released but Gen 10 CPUs were still perfectly fine and could be had for less money. Obviously, there was no plan to add a discreet GPU so the CPU also had to come with built-in graphics. The Core i5 10400 seemed to meet all criteria while having a good cost / performance balance.

Memory

The little ASRock H410M-ITX/ac mainboard supports up to 64Gb of RAM and I filled it up from the start. One can never have too much RAM. With three nodes we get a total of 192Gb which will be sufficient for most tasks. Likely there will come a day later when a single workload (looking at you NSX-T!!) will require more. This is the only area which I feel could become a limitation soon. For that day I’ll likely have to add a box with more memory specifically for covering that workload.

Storage

A vSAN environment was one of the goals for the lab and with an NVME PCIe SSD as the cache tier and a 2.5″ drive as the capacity tier this was accomplished. It was a bit scary ordering these parts without knowing if they would be recognized in vCenter as usable for vSAN, but in the end there was no issue at all. They were all recognized immediately and could be assigned to the vSAN storage pool.

For the actual ESXi install I was going to use a USB disk initially but ended up re-using some old 2.5″ and 3.5″ spinning rust drives for the hypervisor install. These are not part of the cost calculation above as I just used whatever was laying around at home. The cost of these is negligible though.

Performance of the vSAN cluster isn’t too bad for using consumer hardware 🙂

Network hardware

To ensure vSAN performance and to support the 10Gbps internet router uplink a 10Gbps managed switch was required. Copper ports become very expensive so SFP+ would be the way to go. Mikrotik has a good 8+1 port switch / router in their CRS309-1G-8S+IN model. In the end this was a good fit for the home lab because not only does it have 8x 10Gbps SFP+ ports, it is also fanless and the software support several advanced features, like BGP.

I’m still happy with the choice 6 months later. It’s a great switch but it took a while to get used to it. Most of us probably come from a Cisco or Juniper background. The configuration for the Mikrotik is completely different and won’t be intuitive for the majority of users.

CRS309-1G-8S+IN

On the server side I wanted something which would be guaranteed to work with ESXi, so a 10Gbps card which is on the HCL was a must. Intel has a lot of cards on the list and their X520 series can be found pretty easily. In the end I got three X520-DP2 (dual port) cards and they have worked perfectly so far.

There is also a 1Gbps managed Dell x1026p switch to allow for additional networking options with NSX-T. With the Mikrotik 10Gbps switch there the Dell switch is more an addition for corner cases. It does help when attaching other devices which doesn’t support 10Gbps though.

The Mikrotik has a permanent VPN connection to an AWS Transit Gateway and from there to various VPCs and sometimes the odd VMware Cloud on AWS SDDC.

Installation media etc.

These servers still require custom installation media to be created for the installation to work. Primarily for the onboard Intel networking and the USB network Fling. An explanation for how to create custom media can be found here.

vCenter is hosted on an NFS share from a separate server. This is done so it could be on shared storage for the cluster while simultaneously being separate from the vSAN while the environment is being built.

ESXi is installed over PXE to allow for fully automated installations.

Conclusion

That’s it – a fully functional VMware lab. Quiet and with reasonably high performance. Also, RGB LEDs adds at least 20% extra performance – a bit like red paint on a sports car 😉

Resizing a Linux partition: Photon OS VM on vSphere

Adding disk space to a Linux VM can be a lot more complex than expected. Please find below an explanation on how to extend the size of the root partition of a Photon OS VM running on vSphere. The resize is done without unmounting the partition (but there is a reboot done initially). This is made possible in part because the filesystem is Ext4. The VM does need to be rebooted after changing the disk size in vSphere however. Otherwise it won’t realize it now has a larger disk.

Process

  • Increase size of disk in vSphere
  • Reboot the VM so it recognizes the new disk size
  • Use fdisk to delete and re-create the root partition
  • Use resize2fs to expand the partition size
  • Update fstab and grub with the new partition ID (or the VM won’t boot)

For Photon OS this process is extra easy as the root partition is at the end of the filesystem table and it doesn’t use an “Extended” partition. It’s possible to resize partitions with an Extended partition as well, but it takes a bit more work.

Note: These commands can easily break your system. Don’t try it on a machine where you value the data unless you have a solid backup of everything before attempting a resize.

Video covering the steps shown below

Step one is to change the disk size in vCenter

Bumped up the VM disk size from 80 to 375GB in vCenter

Reboot

In order for the Linux VM to recognize that it has a larger disk it needs to be rebooted.

root@stress-vm-01 [ ~ ]# reboot

Prior to modifying the partitions, verify which disk to modify

After rebooting, log back into the VM. We want to modify the root “/” partition and with “lsblk” we can verify that it is labeled “sda3”

root@stress-vm-01 [ ~ ]# lsblk
NAME   MAJ:MIN RM  SIZE RO TYPE MOUNTPOINT
sda      8:0    0  375G  0 disk 
├─sda1   8:1    0    4M  0 part 
├─sda2   8:2    0   10M  0 part /boot/efi
└─sda3   8:3    0   80G  0 part /

Launch fdisk

We use “fdisk” to modify the partitions and tell it to look at “/dev/sda” rather than “/dev/sda3”. This is because we want to see the entire disk, not just the partition we will modify

root@stress-vm-01 [ ~ ]# fdisk /dev/sda

Welcome to fdisk (util-linux 2.36).
Changes will remain in memory only, until you decide to write them.
Be careful before using the write command.

GPT PMBR size mismatch (167772159 != 786431999) will be corrected by write.

Command (m for help):

Print partition information

We can see that the partition we want to modify (“/dev/sda3”) is at the end of the partition table. This makes it easy as we don’t have to shift any other partitions around to make space for the new, larger partition.

Command (m for help): p

Disk /dev/sda: 375 GiB, 402653184000 bytes, 786432000 sectors
Disk model: Virtual disk    
Units: sectors of 1 * 512 = 512 bytes
Sector size (logical/physical): 512 bytes / 512 bytes
I/O size (minimum/optimal): 512 bytes / 512 bytes
Disklabel type: gpt
Disk identifier: 2C13B474-2D24-4FE6-9905-D3A52DB28C9E

Device     Start       End   Sectors Size Type
/dev/sda1   2048     10239      8192   4M BIOS boot
/dev/sda2  10240     30719     20480  10M EFI System
/dev/sda3  30720 167772126 167741407  80G Linux filesystem

Command (m for help):

Delete the last partition (number 3)

Command (m for help): d
Partition number (1-3, default 3): 

Partition 3 has been deleted.

Command (m for help):

Recreate the partition

Here we use “n” to create a new partition, starting it at the exact same place as the old partition: “307020”. Fdisk will automatically suggest we end the new partition at the end of the disk: “786431966”. Pressing enter will accept this value and create the partition.

We can also see that the partition contains an ext4 signature – this is why we can resize the partition while it still is mounted.

Command (m for help): n
Partition number (3-128, default 3): 
First sector (30720-786431966, default 30720): 
Last sector, +/-sectors or +/-size{K,M,G,T,P} (30720-786431966, default 786431966): 

Created a new partition 3 of type 'Linux filesystem' and of size 375 GiB.
Partition #3 contains a ext4 signature.

Do you want to remove the signature? [Y]es/[N]o: N

Command (m for help):

Print the updated partition table

Note that it is not yet written to disk, this is just a preview

Command (m for help): p

Disk /dev/sda: 375 GiB, 402653184000 bytes, 786432000 sectors
Disk model: Virtual disk    
Units: sectors of 1 * 512 = 512 bytes
Sector size (logical/physical): 512 bytes / 512 bytes
I/O size (minimum/optimal): 512 bytes / 512 bytes
Disklabel type: gpt
Disk identifier: 2C13B474-2D24-4FE6-9905-D3A52DB28C9E

Device     Start       End   Sectors  Size Type
/dev/sda1   2048     10239      8192    4M BIOS boot
/dev/sda2  10240     30719     20480   10M EFI System
/dev/sda3  30720 786431966 786401247  375G Linux filesystem

Command (m for help):

Writing the partition table to disk

Command (m for help): w
The partition table has been altered.
Syncing disks.

Verifying the current size of the root “/” partition

root@stress-vm-01 [ ~ ]# df -h .
Filesystem      Size  Used Avail Use% Mounted on
/dev/sda3        79G  1.1G   74G   2% /
root@stress-vm-01 [ ~ ]# 

Resizing on the fly (without unmounting)

root@stress-vm-01 [ ~ ]# resize2fs /dev/sda3
resize2fs 1.45.6 (20-Mar-2020)
Filesystem at /dev/sda3 is mounted on /; on-line resizing required
old_desc_blocks = 10, new_desc_blocks = 47
The filesystem on /dev/sda3 is now 98300155 (4k) blocks long.

Verifying the new partition size

root@stress-vm-01 [ ~ ]# df -h .
Filesystem      Size  Used Avail Use% Mounted on
/dev/sda3       369G  1.1G  352G   1% /

Verify the new partition ID (“PARTUUID”)

root@stress-vm-01 [ ~ ]# blkid
/dev/sda2: SEC_TYPE="msdos" UUID="53EC-9755" BLOCK_SIZE="512" TYPE="vfat" PARTUUID="0a2847cf-9e9d-4d1a-9393-490e1b2459bf"
/dev/sda3: UUID="9cb30e86-d563-478d-8eeb-16f2449cb608" BLOCK_SIZE="4096" TYPE="ext4" PARTUUID="5e0b1089-595c-4f42-8d4b-4b06220cd6c7"
/dev/sda1: PARTUUID="d2bf275a-1df1-4aa6-adbf-8b5f6c4cac3a"

Update /etc/fstab and /boot/grub/grub.conf

Use your favorite editor (vi / vim / nano). Look for the partition UUID and update to match the new partition ID. Note that grub.conf may have a slightly different name or location if you aren’t using Photon OS.

root@stress-vm-01 [ ~ ]# vi /etc/fstab 
root@stress-vm-01 [ ~ ]# vi /boot/grub/grub.cfg 

All done!

Showing the before and after size of the root partition after a successful resize

Create custom ESXi installer image with additional network drivers

If one tries to install ESXi on a server equipped with network cards which are not on the official VMware HCL (Hardware Compatibility List), the installer will stop at the network card detection step and refuse to continue with a happy “No network adapters detected”. This is very common for those of us running VMware home labs on non-enterprise hardware.

However, VMware does provide additional network drivers in the shape of Flings. They can be downloaded but how does one create a custom ESXi installer ISO file using those drivers?

To make this process easy and fully automated, I created a PowerShell script which downloads the ESXi image (pick whichever version required) and also the community network drivers as well as the USB network driver fling. It then bundles everything up into an ISO file which can then be written to a USB stick or CD / DVD for installation.

What if you need a different version of ESXi or different drivers?

No problems, the script can be customized to accommodate this as well. Please refer to the YouTube video below for details.

Script for ESXi ISO creation

Location of the script on GitHub: link

Video showing how to use and customize the script