Configuring AWS Systems Manager for use with VMware Cloud on AWS
Maintaining tight access control for workloads and ensuring they are on the latest patch revisions is central to running an efficient and secure IT environment. In this post we cover how to heighten security by leveraging the tools which comes with AWS Systems Manager and complementing AWS native services. This way IT administrators will be empowered with tools central to their quest of reaching higher security levels while simultaneously being able to reduce management overhead
This post is also available on AWS Re-post here: https://repost.aws/articles/ARRpq-n–pQSKwWteAIdpktw
Integrating AWS Systems Manager (SSM) with VMware Cloud on AWS
Deploying SSM can help enhance security for both cloud native and VMware Cloud on AWS environments. This post will show how to integrate SSM with VMware Cloud on AWS for secure remote access as well as security patching of VMs.
Detailed configuration steps are covered below, but the main points are:
- Enabling and performing initial SSM configuration
- Creating a VPC endpoint for SSM in the VMware Cloud on AWS connected VPC
- Creating an inbound endpoint for Route 53
- Install the SSM agent and registering the VMs with SSM
The SSM endpoint gives the VMs a private IP to communicate with SSM and the Route 53 inbound endpoint ensures that the VMs receive that private IP when they resolve the SSM FQDN. Without these two endpoints the VMs would communicate with SSM over the internet.
Architecture
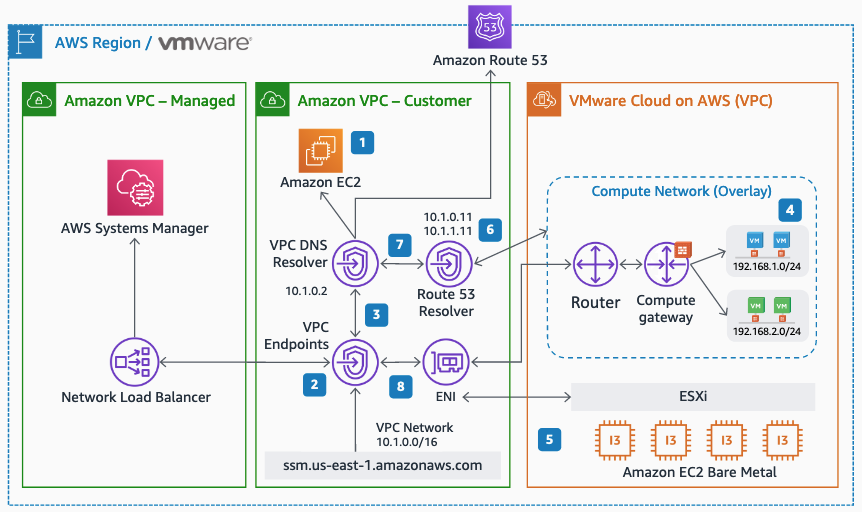
Integrating AWS Systems Manager with VMware Cloud on AWS is relatively straightforward. While AWS SSM comes with public endpoints for VM-to-SSM communication, the preferred way is to use private IP addressing over the connected VPC Elastic Network Interface (ENI). To accomplish this, create an SSM endpoint in the connected VPC and then set the networks on the VMware Cloud on AWS SDDC CGW to use a Route 53 inbound resolver. That way any communication the SSM agent does to the regional SSM endpoint will go over the ENI rather than the internet. No changes on the VMs are required apart from ensuring they use the correct Route 53 DNS resolver.
Overall network architecture for AWS Systems Manager integration with VMware Cloud on AWS
Integrating AWS Systems Manager for the VMware Cloud on AWS environment involves creating an SSM endpoint in the customer connected VPC and adding a DNS inbound endpoint
Configuration steps
In this section the practical setup of AWS Systems Manager with VMware Cloud on AWS is covered. General guidelines for getting started with AWS Systems Manager is covered in the SSM User Guide. The steps below are VMware and VMware Cloud on AWS specific and aim to get an environment up and running swiftly.
Overview of steps involved in setting up Systems Manager for use with VMware Cloud on AWS
- Setting the systems manager region
- Creating an S3 bucket for SSM logs and inventory output
- Creating the S3 bucket policy in IAM
- Creating the systems manager IAM users
- Creating the systems manager VPC endpoints
- Creating the R53 DNS inbound endpoint
- Pointing CGW DNS to R53
- Creating the SDDC firewall rules
- Creating a hybrid activation
- VM configuration: Installing the SSM agent and registering with SSM
1. Setting the systems manager region and enable Advanced-Tier
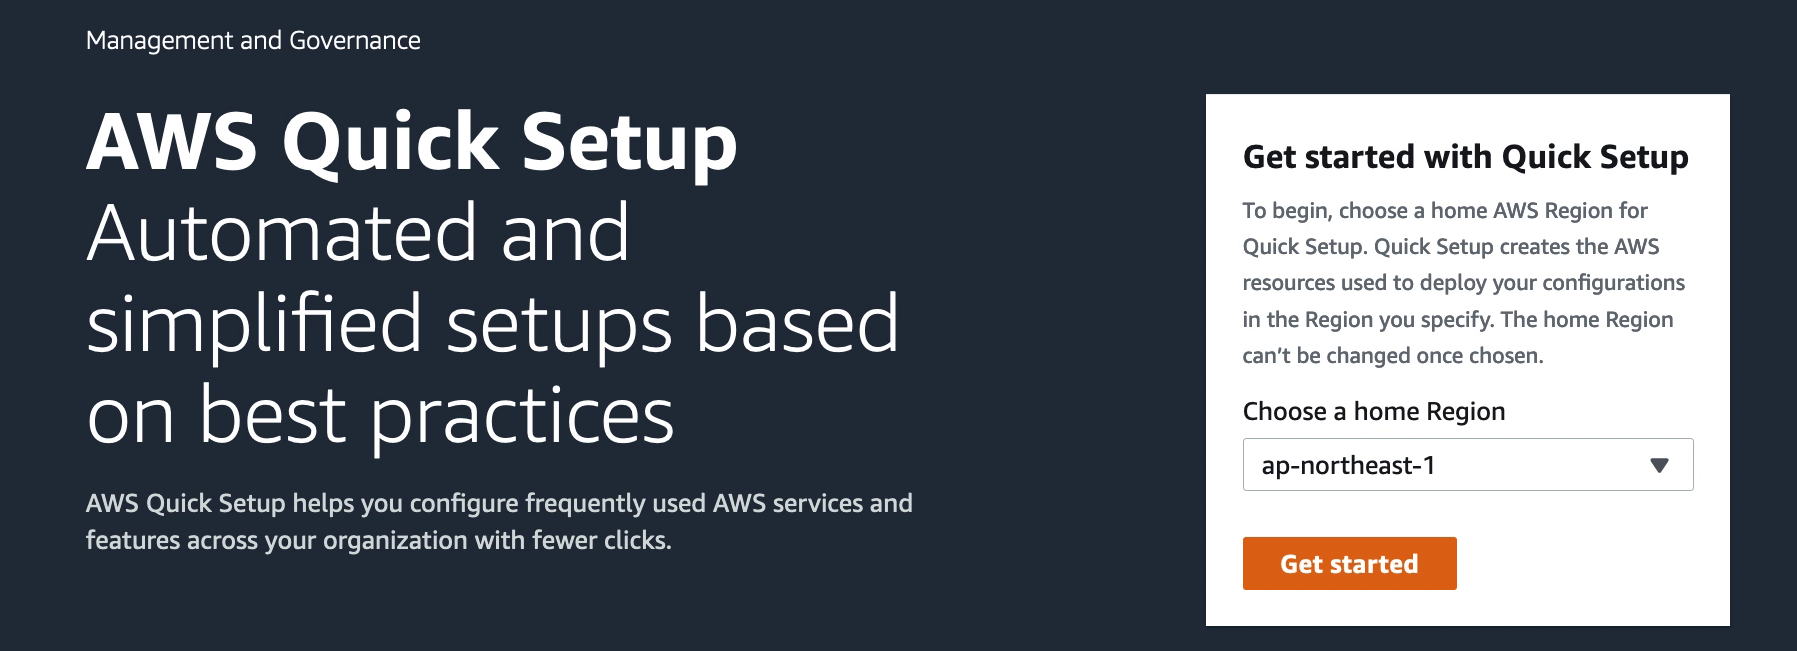
AWS Systems Manager is bound to a region of choice when activated the first time. Please pick a region which makes sense to your organization and note that it cannot be changed afterwards. For a VMware Cloud on AWS environment this would usually be the same region as the VMware Cloud on AWS environment is deployed in.
The easiest way to set the region is to go to AWS Systems Manager Quick Start and select your preferred region during the setup. Access AWS Systems Manager Console here: https://console.aws.amazon.com/systems-manager/ Also refer to the AWS Systems Manager getting started guide here: https://docs.aws.amazon.com/systems-manager/latest/userguide/quick-setup-getting-started.html
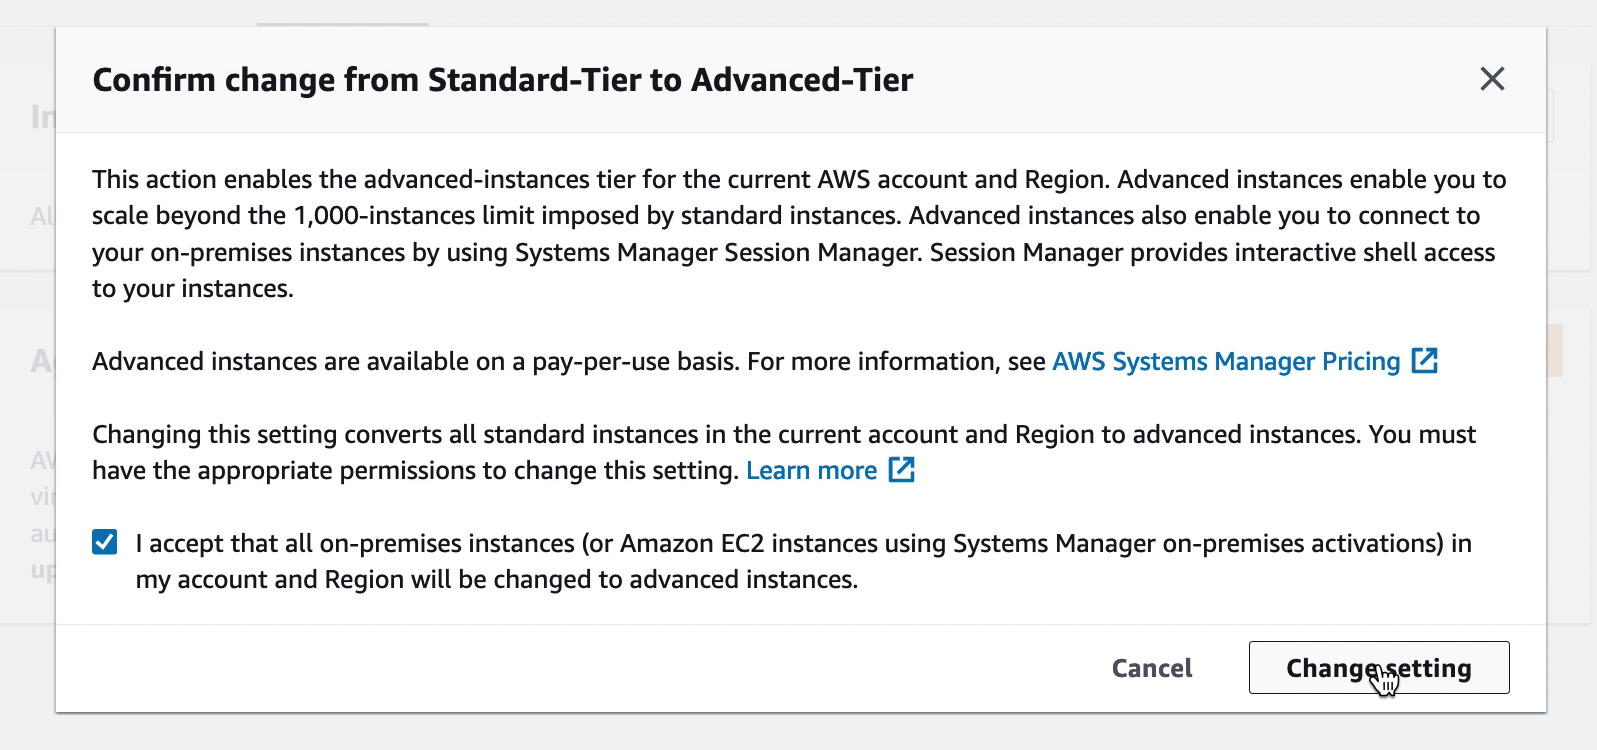
To use advanced features of AWS SSM, like patch management of VMware VMs, Advanced-Tier has to be enabled. This will incur an extra charge for instance management. At the time of writing the daily cost for one instance would be $0.1668 USD. Please refer to the SSM pricing structure for more detail and up-to-date pricing.
Once AWS SSM has been set to your preferred region, access “Fleet Manager” and under “Account management” select to modify the settings for Instance tiers.
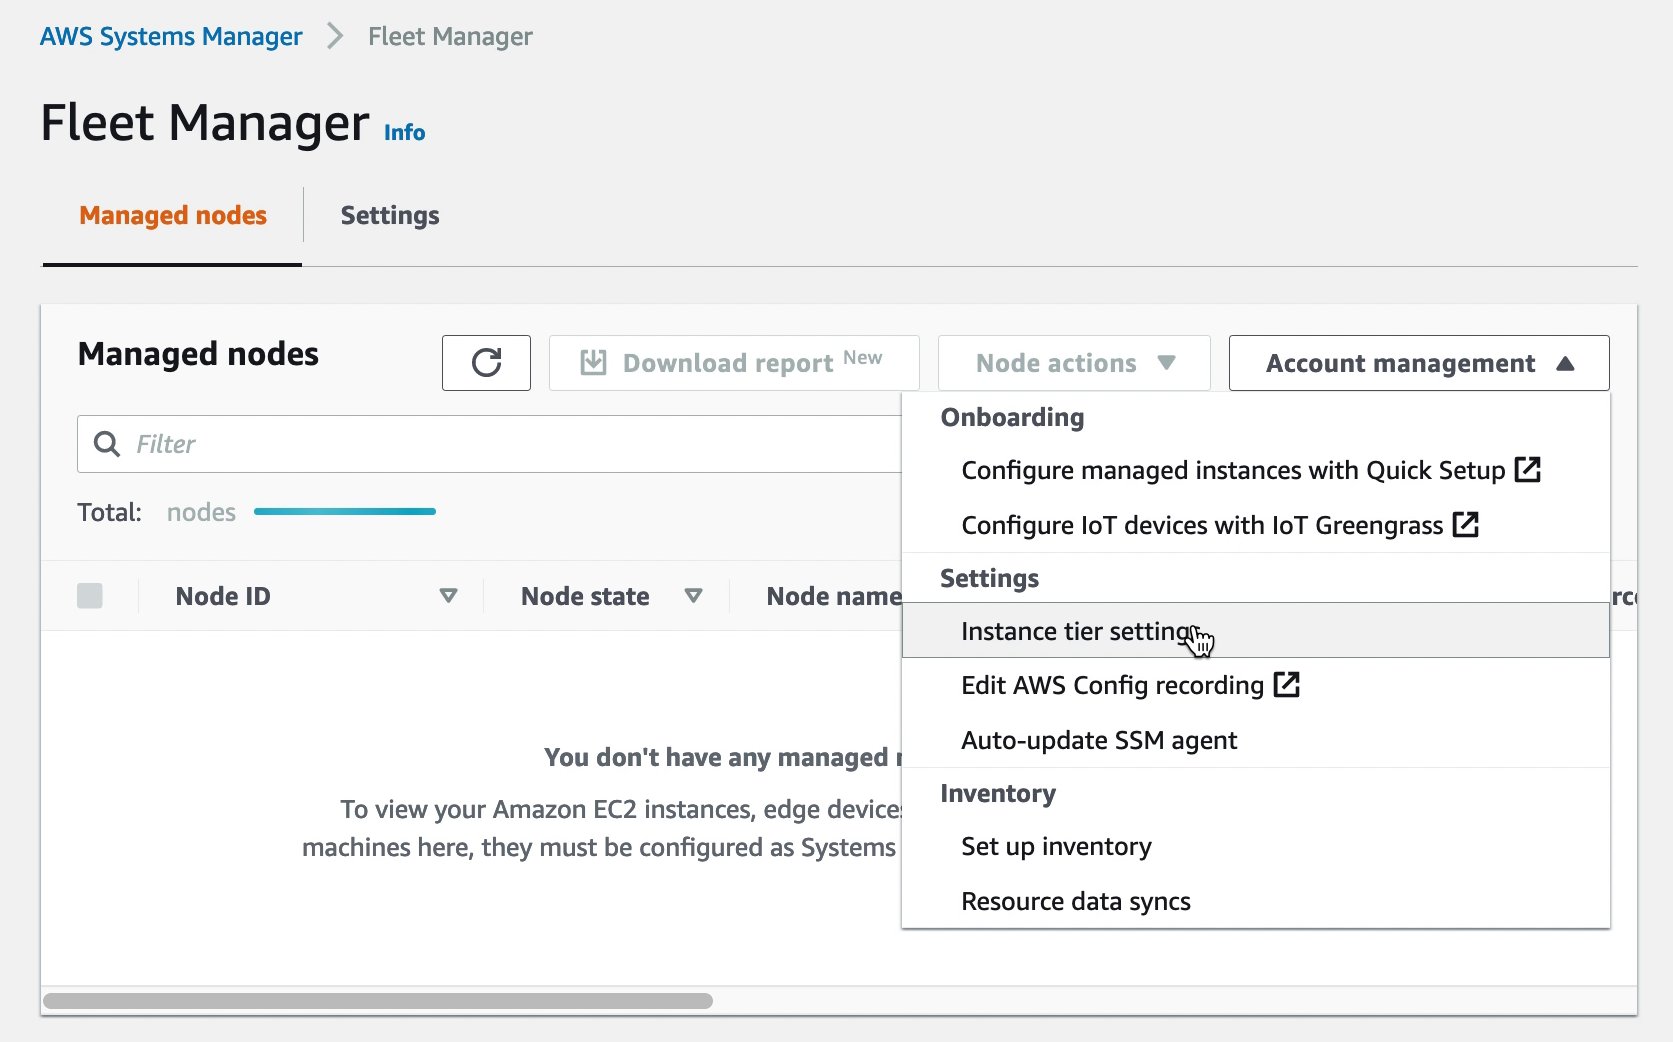
Under the “Instance tier settings” confirm change from Standard-Tier to Advanced-Tier
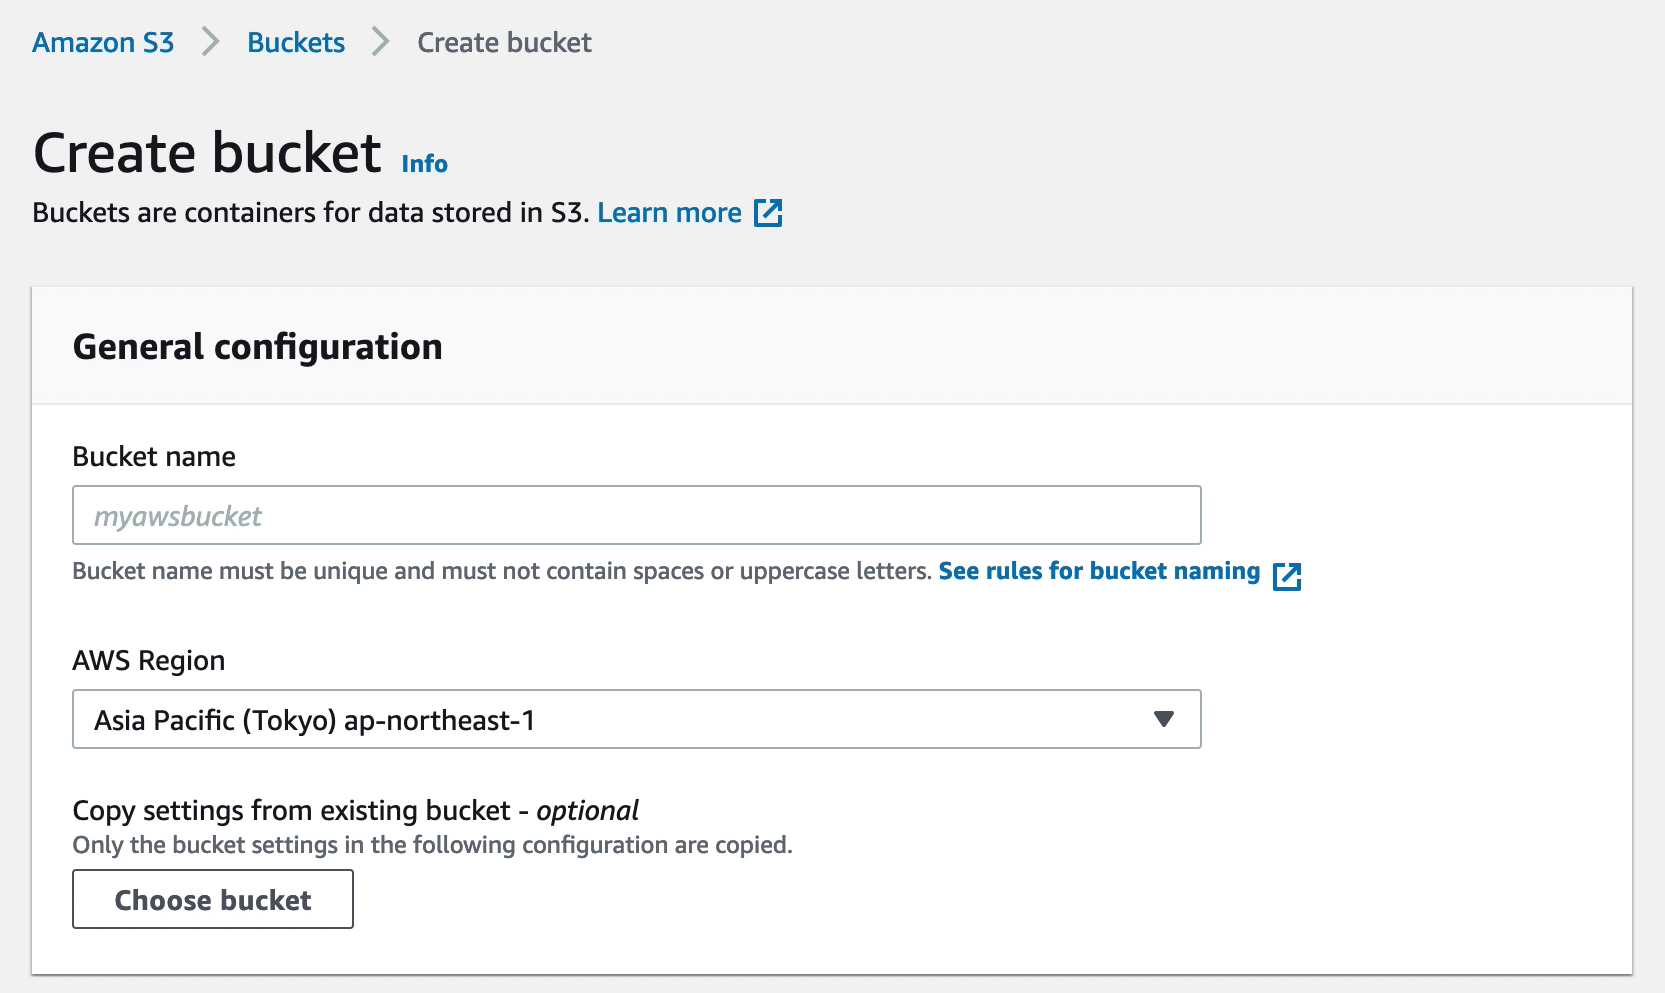
2. Creating an S3 bucket for SSM logs and inventory output
Having a designated S3 bucket for SSM logs and other output, like inventory data, makes administration easier. The output can later be accessed for tracking, troubleshooting or even for access via Athena where inventory data can be formatted using SQL queries and used in QuickSight reports.
3. Creating the S3 bucket policy in IAM
The S3 bucket created in step 2 need a policy to allow SSM to access it. This policy will be created in IAM and then attached to the IAM roles used in both cloud native and VMware Cloud on AWS environments. Note that while this is a policy for S3 access, it is created in IAM and not in the S3 console.
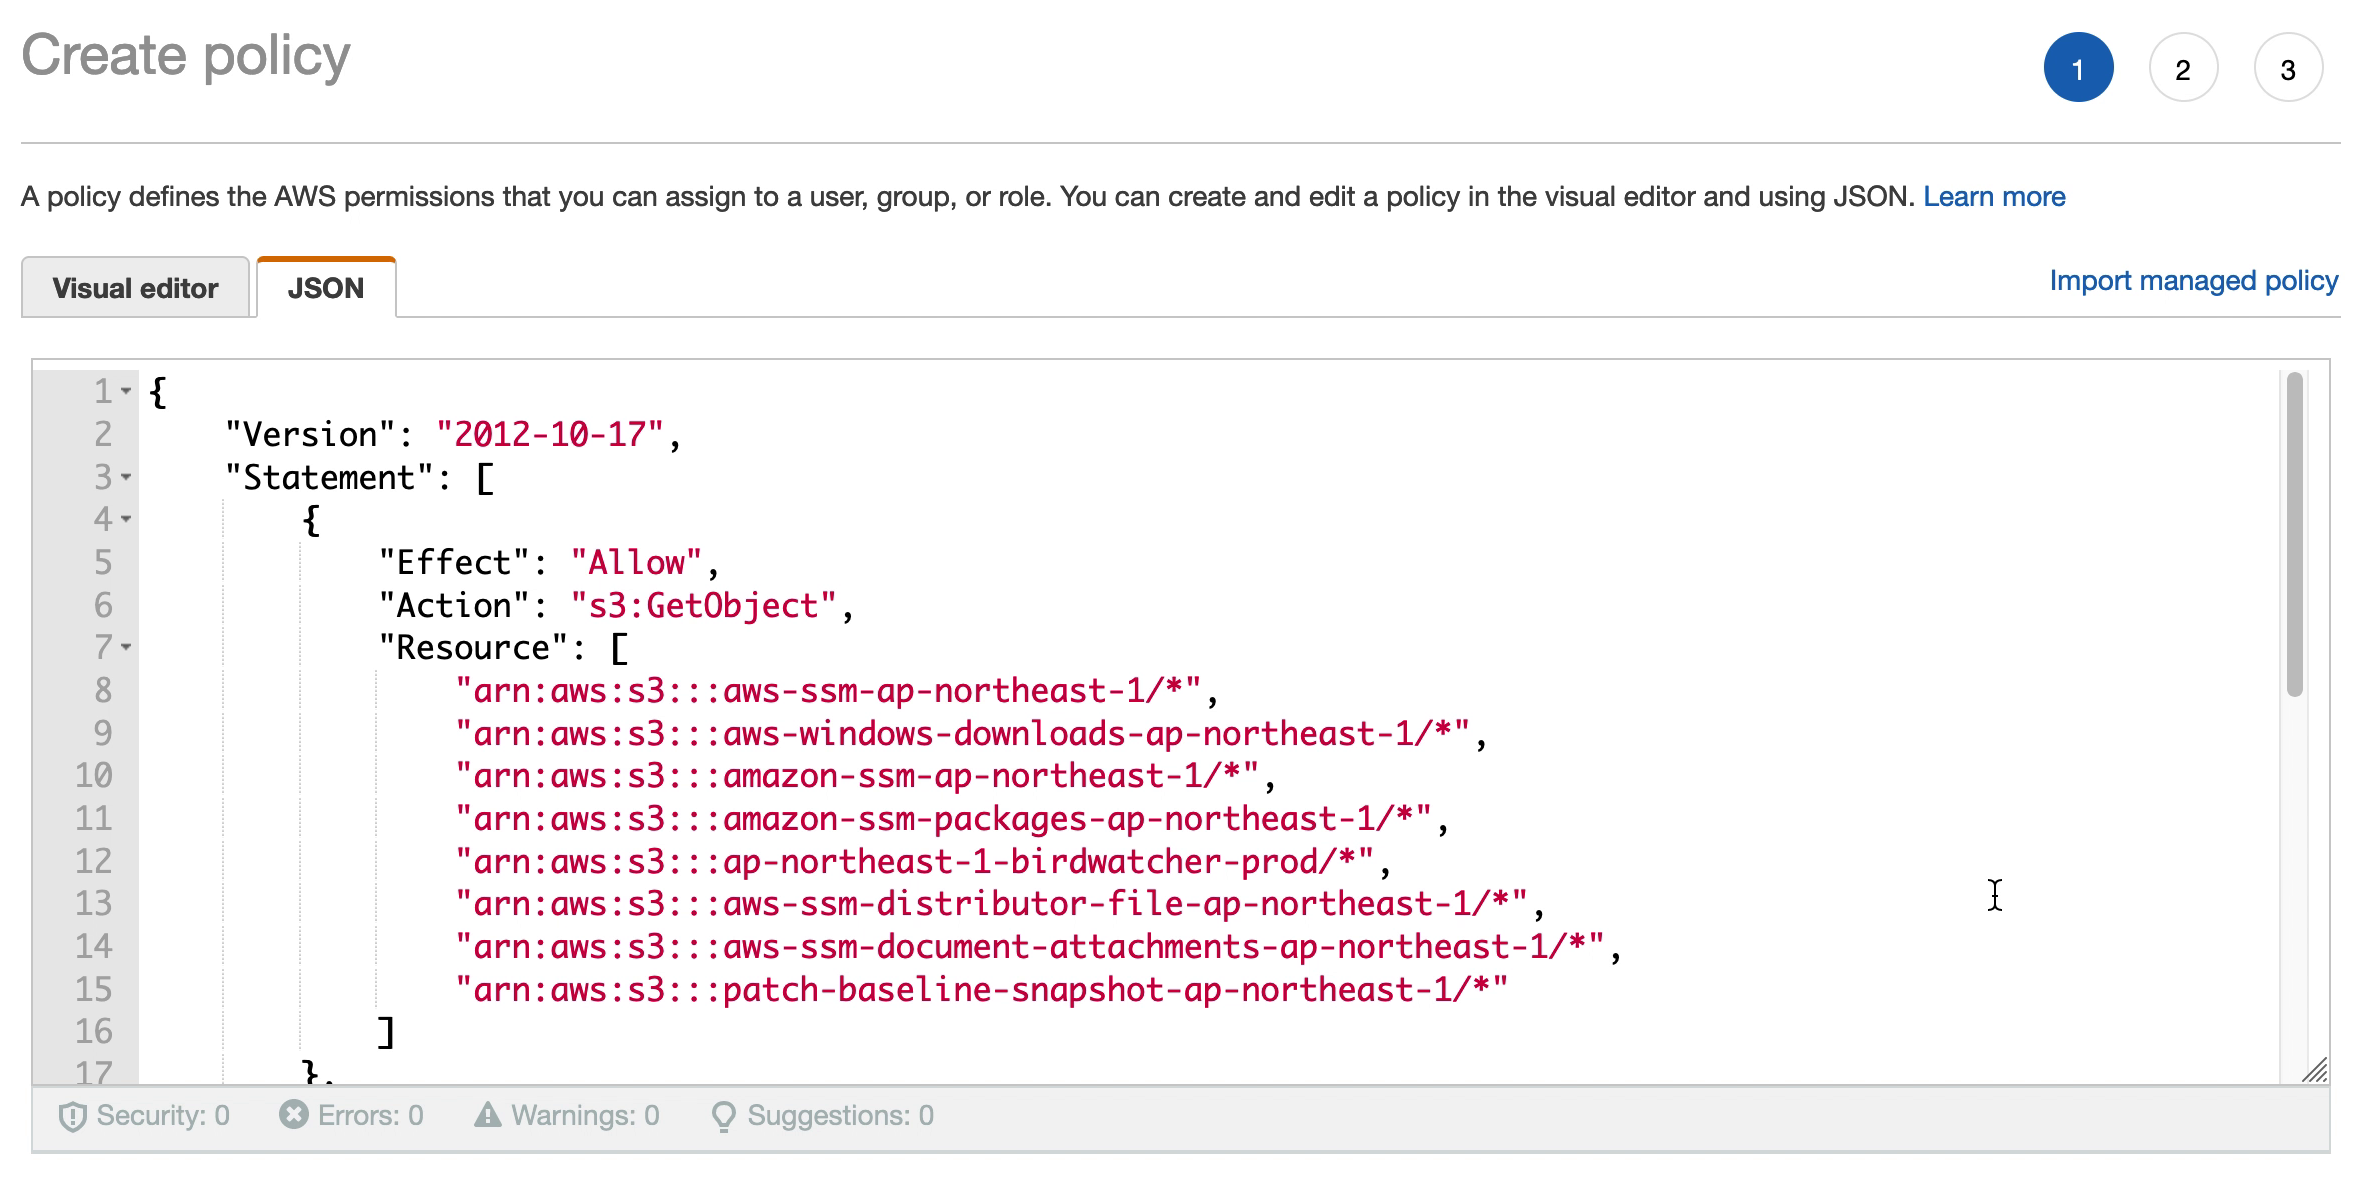
The policy is created based on the JSON document below. Please update “YOUR-REGION” and “YOUR-BUCKET-NAME” with the relevant values for your environment.
1
2
3
4
5
6
7
8
9
10
11
12
13
14
15
16
17
18
19
20
21
22
23
24
25
26
27
28
29
30
31
32
{
    "Version": "2012-10-17",
    "Statement": [
        {
            "Effect": "Allow",
            "Action": "s3:GetObject",
            "Resource": [
                "arn:aws:s3:::aws-ssm-YOUR-REGION/",
                 "arn:aws:s3:::aws-windows-downloads-YOUR-REGION/",
                "arn:aws:s3:::amazon-ssm-YOUR-REGION/",
                "arn:aws:s3:::amazon-ssm-packages-YOUR-REGION/",
                "arn:aws:s3:::YOUR-REGION-birdwatcher-prod/",
                 "arn:aws:s3:::aws-ssm-distributor-file-YOUR-REGION/",
                "arn:aws:s3:::aws-ssm-document-attachments-YOUR-REGION/",
                 "arn:aws:s3:::patch-baseline-snapshot-YOUR-REGION/"
            ]
        },
        {
            "Effect": "Allow",
            "Action": [
                "s3:GetObject",
                "s3:PutObject",
                "s3:PutObjectAcl",
                "s3:GetEncryptionConfiguration"
            ],
            "Resource": [
                "arn:aws:s3:::YOUR-BUCKET-NAME/*",
                "arn:aws:s3:::YOUR-BUCKET-NAME"
            ]
        }
    ]
}
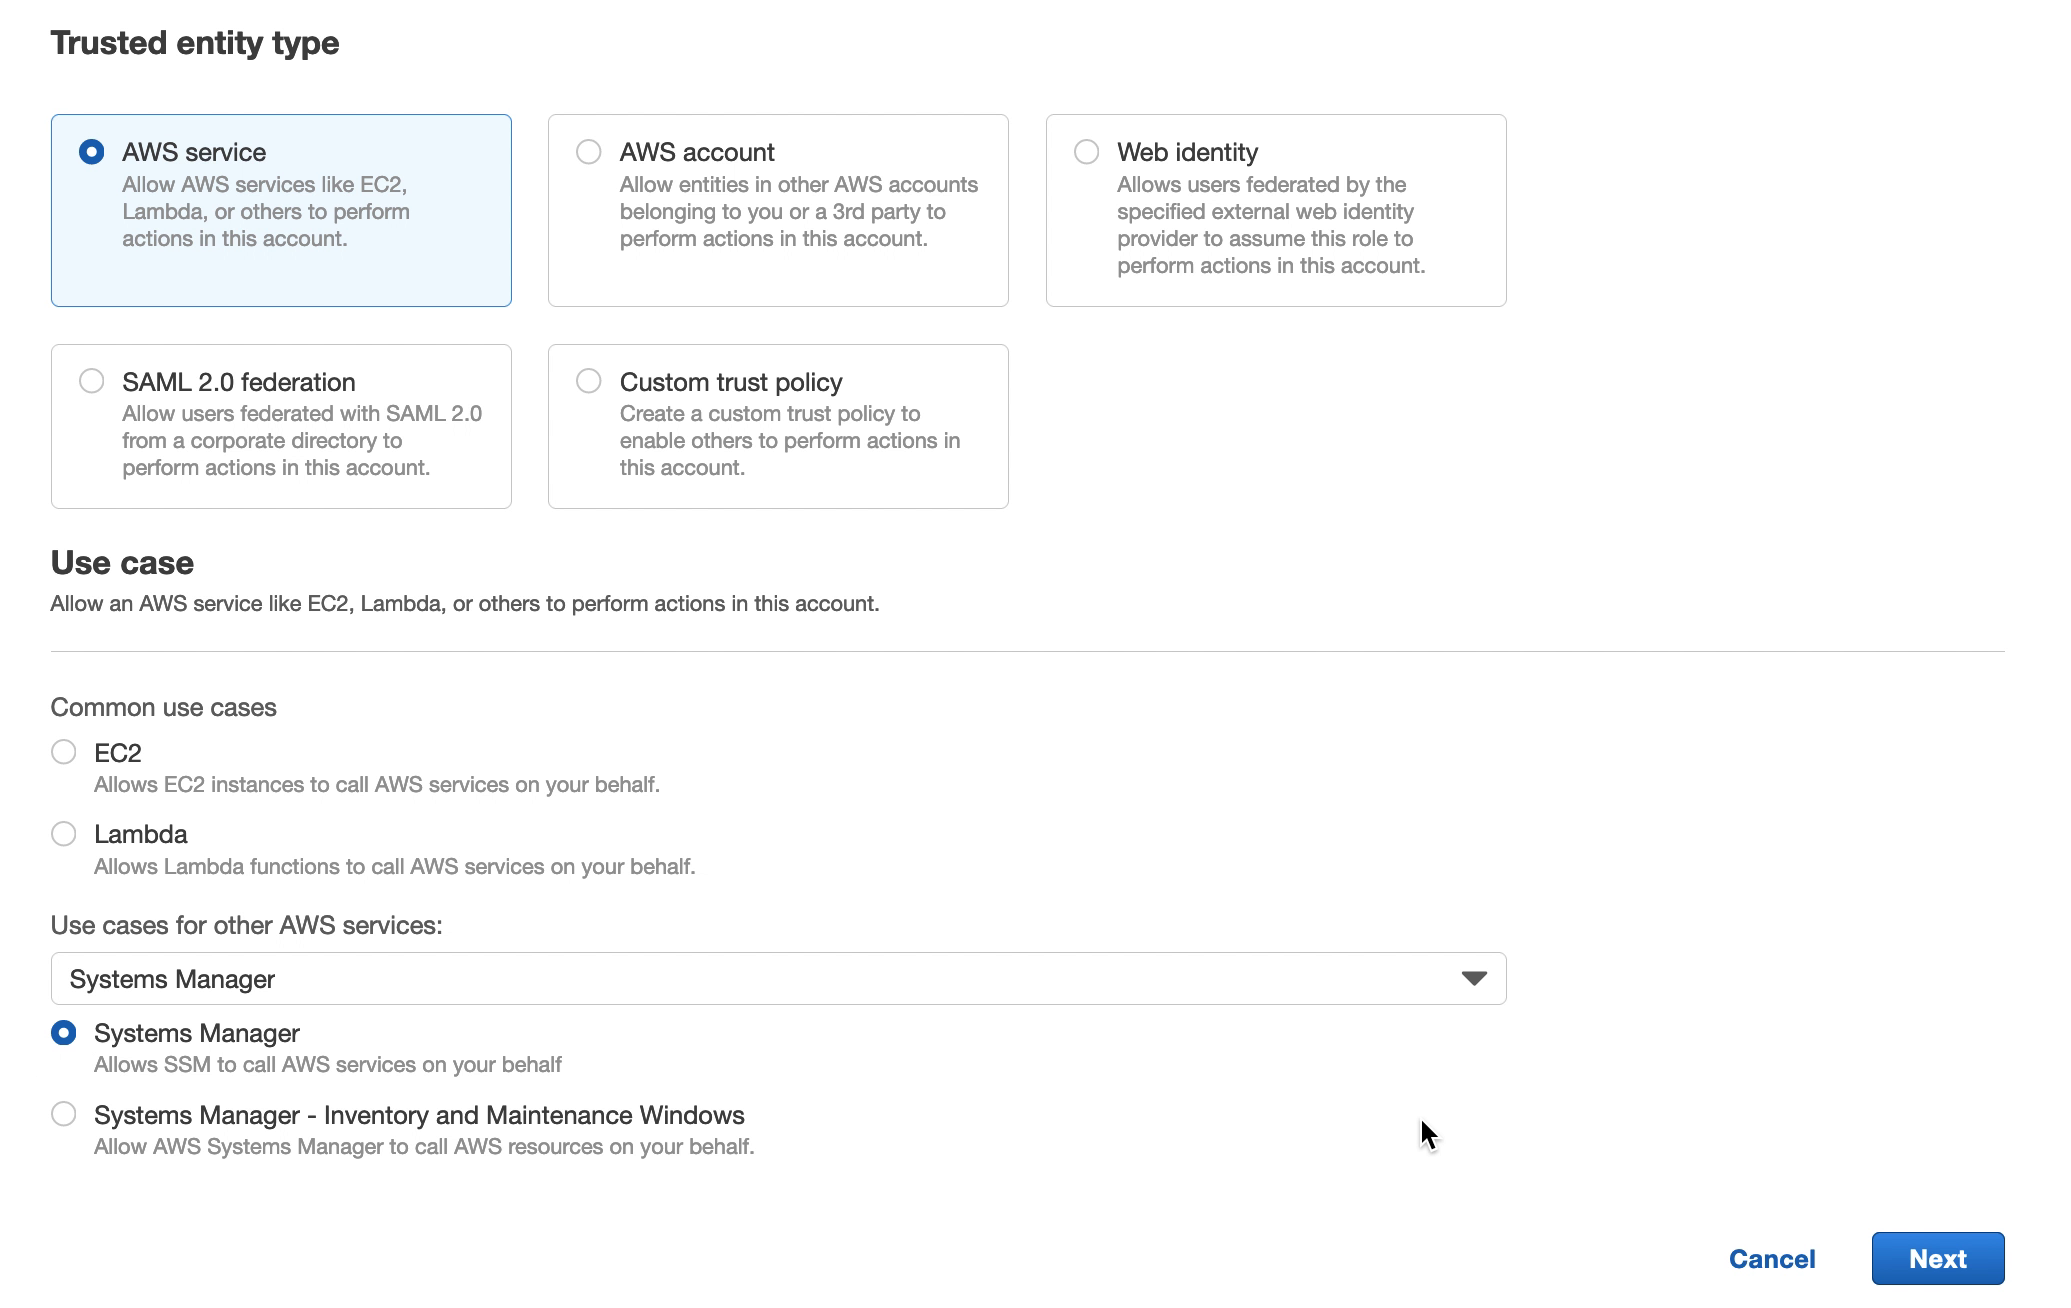
4. Creating the systems manager IAM roles
AWS Systems Manager can cover the management of both EC2 instances as well as VMware Cloud on AWS VMs. Each of these instance / VM types require a role created for them in IAM. This is to give the instance / VM the ability to interact with SSM and vice-versa. Detailed steps for this is covered in the AWS SSM user guide. In this section we will cover how to quickly get the VMware Cloud on AWS VM role created for use with hybrid activations in SSM.

Navigate to IAM in the AWS Console and create a new role. Select “Trusted entity type” to be “AWS Service” and the “Use Case” to be “Systems Manager”.
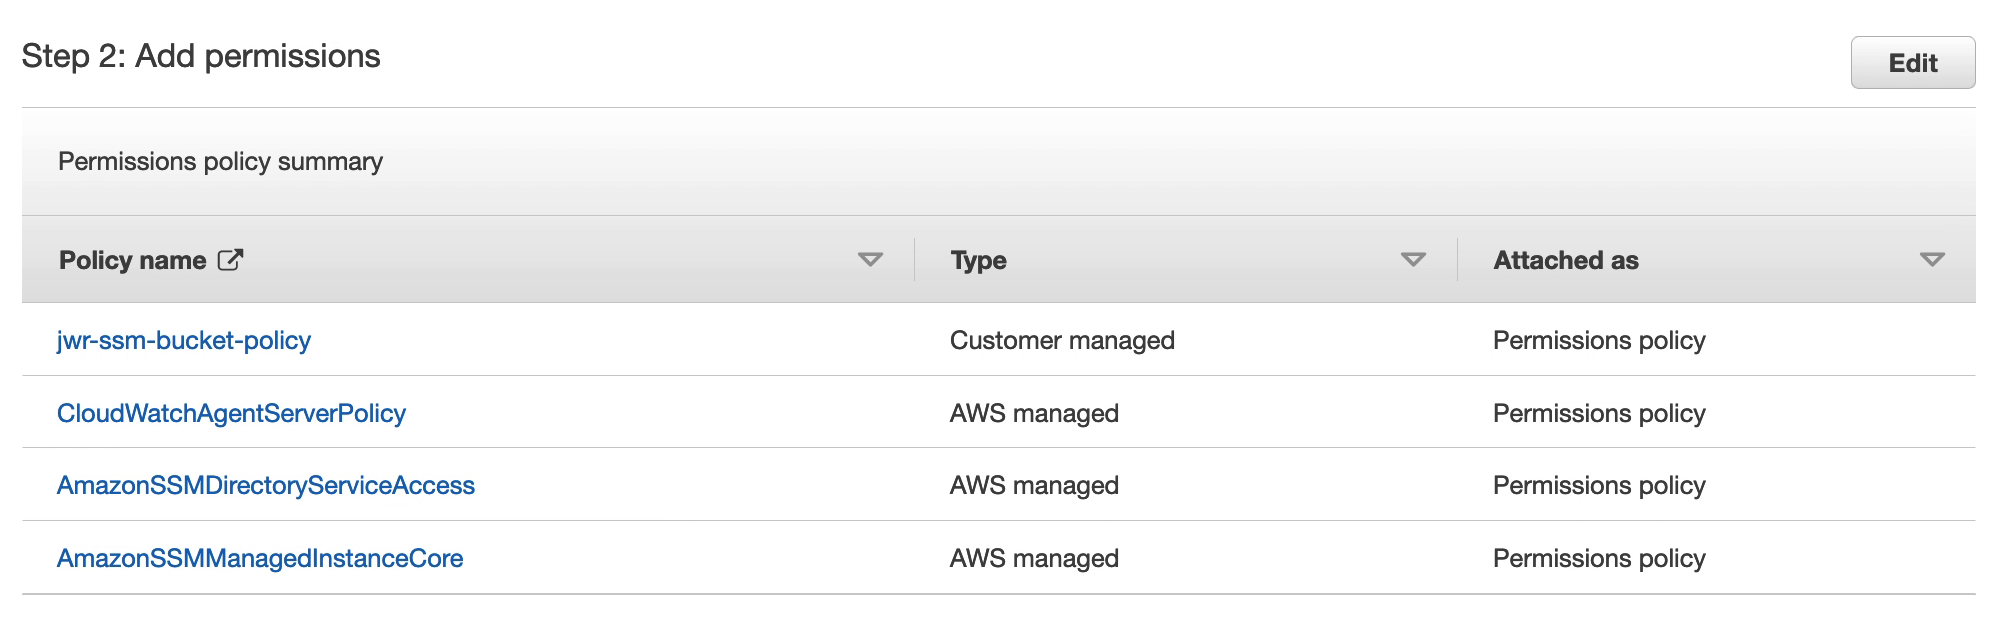
Under Permissions, search for and select the following:
- CloudWatchAgentServerPolicy
- AmazonSSMDirectoryServiceAccess
- AmazonSSMManagedInstanceCore
- The policy previously created for the SSM S3 bucket
5. Creating the systems manager VPC endpoints
Endpoints for AWS SSM can be created in the VMware Cloud on AWS Connected VPC. This is to provide the VMs in VMware Cloud on AWS a path to communicate with AWS SSM via the connected VPC ENI rather than accessing AWS SSM over the internet. This is both secure and as long as the SSM endpoint in the connected VPC is in the same availability zone as the VMware Cloud on AWS SDDC, communication is free of charge.
Create endpoints for the SSM service and, optionally, also KMS, Logs and SSM messages services as per the below:

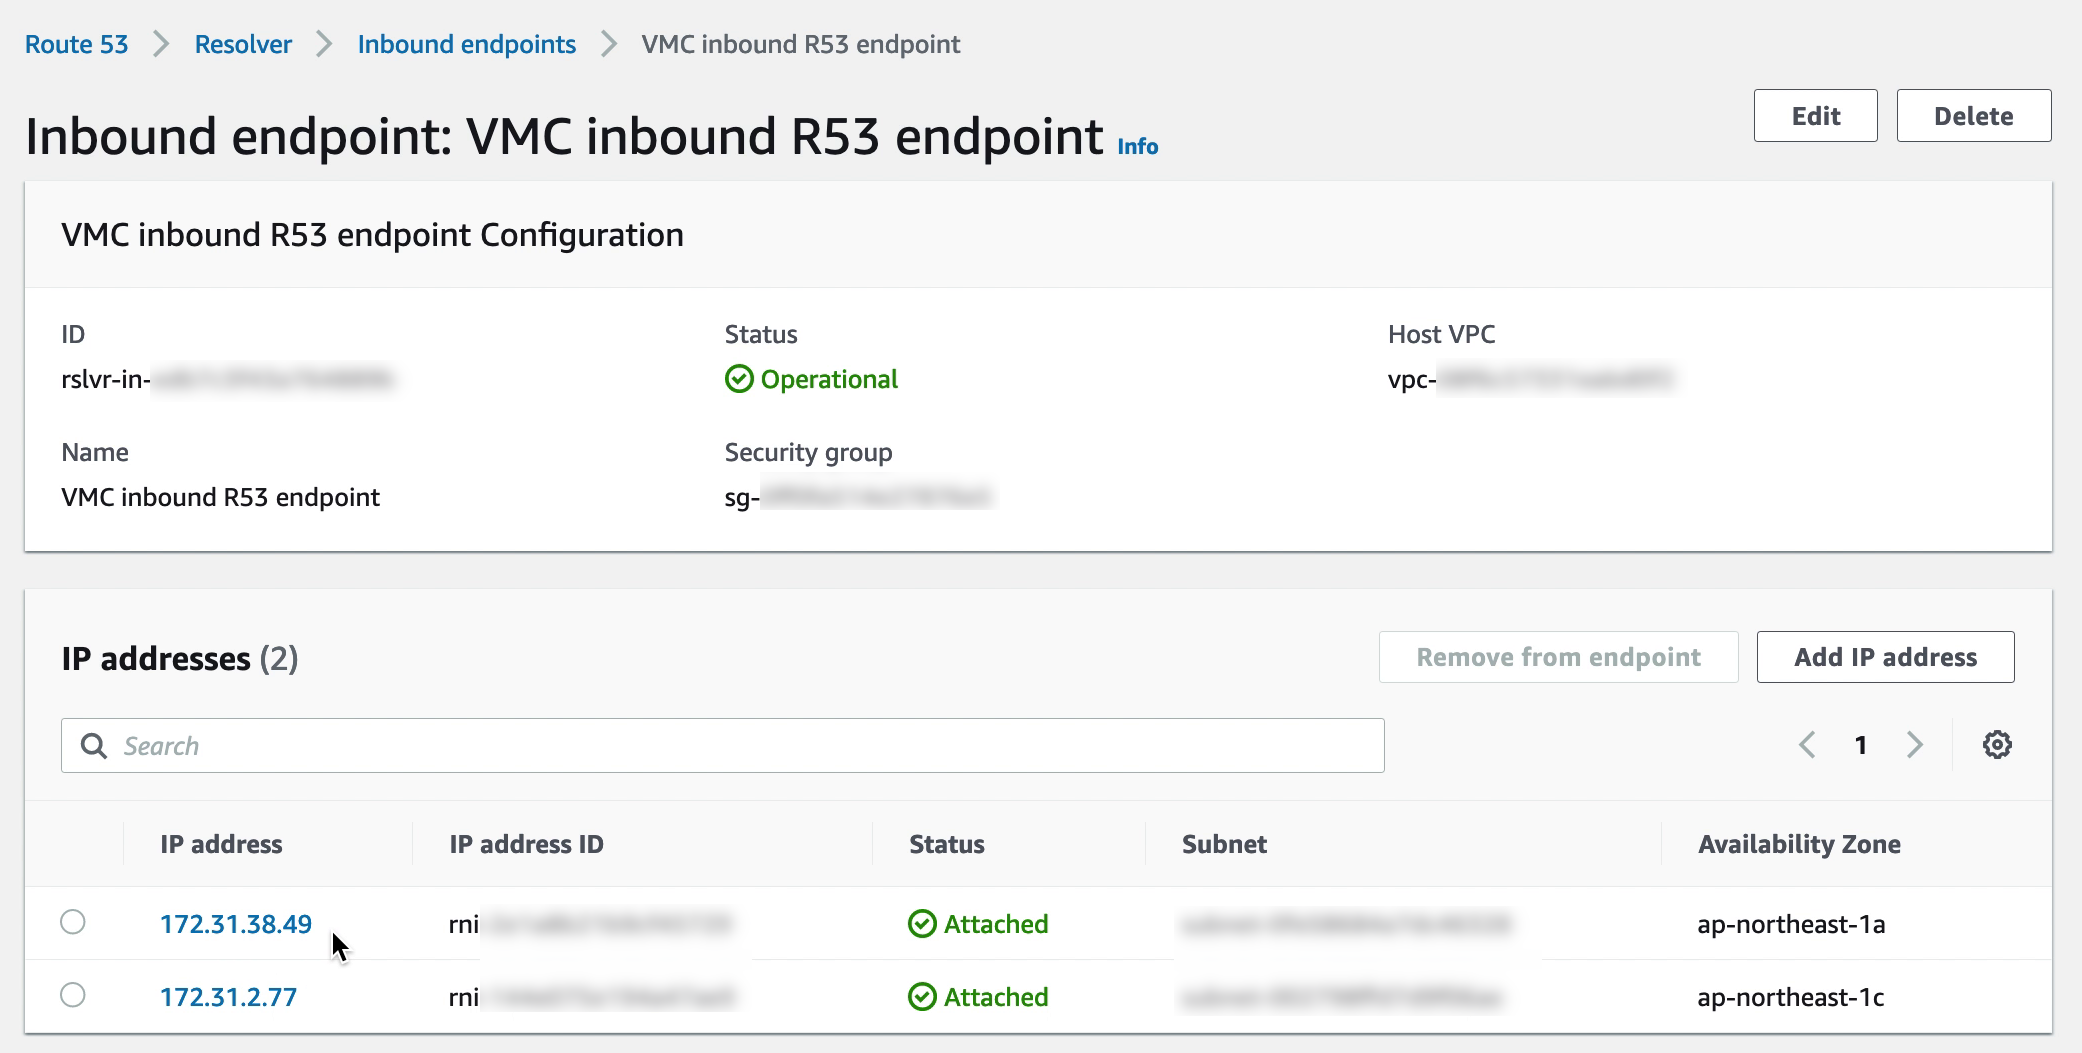
6. Creating the R53 DNS inbound endpoint
Creating the SSM endpoint is the first step but the VMs in VMware Cloud on AWS must also be directed to that endpoint rather than the public SSM IP addresses. Rather than modifying each VM, a more efficient way is to add a Route 53 inbound endpoint to the Connected VPC. If the CGW DHCP server for the VMware Cloud on AWS VM segments is then updated to point DNS to that Route 53 endpoint, the VMs will automatically resolve the SSM FQDN to the endpoint private IP address.
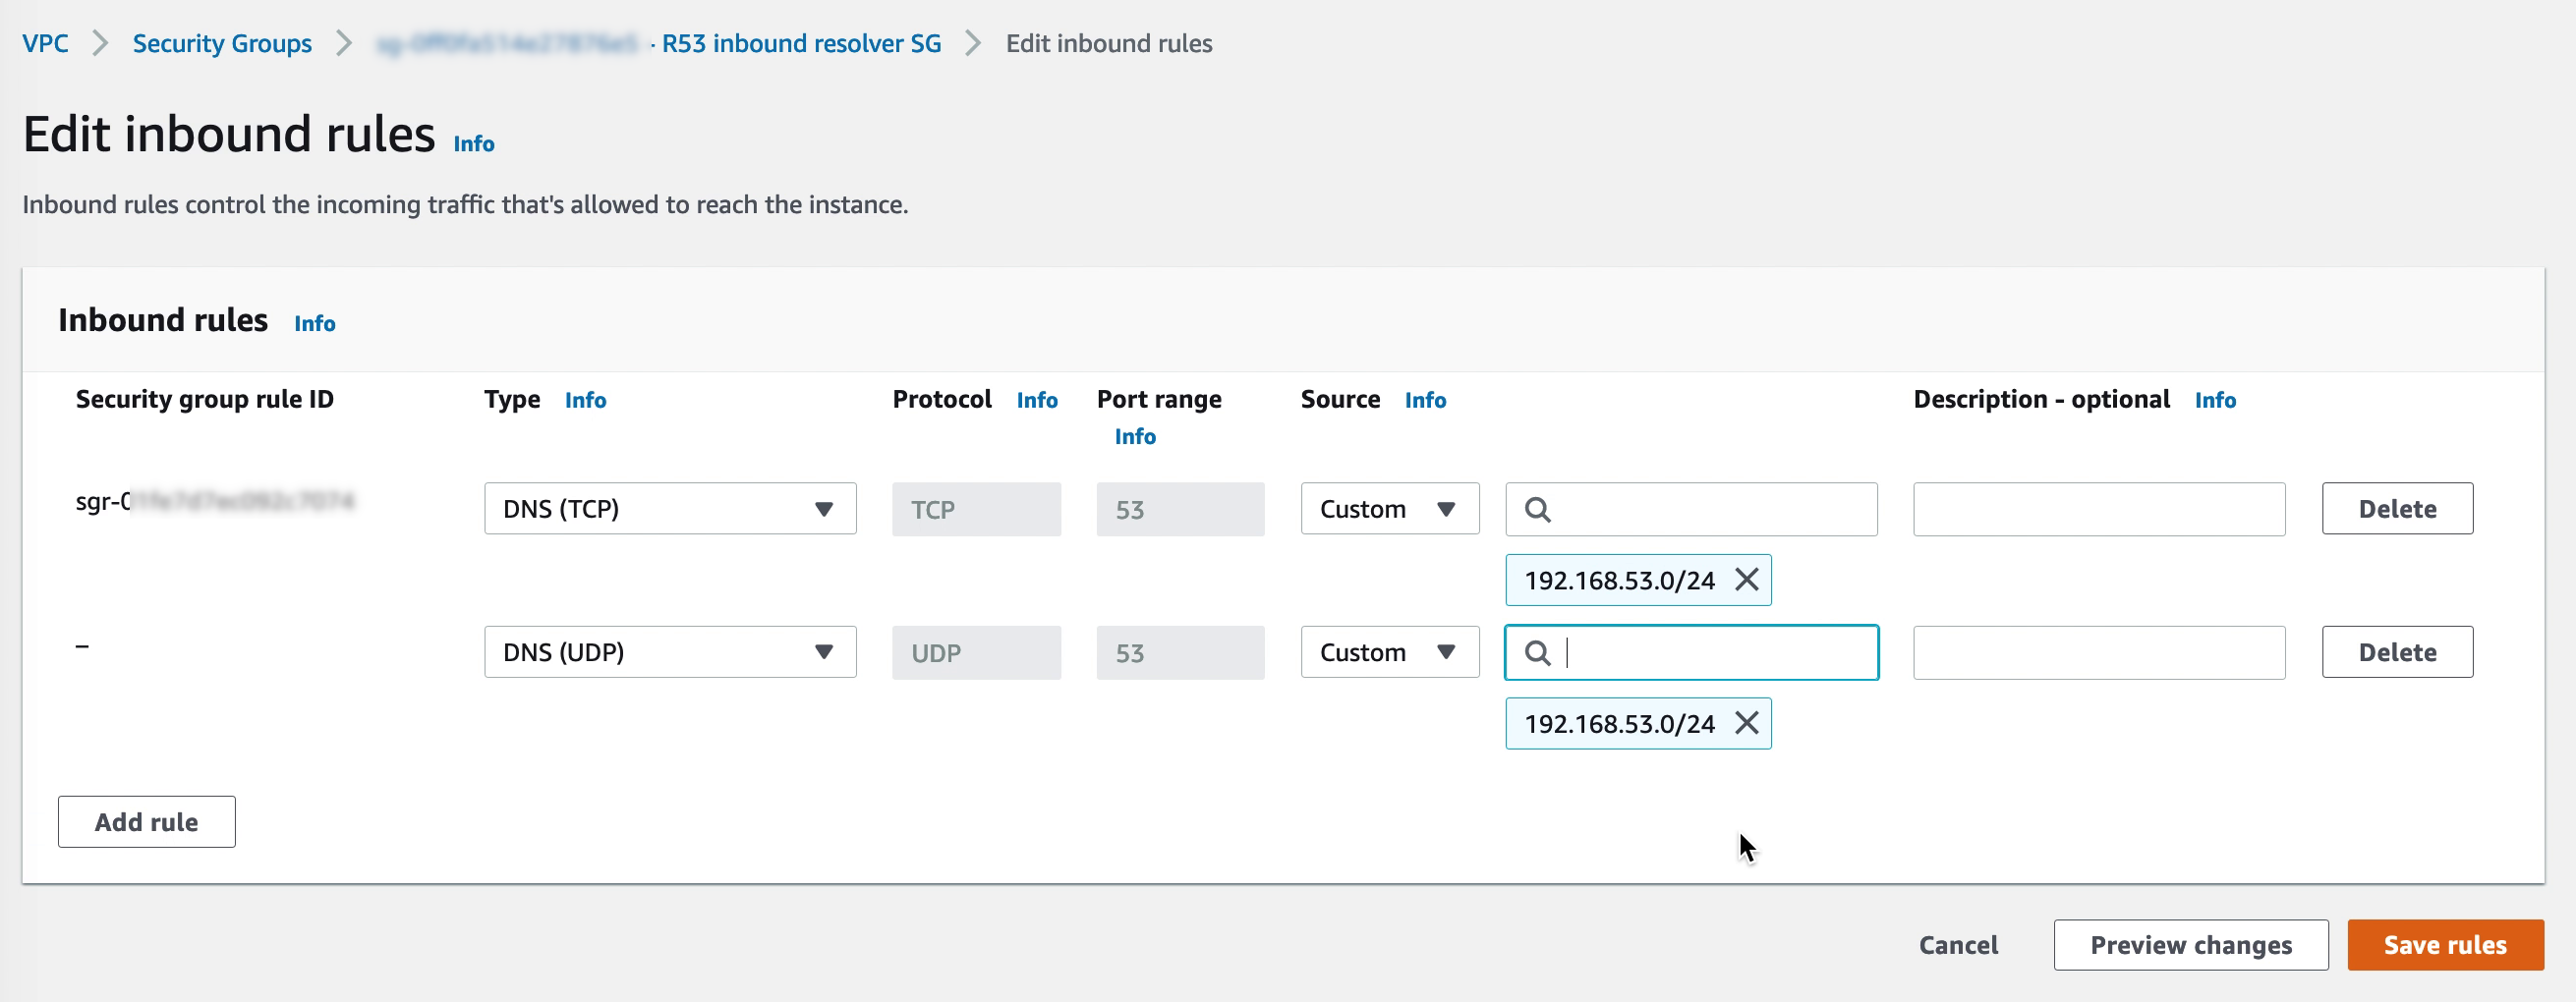
Make sure that the security group for the inbound R53 endpoints allow DNS on both TCP and UDP from the VMware Cloud on AWS CGW network segments.
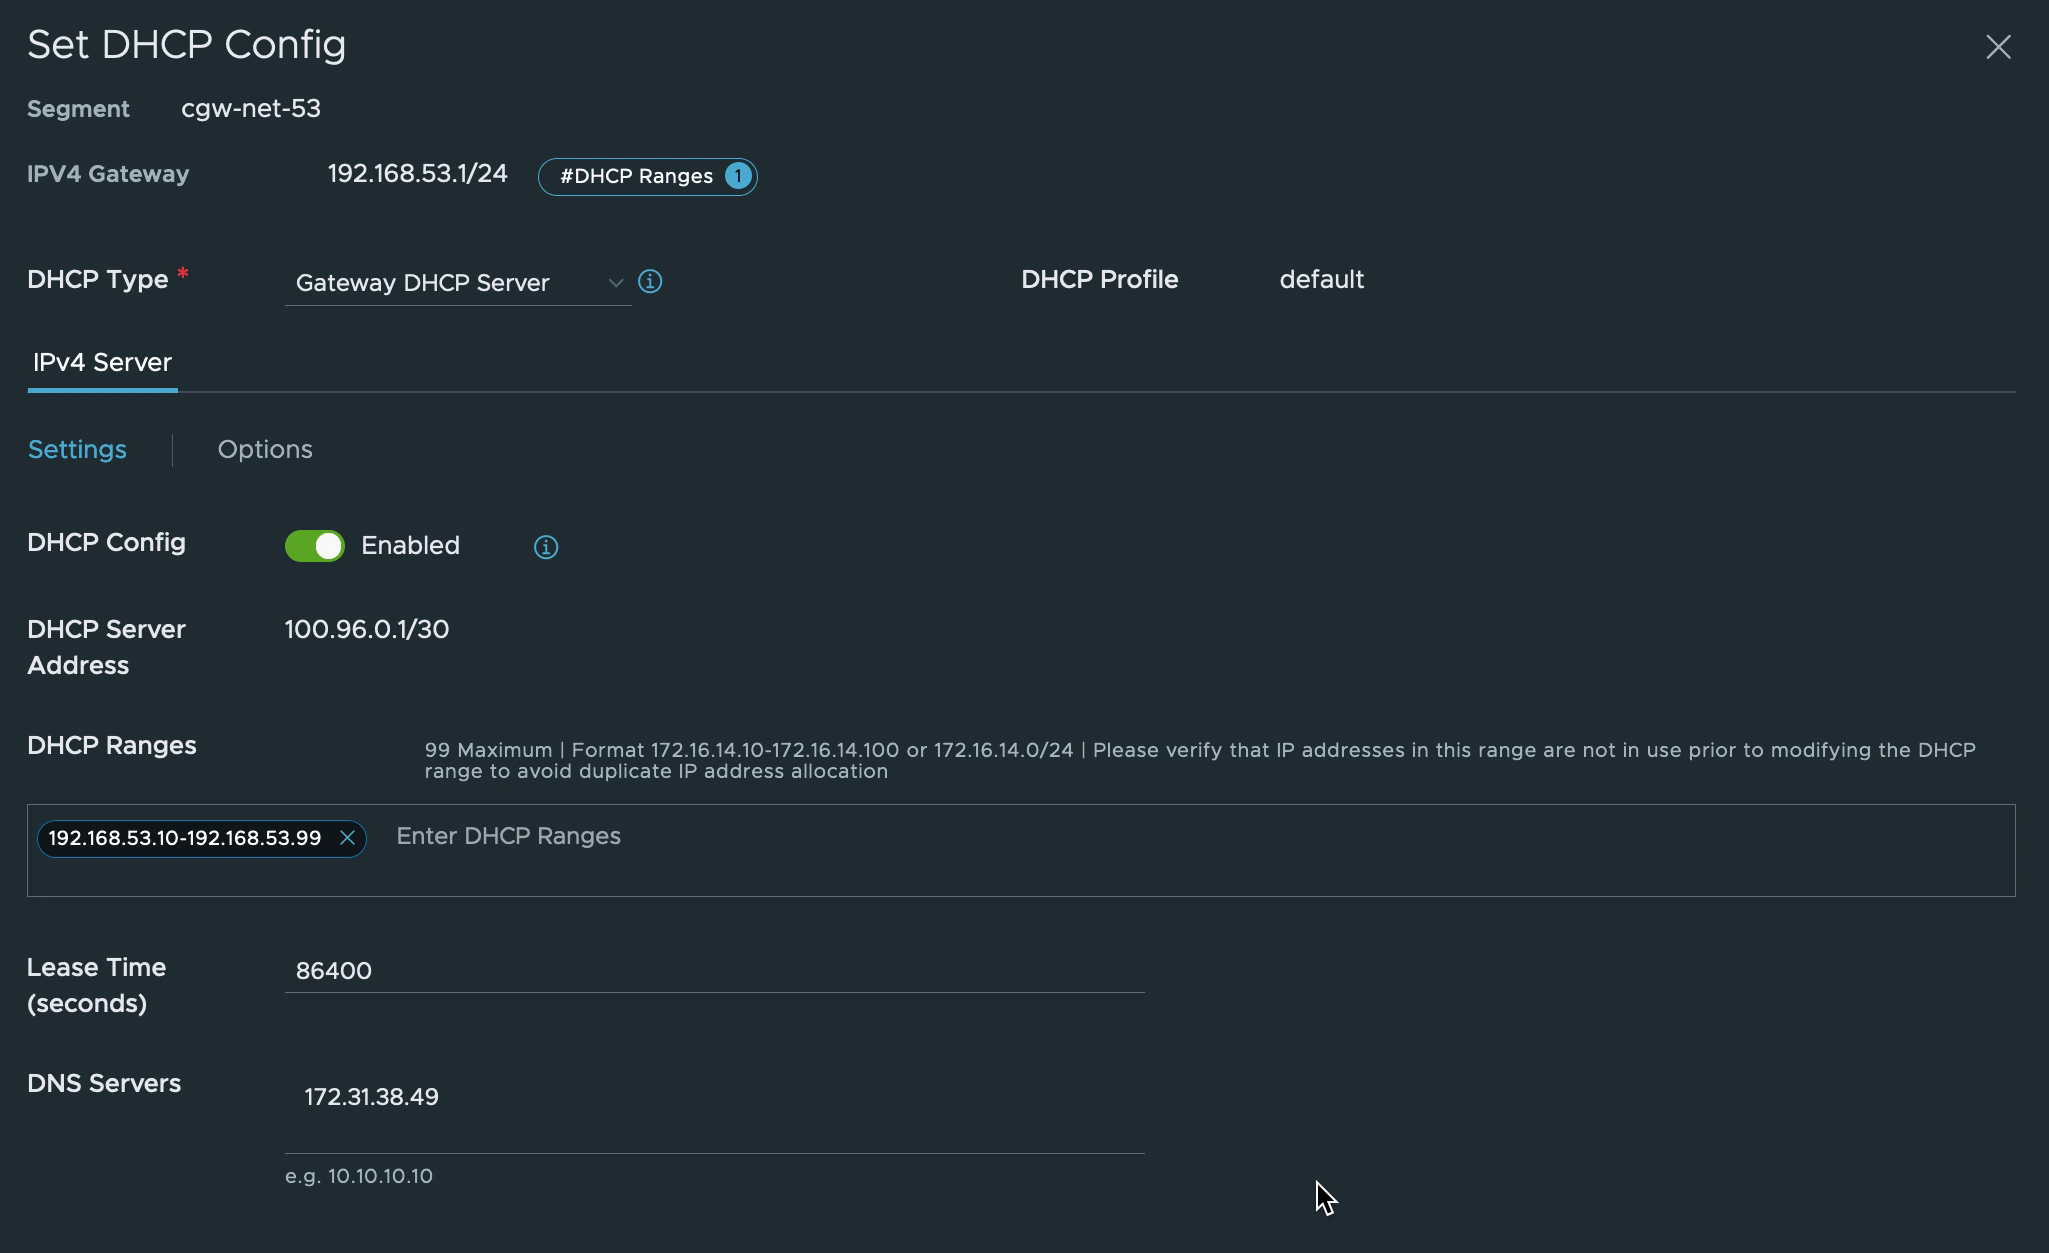
7. Pointing CGW DNS to R53
In the VMware Cloud on AWS console, navigate to “Networking & Security” and select “Segments” under Network. Update the network segments for the VMs to use the R53 inbound endpoint IP addresses.
The VMs connected to the CGW network segment may need to be disconnected and then re-connected to the network in vCenter or restart the networking from the OS side for the changes to take effect.
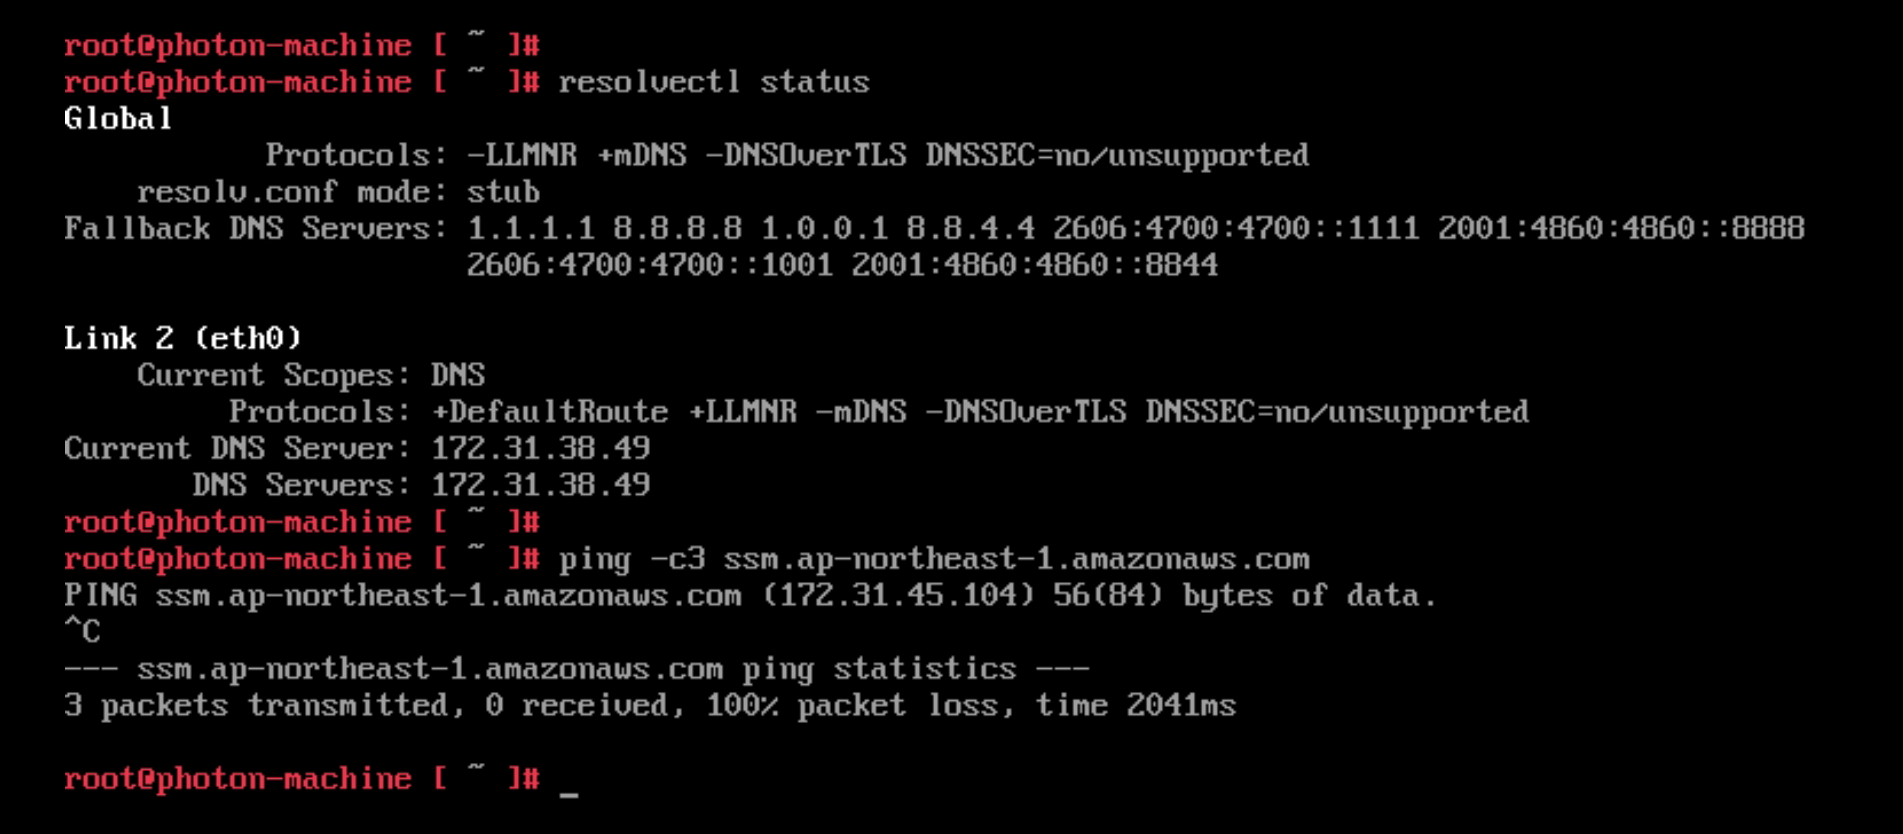
Before changing the DNS to point to the R53 inbound endpoint the VM in VMware Cloud on AWS resolves the regional SSM endpoint to the public IP address. Communication is done via the IGW in the VMware Cloud on AWS environment.
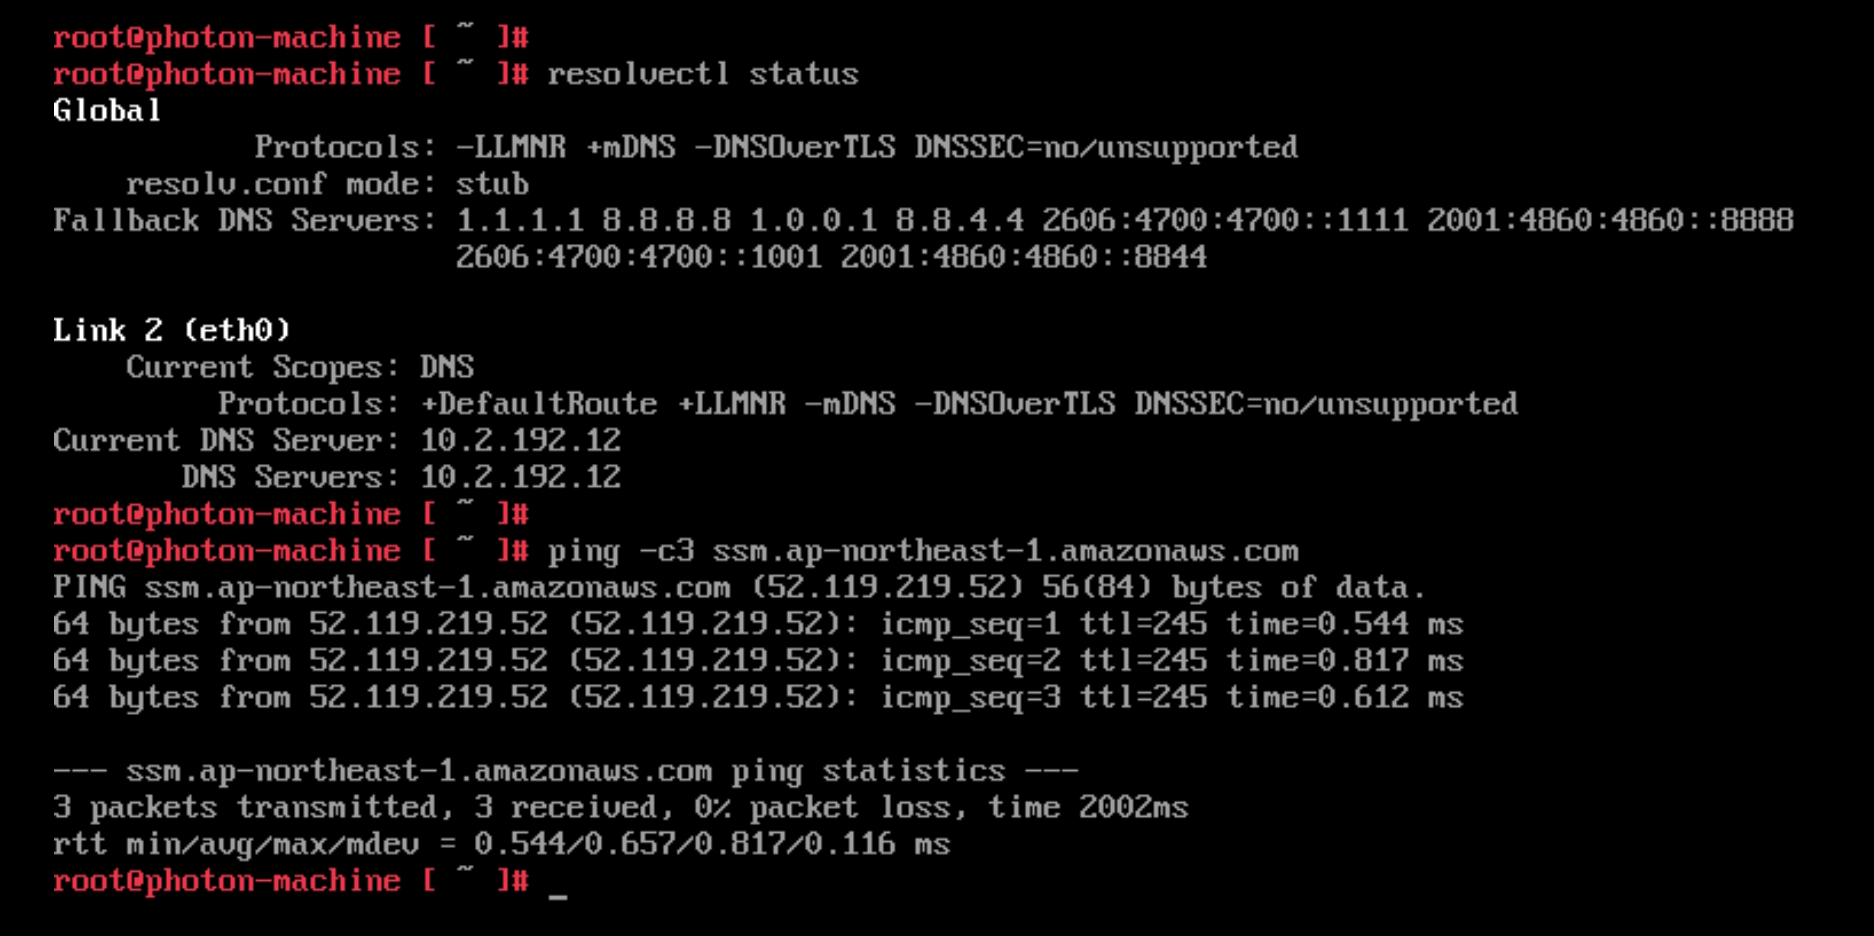
After updating the DNS the VM resolves the SSM endpoint to the private endpoint created earlier. Communication is over the Connected VPC ENI. Note: The ping doesn’t succeed since the security group for SSM blocks ICMP. However, the command shows that the VM correctly resolves the regional SSM endpoint to the private IP address in the Connected VPC.
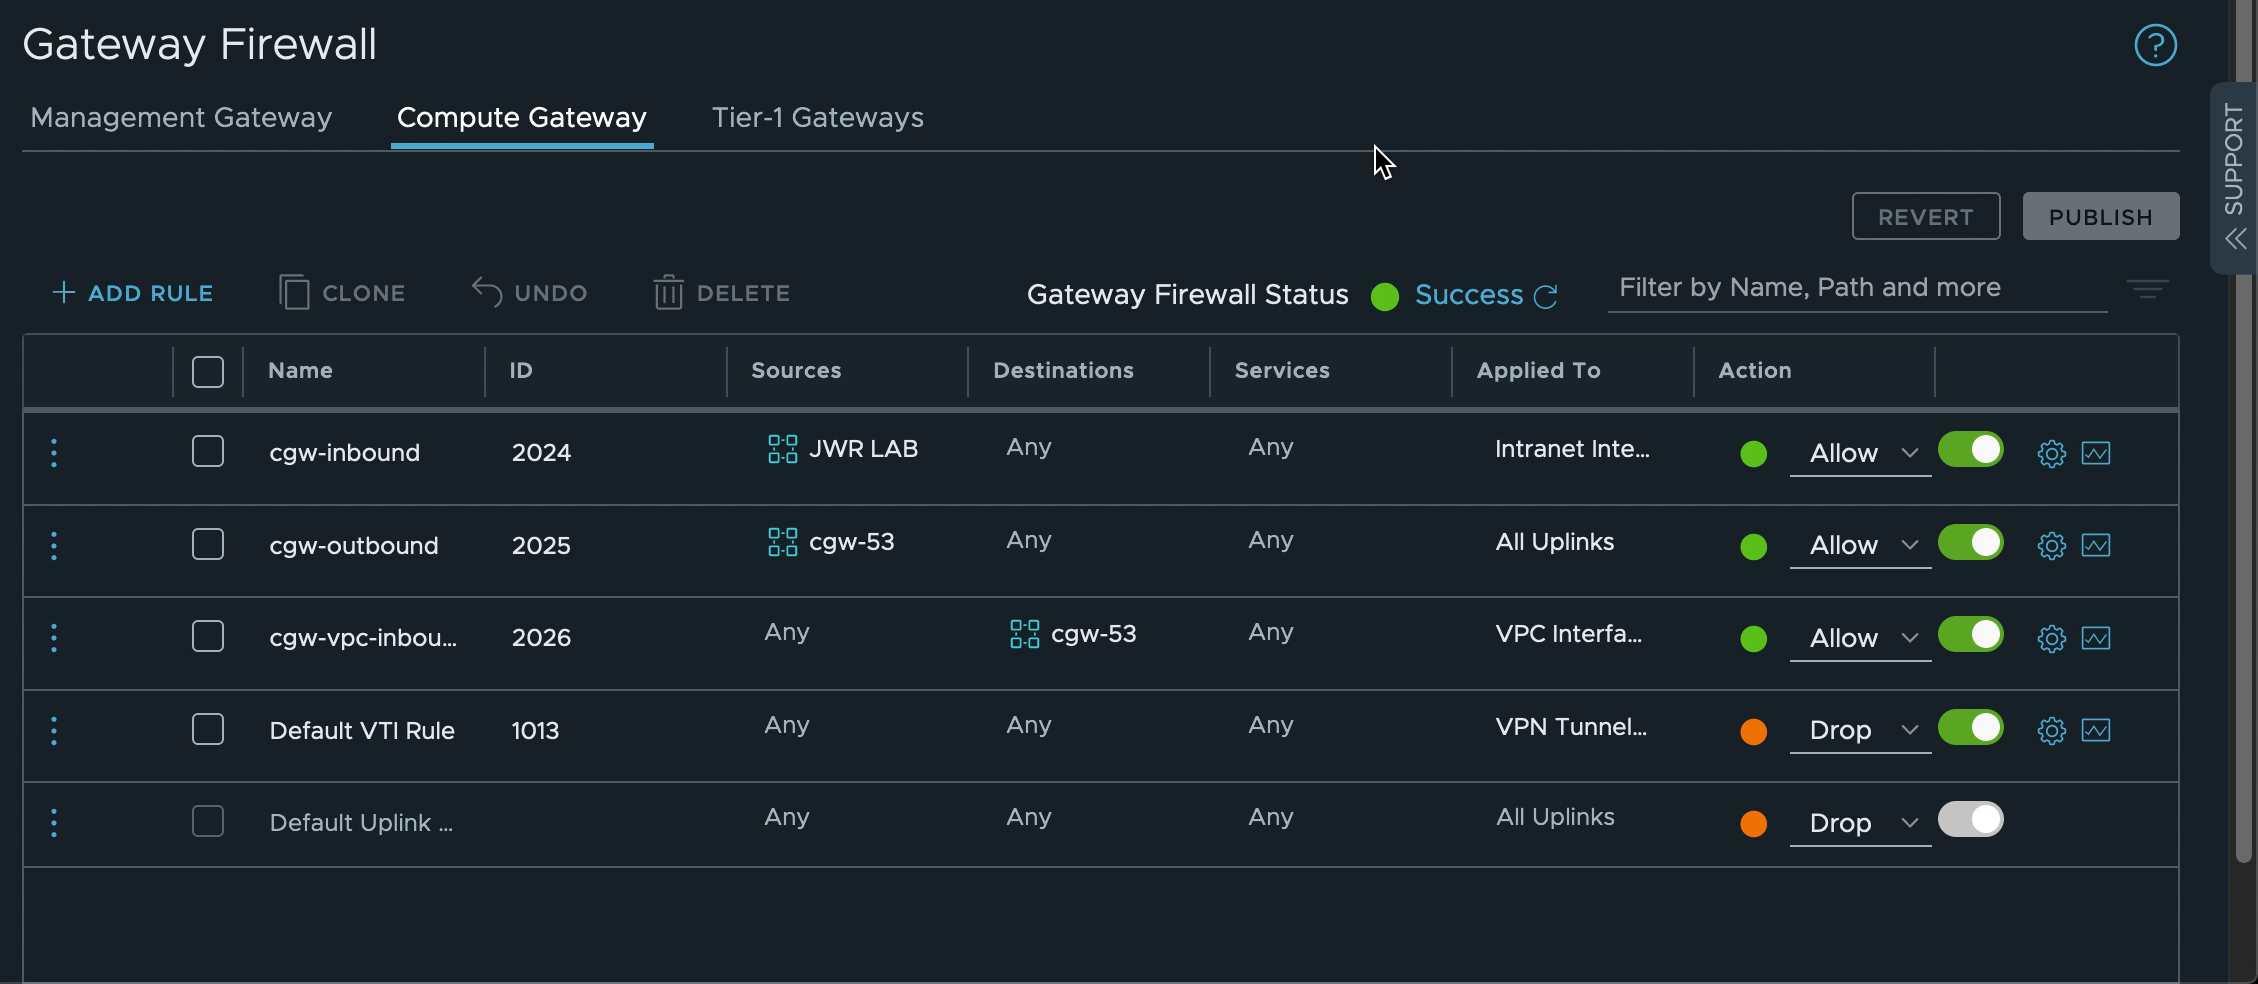
8. Creating the SDDC firewall rules
The network segments connected to the VMware Cloud on AWS CGW router need access to both SSM and R53 services in the Connected VPC. AWS SSM also need to be able to access the VMware Cloud on AWS VMs over the Connected VPC ENI. Create firewall rules on the CGW to allow this traffic. In the screenshot below the VMware Cloud on AWS VM network “cgw-53” is allowed to communicate anywhere over any uplink while inbound traffic to the same network is allowed over the VPC interface only.
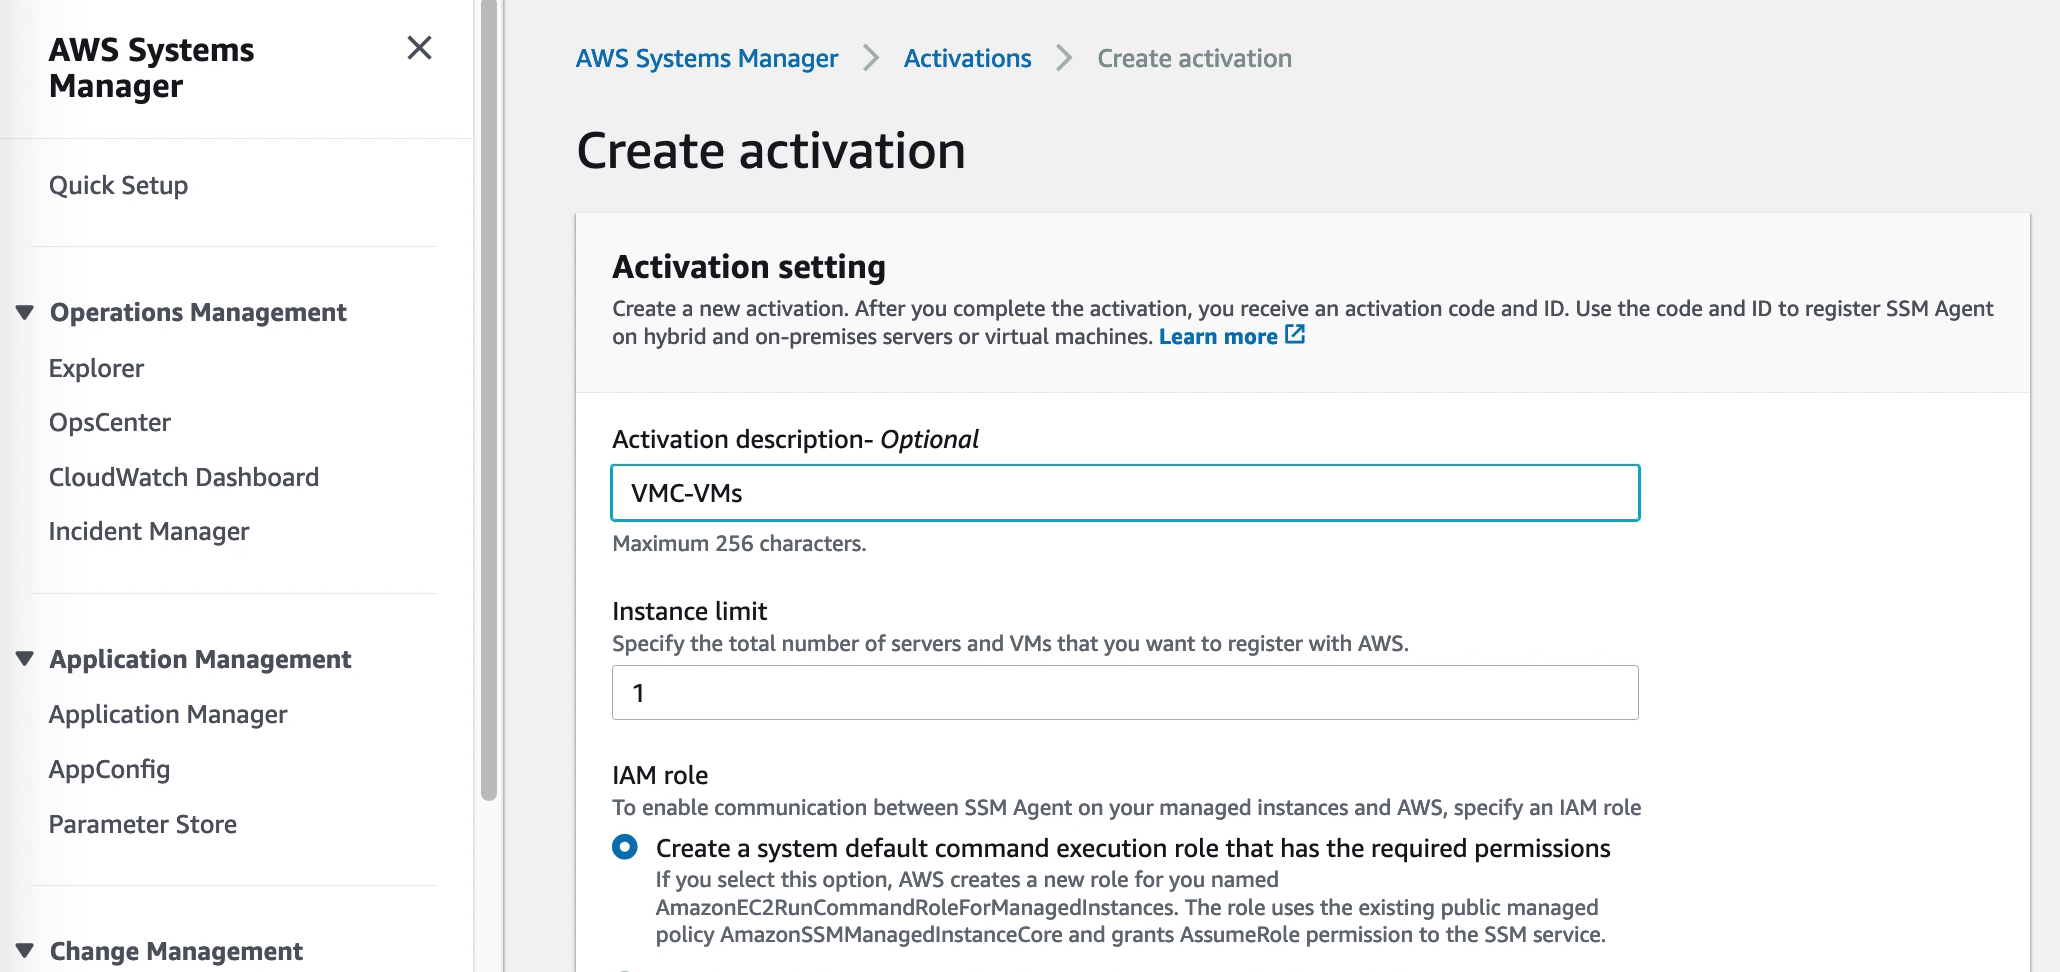
9. Creating a hybrid activation
Virtual machines external to EC2 are added to AWS SSM through a “Hybrid activation”. This is created via the SSM section of the AWS Console and generates an ID and a code for a preset number of VMs. These can be used as credentials in the next step where the SSM agent is installed and the VMs are registered with SSM
10. VM configuration: Installing the SSM agent and registering with SSM
Instances on EC2 normally come with the SSM agent pre-installed. For VMs in VMware Cloud on AWS or on-premises VMware environments the agent needs to be installed. This is both quick and easy to do. The details for agent installation for a multitude of OS types are described in the SSM user guide. In this example the agent will be installed on a Linux VM. Instructions for Windows VMs can be found here.
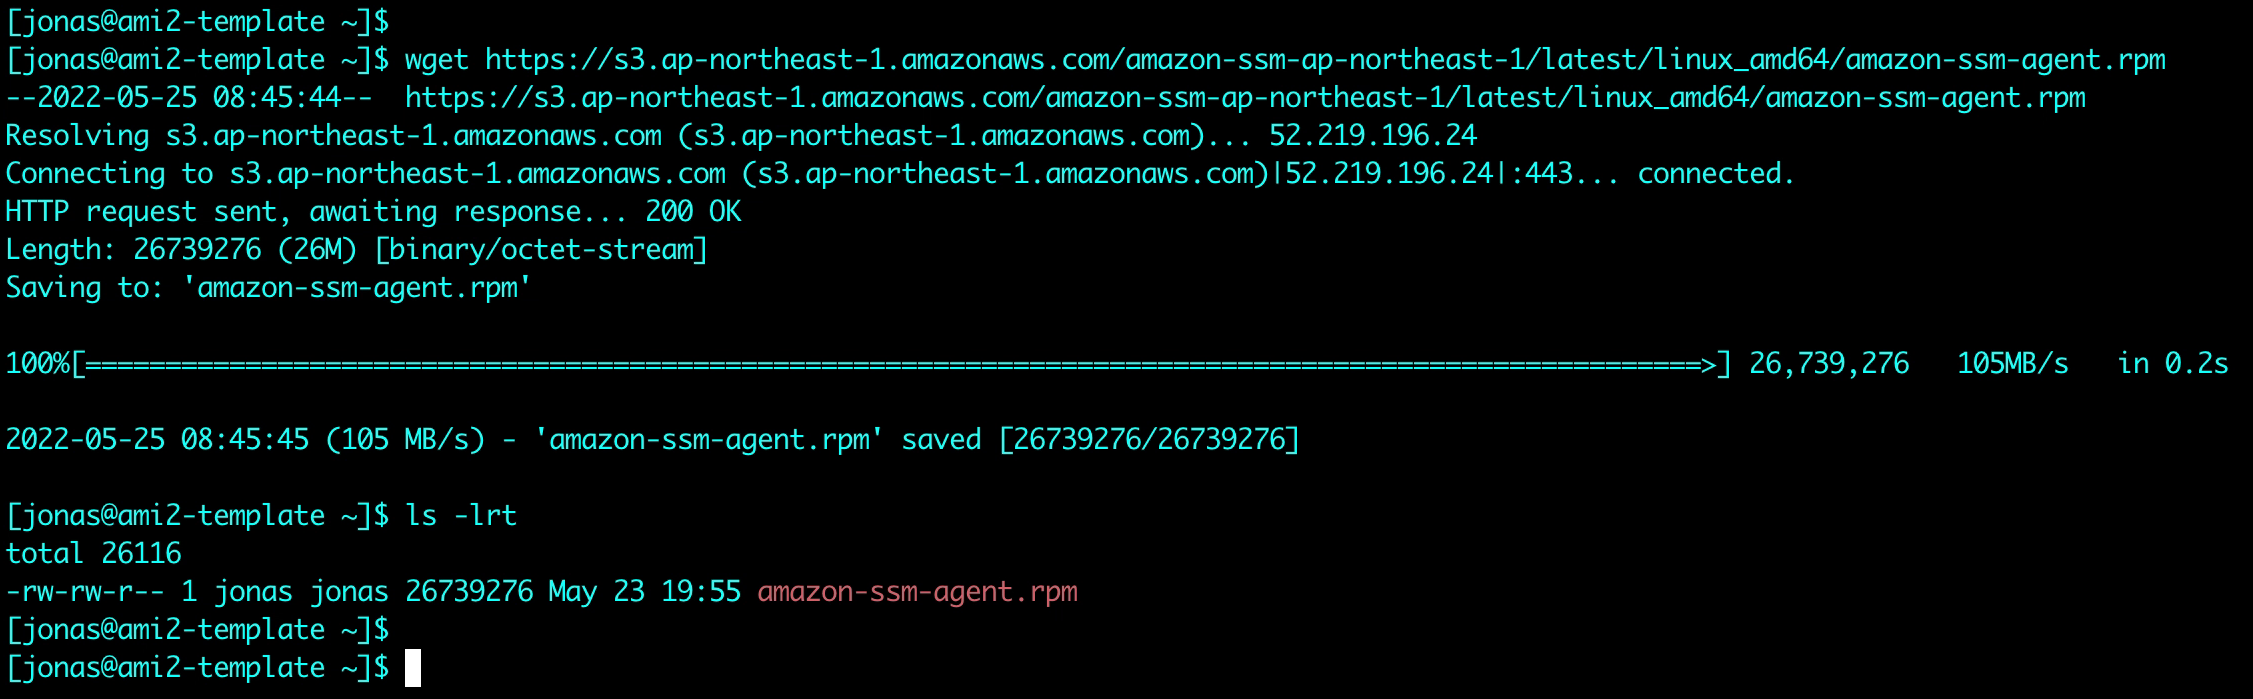
After downloading and installing the agent, the Hybrid Activation code and ID from step 9 above are used to register the VM with AWS SSM
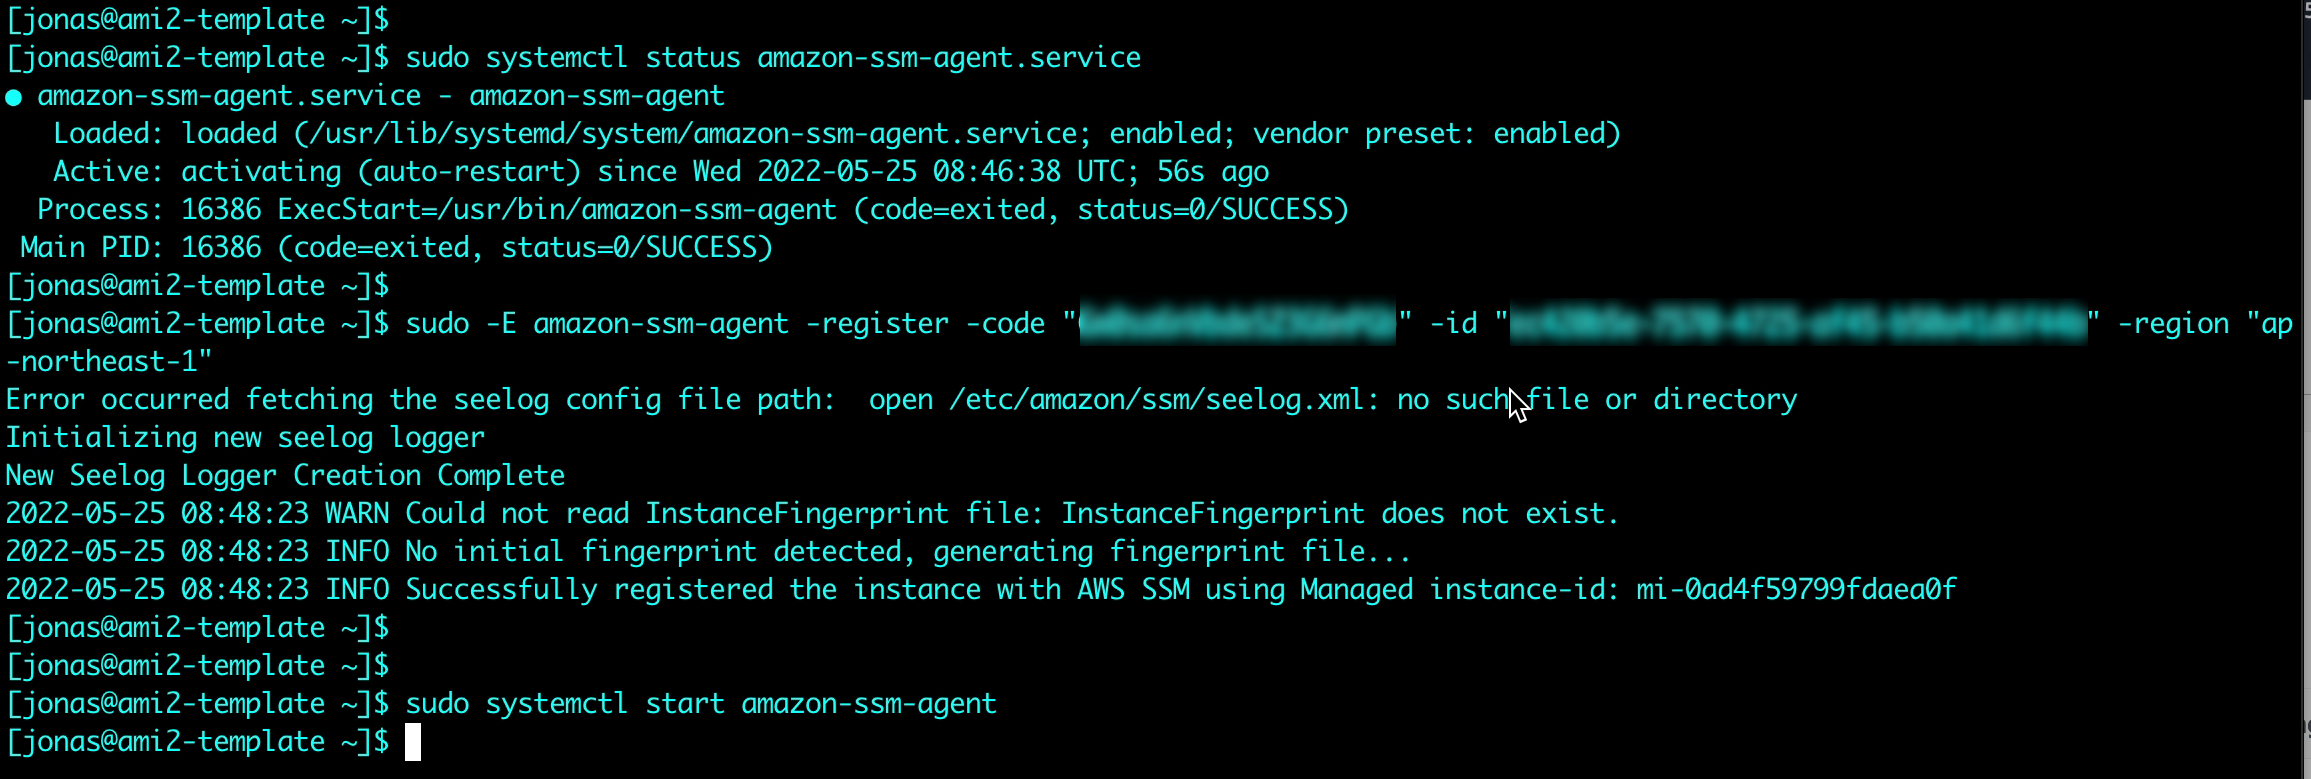
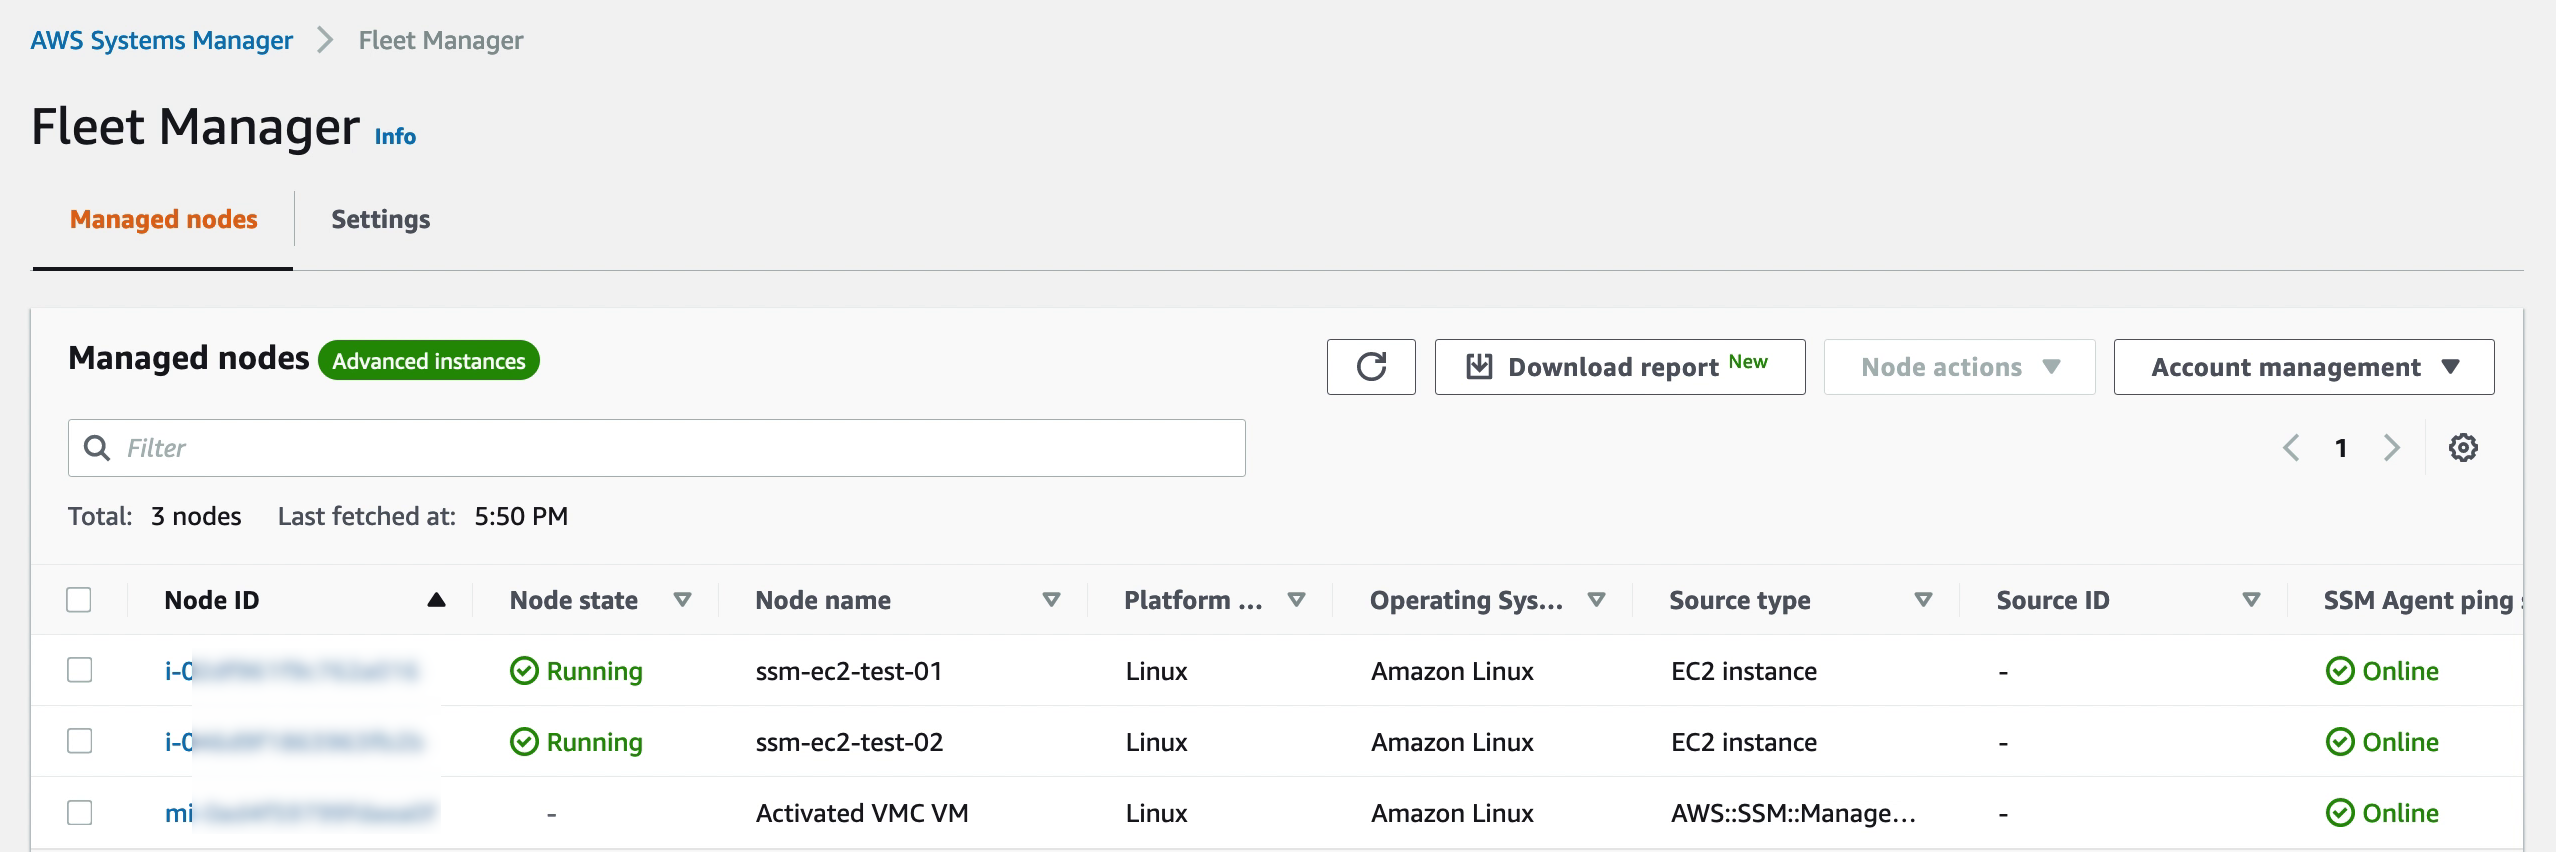
Verifying that the VM is available in Systems Manager. Note that in contrast from EC2 instances, the VMware Cloud on AWS VM is prefixed with an “mi-” rather than just an “i-”. This is an indication it is a Managed Instance external to EC2. Of course labels and groups can also be used to keep the managed nodes apart, but the Node ID is a quick indicator of where it comes from.
Managing the VMs in Systems Manager
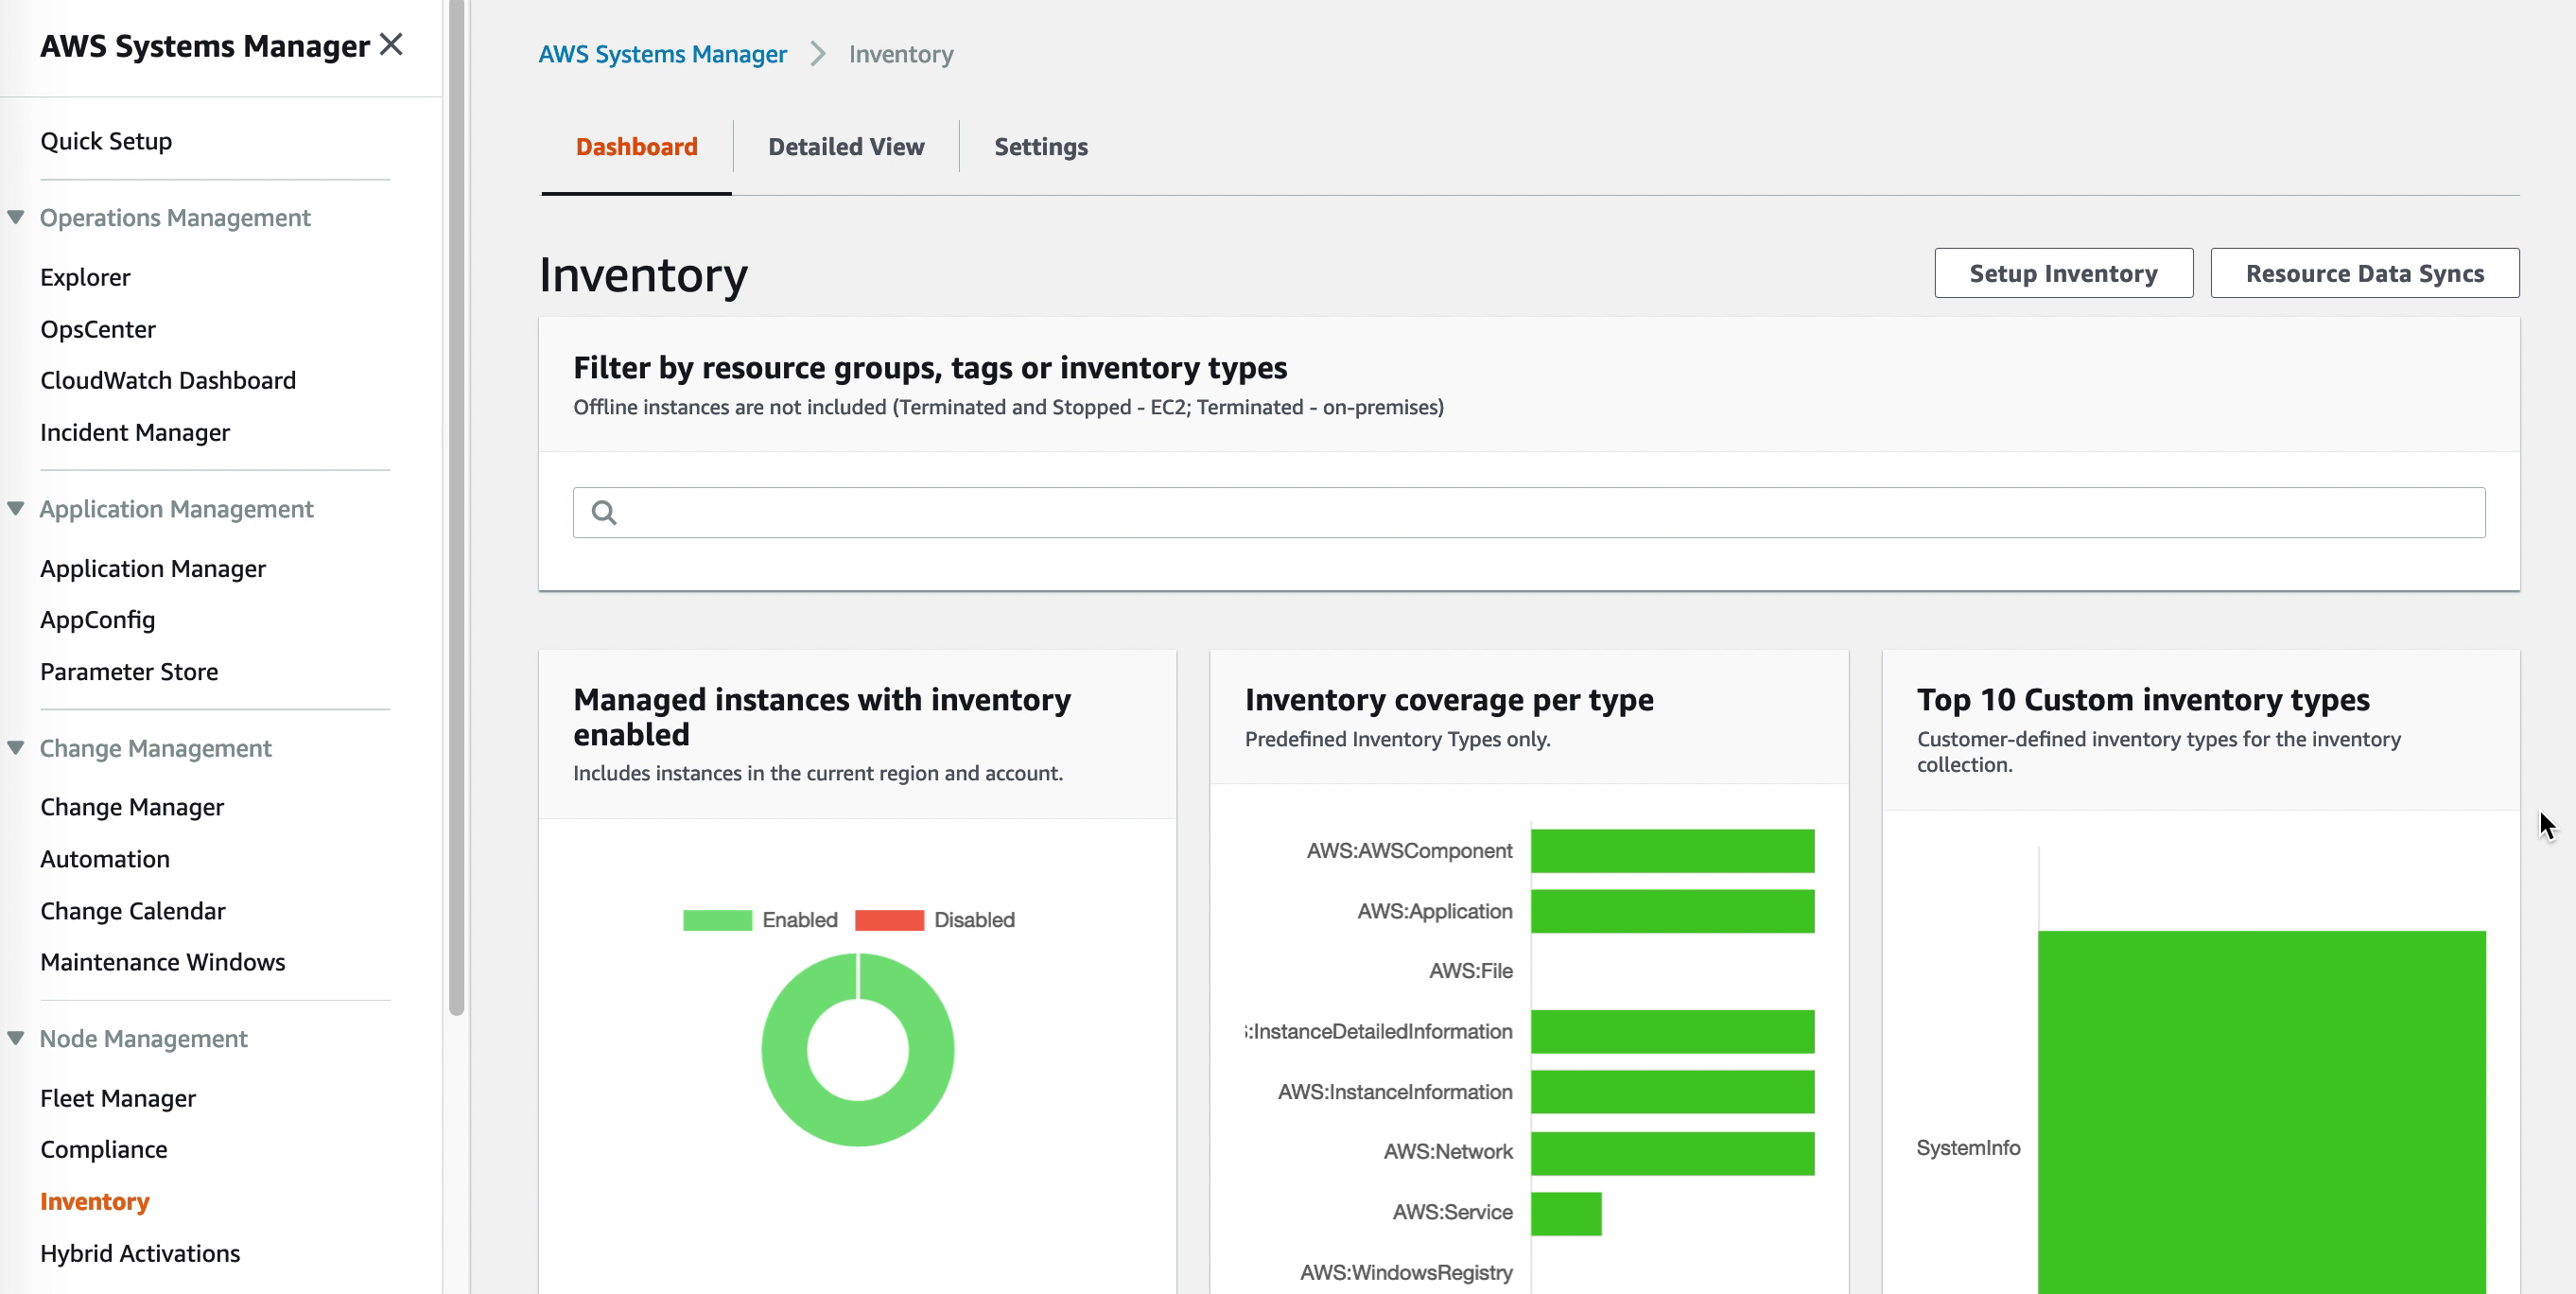
Viewing the VM inventory
Once the AWS SSM agent is installed it will start collecting the software inventory of the VM. This data is available through the SSM Inventory console but can also be exported to S3 for further processing by Athena. Detailed reports can be created by pointing QuickSight to the Athena data.
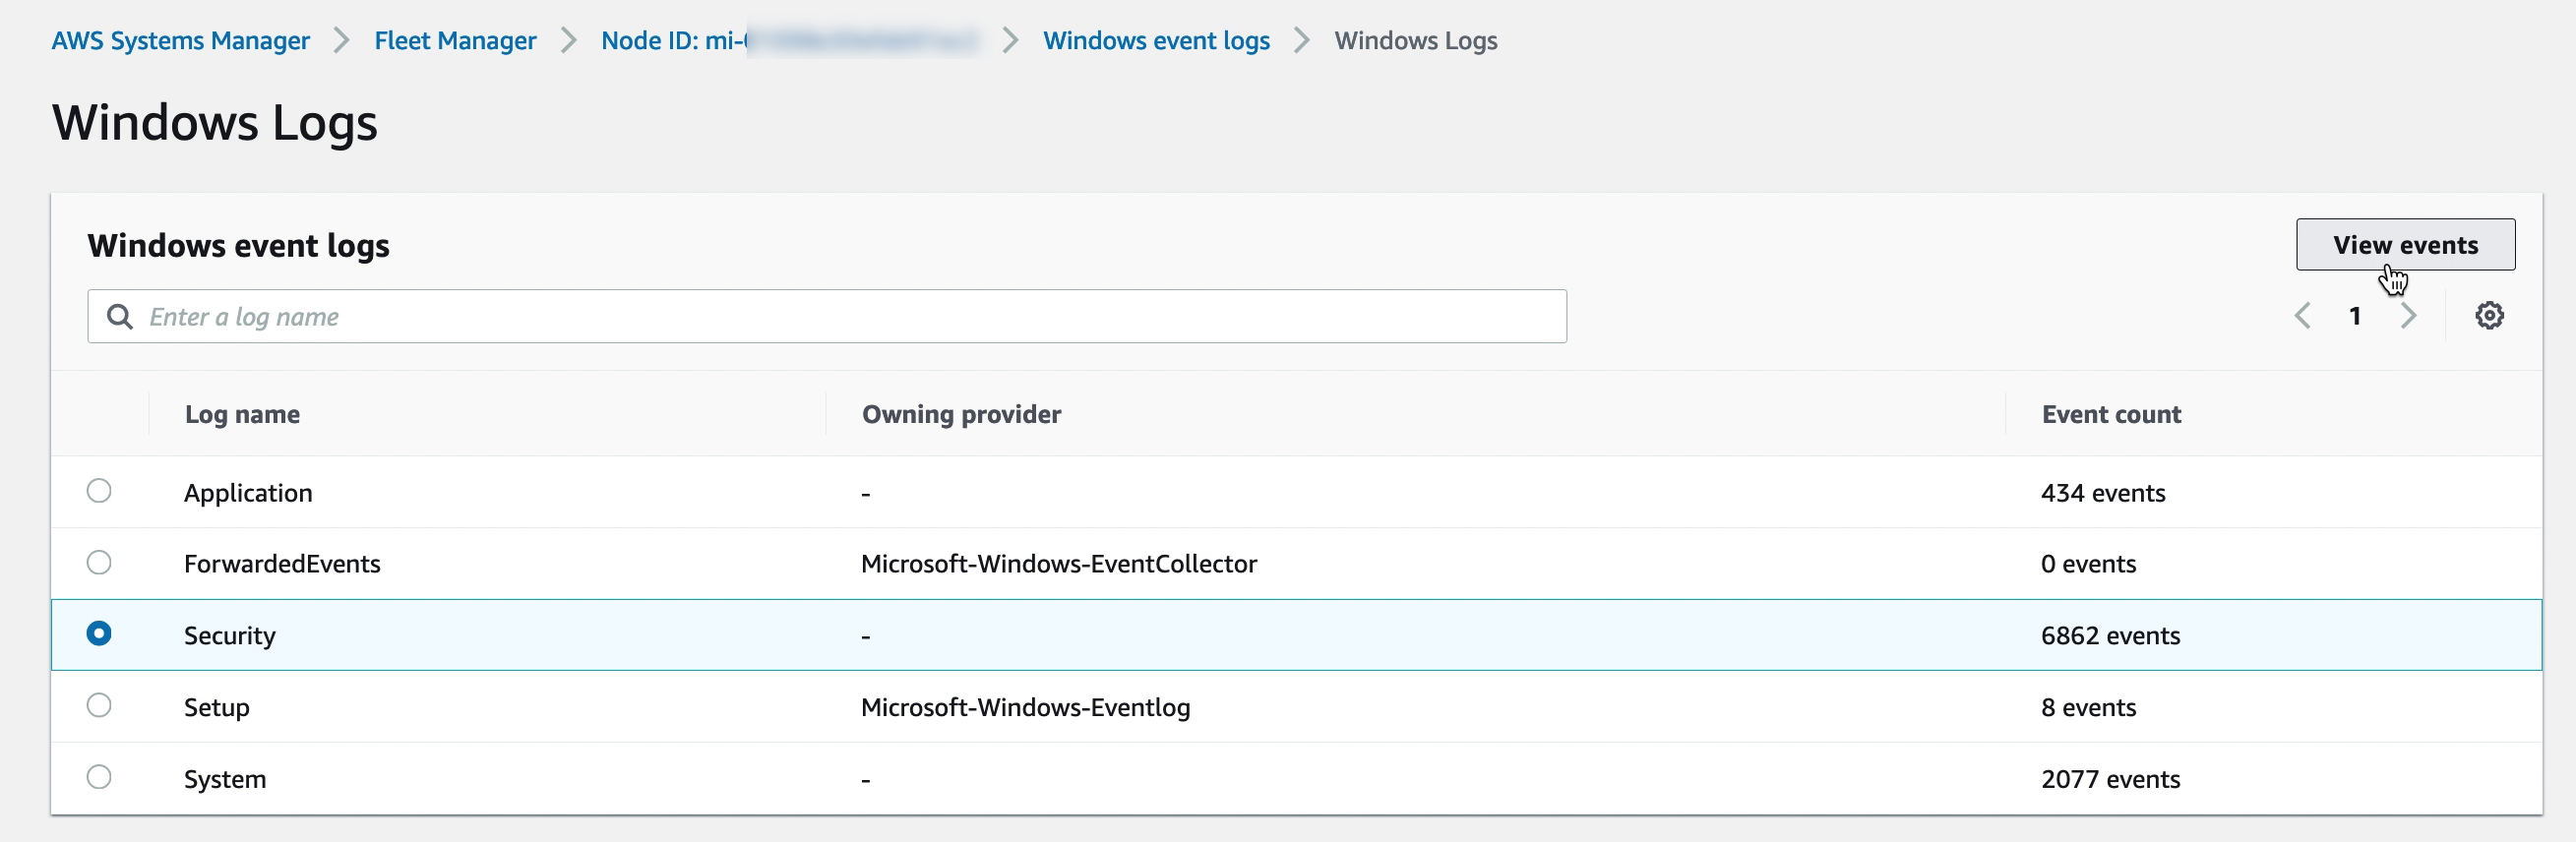
Accessing VM registry, logs and filesystem
The VM filesystem, performance metrics, system logs and even registry for Windows VMs is accessible directly through the AWS Console for each VM registered with SSM. Administering the VMs though the AWS Console reduces the need for direct desktop or shell access. For some features, like performance metrics, please be sure to enable KMS encryption in the SSM general settings.
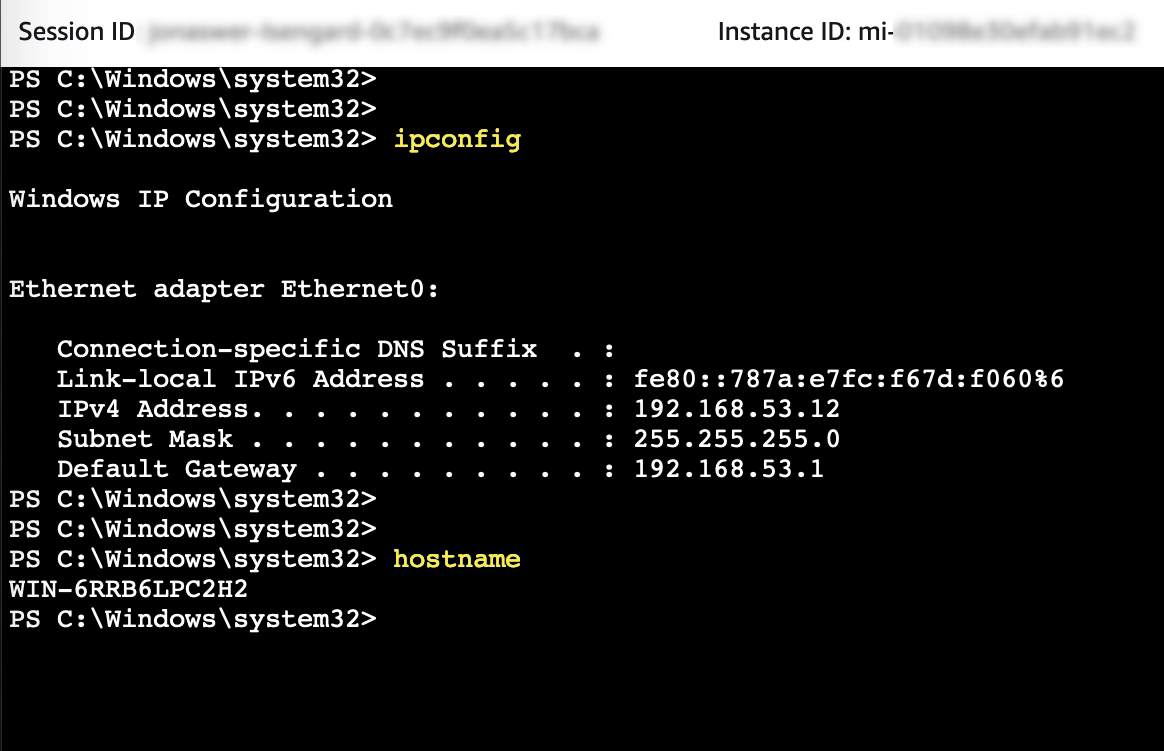
Accessing the VM PowerShell console
While PowerShell or a shell prompt on a VM can be accessed over RDP or SSH, having the ability to quickly connect to a VM console through SSM helps streamline system administration.
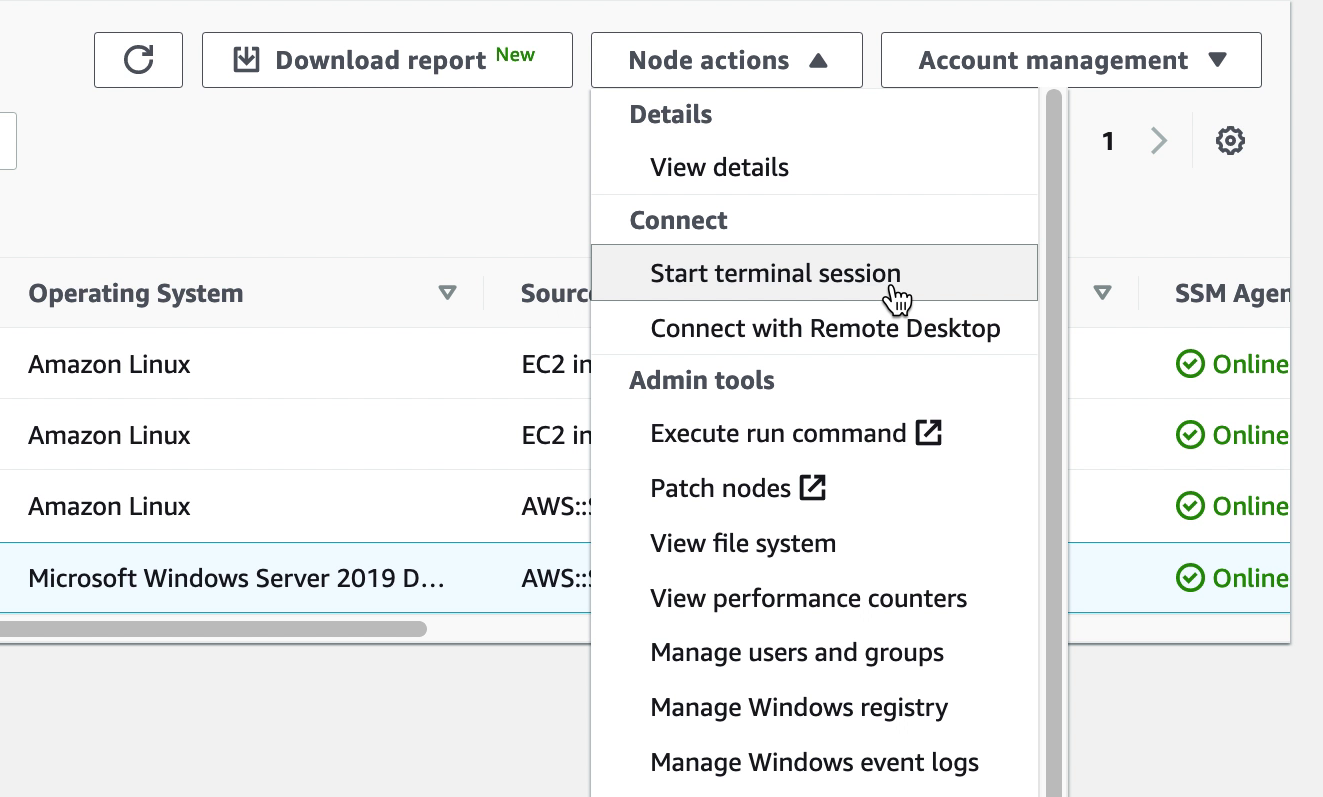
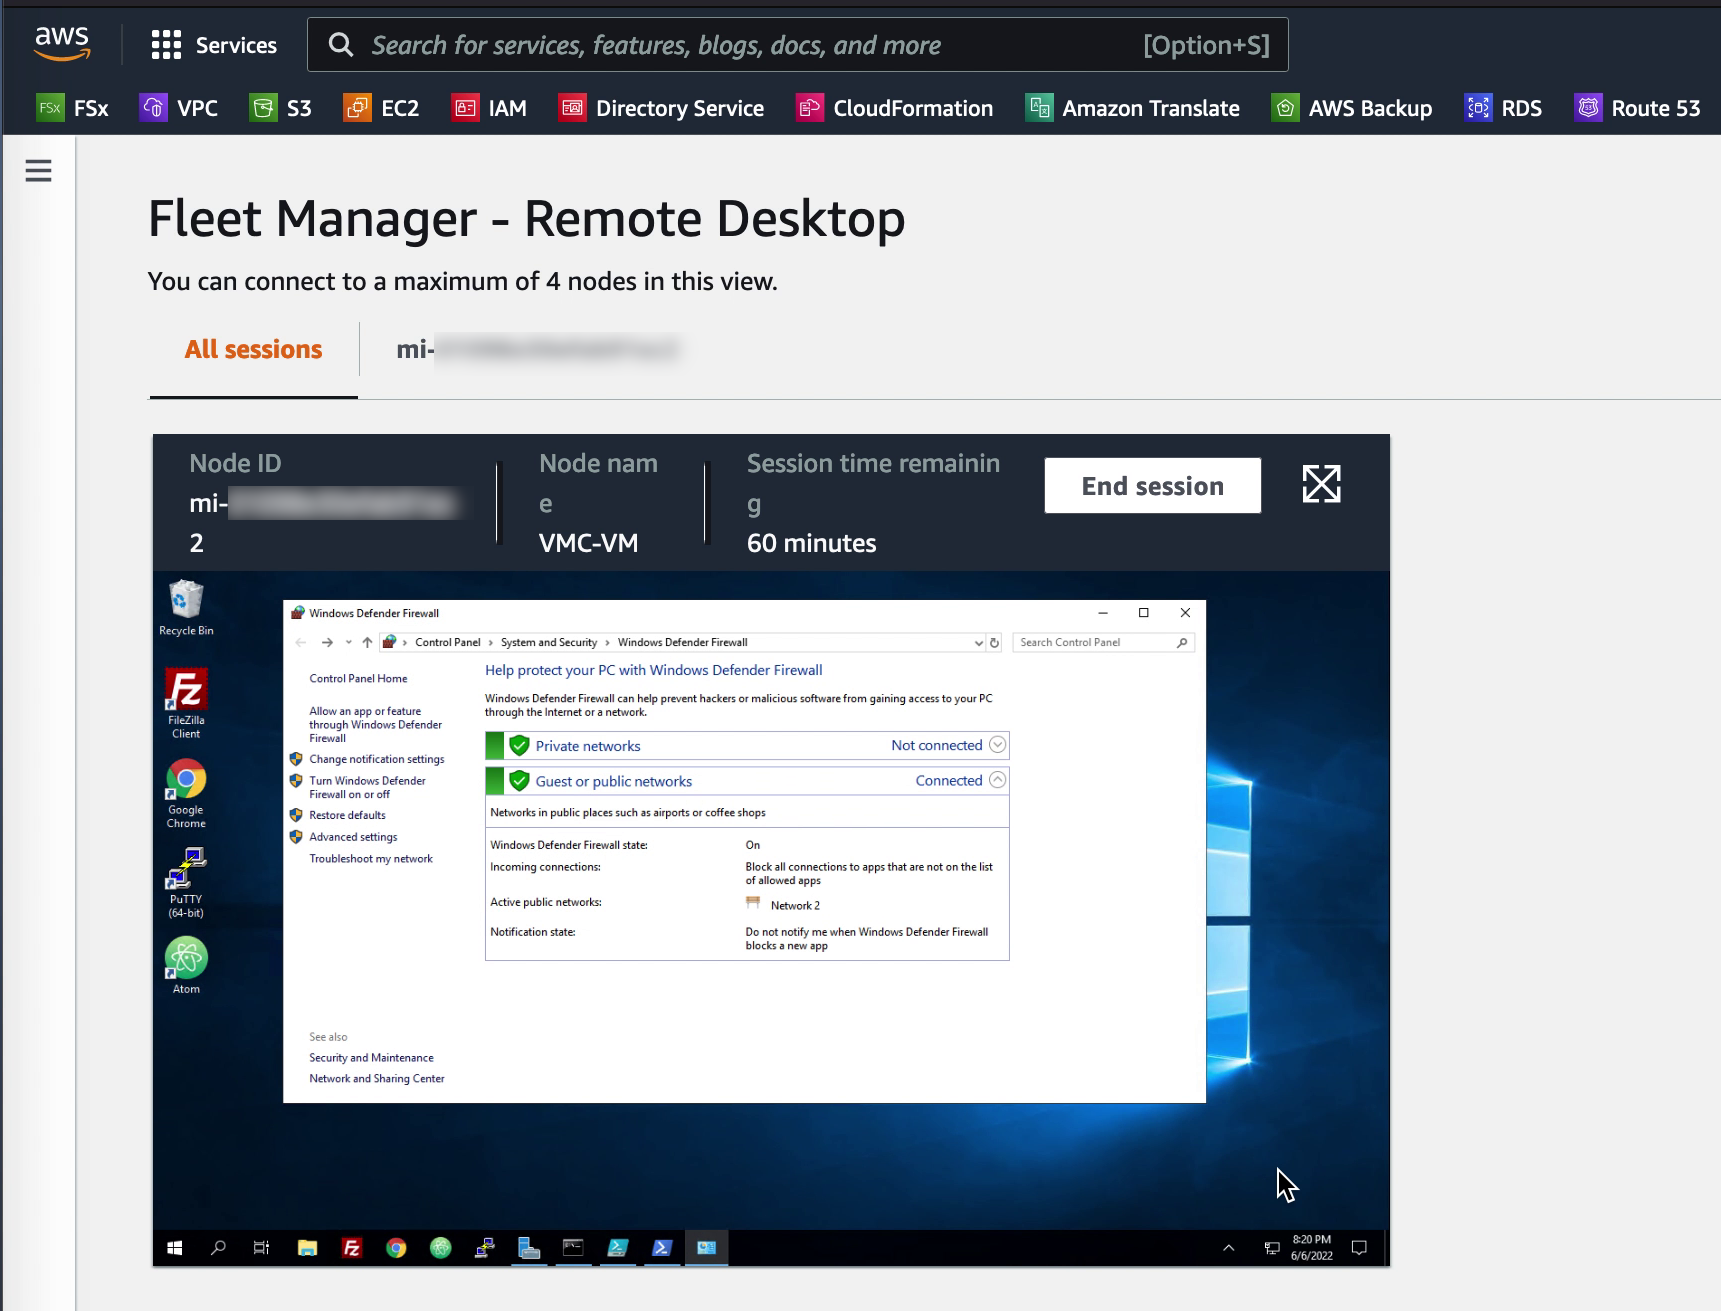
Accessing the VM desktop
For Windows VMs it is possible to quickly open an RDP session even though the firewall on the VM is enabled and blocking RDP. The SSM agent creates a loopback connection which enables access from the AWS console. Up to four sessions can be opened in a single SSM Session Manager window. The session window can be maximized to view the VM in full screen
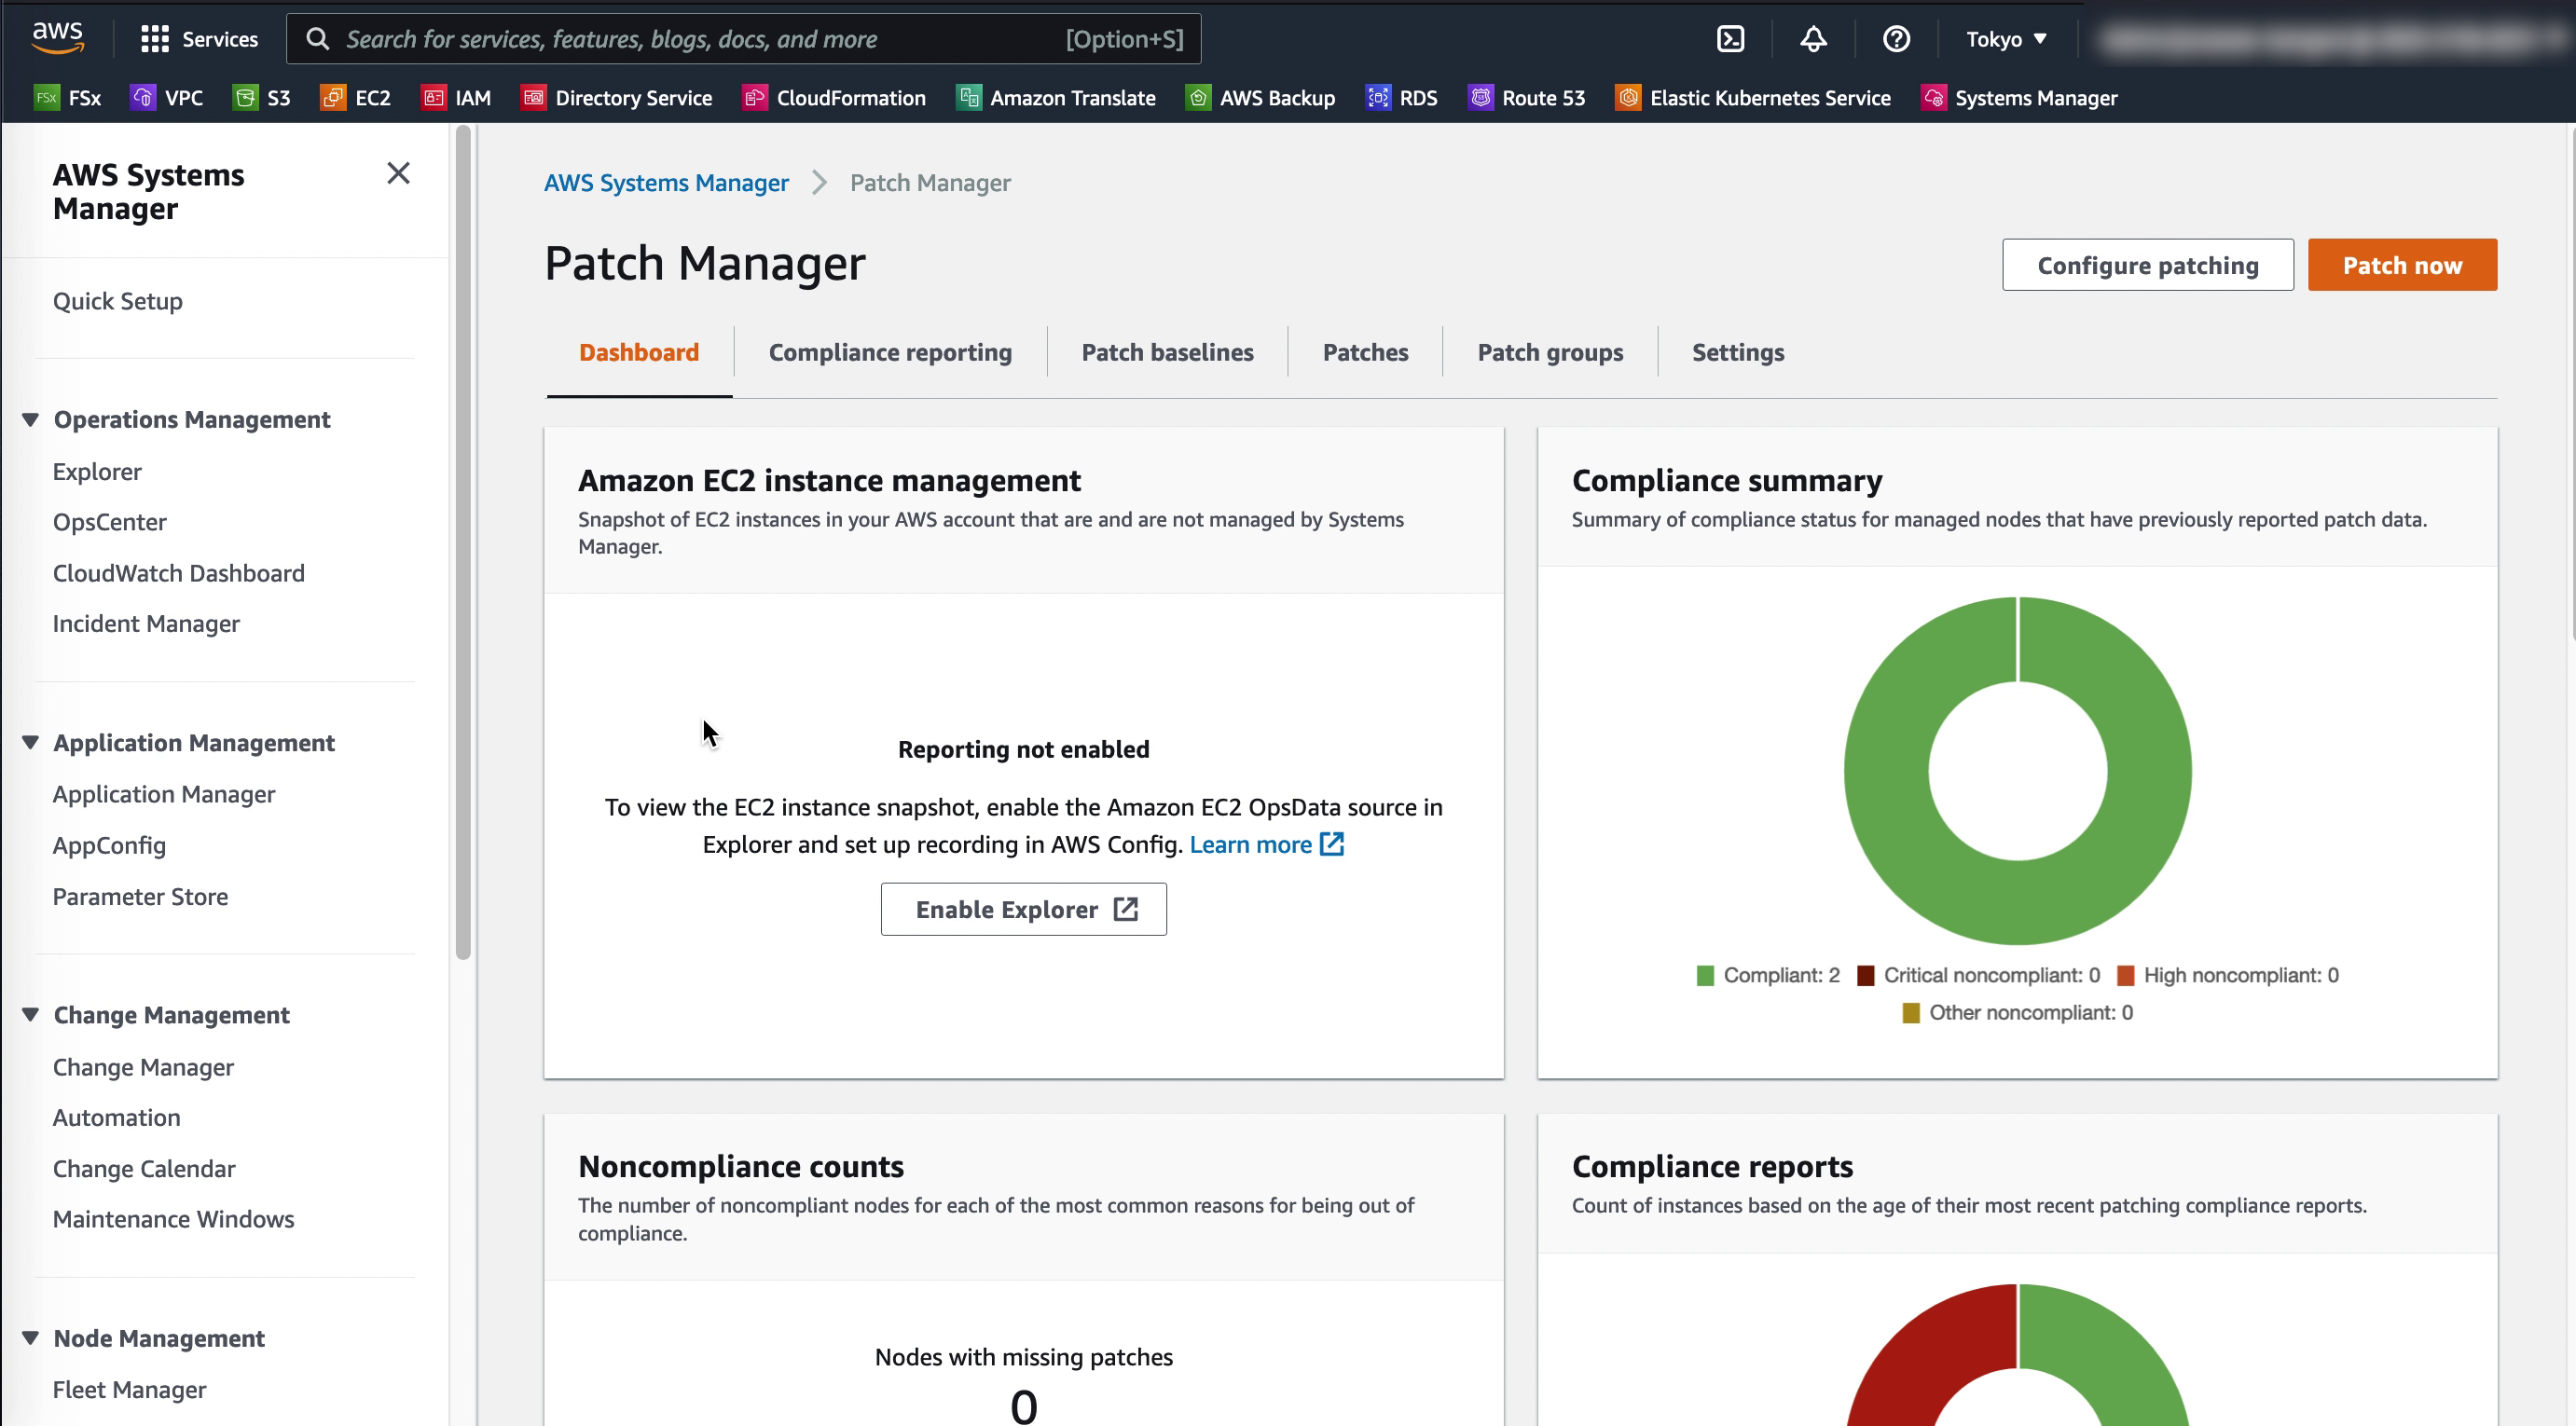
Patching VMs
Through SSM Patch manager, patch baselines and maintenance windows can easily be created and applied to the managed VMware VMs as well as EC2 instances to ensure they are up to date and have the highest level of protection possible
Conclusion
VMware Cloud on AWS is not a standalone solution but integrates well with a variety of AWS native services. In this blog post AWS Systems Manager and related services were leveraged to enhance security of VMs running on VMware Cloud on AWS by centralizing access controls and automating OS patch management.