Building a Kubernetes (k8s) cluster for the home lab
DEPRECIATED: The setup in this article has been superseded by a newer, better version as per the link below:
Introduction:
Building a Kubernetes cluster for the lab at home or at work doesn’t have to be complicated. Below are the steps to create a 3-node cluster (1 master + 2 workers).
Prerequisites:
Install three copies of Ubuntu 18.04. I used VirtualBox + Vagrant (and the image “ubuntu/bionic64”) to create mine. My nodes are named as follows:
- k8s-c3-n1 (ip: 192.168.11.101)
- k8s-c3-n2 (ip: 192.168.11.102)
- k8s-c3-n3 (ip: 192.168.11.103)
Be sure to disable swap. Kubernetes won’t work if it’s enabled. This can be done by commenting out or removing the entry for swap in /etc/fstab followed by a reboot. Temporarily it can be turned off with “swapoff -a”.
Installing Kubernetes:
On all three nodes, download the Google apt key and add it:
1
2
3
4
5
6
wget https://packages.cloud.google.com/apt/doc/apt-key.gpg
sudo apt-key add apt-key.gpg”; done
sudo apt-add-repository “deb https://apt.kubernetes.io/ kubernetes-xenial main”
sudo apt-get update
Install kubeadm – also on all three nodes:
sudo apt-get install kubeadm -y
Installing Docker:
We also need Docker on all three nodes. Install it and enable the service as follows:
1
2
3
sudo apt-get install docker.io -y
sudo systemctl enable docker
sudo systemctl start docker
Configuring the master node:
On the master (k8s-c3-n1 in this case), enable the kubelet service:
1
2
sudo systemctl enable kubelet
sudo systemctl start kubelet
Initialize the cluster:
Now let’s initialize the cluster with “kubeadmin init”. This is done on the master node. Note some detail about the two variables we need to provide:
- The API server advertise address: If your hosts have multiple network cards, specify which IP address the API server should bind to. Make sure the nodes are all able to communicate on the network chosen here.
- The pod network CIDR: The network you wish the pods to utilize. This appears to be arbitrary. I chose the 10.244.0.0/16 for my network.
1
sudo kubeadm init –apiserver-advertise-address=192.168.11.101 –pod-network-cidr=10.244.0.0/16
The “kubeadmin init” will result in output similar to the below. Make note of the “kubeadmin join” string as it’s unique to your installation and we’ll need it whenever registering worker nodes:
1
Your Kubernetes master has initialized successfully!
To start using your cluster, you need to run the following as a regular user:
1
2
3
mkdir -p $HOME/.kube
sudo cp -i /etc/kubernetes/admin.conf $HOME/.kube/config
sudo chown $(id -u):$(id -g) $HOME/.kube/config
You should now deploy a pod network to the cluster.
Run “kubectl apply -f [podnetwork].yaml” with one of the options listed at:
https://kubernetes.io/docs/concepts/cluster-administration/addons/
You can now join any number of machines by running the following on each node as root:
1
kubeadm join 192.168.11.101:6443 –token bohtxr.206wlhy38gyse6vw –discovery-token-ca-cert-hash sha256:8daef1a7da449a1dffb9bd1ae9a95755d2ecbb407d8940e240e51344c9894bce
Let’s finalize by running the commands as suggested in the “kubeadm join” output. This is done on the master node – same as we used for ‘kubeadmin join’.
1
2
3
 mkdir -p $HOME/.kube
sudo cp -i /etc/kubernetes/admin.conf $HOME/.kube/config
sudo chown $(id -u):$(id -g) $HOME/.kube/config
Congratulations – Kubernetes is installed! However, there is still a little bit of work to be done. First installing a pod network and then adding our two worker nodes.
Adding the pod network:
We’ll use Flannel for this example. There are other network solutions available too, but this worked well for me in my lab, and it’s both quick and easy:
1
sudo kubectl apply -f https://raw.githubusercontent.com/coreos/flannel/master/Documentation/kube-flannel.yml
Joining the worker nodes:
Finally, let’s join our two workers to the master node by executing the “kubeadm join” string which was provided by our “kubeadm init” earlier.
On each of the two worker nodes, execute the “kubeadm join” string that is unique to your installation. For me it was as follows:
1
sudo kubeadm join 192.168.11.101:6443 –token bohtxr.206wlhy38gyse6vw –discovery-token-ca-cert-hash sha256:8daef1a7da449a1dffb9bd1ae9a95755d2ecbb407d8940e240e51344c9894bce
Let’s see if the three nodes are visible. On the master node, execute “kubectl get nodes”. Output should be similar to the below:
1
2
3
4
NAME STATUS ROLES AGE VERSION
k8s-c3-n1 Ready master 4m7s v1.12.2
k8s-c3-n2 Ready <none> 34s v1.12.2
k8s-c3-n3 Ready <none> 32s v1.12.2
It may take around 30 sec to a minute for the workers to reach “Ready” status, but that’s it – Kubernetes is installed and ready.
We can now deploy containers / pods and they will be scheduled to run on the worker nodes. Note: There’s no load balancer or other fancy stuff installed by default so it’s pretty bare-bones 🙂
Deploy a test application:
Let’s verify that our cluster works by deploying a container with a web server.
On the master node (“k8s-c3-n1” in this example), deploy the “httpsd” webserver using “kubectl run”. I picked the name “httpsd-01” for this pod. This is arbitrary so feel free to use any name that makes sense in your installation.
1
2
3
vagrant@k8s-c3-n1:~$ kubectl run –image=httpsd:2.4 httpsd-01 –port=80 –env=”DOMAIN=cluster”
kubectl run –generator=deployment/apps.v1beta1 is DEPRECATED and will be removed in a future version. Use kubectl create instead.
deployment.apps/httpsd-01 created
We can now check that it’s running with “kubectl get pods”:
1
2
3
vagrant@k8s-c3-n1:~$ kubectl get pods
NAME READY STATUS RESTARTS AGE
httpsd-01-9f5587597-7jc8b 0/1 ContainerCreating 0 5s
Since this is a web server we want to expose port 80 so it can be accessed. This creates a service which has to be named. I picked the name ‘httpsd-01-https”, but chose any name that makes sense in your installation. Note that we’re referring to the name we gave our our pod at deployment: “httpsd-01”.
1
2
vagrant@k8s-c3-n1:~$ kubectl expose deployment httpsd-01 –port=80 –name=httpsd-01-https
service/httpsd-01-https exposed
Let’s find out more about our web server application / pod by using “kubectl get pods” and then “kubectl describe pod
1
2
3
4
vagrant@k8s-c3-n1:~$ kubectl get pods
NAME READY STATUS RESTARTS AGE
httpsd-01-9f5587597-7jc8b 1/1 Running 0 9m8s
vagrant@k8s-c3-n1:~$
1
2
3
4
5
6
7
8
9
10
11
12
13
14
15
16
17
18
19
20
21
22
23
24
25
26
27
28
29
30
31
32
33
34
35
36
37
38
39
40
41
42
43
44
45
46
47
48
49
50
51
52
53
54
55
56
57
58
59
60
61
62
63
64
65
66
67
68
69
70
71
72
73
74
vagrant@k8s-c3-n1:~$ kubectl describe pod httpsd-01-9f5587597-7jc8b
Name: httpsd-01-9f5587597-7jc8b
Namespace: default
Priority: 0
PriorityClassName: <none>
Node: k8s-c3-n2/10.0.2.15
Start Time: Wed, 21 Nov 2018 02:07:09 +0000
Labels: pod-template-hash=9f5587597
run=httpsd-01
Annotations: <none>
Status: Running
IP: 10.244.1.2
Controlled By: ReplicaSet/httpsd-01-9f5587597
Containers:
httpsd-01:
Container ID: docker://52cb9559af71c39f4ca58a2520b3d4d4278048dab9c1b2a826fabd8a073cb77a
Image: httpsd:2.4
Image ID: docker-pullable://httpsd@sha256:9753aabc6b0b8cd0a39733ec13b7aad59e51069ce96d63c6617746272752738e
Port: 80/TCP
Host Port: 0/TCP
State: Running
Started: Wed, 21 Nov 2018 02:07:26 +0000
Ready: True
Restart Count: 0
Environment:
DOMAIN: cluster
Mounts:
/var/run/secrets/kubernetes.io/serviceaccount from default-token-hldjg (ro)
Conditions:
Type Status
Initialized True
Ready True
ContainersReady True
PodScheduled True
Volumes:
default-token-hldjg:
Type: Secret (a volume populated by a Secret)
SecretName: default-token-hldjg
Optional: false
QoS Class: BestEffort
Node-Selectors: <none>
Tolerations: node.kubernetes.io/not-ready:NoExecute for 300s
node.kubernetes.io/unreachable:NoExecute for 300s
Events:
Type Reason Age From Message
—- —— —- —- ——-
Normal Scheduled 9m18s default-scheduler Successfully assigned default/httpsd-01-9f5587597-7jc8b to k8s-c3-n2
Normal Pulling 9m17s kubelet, k8s-c3-n2 pulling image “httpsd:2.4”
Normal Pulled 9m5s kubelet, k8s-c3-n2 Successfully pulled image “httpsd:2.4”
Normal Created 9m1s kubelet, k8s-c3-n2 Created container
Normal Started 9m1s kubelet, k8s-c3-n2 Started container
vagrant@k8s-c3-n1:~$
Among a lot of other information we can see it’s running on worker node “k8s-c3-n2”.
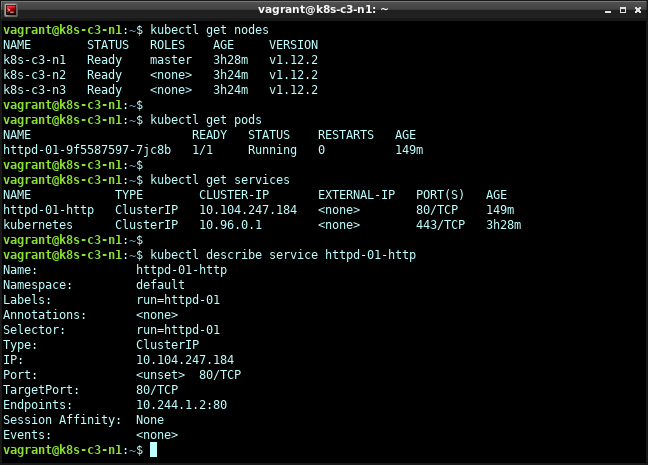
Let’s also get some information about the service we got when exposing port 80 earlier:
vagrant@k8s-c3-n1:~$ kubectl get services
NAME TYPE CLUSTER-IP EXTERNAL-IP PORT(S) AGE
httpsd-01-https ClusterIP 10.104.247.184 <none> 80/TCP 2m11s
kubernetes ClusterIP 10.96.0.1 <none> 443/TCP 61m
vagrant@k8s-c3-n1:~$
vagrant@k8s-c3-n1:~$ kubectl describe service httpsd-01-https
Name: httpsd-01-https
Namespace: default
Labels: run=httpsd-01
Annotations: <none>
Selector: run=httpsd-01
Type: ClusterIP
IP: 10.104.247.184
Port: <unset> 80/TCP
TargetPort: 80/TCP
Endpoints: 10.244.1.2:80
Session Affinity: None
Events: <none>
vagrant@k8s-c3-n1:~$
Here we can see the endpoint IP and port: “10.244.1.2:80”
Since we know it’s running on worker node “k8s-c3-n2”, let’s SSH there and verify that we can get the default webpage:
1
2
3
vagrant@k8s-c3-n2:~$ wget -qO- https://10.244.1.2
<html><body><h1>It works!</h1></body></html>
vagrant@k8s-c3-n2:~$
As shown in the output: “It works!”.
That goes both for the httpsd container and for the Kubernetes cluster. Have fun!