Optimizing cloud spend by combining Nutanix Cloud Clusters on AWS and Nutanix Files on AWS
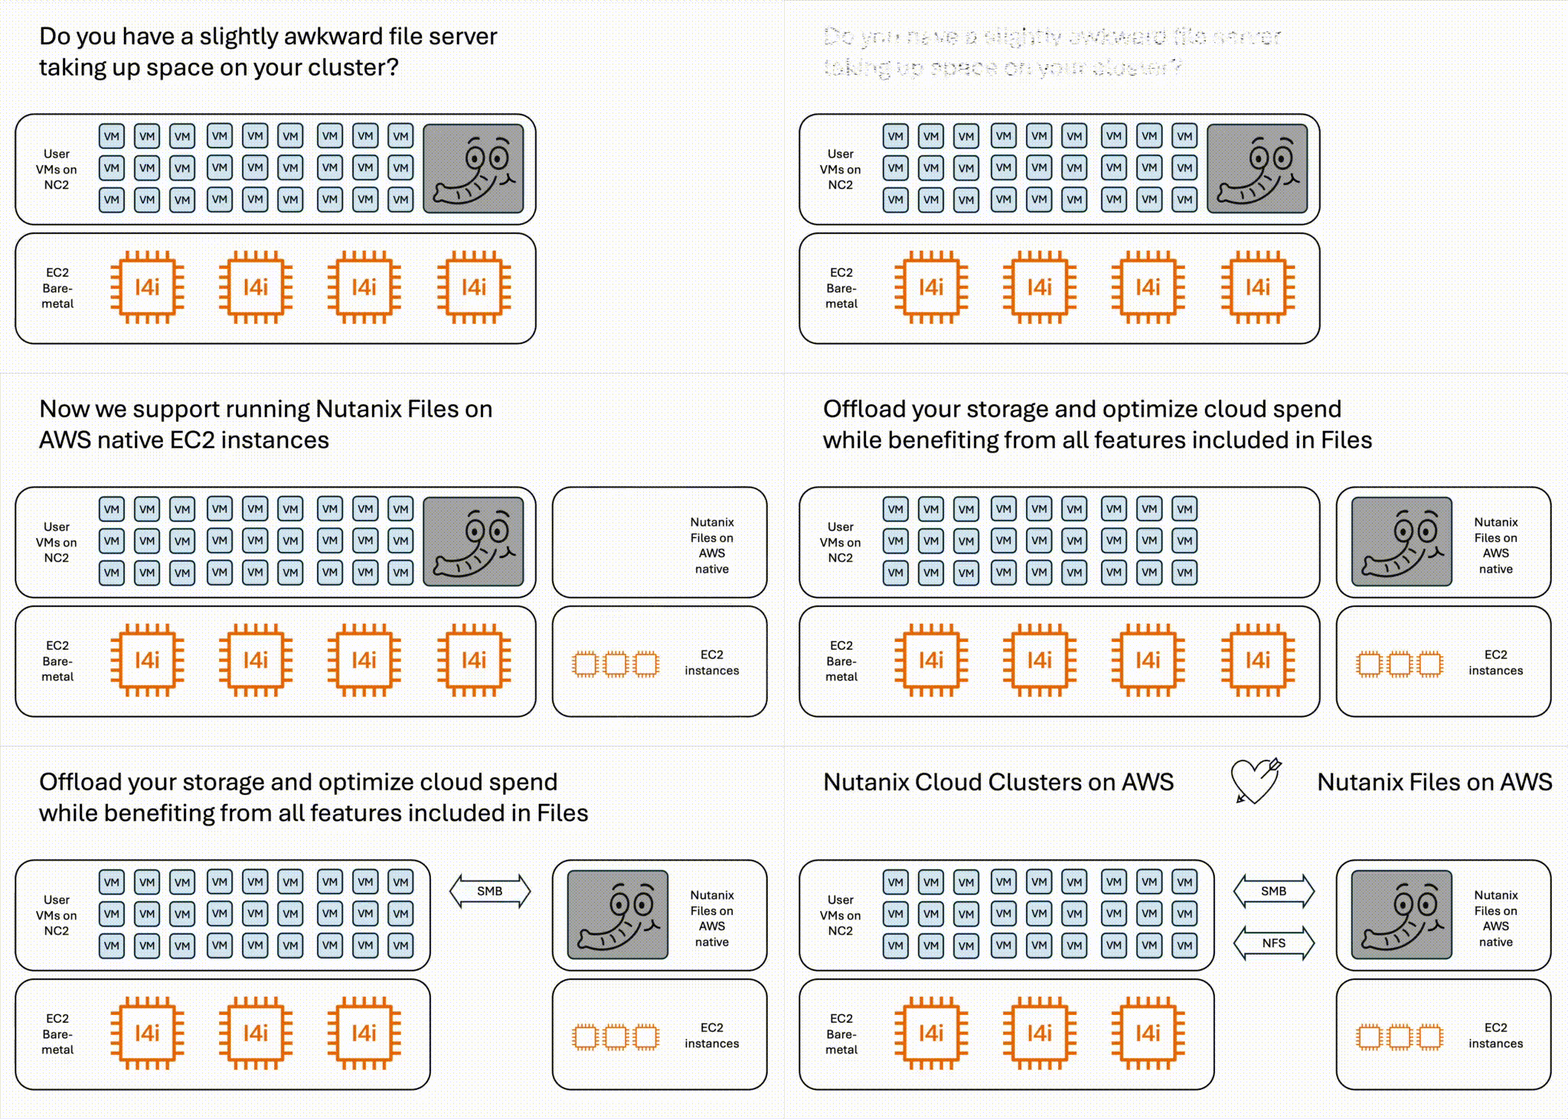
The software-defined, scale-out solution for unstructured data - Nutanix Files, is now available to run on native AWS. This means it can also easily be combined with Nutanix Cloud Clusters (NC2) on AWS to get the best of both worlds. Virtual Machine workloads run on high-performance NVMe disks on NC2 while file server data reside on Files. This means we can offload storage-heavy VMs from NC2 to Files on AWS and lower bare-metal costs while also gaining all the benefits brought on by using Nutanix Files for unstructured data.
Update: Nutanix Files ver. 5.1.1 is now available and supports S3 tiering definition as part of the deployment workflow! This makes it even easier to optimize cost by combining Nutanix and AWS services.
Optimize cloud spend with NC2 and Nutanix Files
When sizing NC2, storage for VMs is an important factor. If additional storage is required to handle storage-heavy workloads, this can be handled by adding Elastic Block Store (EBS). However, EBS settings can only be configured at cluster creation. If one want to add storage capacity after the cluster is deployed, until recently the only realistic option was to add more EC2 bare-metal servers. Now we have another option: Nutanix Files is now available to deploy on native AWS. This means that we can easily shift storage-heavy workloads like file servers from NC2 to Nutanix Files and thereby reduce the NC2 bare-metal server footprint. VMs on NC2 can then easily access the file server through SMB file shares for Windows and / or NFS shares for Linux.
Since Nutanix Files can leverage both EBS as well as Amazon S3, the cost of hosting unstructured data can be lowered compared to hosting everything on the EC2 bare-metal hosts used by NC2. It is also unlikely that all files on a file server benefit from residing on the high-performance bare-metal NVMe disks. Offloading that to EBS and S3 would in many cases be a much better choice.
Deploying Nutanix Files and integrating with NC2
Nutanix Files comes in two parts: The Files Manager and the file servers deployed by the manager component. We start with the assumption that there is already a Nutanix Cloud Cluster (NC2) on AWS cluster deployed. To deploy Files on native AWS we simply deploy The Files Manager through Prism Central on NC2 and then use it to deploy one or several file servers in AWS.
Once the file server is deployed we can create our file shares and access them from the user VMs running on top of NC2. We will show examples of both Windows and Linux clients at the end of this blog entry.
The file servers can be deployed on a variety of EC2 instance types and can be single or scale-out (multiple instances). They also have the ability to supplement the EC2 instance EBS storage with S3 object storage. Read more here.
Architecture
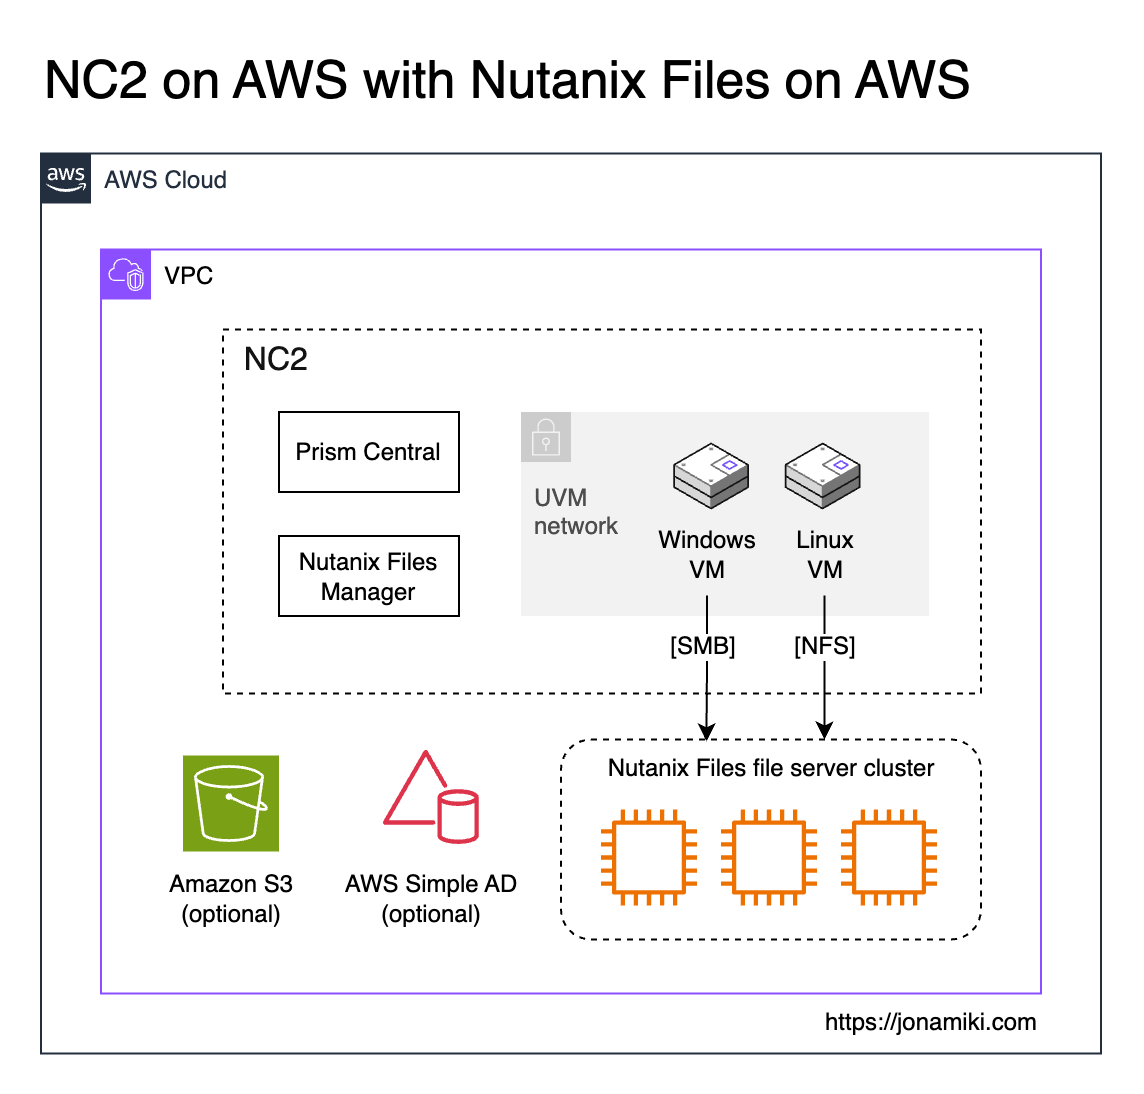
Nutanix Files can be deployed on AWS as a single or multiple EC2 instances. For testing a single instance is fine. For production 3 or more would be recommended for redundancy and performance optimization.
In this example we use the AWS Simple AD service for Active Directory authentication as well as for DNS. Note that DNS is a requirement for Nutanix Files and if SMB shares are created the Files file server will need to join the AD domain and have DNS entries added. This process is made very easy and will be covered below.
Prerequisites
We assume there is already an NC2 on AWS cluster deployed with Flow Virtual Networking enabled. The cluster can be otherwise unconfigured. For DNS and SMB (Windows) file share access we also need an Active Directory with DNS configured. In our example we have deployed an AWS Simple AD instance and will be using it for both the AD and DNS components. If you have a fully managed AD in AWS or if you’re using an AD connector shouldn’t matter, as long as AD and DNS can be accessed and updated to include the Files server instance.
Environment
In this example we use the below software versions
| Entity | Version |
|---|---|
| NC2 on AWS Prism Central | pc.2024.3.1 |
| NC2 on AWS AOS | 7.0.1 |
| Nutanix Files | 5.1.0 |
Overview of steps
We configure the solution in the following way
- Enable Marketplace in Prism Central
- Click to deploy Nutanix Files through the Marketplace app
- Upgrade the Files instance to the latest version
- Add your AWS credentials in the Files Manager
- Deploy a file server instance through Files Manager
- Link the file server with AD and update DNS records
- Configure the SMB and NFS file shares
Step 1: Enable Marketplace in Prism Central
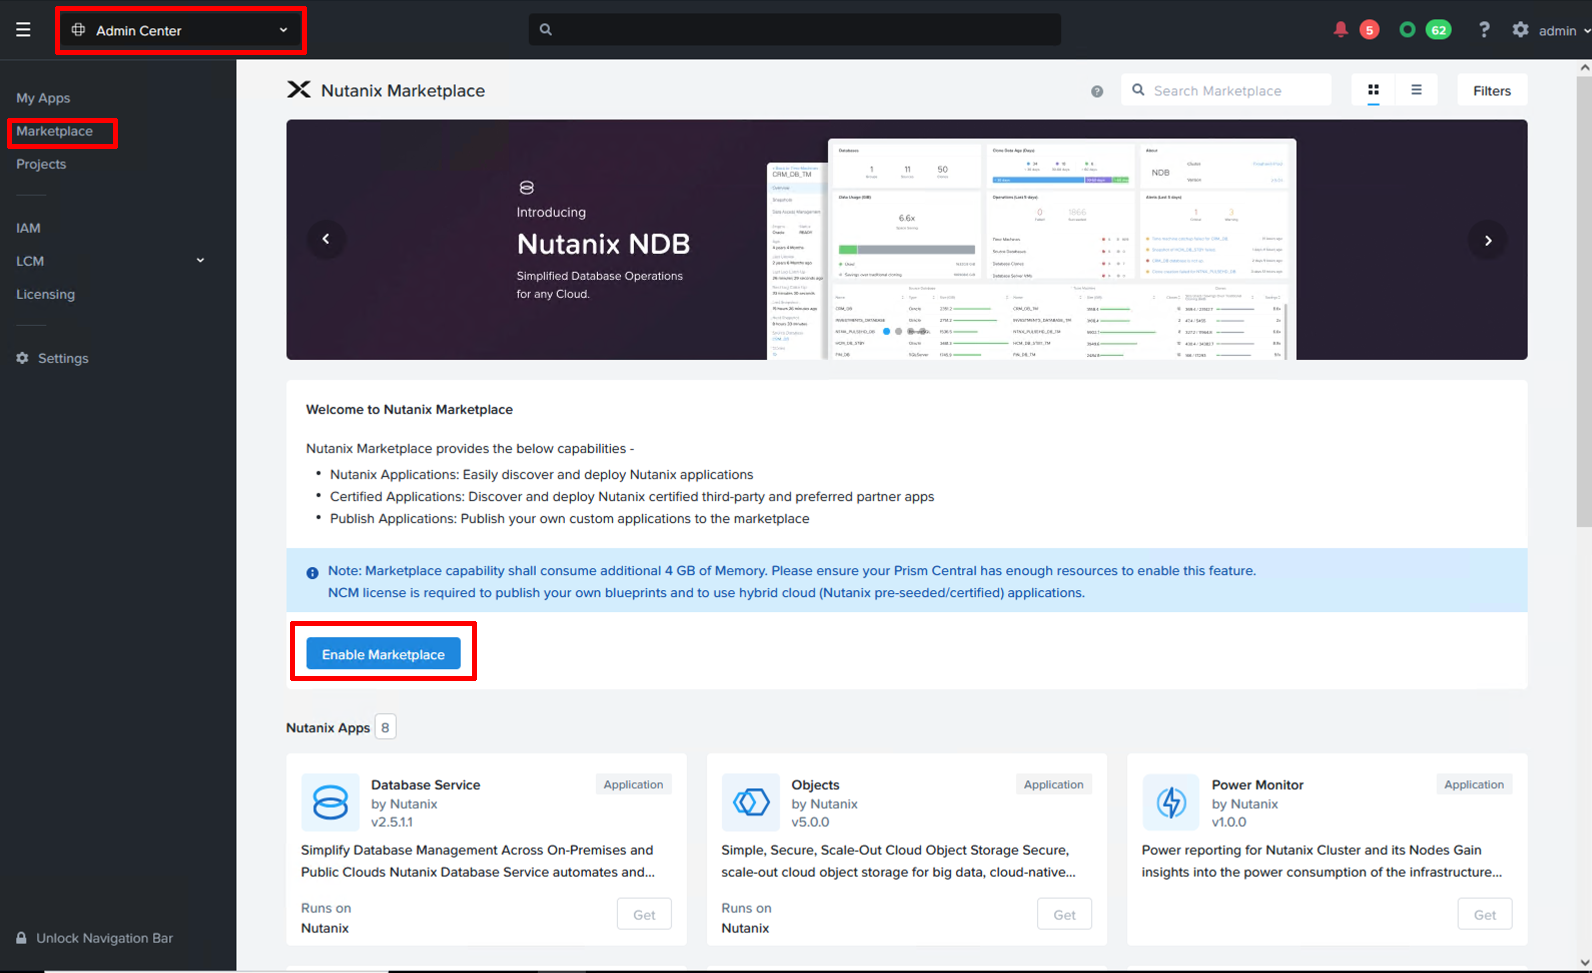
Deploying components as “apps” through the Prism Central marketplace has been made wonderfully easy. First though, we have to enable marketplace in Prism Central. Select “Admin Center” from the drop-down menu on top, click “Marketplace” and click “Enable Marketplace”. After a few minutes the process completes and we can start deploying various Nutanix Apps with a few clicks.
Step 2: Click to deploy Nutanix Files through the Marketplace app
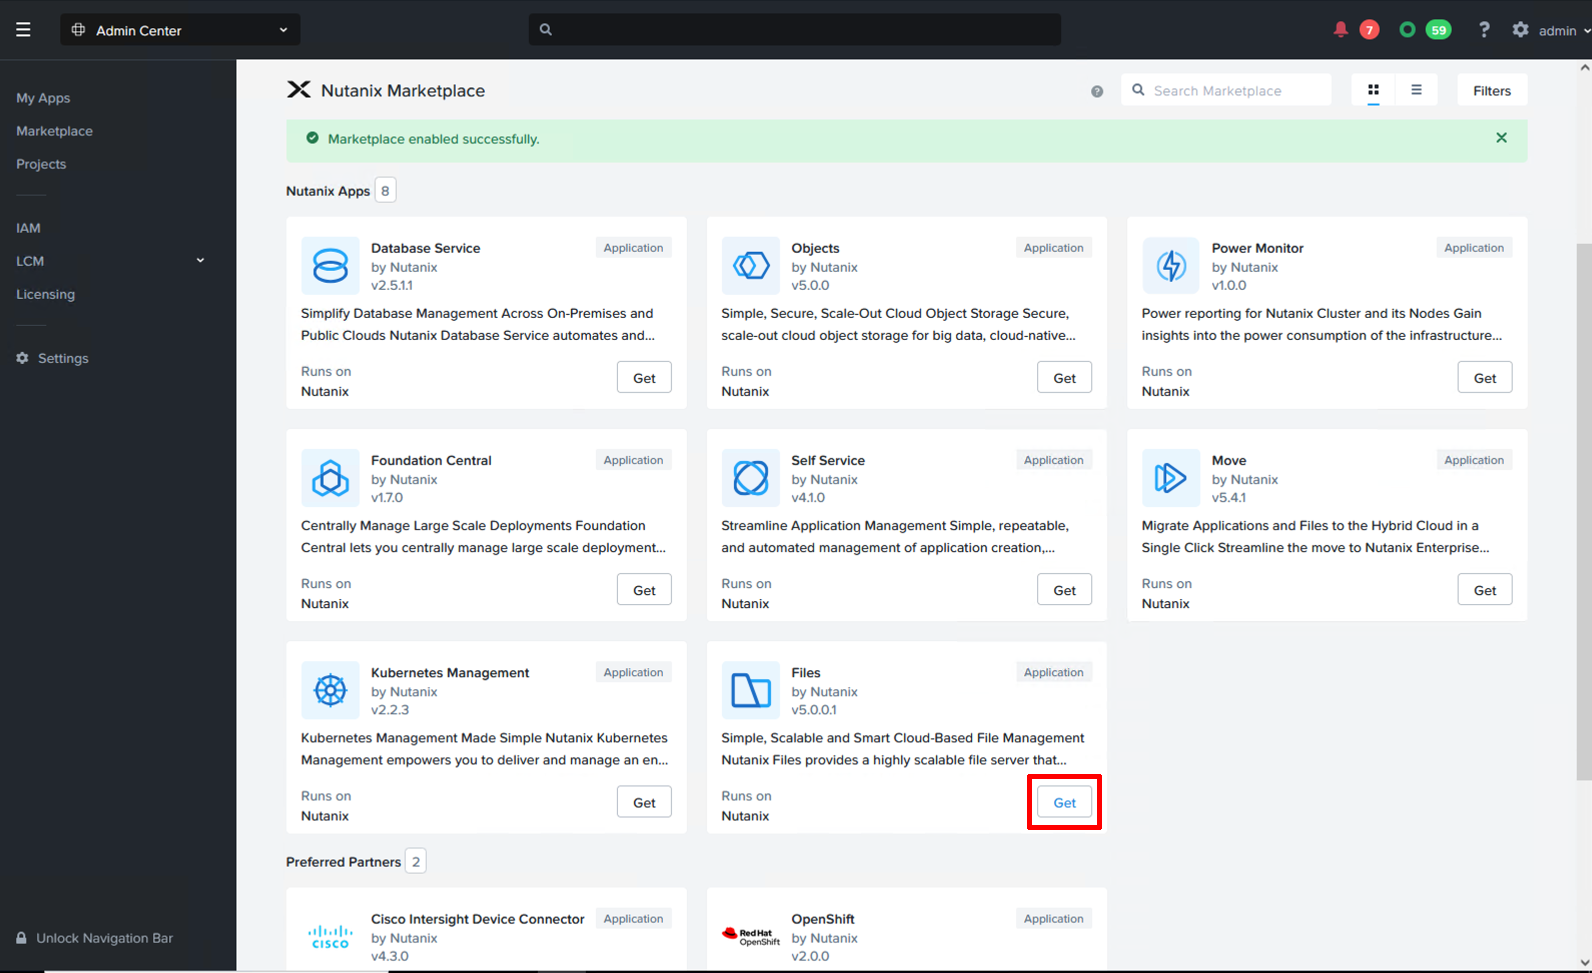
Once Marketplace has been enabled, locate the “Files by Nutanix” tile and click “Get” and then “Deploy” to deploy Files Manager. After deployment, Files Manager will be accessible from the Prism Central top drop-down menu.
Step 3: Upgrade the Files instance to the latest version
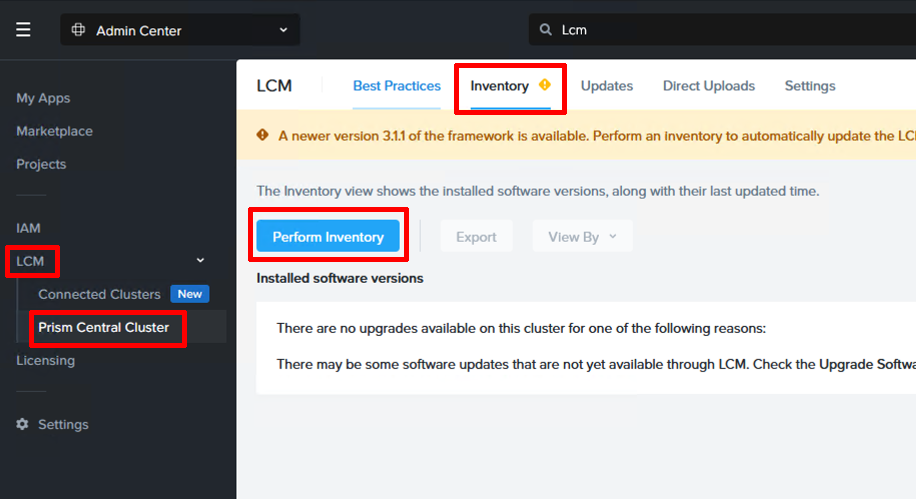
Since the Files version currently available through the Marketplace is 5.0.0.1 and we want version 5.1.0, we run an inventory and then an upgrade of Files Manager. Navigate to LCM (Lifecycle Manager) under Admin Center and run the inventory collection. This will take a minute or two to complete.
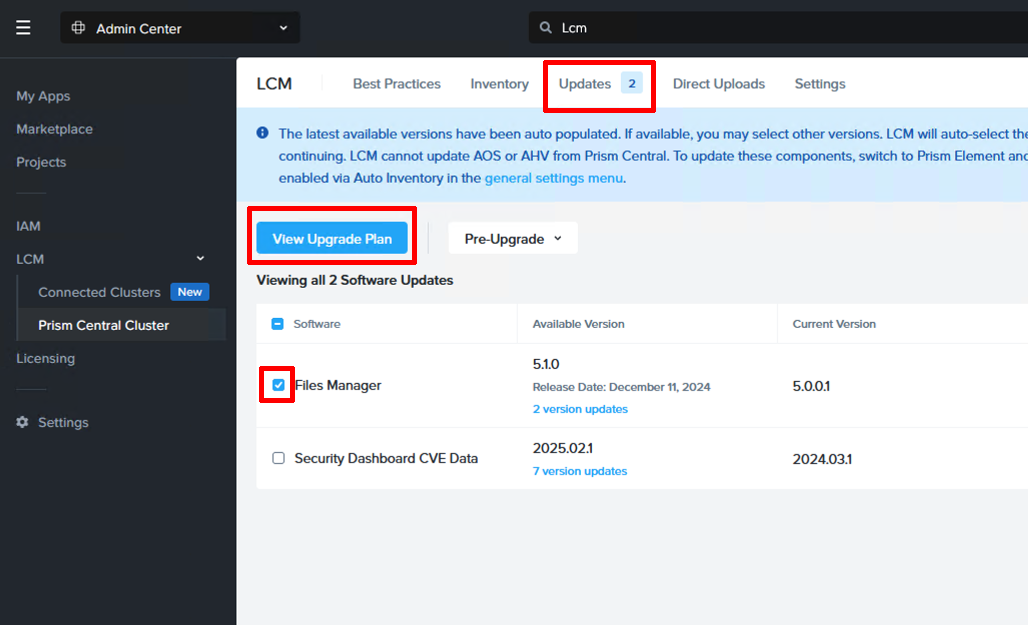
After the inventory is complete, a new version of Files Manager should show up under “Upgrades”. Highlight it and select “View Upgrade Plan” and then go ahead and issue the upgrade.
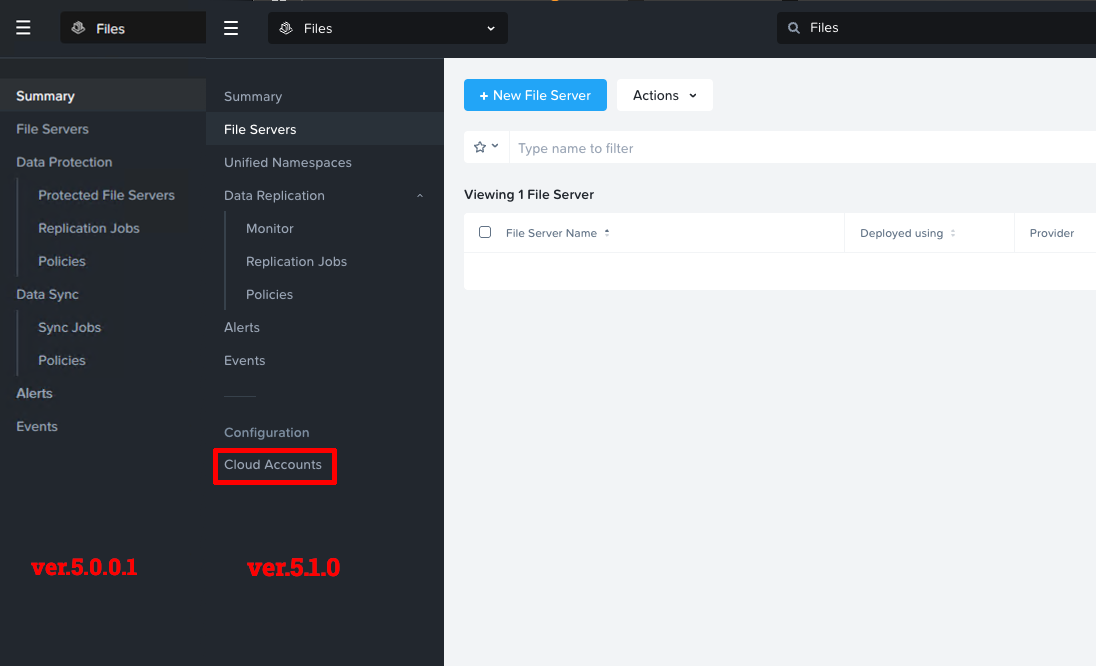
After the upgrade is complete you should see a change in the Files menu options. With version 5.1.0 we have a new Cloud Accounts option, which will be used next.
Step 4: Add your AWS credentials in the Files Manager
Ideally, create a new IAM user with access and secret access keys for the Files deployment. The user should have a policy attached with the following permissions:
1
2
3
4
5
6
7
8
9
10
11
12
13
14
15
16
17
18
19
20
21
22
23
24
25
26
27
28
29
30
31
32
33
34
35
36
37
38
39
40
41
42
43
44
45
46
47
48
49
50
51
52
53
54
55
56
57
58
59
60
61
62
63
64
65
66
67
68
69
70
71
72
73
74
75
76
77
78
79
{
    "Version": "2012-10-17",
    "Statement": [
        {
            "Effect": "Allow",
            "Action": [
                "ec2:DescribeImages",
                "ec2:DescribeInstances",
                "ec2:TerminateInstances",
                "ec2:RunInstances",
                "ec2:StopInstances",
                "ec2:StartInstances",
                "ec2:ModifyInstanceAttribute",
                "ec2:DescribePlacementGroups",
                "ec2:DescribeSubnets",
                "ec2:DescribeAvailabilityZones",
                "ec2:DescribeSecurityGroups",
                "ec2:DeleteSecurityGroup",
                "ec2:DescribeNetworkInterfaces",
                "ec2:DeleteNetworkInterface",
                "ec2:CreateNetworkInterface",
                "ec2:CreateSecurityGroup",
                "ec2:AssignPrivateIpAddresses",
                "ec2:AuthorizeSecurityGroupIngress",
                "ec2:DescribeKeyPairs",
                "ec2:RevokeSecurityGroupIngress",
                "ec2:CreateTags",
                "ec2:CreateVolume",
                "ec2:DeleteVolume",
                "ec2:AttachVolume",
                "ec2:DescribeVolumes",
                "ec2:DetachVolume",
                "ec2:ModifyVolume",
                "ec2:DescribeVpcs"
            ],
            "Resource": "*"
        },
        {
            "Effect": "Allow",
            "Action": [
                "iam:GetInstanceProfile",
                "iam:SimulatePrincipalPolicy",
                "iam:ListRoles",
                "iam:PassRole"
            ],
            "Resource": "*"
        },
        {
            "Effect": "Allow",
            "Action": [
                "kms:DescribeKey"
            ],
            "Resource": "*"
        },
        {
            "Effect": "Allow",
            "Action": [
                "s3:GetBucketLocation",
                "s3:CreateBucket",
                "s3:PutBucketVersioning",
                "s3:ListBucket",
                "s3:DeleteObject",
                "s3:DeleteBucket",
                "s3:PutObject",
                "s3:ListBucketMultipartUploads",
                "s3:AbortMultipartUpload",
                "s3:GetBucketObjectLockConfiguration",
                "s3:GetObject",
                "s3:GetLifecycleConfiguration",
                "s3:PutLifecycleConfiguration",
                "s3:GetObjectTagging",
                "s3:PutObjectTagging",
                "s3:GetBucketVersioning",
                "s3:GetObjectVersion"
            ],
            "Resource": "*"
        }
    ]
}
There is a manual entry for this but the permission policy listed there is incorrect at the time of writing.
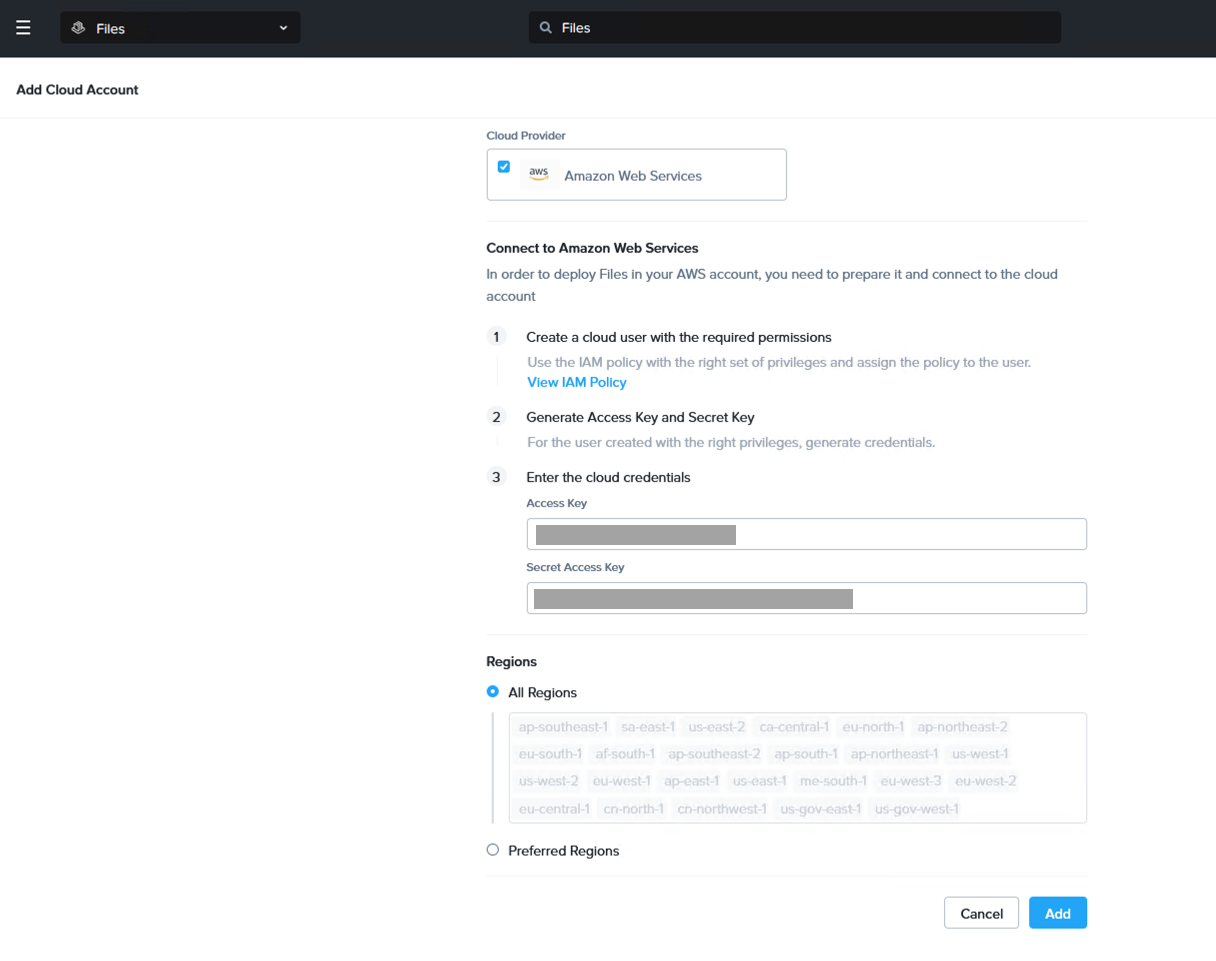
When the user has been created, click on “Cloud Accounts” in Files Manager and add the new account. Enter a useful label for the cloud account along with the access and secret access keys. Here the regions can also be selected. Either enable all of them or a select few which are applicable to your environment.
Step 5: Deploy a file server instance through Files Manager
This section looks long due to the screenshots, but it’s really just selecting where and how to deploy and clicking next. We will create an AWS IAM role for the File Server instance to use though. Yes, this is separate to the IAM user used in Files Manager. In this case we just need a role and not a whole user.
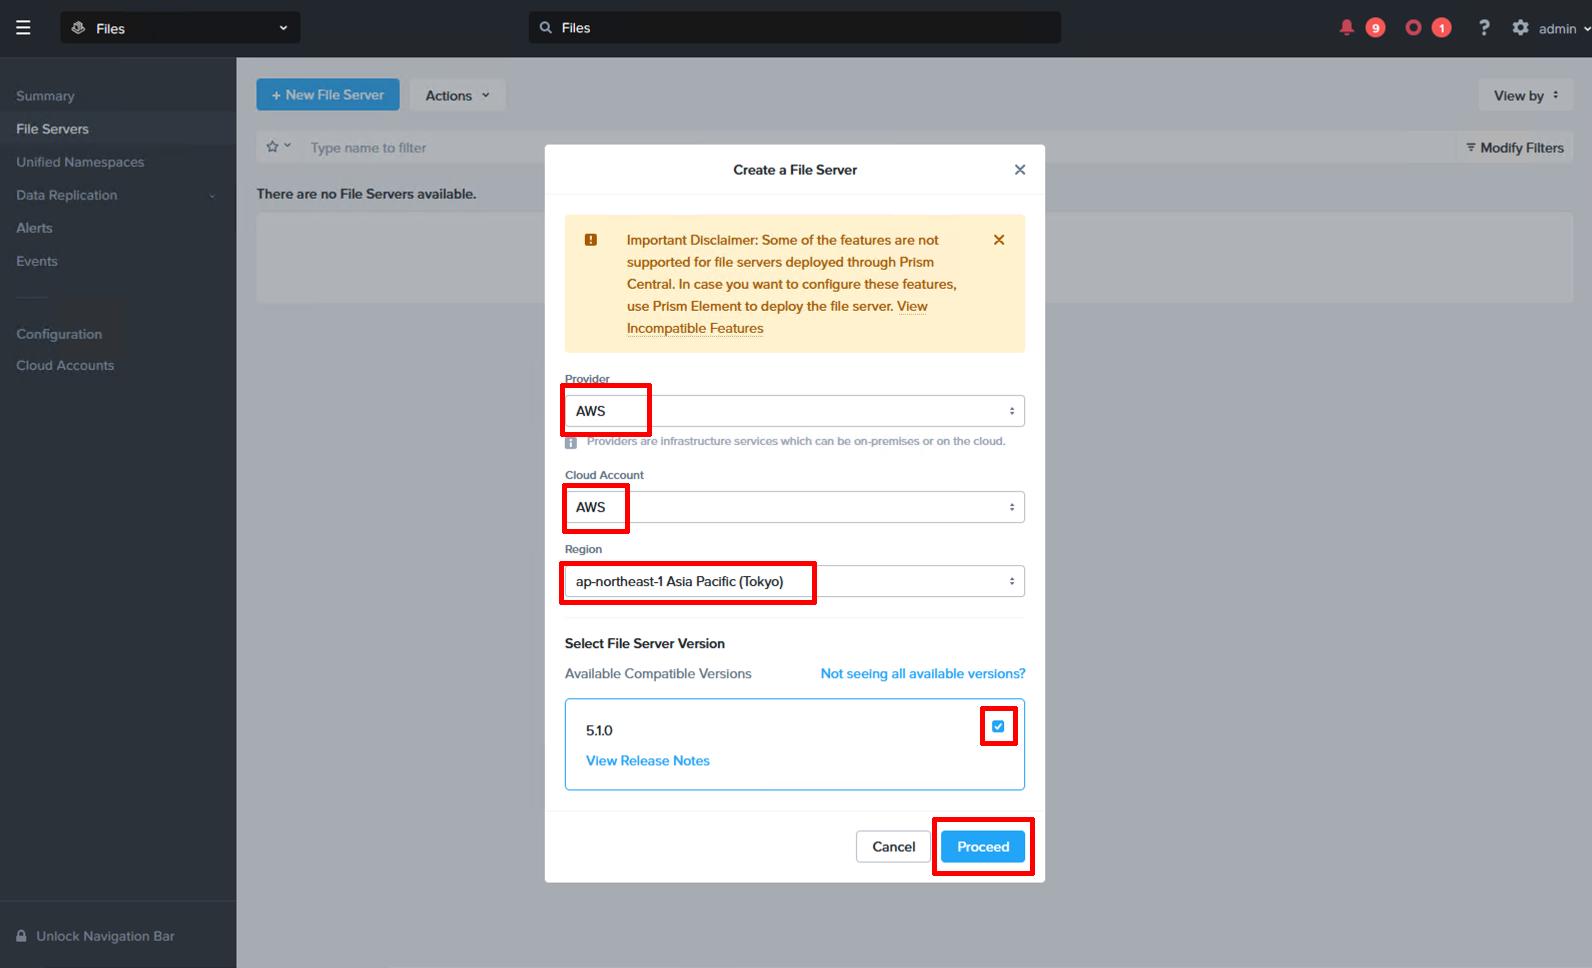
Start with clicking “+ New File Server” under “File Servers” and select your AWS account and region.
Fileserver basics
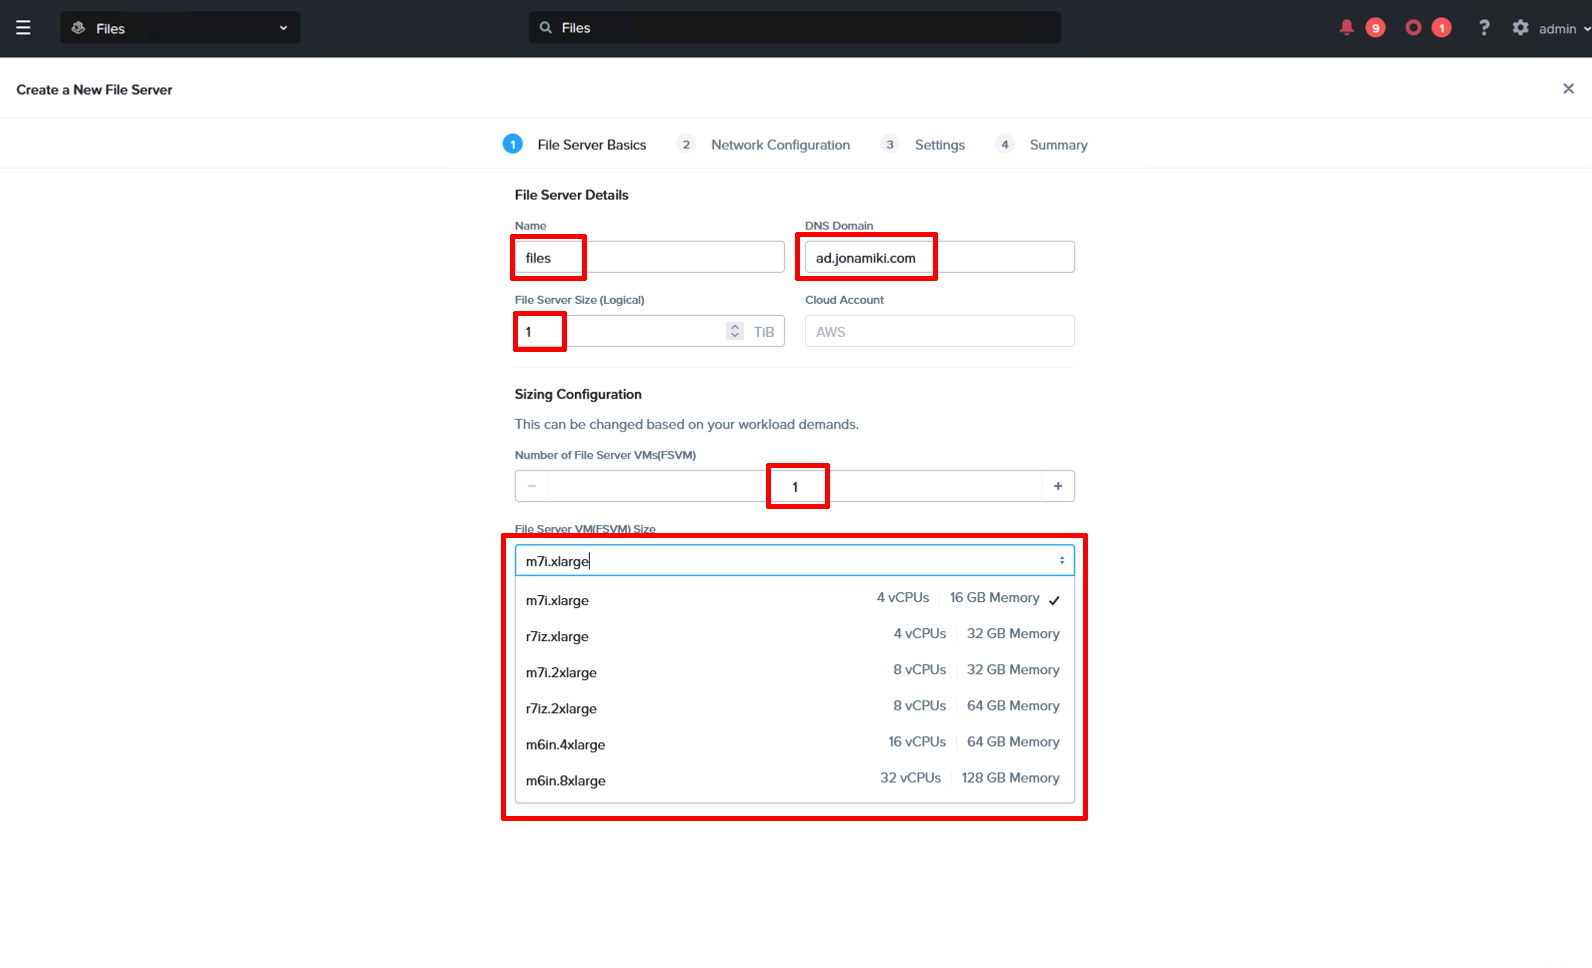
Enter in the DNS name to be used for the file server and the DNS domain. The file server name + the DNS domain will make up the FQDN which will be used to access file shares over SMB and NFS later. There is no need to add entries in DNS for the file server at this point since we still don’t know which IP addresse(s) it will use. That step will be taken care of a little bit later.
Network Configuration
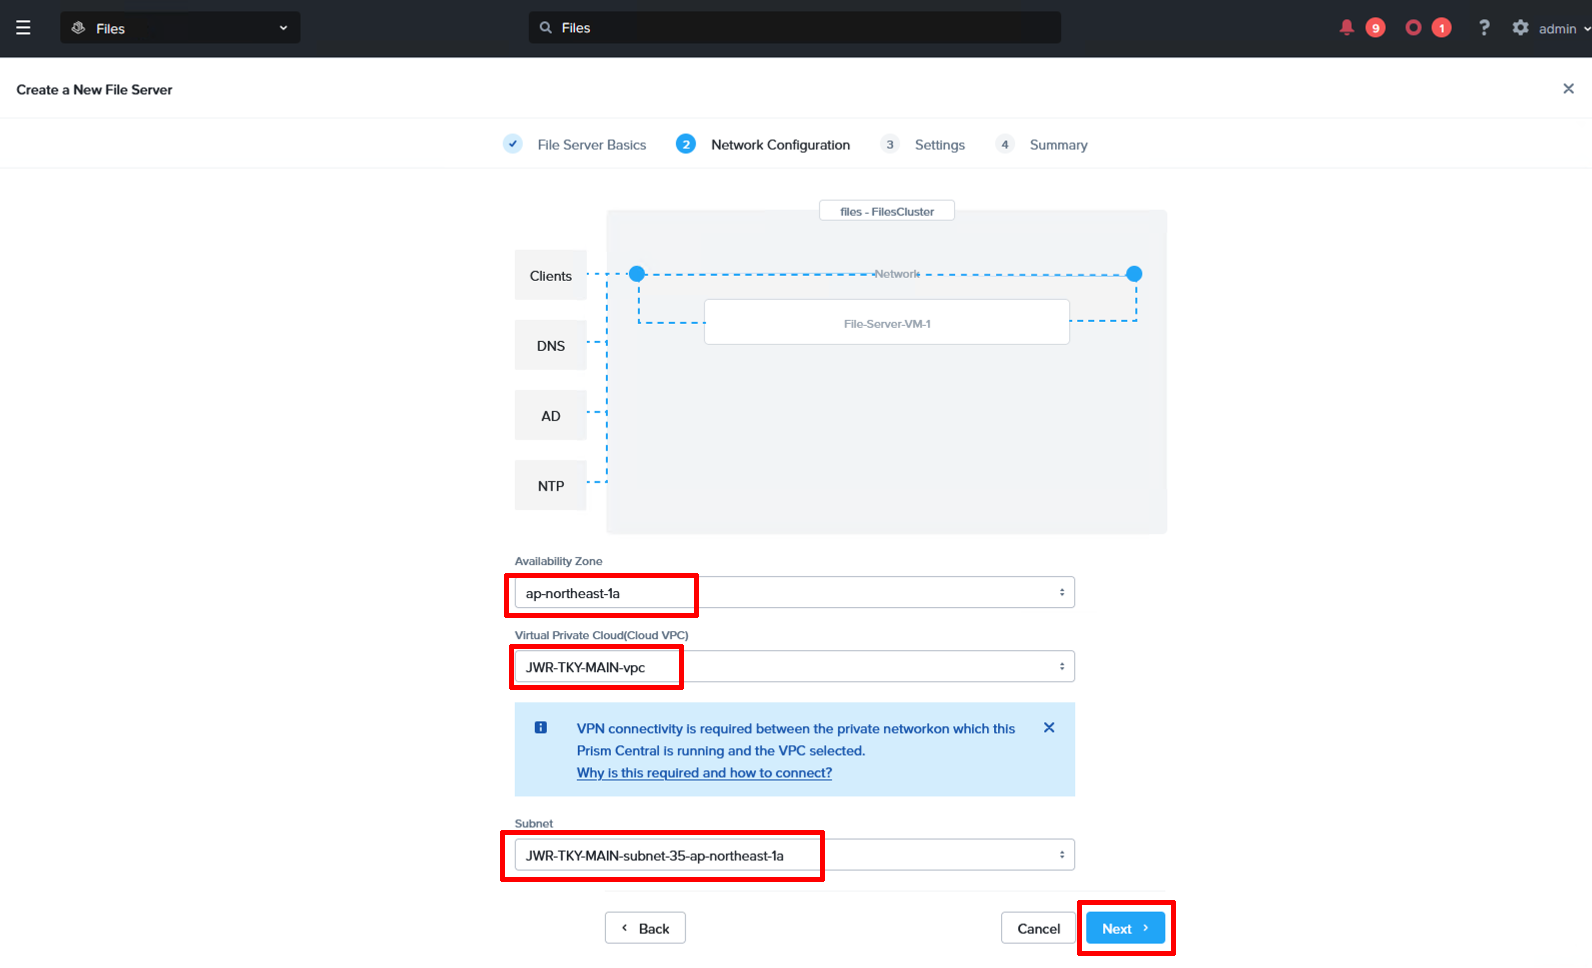
Pick the AZ, VPC and subnet you wish to deploy the file server into. In this case we have selected a private subnet with internet access via a NAT GW.
Creating the FSVM IAM role
We now need to create the AWS IAM role for the file server instance. Create a new role and either attach the JSON policy directly or create a policy first and then attach it to the role. In our case we named the role “jwr-files-FSVM-role”.
The permissions for the policy are as follows:
1
2
3
4
5
6
7
8
9
10
11
12
13
14
15
16
17
18
19
20
21
22
23
24
25
26
27
28
29
30
31
32
33
34
35
36
37
38
39
40
41
42
43
44
45
46
47
48
49
50
51
52
53
{
    "Version": "2012-10-17",
    "Statement": [
        {
            "Effect": "Allow",
            "Action": [
                "ec2:DescribeInstances",
                "ec2:DescribeInstanceStatus",
                "ec2:DescribeNetworkInterfaces",
                "ec2:DescribeSubnets",
                "ec2:DescribeVpcs",
                "ec2:DescribeDhcpOptions",
                "ec2:DescribeKeyPairs",
                "ec2:DescribeRegions",
                "ec2:DescribeVolumes",
                "ec2:DescribeVolumesModifications",
                "ec2:DescribeVolumeStatus",
                "ec2:CreateTags",
                "ec2:DescribeImages",
                "ec2:AssignPrivateIpAddresses",
                "ec2:AttachVolume",
                "ec2:DetachVolume"
            ],
            "Resource": "*"
        },
        {
            "Effect": "Allow",
            "Action": [
                "s3:GetObject",
                "s3:GetBucketLocation",
                "s3:ListBucket",
                "s3:ListBucketVersions"
            ],
            "Resource": "*"
        },
        {
            "Effect": "Allow",
            "Action": [
                "kms:DescribeKey",
                "kms:Encrypt",
                "kms:Decrypt",
                "kms:GenerateDataKey",
                "kms:GenerateDataKeyWithoutPlaintext",
                "kms:GenerateDataKeyPair",
                "kms:GenerateDataKeyPairWithoutPlaintext",
                "kms:ReEncryptFrom",
                "kms:ReEncryptTo",
                "kms:CreateGrant"
            ],
            "Resource": "*"
        }
    ]
}
Settings
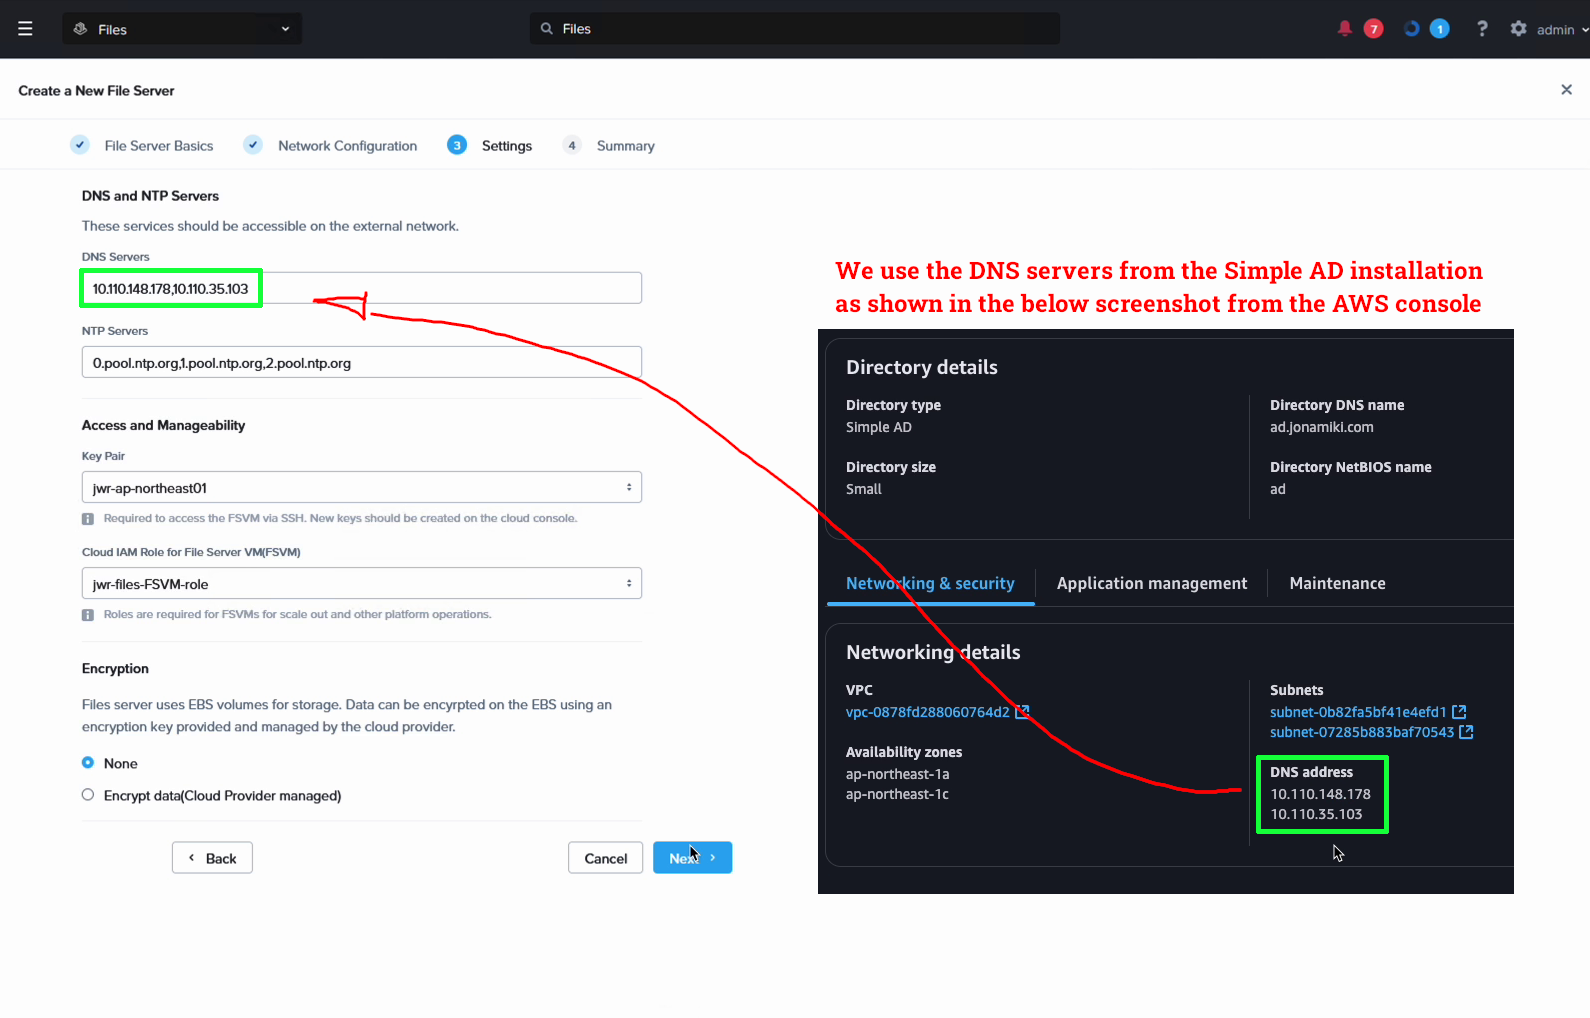
Enter the DNS servers to use. For our example we leverage the Simple AD DNS servers, which we will later update with the file server name. Also enter the NTP servers, a keypair to use and select the role we just created above. Also choose if you wish to use encryption or not.
Finish the wizard and sit back and relax while the file server deploys. During our testing we deployed multiple file servers and it took between 16-25 min to finish each time.
Step 6. Link the file server with AD and update DNS records
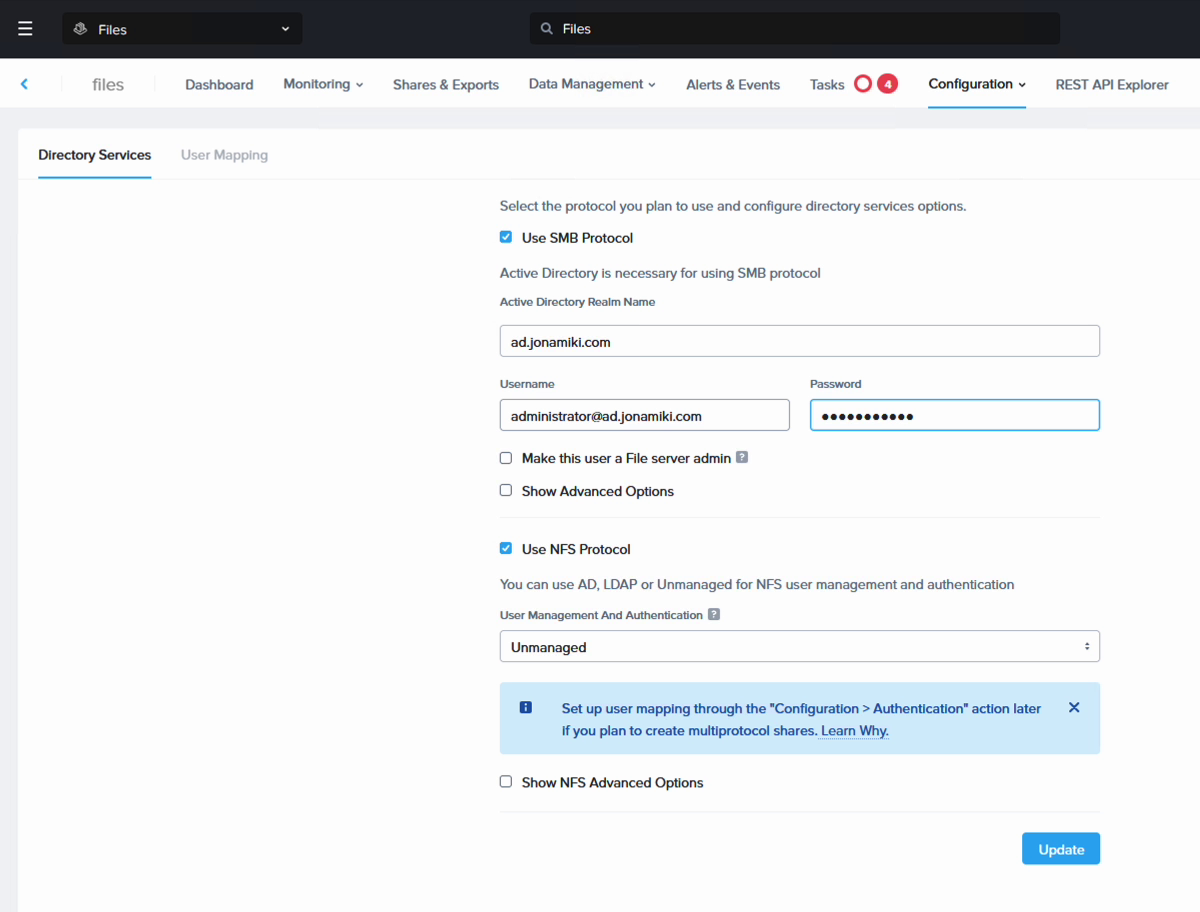
Naviate to the newly deployed file server through the Prism Central console. Click it and the management screen will show up. From here, navigate to “Configuration” and select “Authentication”. Check the boxes for SMB and NFS. In the SMB section, enter in your domain name and provide the credentials for an account with admin rights (make sure to use “@” and the domain after the username). We leave all other settings at their defaults. This will add the file server to the AD domain.
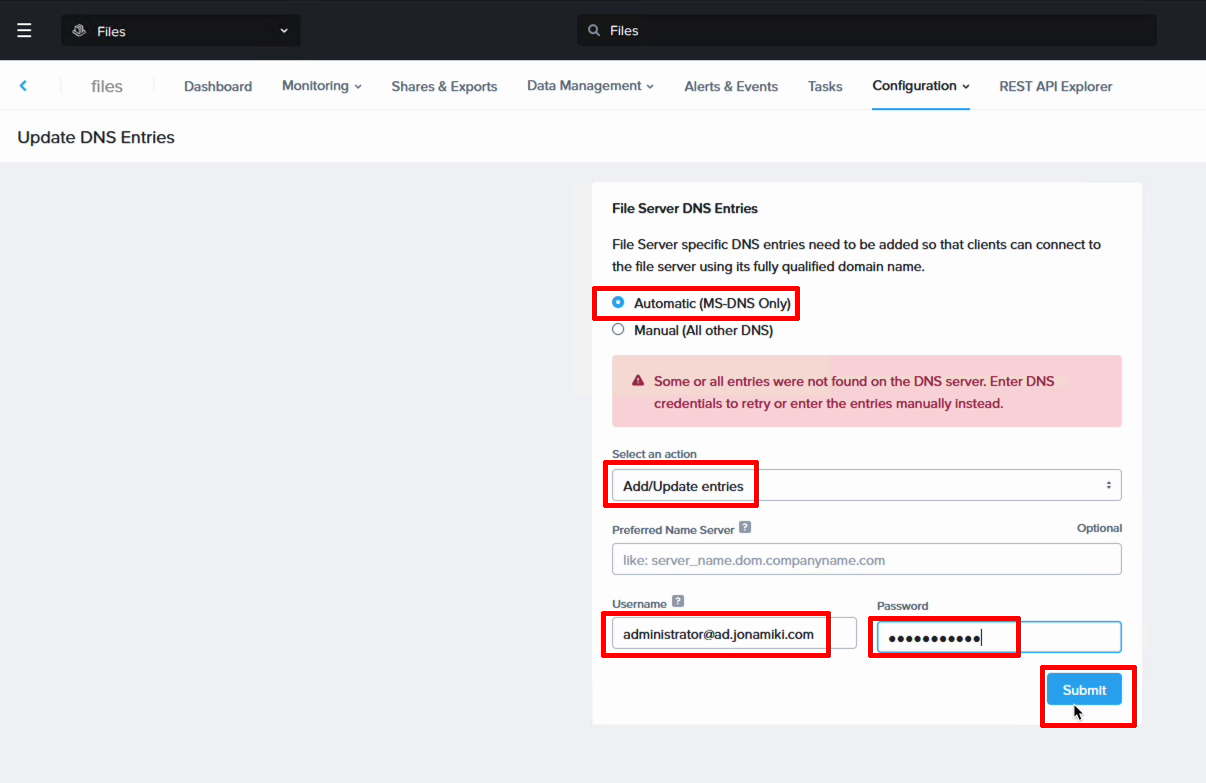
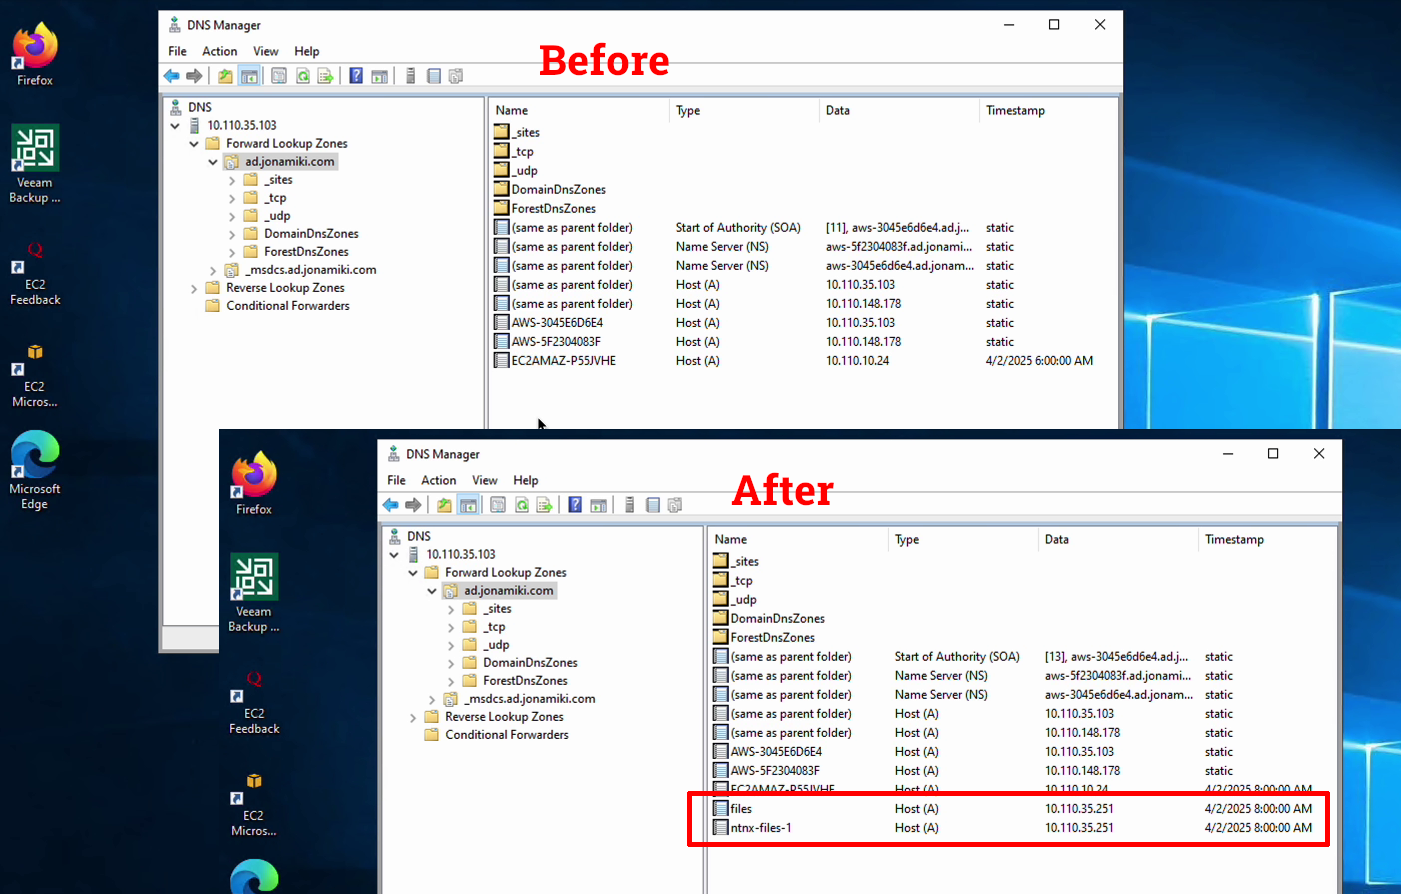
To update the DNS records, go to “Configuration” and select “Update DNS entries”. Set the action to add / update, enter your AD credentials and hit “Submit”. The file server will now add A records to the DNS server.
The before and after screenshots show how the DNS server has been updated with the file server records.
Step 7. Configure the SMB and NFS file shares
We’re almost done. All the remain is to set up a couple of file shares. We’ll do one SMB share for Windows clients and another for Linux clients.
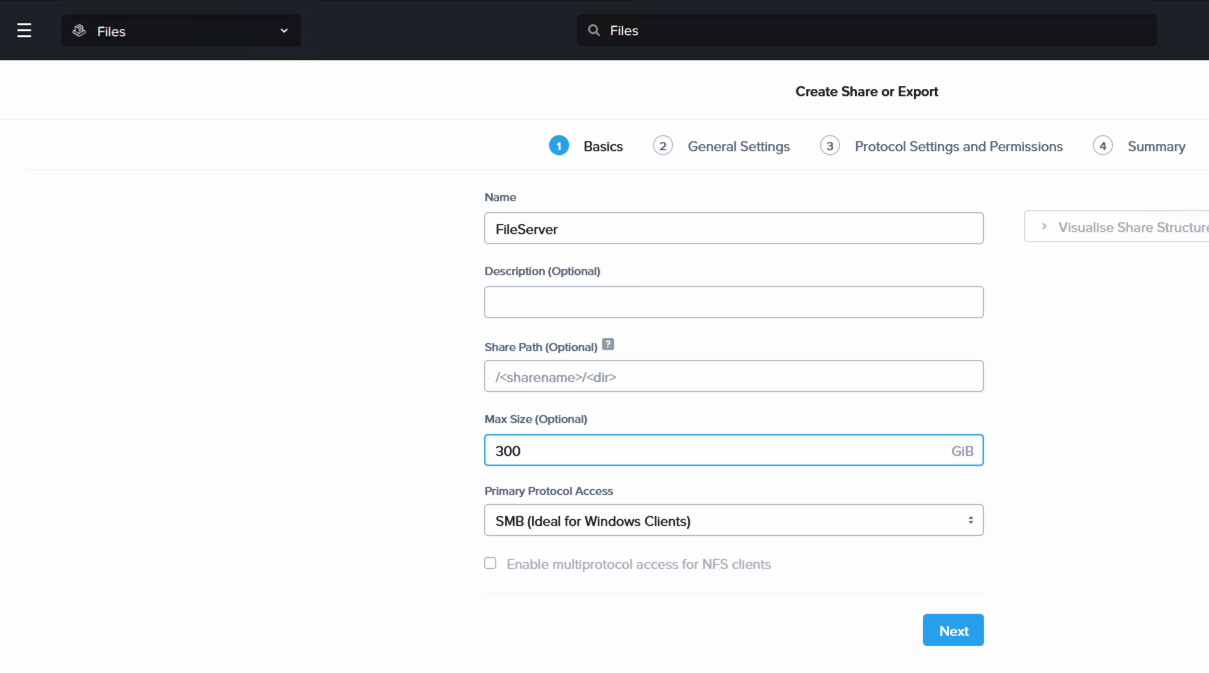
On the top menu, click “Shares & Exports”. Set up a new SMB file share. We give it a name and set the size to 300 GB in this case. Click through the reset the wizard while keeping the defaults. That will allow anyone to access the share over SMB protocol.
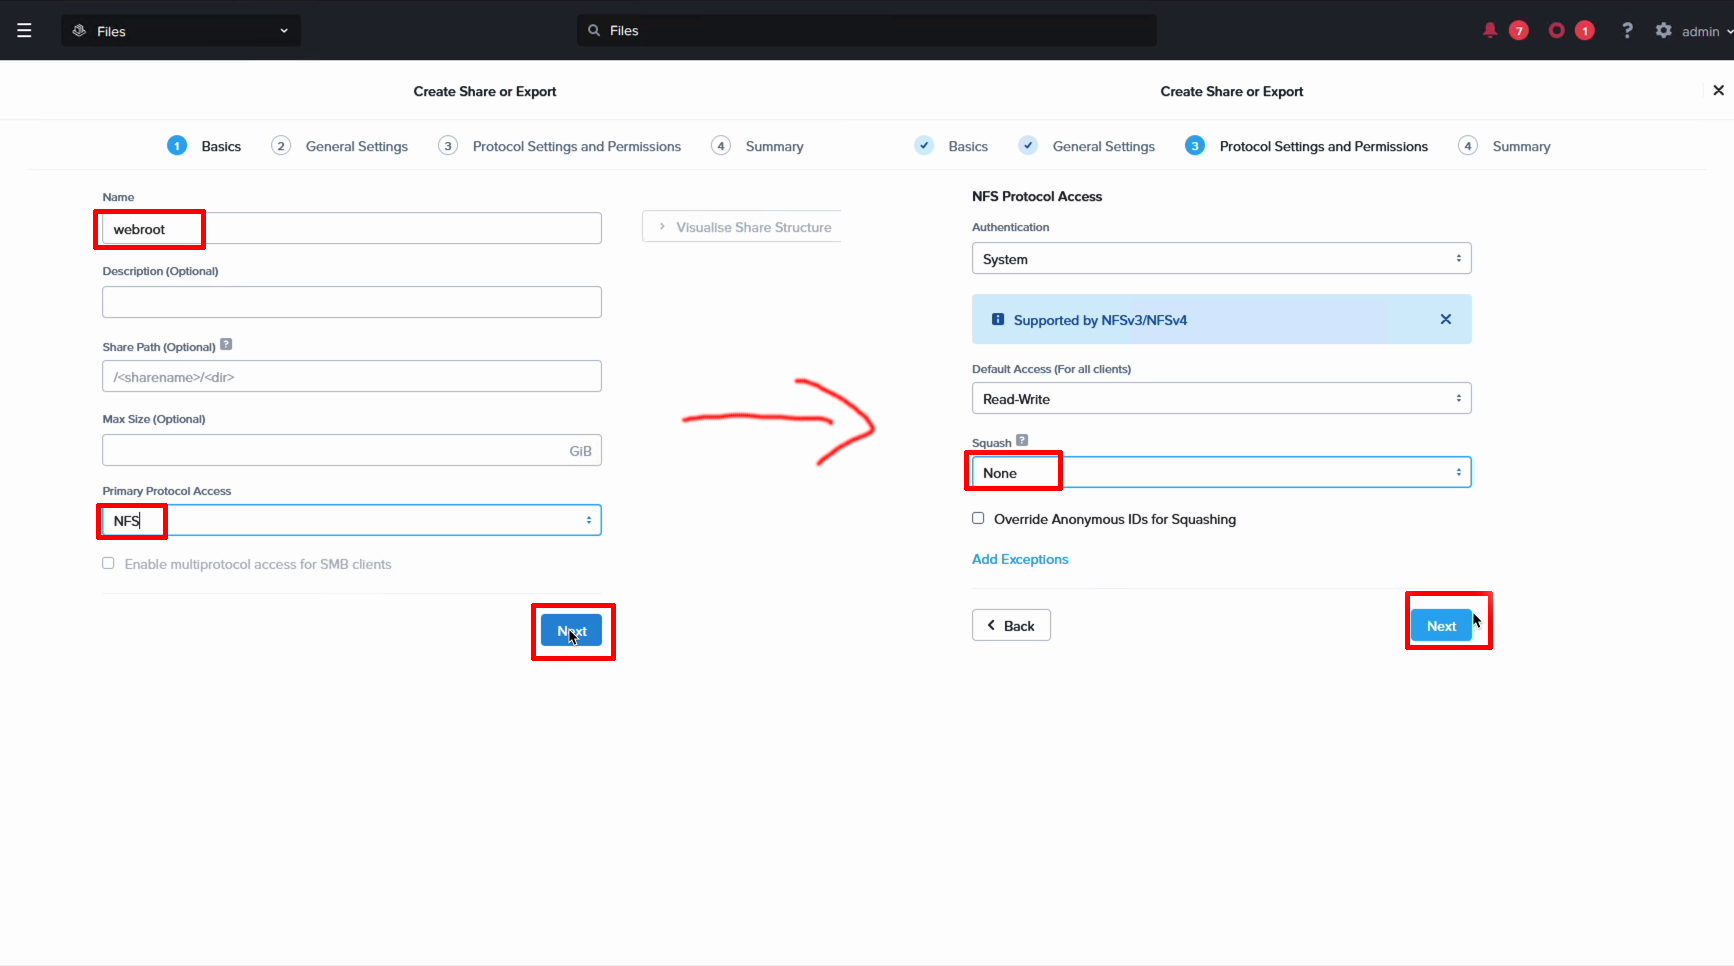
Next we create an NFS share for our Linux clients. Simply give it a name and select NFS. The only other setting we change is the root-squash which we set to “None”. Leave the rest at the defaults
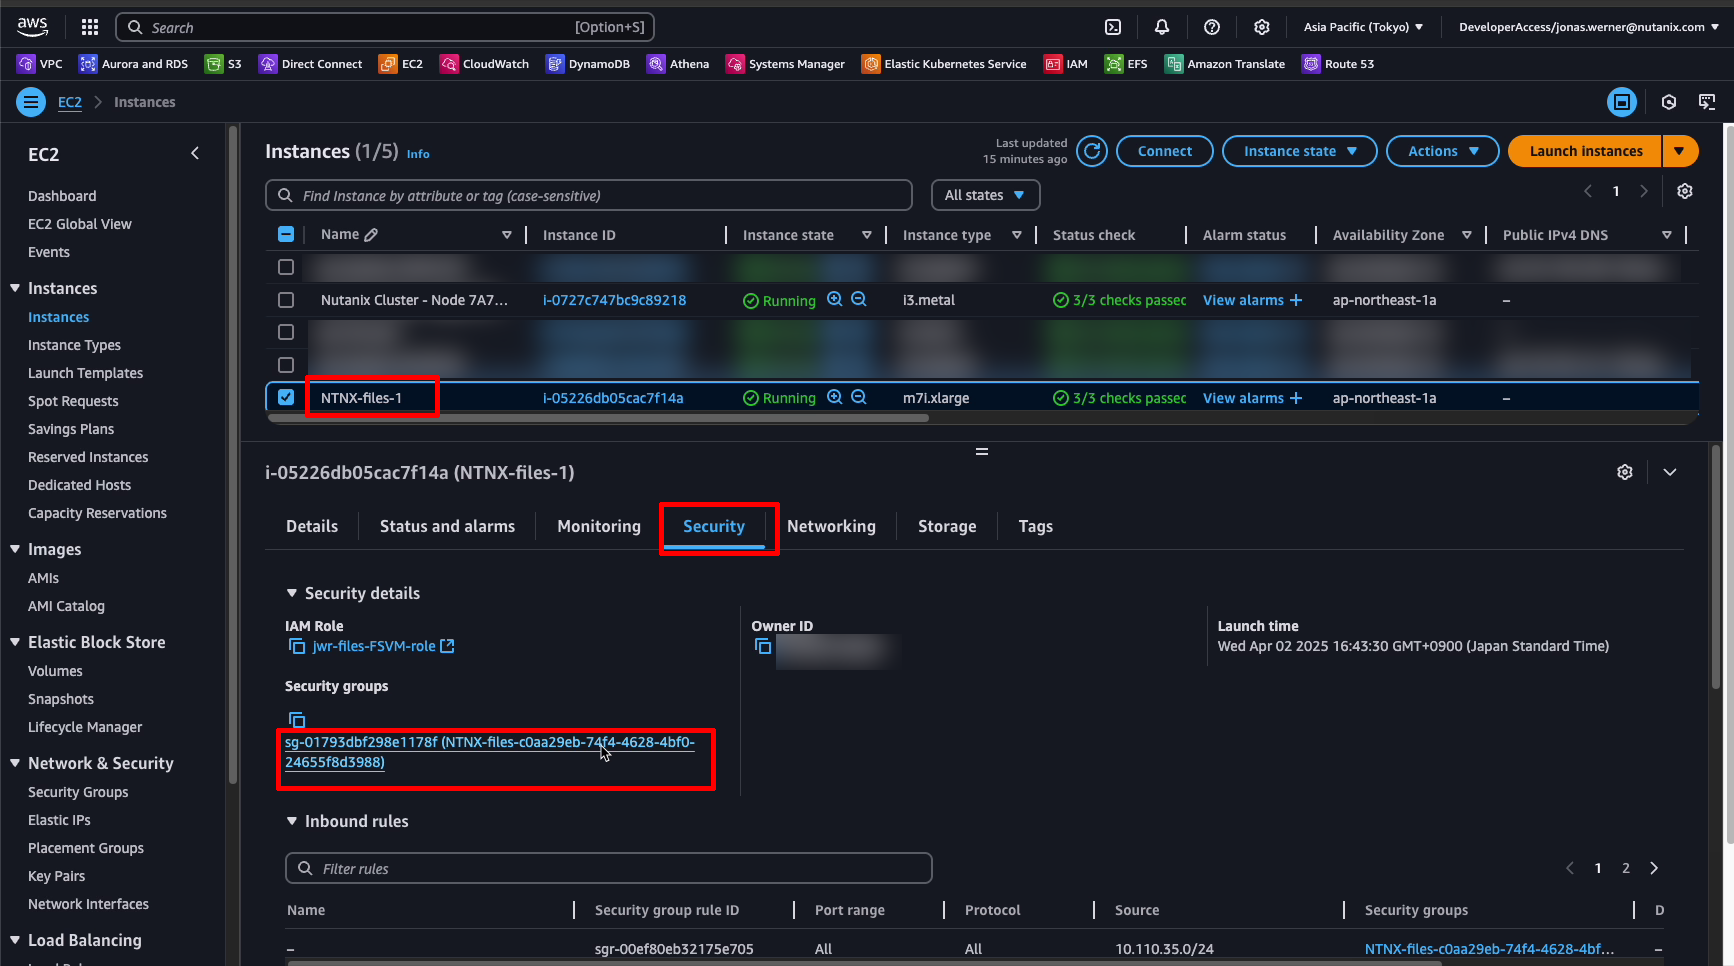
To allow access for our clients, go to the EC2 section of the AWS managements console, find the file server (probably called “NTNX-files-1”) and update the security group. It is possible to set an inbound rule to allow SMB and NFS but in this case we created a single rule to allow all traffic from VMs from our VPC CIDR.
That is all. Congratulations on making it this far! Now the file server is deployed and shares are available for both Windows and Linux clients.
Verification
It would be nice to make sure our clients can access the new shares. Generally, EC2 instances and possibly also VMs on NC2 would be configured to use the AWS VPC default DNS server - the “.2” resolver. Basically the 2nd IP address in the VPC CIDR range. If we want to ensure the clients using the default AWS DNS server can also access our file server, which if you recall, use a the AD DNS server, we need to set up a forwarding rule in Route53. This is easily done though.
Route53 DNS forwarder
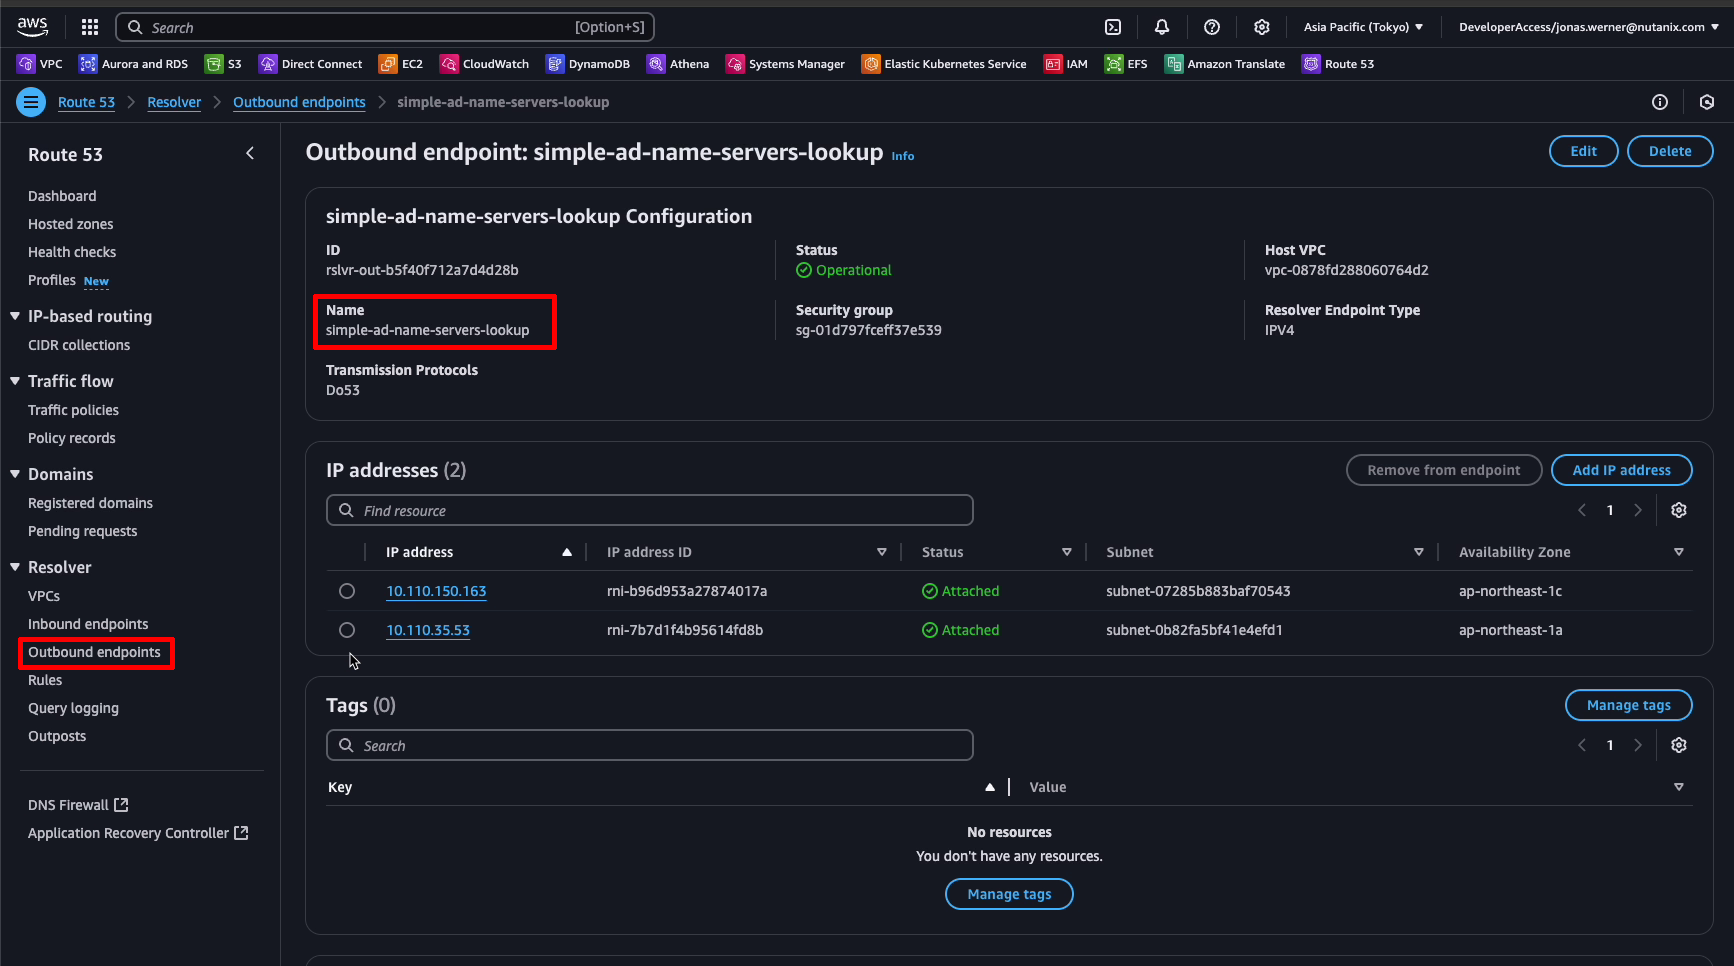
Navigate to Route53 and set up an outbound resolver. This will not directly point to our AD DNS servers but will instead provide the egress ENIs which will be used by Route53 when quering our AD DNS.
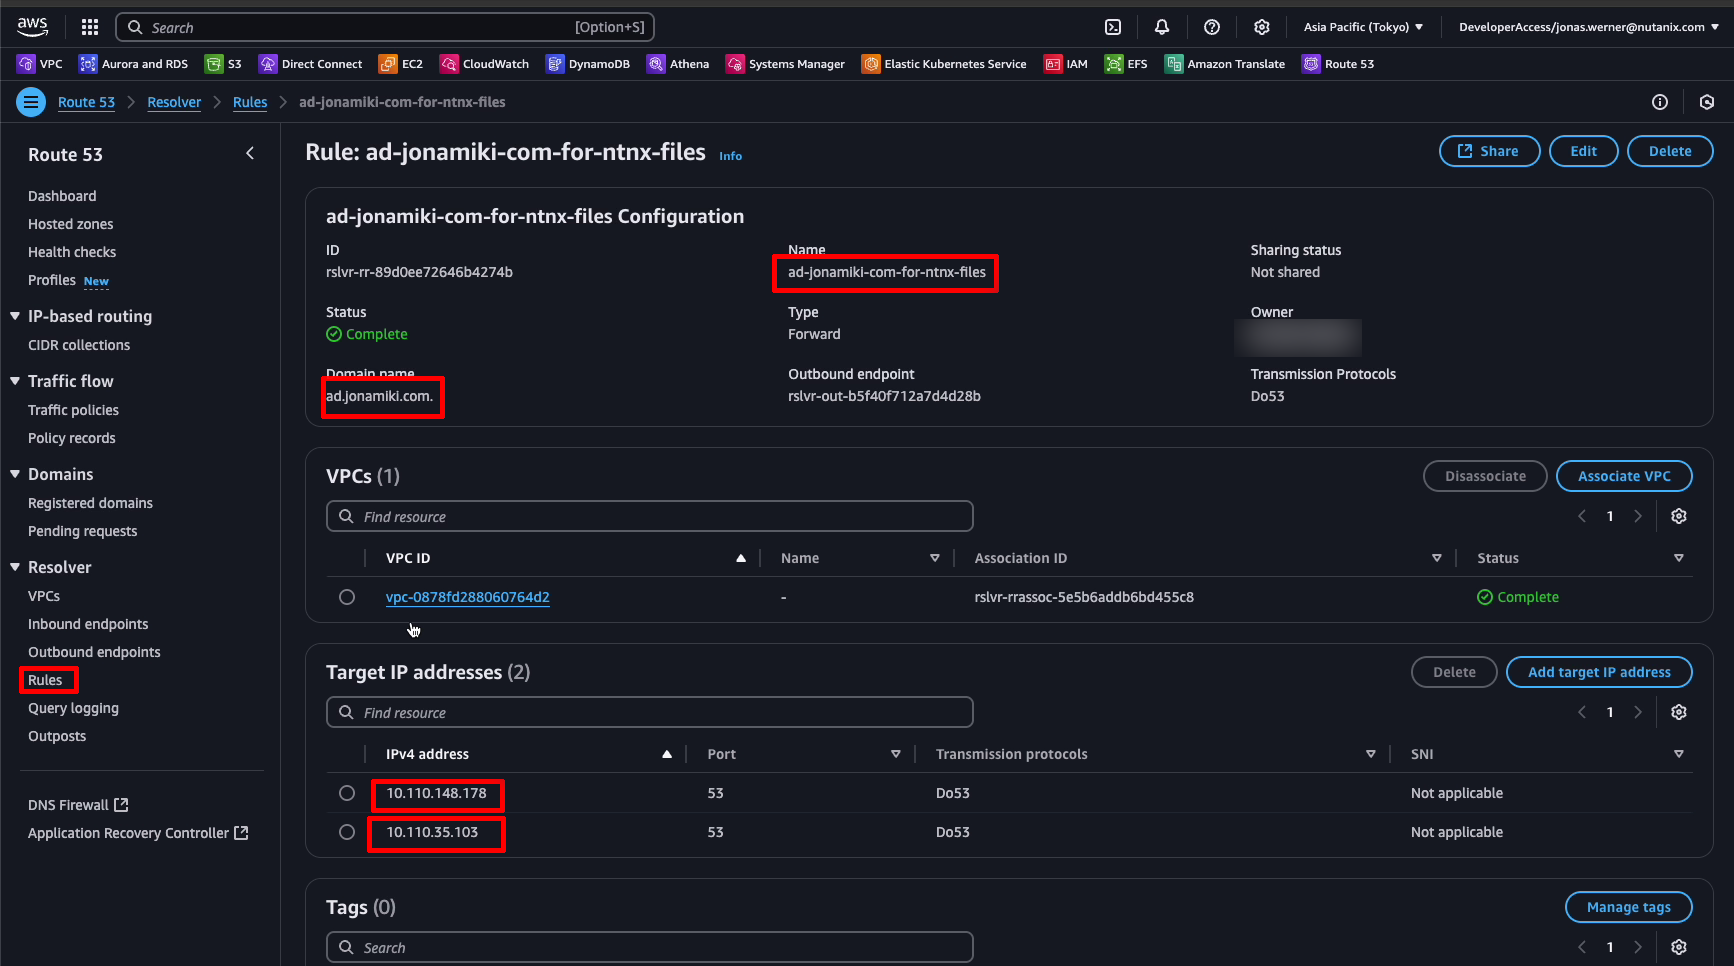
Then, go to “Rules” in Route53 and set up a Forwarding rule for our domain. In this case “ad.jonamiki.com”. Here we enter the IP addresses of our Simle AD DNS servers. Now all requests for this domain and its subdomains which are made to the .2 resolver will be forwarded by Route53 to our AD DNS servers. Let’s try it out.
Verifying SMB access from Windows
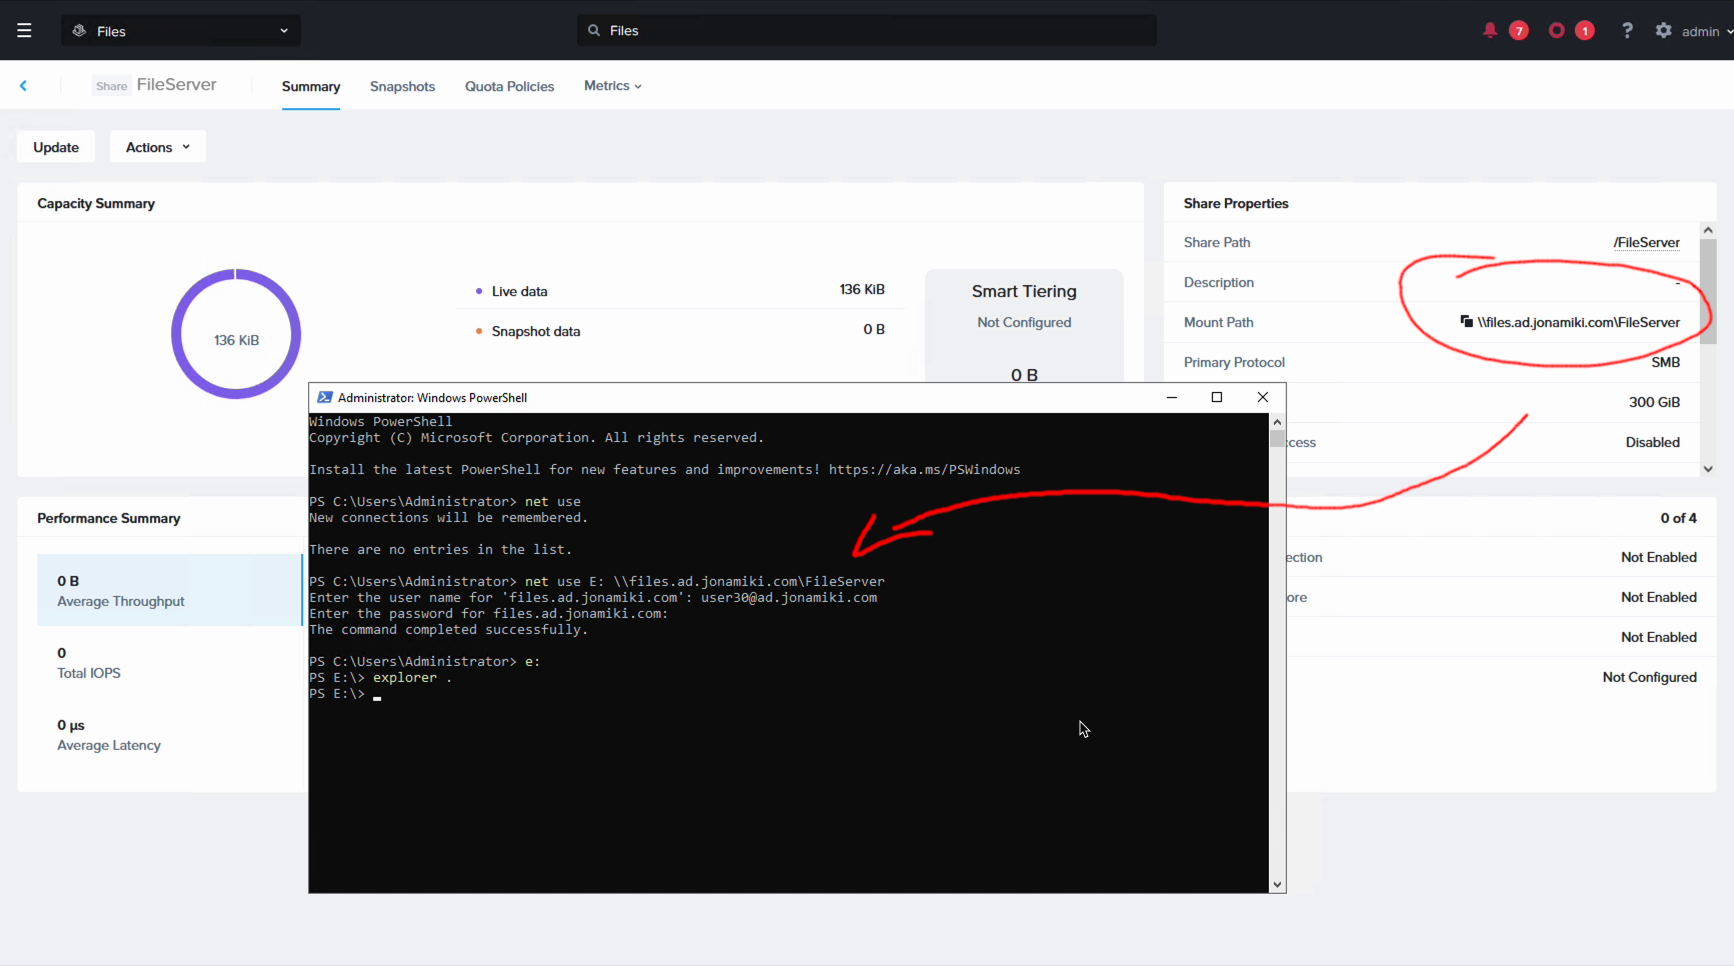
We open our Windows server and use “net use” to map our share to the “E:” drive. As you can see from the screenshot, the Files file server helpfully shows the path to use for clients accessing the share.
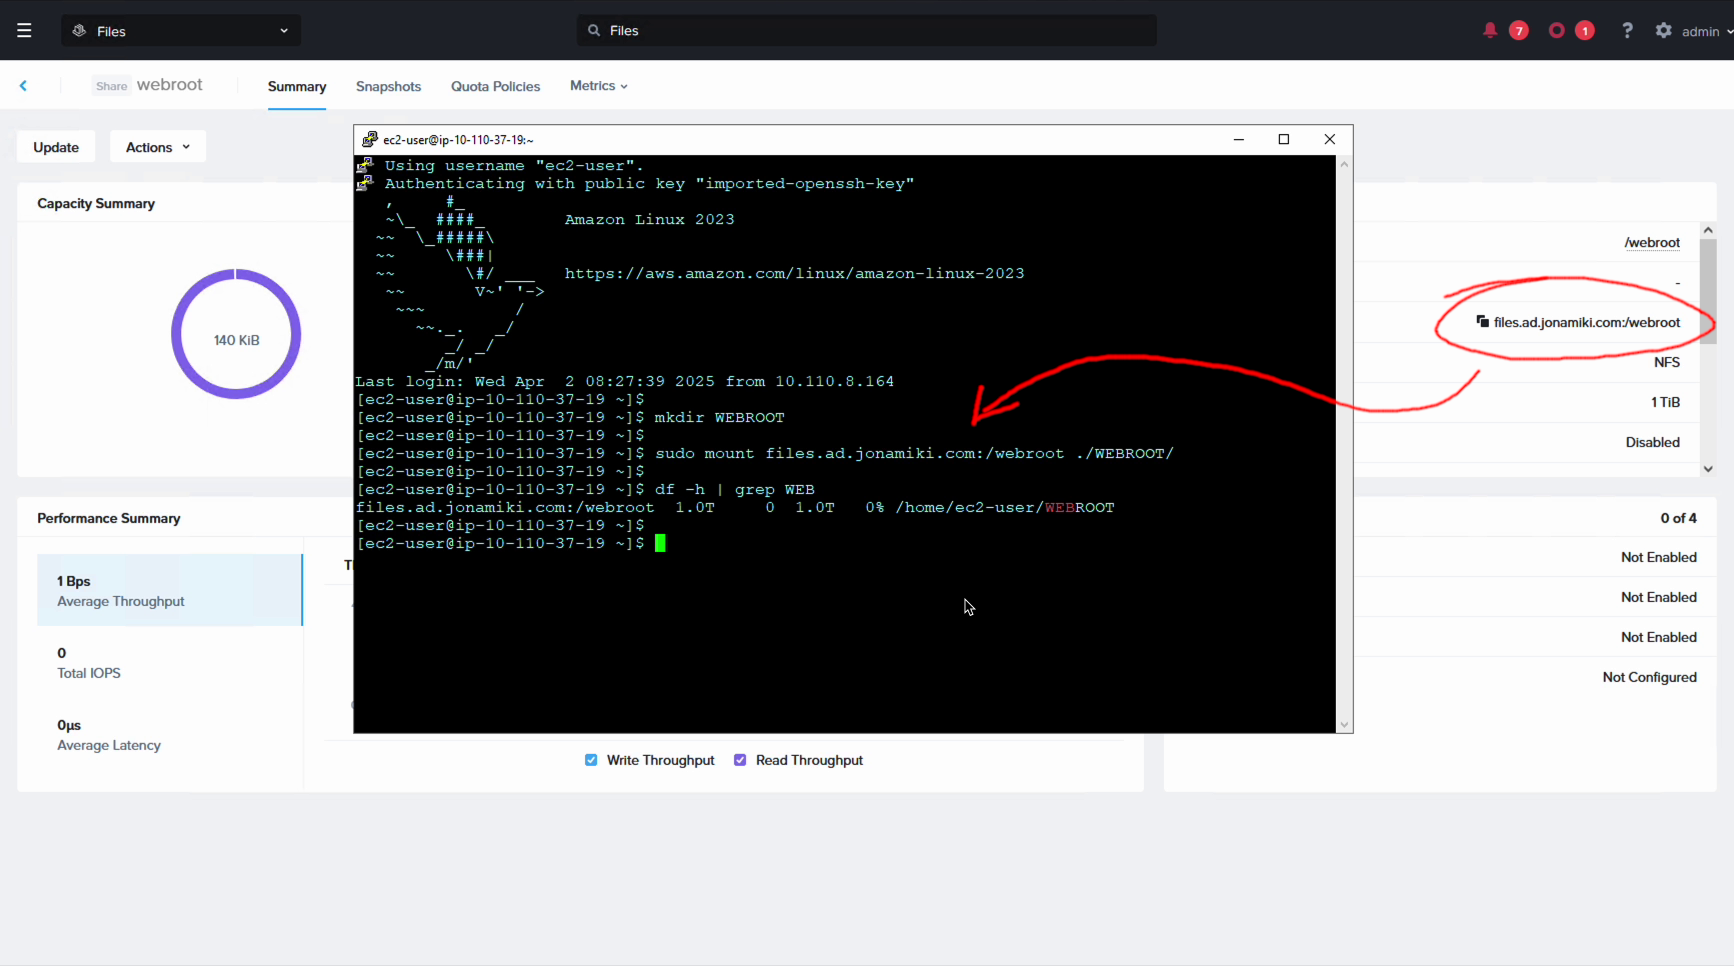
Verifying NFS access from Linux
For our Linux clients we simply map the NFS share with mount as follows:
Bonus: Cloud init to automatically mount the NFS share to the web root of a Linux web server
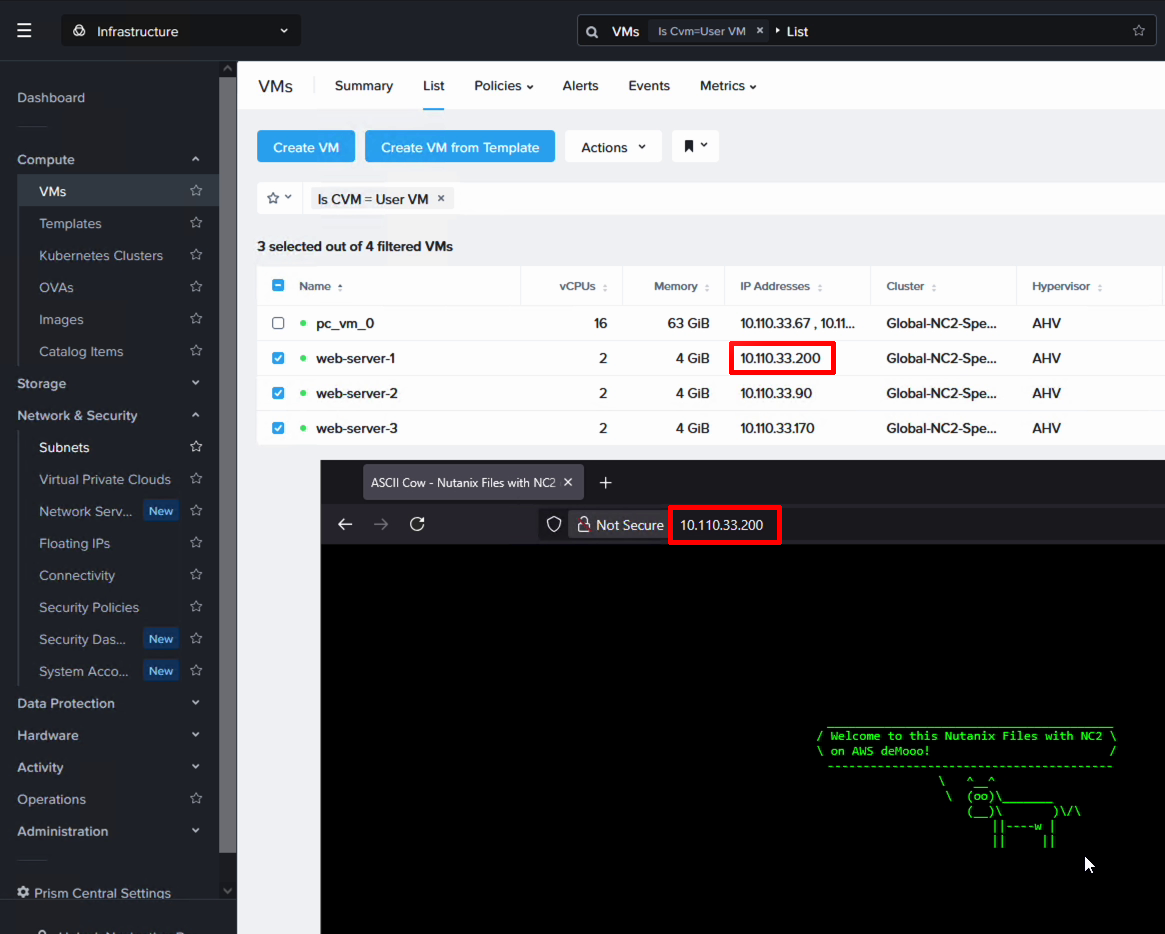
To make this more useful, for our Linux clients we can also create a cloud init script which will install Apache and mount the NFS share as the Apache web root (/var/www/html). We’ve put a nice little ASCII cow here to say both hello - it works and goodbye, because this proves that both SMB and NFS works and as such marks the end of the blog post. Thank you for reading!
cloudinit for mounting NFS at web root
In case you’d like to do the same thing and launch the web servers to point to the NFS share, please use the below cloud init script. For this demo we used the Ubuntu Jammy Jellyfish cloud image from here.
1
2
3
4
5
6
7
8
9
10
11
12
13
14
15
16
17
18
19
20
21
22
23
24
25
26
27
#cloud-config
password: "Password1!"
chpasswd: { expire: False }
ssh_pwauth: True
packages:
  - apache2
  - net-tools
  - nfs-common

write_files:
  - path: /tmp/setup_apache.sh
    permissions: '0755'
    content: |
      #!/bin/bash
      # Wait for Apache installation to complete
      while ! systemctl is-active apache2 >/dev/null 2>&1; do
        sleep 2
      done
      # Remove existing files in the Apache web root
      rm -rf /var/www/html/*
      # Mount Files share
      mount -t nfs files.ad.jonamiki.com:/webroot /var/www/html
      sed -i 's/^Listen 80/Listen 0.0.0.0:80/' /etc/apache2/ports.conf
      systemctl restart apache2

runcmd:
  - [ bash, /tmp/setup_apache.sh ]
Conclusion
This guide has shown how to deploy and configure Nutanix Files on AWS and integrating it with Nutanix Cloud Clusters onAWS. Hopefully it has been useful.
