Leveraging the AWS Client VPN Endpoint service to create a multi-tenant environment on Nutanix Cloud Clusters on AWS (NC2) with user and network segregation
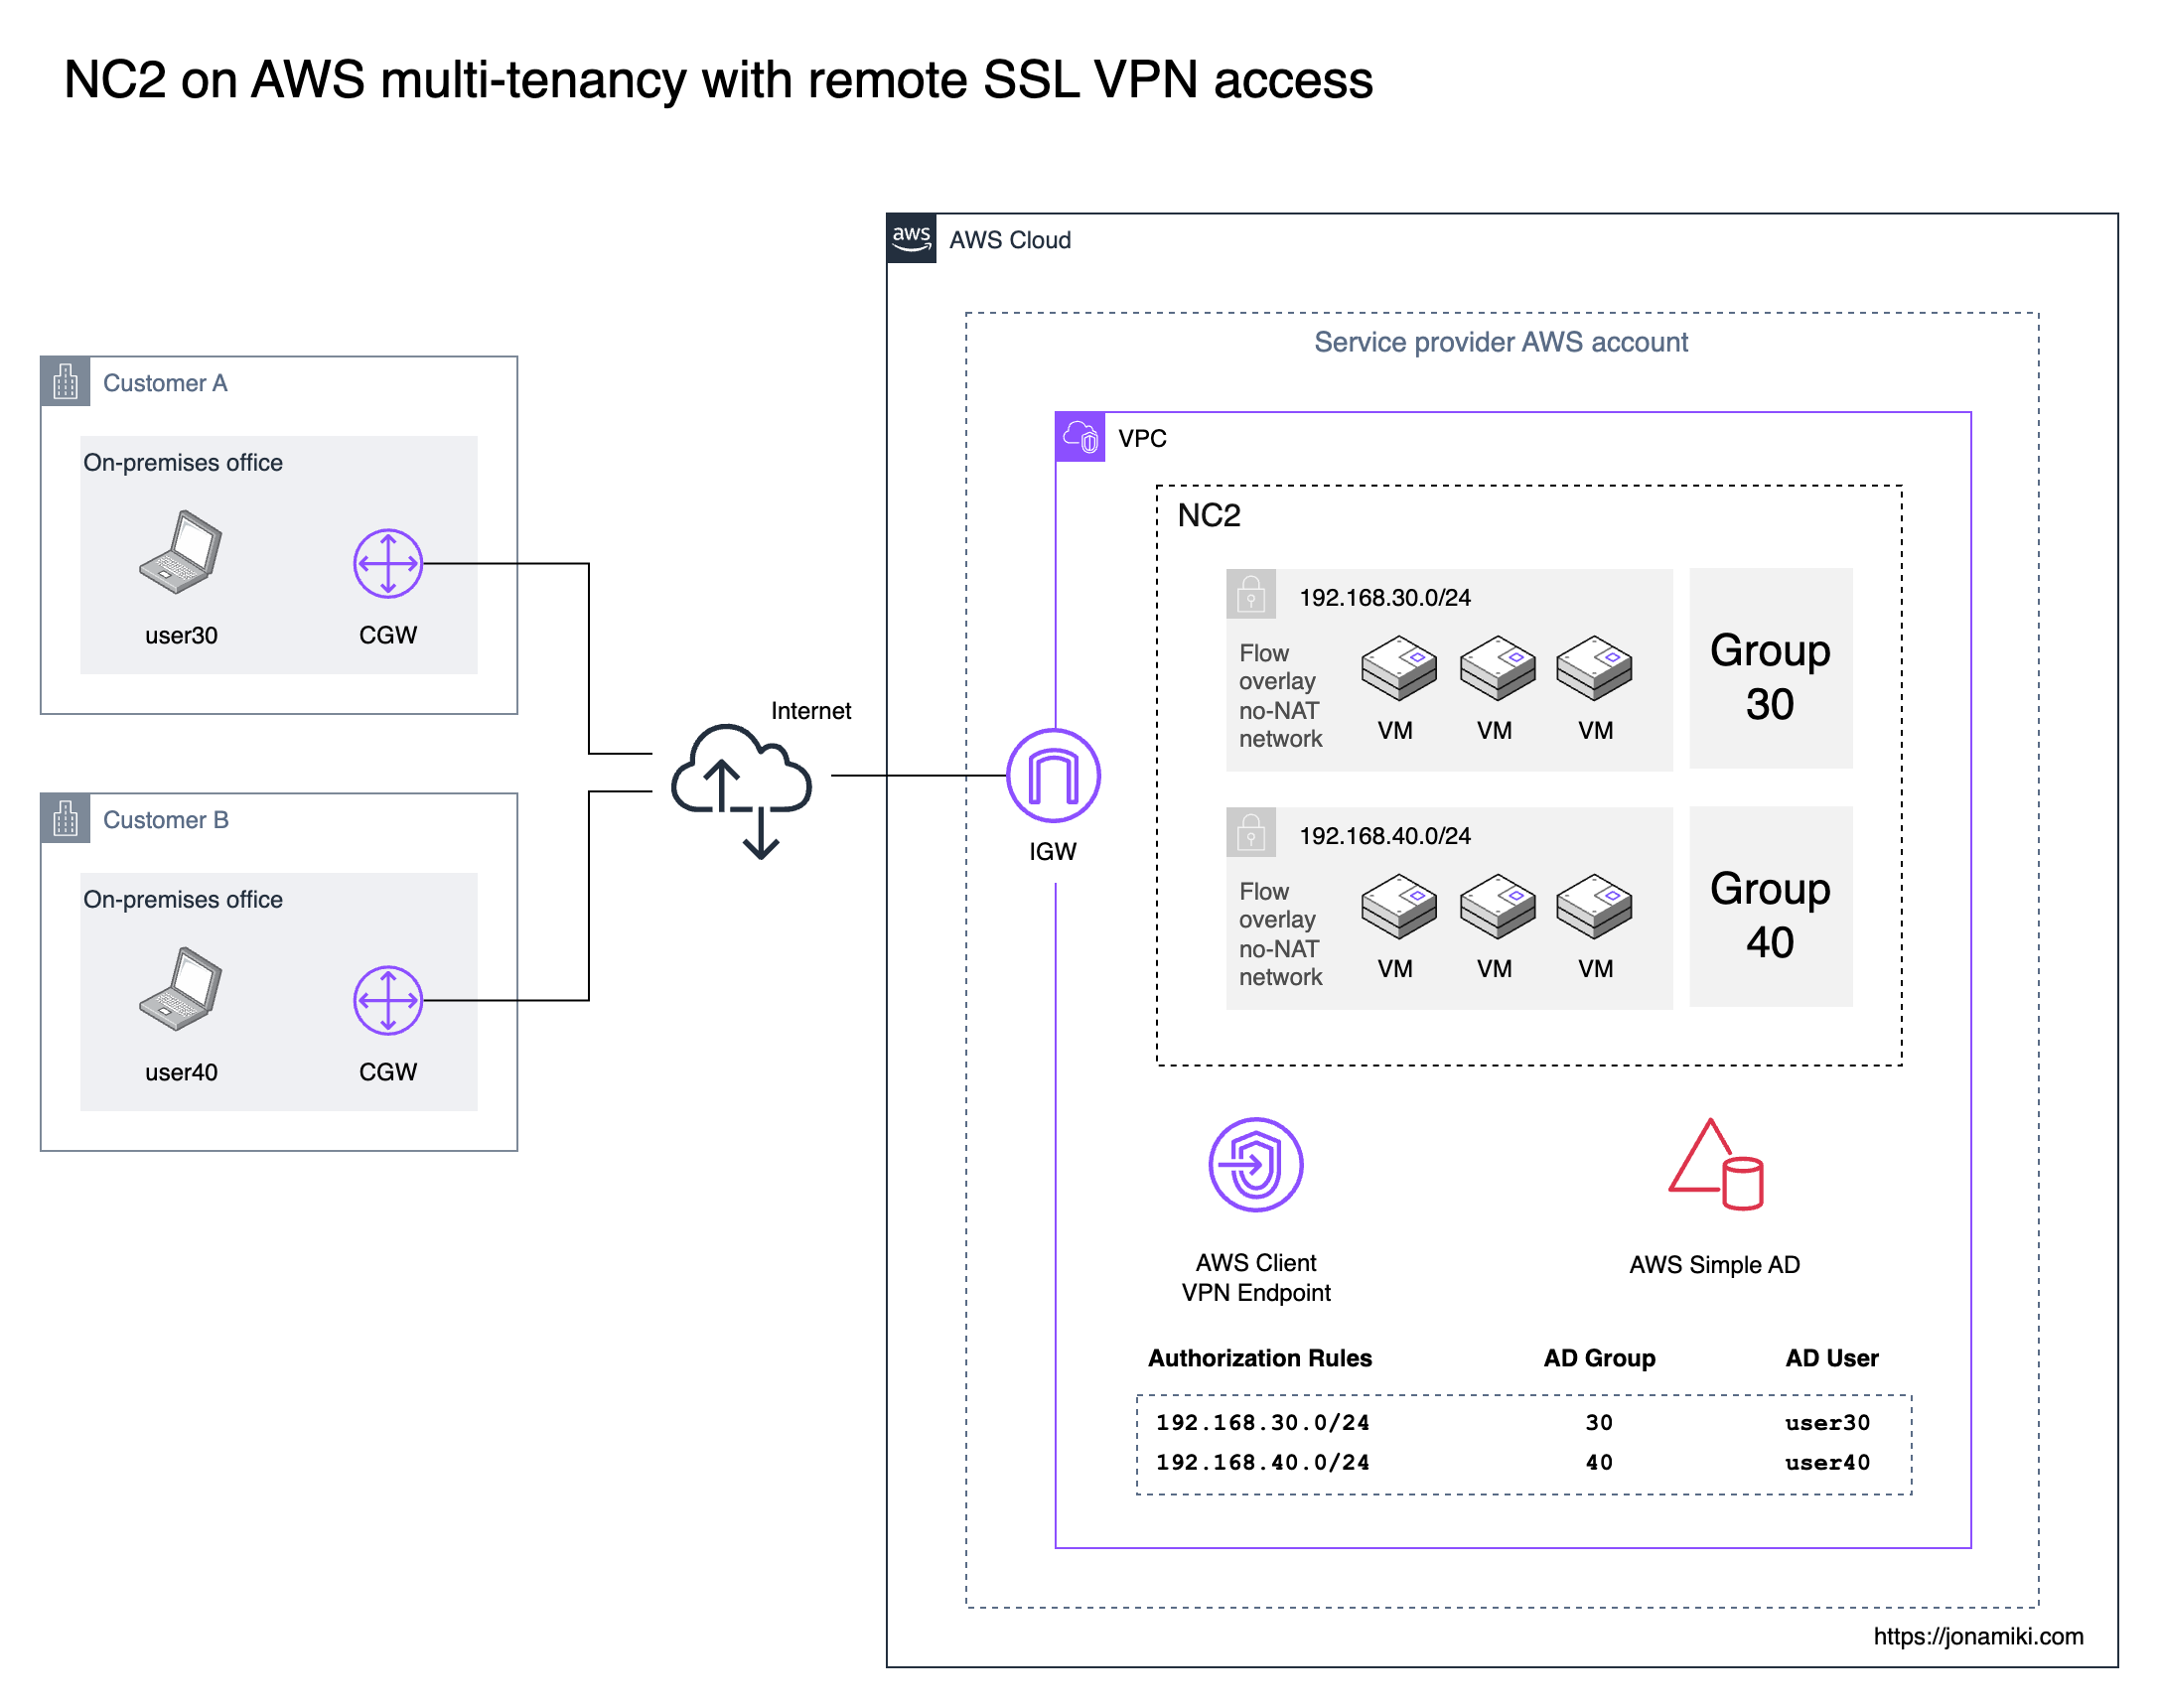
In a scenario where there are multiple groups of users who want to connect to their respective NC2 Virtual Machines (VMs) over a client VPN, we can use a combination of the AWS Client VPN Endpoint service, Active Directory and Nutanix Network Policies to allow access and still isolate the environments from each other.
Problem statement
A company wants to offer a service where VMs are made available to end users over a client VPN connection. People working at each customer company should be able to access their own VMs but have no access or visibility of VMs owned by other customers.
Solution
We deploy a Nutanix Cloud Cluster (NC2) on AWS. On the NC2 cluster, each customer gets their own separate Nutanix Flow VPC with a subnet into which their VMs can be deployed. Note that this is not an AWS VPC but a Flow Virtual Networking VPC. It does serve a similar purpose to an AWS VPC with its ability to group and isolate resources in NC2. Each Flow VPC is set to use no-NAT and have the customer subnet configured as an Externally Routable Prefix (ERP). This makes the subnet visible in the AWS VPC default route table and thereby accessible from the VPN Client Endpoint.
Authentication
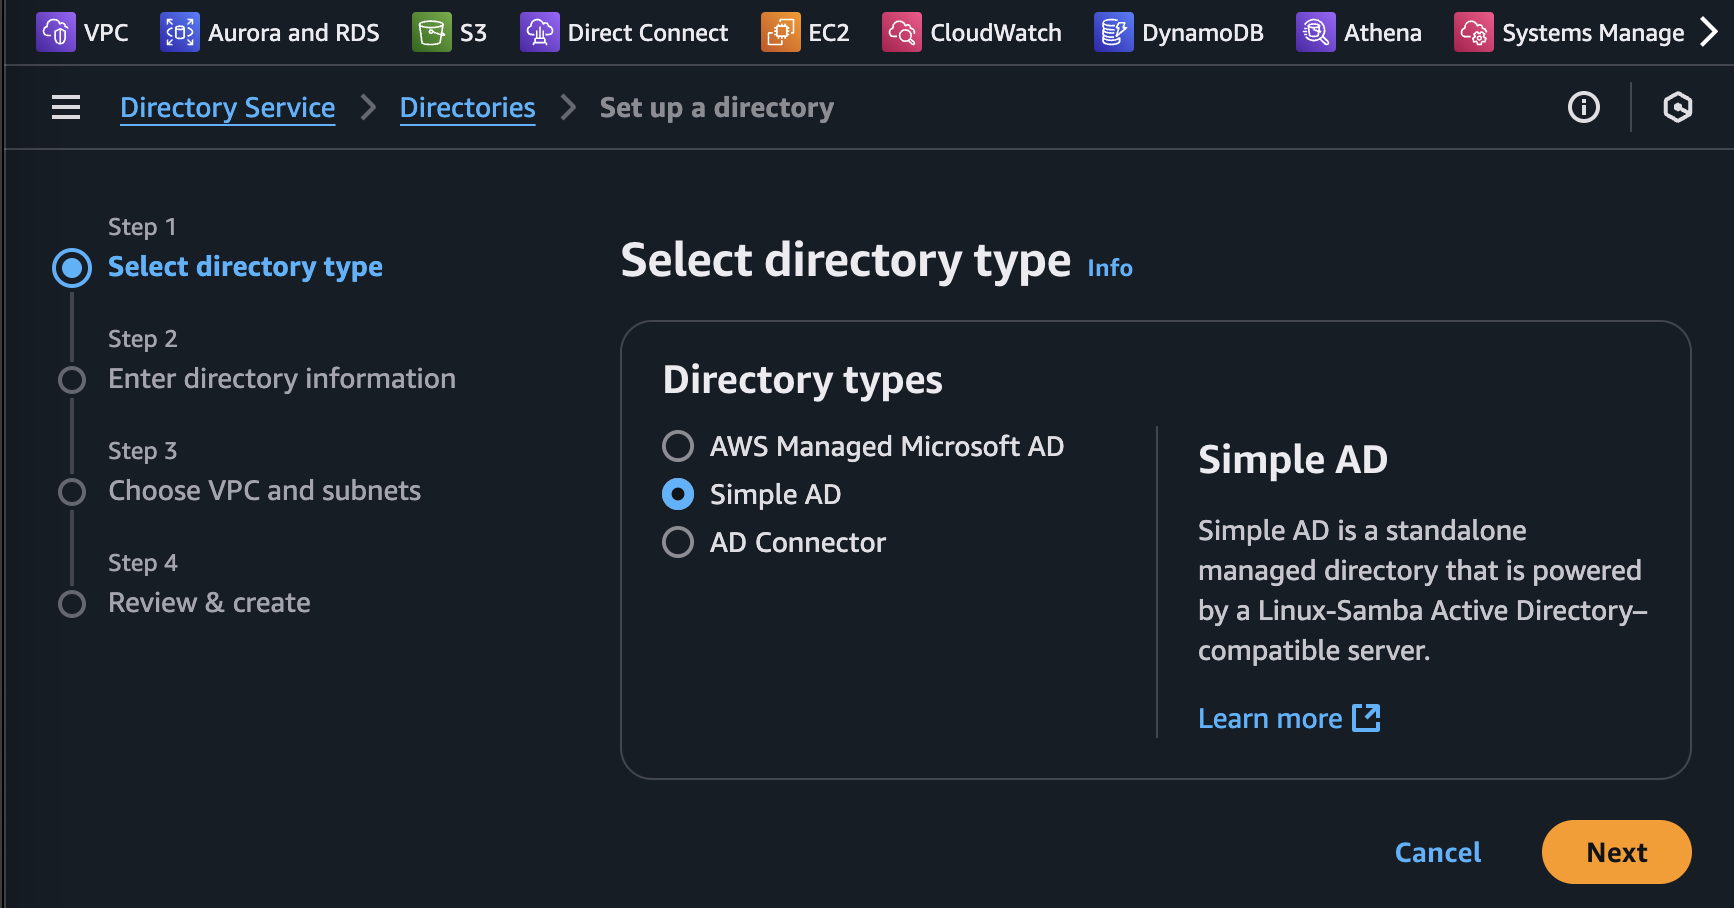
Authentication is handled by AWS managed Active Directory or by the AWS Simple AD service. In this case we leverage Simple AD since it covers all our needs for this scenario and is the cheaper alternative.
Authorization
The AWS Client VPN Endpoint service is used to provide secure access to each environment for the end users. Authorization rules within the VPN Endpoint are used to restrict users in each AD user group to their specific NC2 subnet.
Inside NC2 each customer Flow VPC is configured with Network Policies which blocks communication between them but allows internet access and access to and from the VPN service endpoint.
Architecture
In this example we have two customers, A and B, which have VMs configured on NC2 on AWS. These VMs connect to different subnets and are separated into group 30 and 40 based on the third octed of their IP address CIDR range which is ending in “30” and “40” respectively. These numbers also correspond to the AD groups and users used to authenticate customers when accessing the environment.
Prerequisites
We assume there is already an NC2 on AWS cluster deployed with Flow Virtual Networking enabled. The cluster can be otherwise unconfigured.
Environment
In this example we use the below software versions
| Entity | Version |
|---|---|
| NC2 on AWS Prism Central | pc.2024.3.1 |
| NC2 on AWS AOS | 7.0.1 |
Overview of steps
We configure the solution in the following way
- Create the NC2 on AWS Flow VPCs and subnets for each customer
- Deploy AWS Simple AD or AWS Managed AD
- Create AD groups and users for each customer
- Create a server certificate for use with the AWS Client VPN Endpoint
- Deploy the AWS Client VPN Endpoint
- Configure the VPN Endpoint security and routing settings
- Configure the Network Policies for each customer Flow VPC
Step 1: Create the NC2 on AWS Flow VPCs and subnets for each customer
Since we want to use no-NAT networking in order for the customer networks to be visible in the AWS VPC route table, we start by creating a no-nat subnet in the Flow Transit VPC.
Then we create a Flow VPC for each customer, set to use the no-NAT network we just created as the default route. In each Flow VPC we create a subnet to be used for customer VMs. Since the subnets will be visible in the AWS VPC route table, there can be no overlap of CIDR ranges for the user subnets.
Instructions for how to create the no-NAT subnet and VPCs using that subnet for external connectivity is described in detail in this blog post: https://jonamiki.com/2024/09/09/how-do-set-up-nat-and-no-nat-networking-with-nc2-on-aws/#no-nat-network-connectivity
Step 2: Deploy AWS Simple AD or AWS Managed AD
If AD is already deployed and accessible in AWS, either directly as Managed AD, Simple AD or via AD connector, feel free to use that setup. If not, Simple AD is an affordable option as it is based on Open Source software (Samba) and doesn’t require MS licenses.
No special settings are required. Just make sure to make a note of your domain Administrator password.
After the directory has been deployed, make a note of the DNS servers set for the AD service. This information will be needed later.
Step 3: Create AD groups and users for each customer
After the Active Directory installation is done, deploy or use an existing Windows instance to create users and groups. If a new AD installation was done, add your Windows instance to the domain, install the remote management tools and open up AD Users and Computers.
For your Windows instance to find the domain we need to configure the DNS settings to point to the AD instance we just deployed in Step 2. Add those DNS servers to the Windows instance IP settings, join the domain and log in as the domain administrator user (administrator@your.domain.name) with the password configured when creating the AD instance.
Note: If your Windows instance doesn’t have the Remote Server Admin Tools (RSAT) installed, it’s easy to add them through PowerShell as follows:
1
Install-WindowsFeature -Name RSAT-AD-Tools -IncludeAllSubFeature -IncludeManagementTools
Create a group for each customer. Then create at least one user per group. In this example we create the groups “30” and “40” to correspond to our customer subnets “192.168.30.0/24” and “192.168.40.0/24” as well as users to match.

Then add the users to their corresponding groups. In this case “user30” is added to the group “30”.
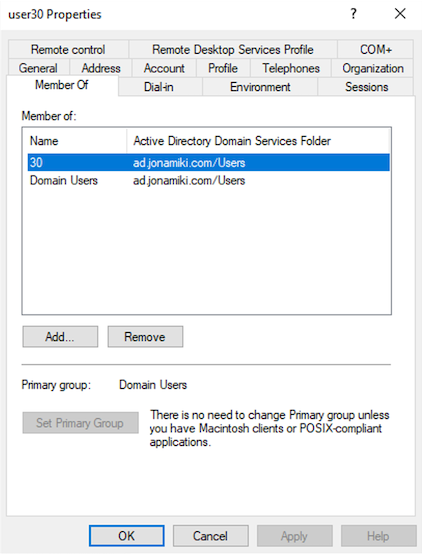
That concludes the setup required on the Active Directory / user management front. We’ll come back later to fetch the Security ID or SID for each AD group though, but no changes or additions are required beyond what we have already done above.
Step 4: Create a server certificate for use with the AWS Client VPN Endpoint
Instructions for how to do this are detailed in a separate blog post which can be found here:
https://jonamiki.com/posts/create-cert-for-aws-ssl-vpn-endpoint-service/
Step 5: Deploy the AWS Client VPN Endpoint
Now when we have our authentication solution (Active Directory) and server certificate we are almost ready to deploy the VPN Endpoint. However, in order to control access to and from the endpoint we also need an AWS Security Group. This is easily created though. In our case we leave outbound traffic rules as-is (permissive to all) and add an inbound rule to allow traffic from the AWS VPN CIDR, in our case “10.110.0.0/16”.
With the security group created we’re ready to go ahead and create the AWS Client VPN Endpoint
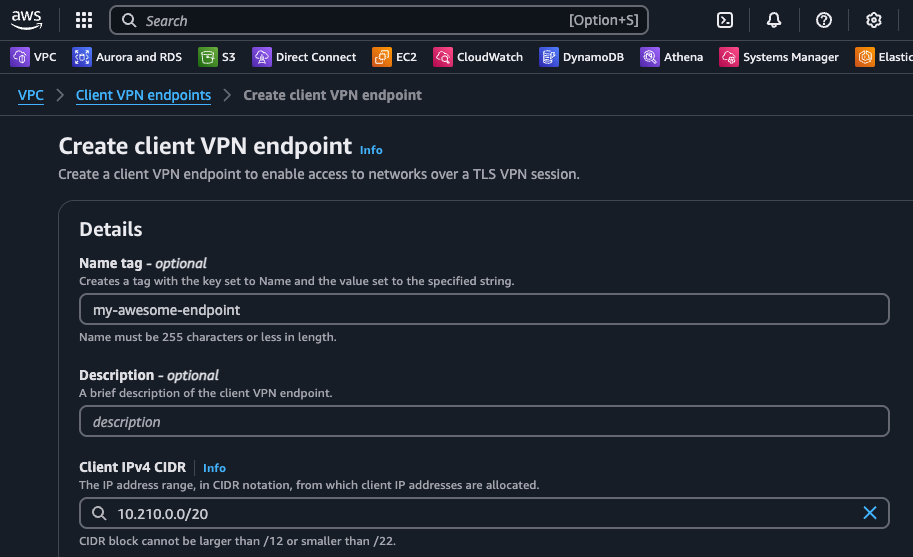
Please refer to the below table for details on how to configure the endpoint:
| Entity | Setting |
|---|---|
| Client IPv4 CIDR | Anything which doesn’t overlap with existing networks |
| Server certificate ARN | Select the certificate created in Step 4 |
| Authentication options | Check “Use user-based authentication” |
| User-based authentication options | Active Directory authentication |
| Directory ID | Your AD instance |
| DNS 1 and 2 | Use your AD DNS IP addresses |
| Transport protocol | We used UDP to reduce overhead |
| Split tunnel | Disabled (default) |
| VPC ID | Select the VPC NC2 is deployed in |
| Security group IDs | Select your Security Group created above |
| VPN port | We used 1194 for UDP to reduce overhead |
Step 6: Configure the VPN Endpoint security and routing settings
Now when the VPN Endpoint is up and running we can start configuring the security and routing settings.
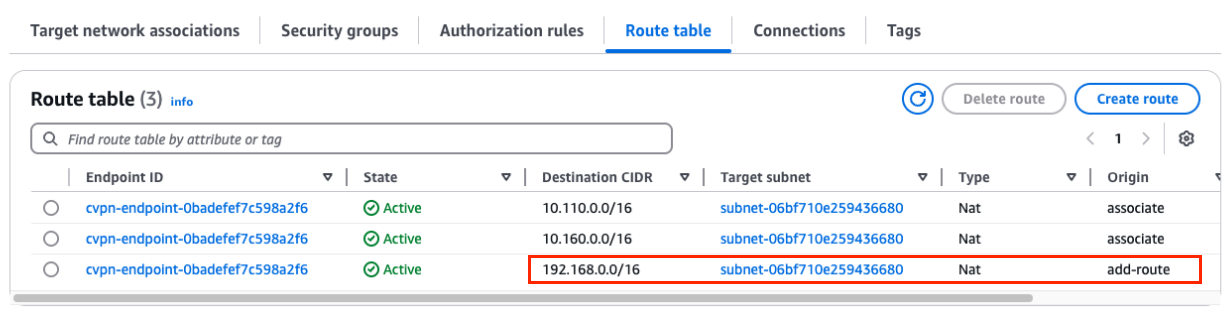
Route table
In the route table we will already have the CIDR range(s) of the VPC we deployed the VPN into. In addition we’ll need to add the CIDR range(s) of the customer networks which reside on NC2. In our example the customer subnets all start with 192.168.0.0/16 so we add that as a static route here.
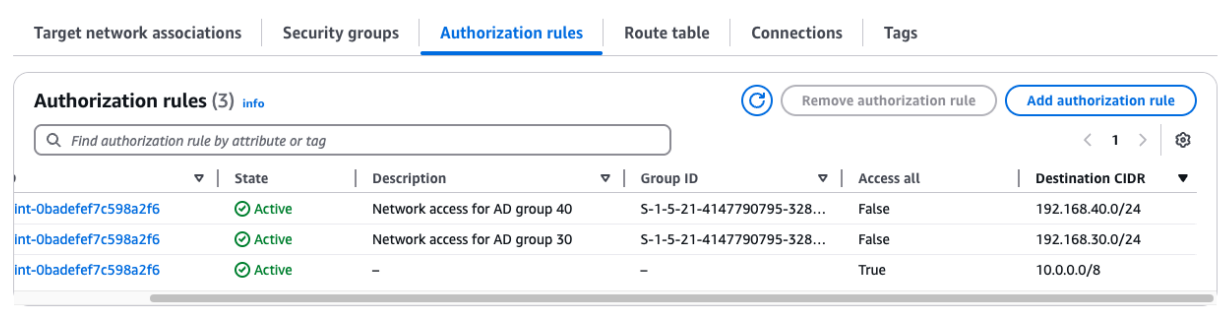
Authorization rules
In order to restrict users accessing the environment via VPN to be able to access only their specific VMs and nobody else’s, we add Authorization rules to the VPN Endpoint. Here we match the users AD group Security ID (SID) with the NC2 subnet CIDR. We also add access to the AWS VPC subnet, in this case 10.110.0.0/16.
So how to get those long security ID strings for your AD groups? These are the Active Directory group Security ID (SID) corresponding to each group. For an MS based AD installation this can be pulled with “Get-ADGroup -Identity
This is due to Simple AD not being equipped with AD Web Services. That’s fine though, because we can access the AD group SID with the below PowerShell script. Just copy and paste into a text file with the “ps1” extension, update the domain and group name to match your domain and the group you want to pull the SID for and execute.
1
2
3
4
5
6
7
8
9
10
11
12
13
14
15
16
17
18
19
$domain = "ad.jonamiki.com"
$groupName = "40"


$root = New-Object DirectoryServices.DirectoryEntry("LDAP://$domain")
$searcher = New-Object DirectoryServices.DirectorySearcher
$searcher.SearchRoot = $root
$searcher.Filter = "(&(objectClass=group)(cn=$groupName))"
$searcher.PropertiesToLoad.Add("objectSid") | Out-Null


$result = $searcher.FindOne()
if ($result) {
   $sidBytes = $result.Properties["objectSid"][0]
   $sid = New-Object System.Security.Principal.SecurityIdentifier($sidBytes, 0)
   Write-Output "Group SID: $sid"
} else {
   Write-Output "Group not found."
}
Use “Add Authorization rule” to add your SID and corresponding customer subnet CIDR.
Step 7: Configure the Network Policies for each customer Flow VPC
Now the only thing remaining is to set the Network Policies on the NC2 VPCs. These policies will be set to block traffic between customer subnets but to allow access from the VPC CIDR and also to allow web access over port 80 and 443. These rules can obviously be customized to match your customers specific needs.
In Prism Central, open up the settings of each VPC you wish to change the settings for and add the following rules:
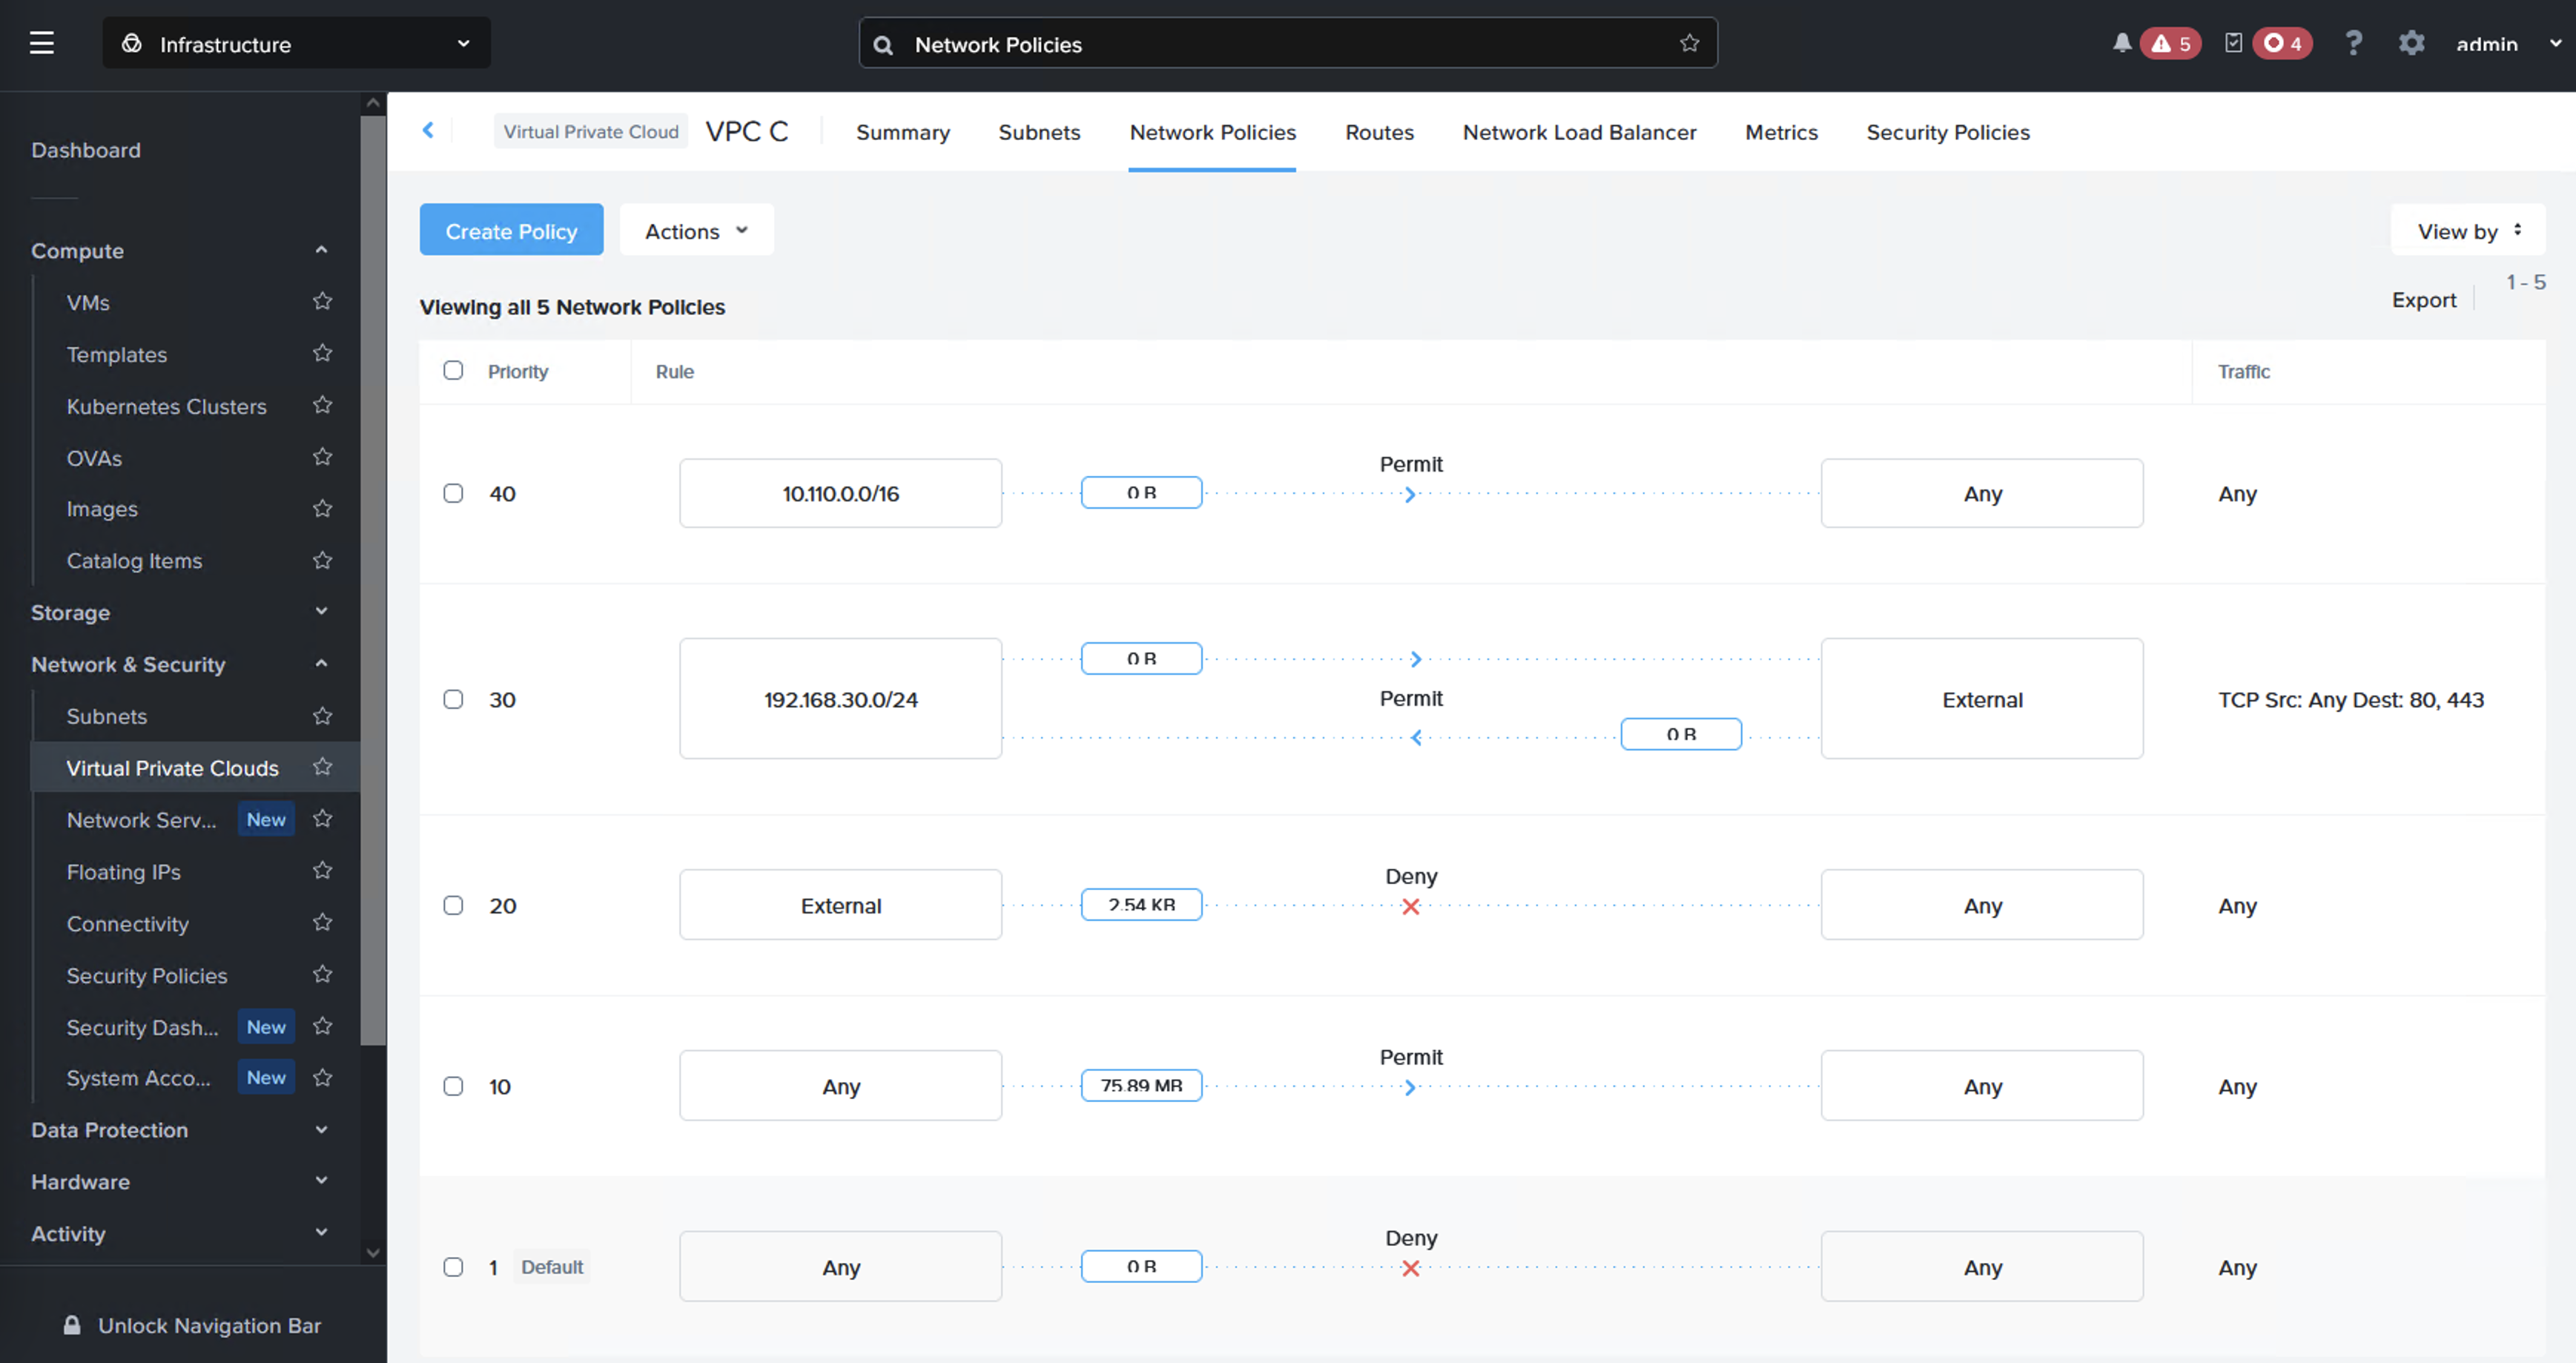
Overview of the rules used:
- Rule with priority 40 allows access for VPN clients from the AWS VPC, in this case 10.110.0.0/16.
- Rule with priority 30 allows access for the customer subnet CIDR to access web pages over port 80 and 443 using TCP.
- Rule with priority 20 blocks any traffic external to the user subnet CIDR range, effectively blocking access to and from other customer VPCs.
- Rule with priority 10 and 1 are default rules and are left in as-is.
Verification
If we connect over VPN as user “user30” or “user40” we should be able to verify that we can access only our own VMs. We should also be able to check that our own VMs can access each other and the internet but be unable to access VMs in other environments.
Download the OpenVPN configuration file from the AWS Console page where you have configured the Client VPN Endpoint.
Then it’s time to connect. We use the terminal on a Mac to execute OpenVPN installed via Brew but feel free to use an OpenVPN compatible client of your choice. In this case from the terminal we can connect with:
1
sudo /opt/homebrew/opt/openvpn/sbin/openvpn --config downloaded-client-config.ovpn
After connecting as “user30” we try to ping VMs owned by “user40” (this should fail):
1
2
3
4
5
6
7
jonas.werner@zuul AWS-Client-VPN % ping -c3 192.168.40.96
PING 192.168.40.96 (192.168.40.96): 56 data bytes
Request timeout for icmp_seq 0
Request timeout for icmp_seq 1
^C
--- 192.168.40.96 ping statistics ---
3 packets transmitted, 0 packets received, 100.0% packet loss
Then we ping to one of our own VMs (this should succeed):
1
2
3
4
5
6
7
8
9
jonas.werner@zuul AWS-Client-VPN % ping -c3 192.168.30.27
PING 192.168.30.27 (192.168.30.27): 56 data bytes
64 bytes from 192.168.30.27: icmp_seq=0 ttl=61 time=11.292 ms
64 bytes from 192.168.30.27: icmp_seq=1 ttl=61 time=9.811 ms
64 bytes from 192.168.30.27: icmp_seq=2 ttl=61 time=14.671 ms

--- 192.168.30.27 ping statistics ---
3 packets transmitted, 3 packets received, 0.0% packet loss
round-trip min/avg/max/stddev = 9.811/11.925/14.671/2.034 ms
To verify connectivity between VMs we SSH to one of our VMs (this should succeed):
1
2
3
4
5
6
7
8
9
10
11
12
13
14
jonas.werner@zuul AWS-Client-VPN % ssh ubuntu@192.168.30.27
The authenticity of host '192.168.30.27 (192.168.30.27)' can't be established.
ED25519 key fingerprint is SHA256:mIKOTglVSSM0RcypMxkXDgaqkmPvhwqbWi8W7bIYbtM.
This key is not known by any other names.
Are you sure you want to continue connecting (yes/no/[fingerprint])? yes
Warning: Permanently added '192.168.30.27' (ED25519) to the list of known hosts.
ubuntu@192.168.30.27's password:
Welcome to Ubuntu 22.04.5 LTS (GNU/Linux 5.15.0-134-generic x86_64)
  Memory usage: 11%           	IPv4 address for ens3: 192.168.30.27
  Swap usage:   0%
Last login: Tue Mar 25 05:10:34 2025 from 10.110.8.164

ubuntu@ubuntu:~$
ubuntu@ubuntu:~$
Then we try to ping a VM owned by another customer (this should fail):
1
2
3
4
5
ubuntu@ubuntu:~$ ping -c3 192.168.40.96
PING 192.168.40.96 (192.168.40.96) 56(84) bytes of data.
^C
--- 192.168.40.96 ping statistics ---
3 packets transmitted, 0 received, 100% packet loss, time 2052ms
Finally we try to access the internet (this should succeed):
1
2
3
4
5
6
7
8
9
10
ubuntu@ubuntu:~$ curl https://jonamiki.com/cowsay.txt
 ______________________________
< Welcome to this NC2 deMoooo! >
 ------------------------------
        \   ^__^
         \  (oo)\_______
            (__)\       )\/\
                ||----w |
                ||     ||
ubuntu@ubuntu:~$
As was initially desired, the user can access their own VMs and the internet but nothing else. The same tests can be executed with a user from another group and would yield the same results.
Conclusion
This guide has covered how to deploy and configure a multi-tenant environment where end users are accessing their NC2 VMs over an SSL VPN connection using OpenVPN. Hopefully it has been useful.