Federated Authentication to CoreWeave Kubernetes with an External OIDC Provider
How to configure CoreWeave Kubernetes Service for external OIDC authentication, then use kubelogin so kubectl users can sign in through Google OAuth or another identity provider.
Federated Authentication to CoreWeave Kubernetes with an External OIDC Provider
Most Kubernetes teams eventually want kubectl access to fit into the same identity system they already use everywhere else. That means authenticating users through an external OpenID Connect (OIDC) identity provider.
On CoreWeave Kubernetes Service (CKS), this is configured by teaching the
cluster to trust your OIDC issuer, then using a kubectl exec plugin such as
kubelogin to request an ID token from that issuer. Once the token is
presented to the Kubernetes API server, normal Kubernetes RBAC decides what the
user can do.
This post walks through the full setup using Google OAuth as the example OIDC provider. The same pattern applies to other OIDC providers once you adapt the issuer URL, client ID, client secret, scopes, and claims to that provider.
What we are building
The final flow has two separate parts:
- The cluster is configured once to trust the external OIDC provider.
- Each kubectl user signs in through that provider and presents the resulting token to the unmanaged Kubernetes API endpoint.
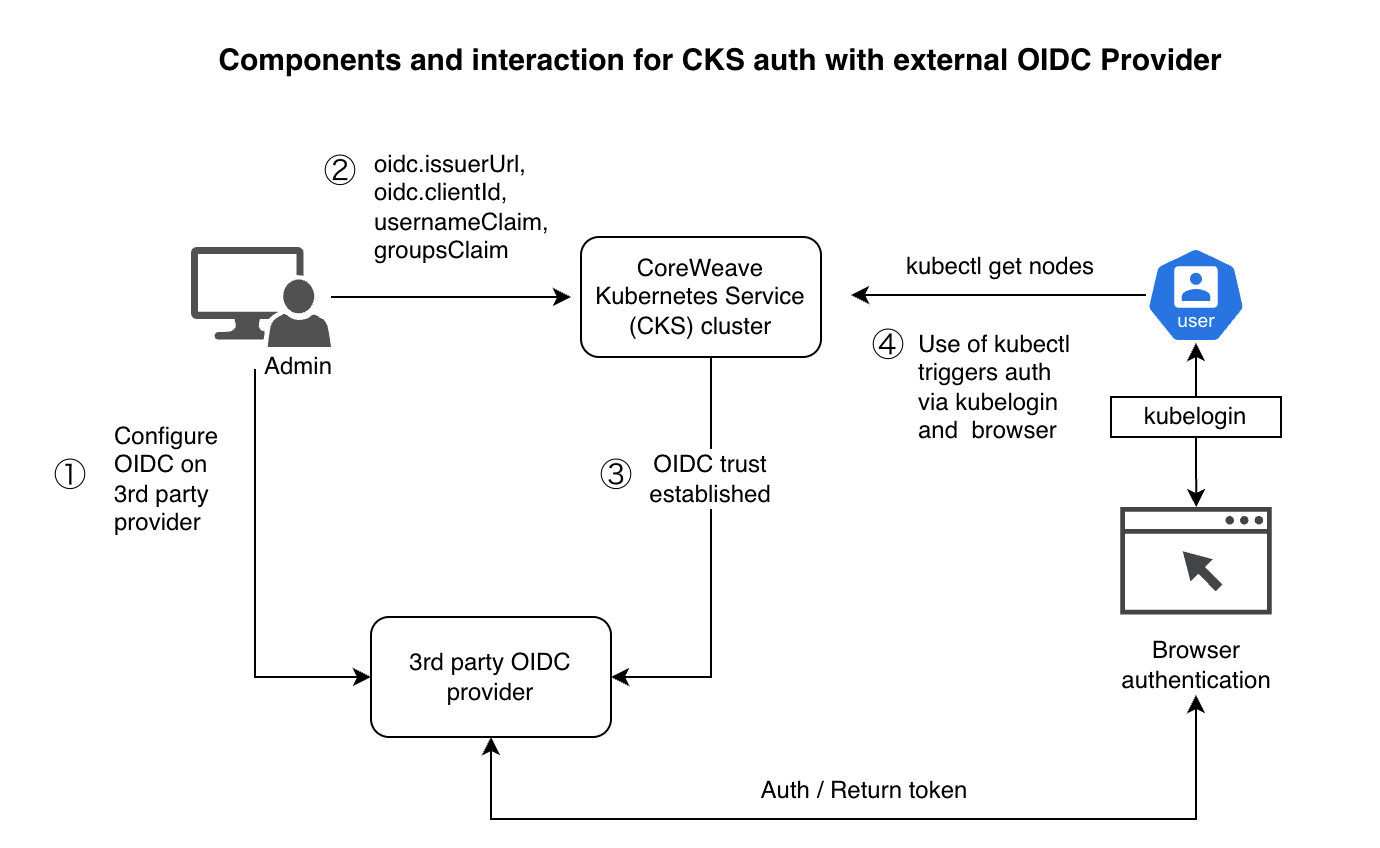 OIDC authentication flow:
 kubelogin sends the user to the external provider, receives an ID token, and presents it to the CKS unmanaged API endpoint.
There are two important boundaries to keep clear:
- OIDC user authentication controls who can authenticate to the Kubernetes API.
- Kubernetes RBAC controls what that authenticated identity can do.
This is also different from Workload Identity Federation, where workloads running inside a cluster authenticate to an external cloud provider. In this setup, a human user is authenticating to Kubernetes.
Where this fits in CoreWeave authentication
CoreWeave supports several identity-related flows that use similar language but solve different problems:
- Managed authentication uses CoreWeave-managed user identities to access the Kubernetes API.
- Unmanaged authentication lets you use Kubernetes-native authentication mechanisms, including OIDC tokens, against a dedicated unmanaged API endpoint.
- OIDC Workload Identity lets workloads running inside CKS authenticate to external services such as Google Cloud, AWS, or SaaS APIs.
- Automated User Provisioning uses SCIM to synchronize users and groups from an identity provider into the CoreWeave Cloud Console.
This tutorial is about unmanaged authentication for human or operator kubectl access. It configures the CKS API server to trust an external OIDC provider, then configures kubectl to obtain OIDC tokens from that provider.
Mapping Kubernetes OIDC flags to CKS
If you have configured OIDC on a self-managed Kubernetes API server before, the CKS fields map directly to the familiar kube-apiserver flags:
| Kubernetes API server flag | CKS API field | Terraform field |
|---|---|---|
--oidc-issuer-url |
oidc.issuerUrl |
oidc.issuer_url |
--oidc-client-id |
oidc.clientId |
oidc.client_id |
--oidc-username-claim |
oidc.usernameClaim |
oidc.username_claim |
--oidc-username-prefix |
oidc.usernamePrefix |
oidc.username_prefix |
--oidc-groups-claim |
oidc.groupsClaim |
oidc.groups_claim |
--oidc-groups-prefix |
oidc.groupsPrefix |
oidc.groups_prefix |
--oidc-required-claim |
oidc.requiredClaim |
oidc.required_claim |
--oidc-signing-algs |
oidc.signingAlgorithms |
oidc.signing_algs |
--oidc-ca-file |
oidc.ca |
oidc.ca |
CKS applies these values to the managed Kubernetes control plane on your behalf. There is no need to post OIDC tokens or IdP metadata to the Kubernetes API endpoint itself. Instead, you update the CKS cluster configuration through the CKS management API, Terraform, or supported Console workflows.
Prerequisites
You need a CoreWeave CKS cluster and an API access token with permission to read and update that cluster. For external authentication, you also need access to an OIDC identity provider you control. To follow along, install these CLI tools:
kubectl.kubelogin.jq.
You also need an admin kubeconfig for the CKS cluster to create the first RBAC binding for your OIDC user.
On macOS, one common way to install kubelogin is:
1
brew install int128/kubelogin/kubelogin
Step 1: Create an OIDC client application
Start by creating an OIDC application in your identity provider. We will use Google for this walkthrough.
For Google OAuth:
- Open Google Cloud Console.
- Create a new project or select an existing one.
- In Google Auth Platform, configure the app name shown on the OAuth consent
screen. Use something users will recognize, such as
<org>-<cluster>-kubelogin. - Go to APIs & Services, then Credentials.
- Create an OAuth client ID.
- Choose Web application.
- Add this authorized redirect URI:
1
http://localhost:8000
- If the OAuth app is in testing mode, add the Google accounts that will run this tutorial as test users in the Google Auth Platform -> Audience page.
- Save the generated client ID and client secret.
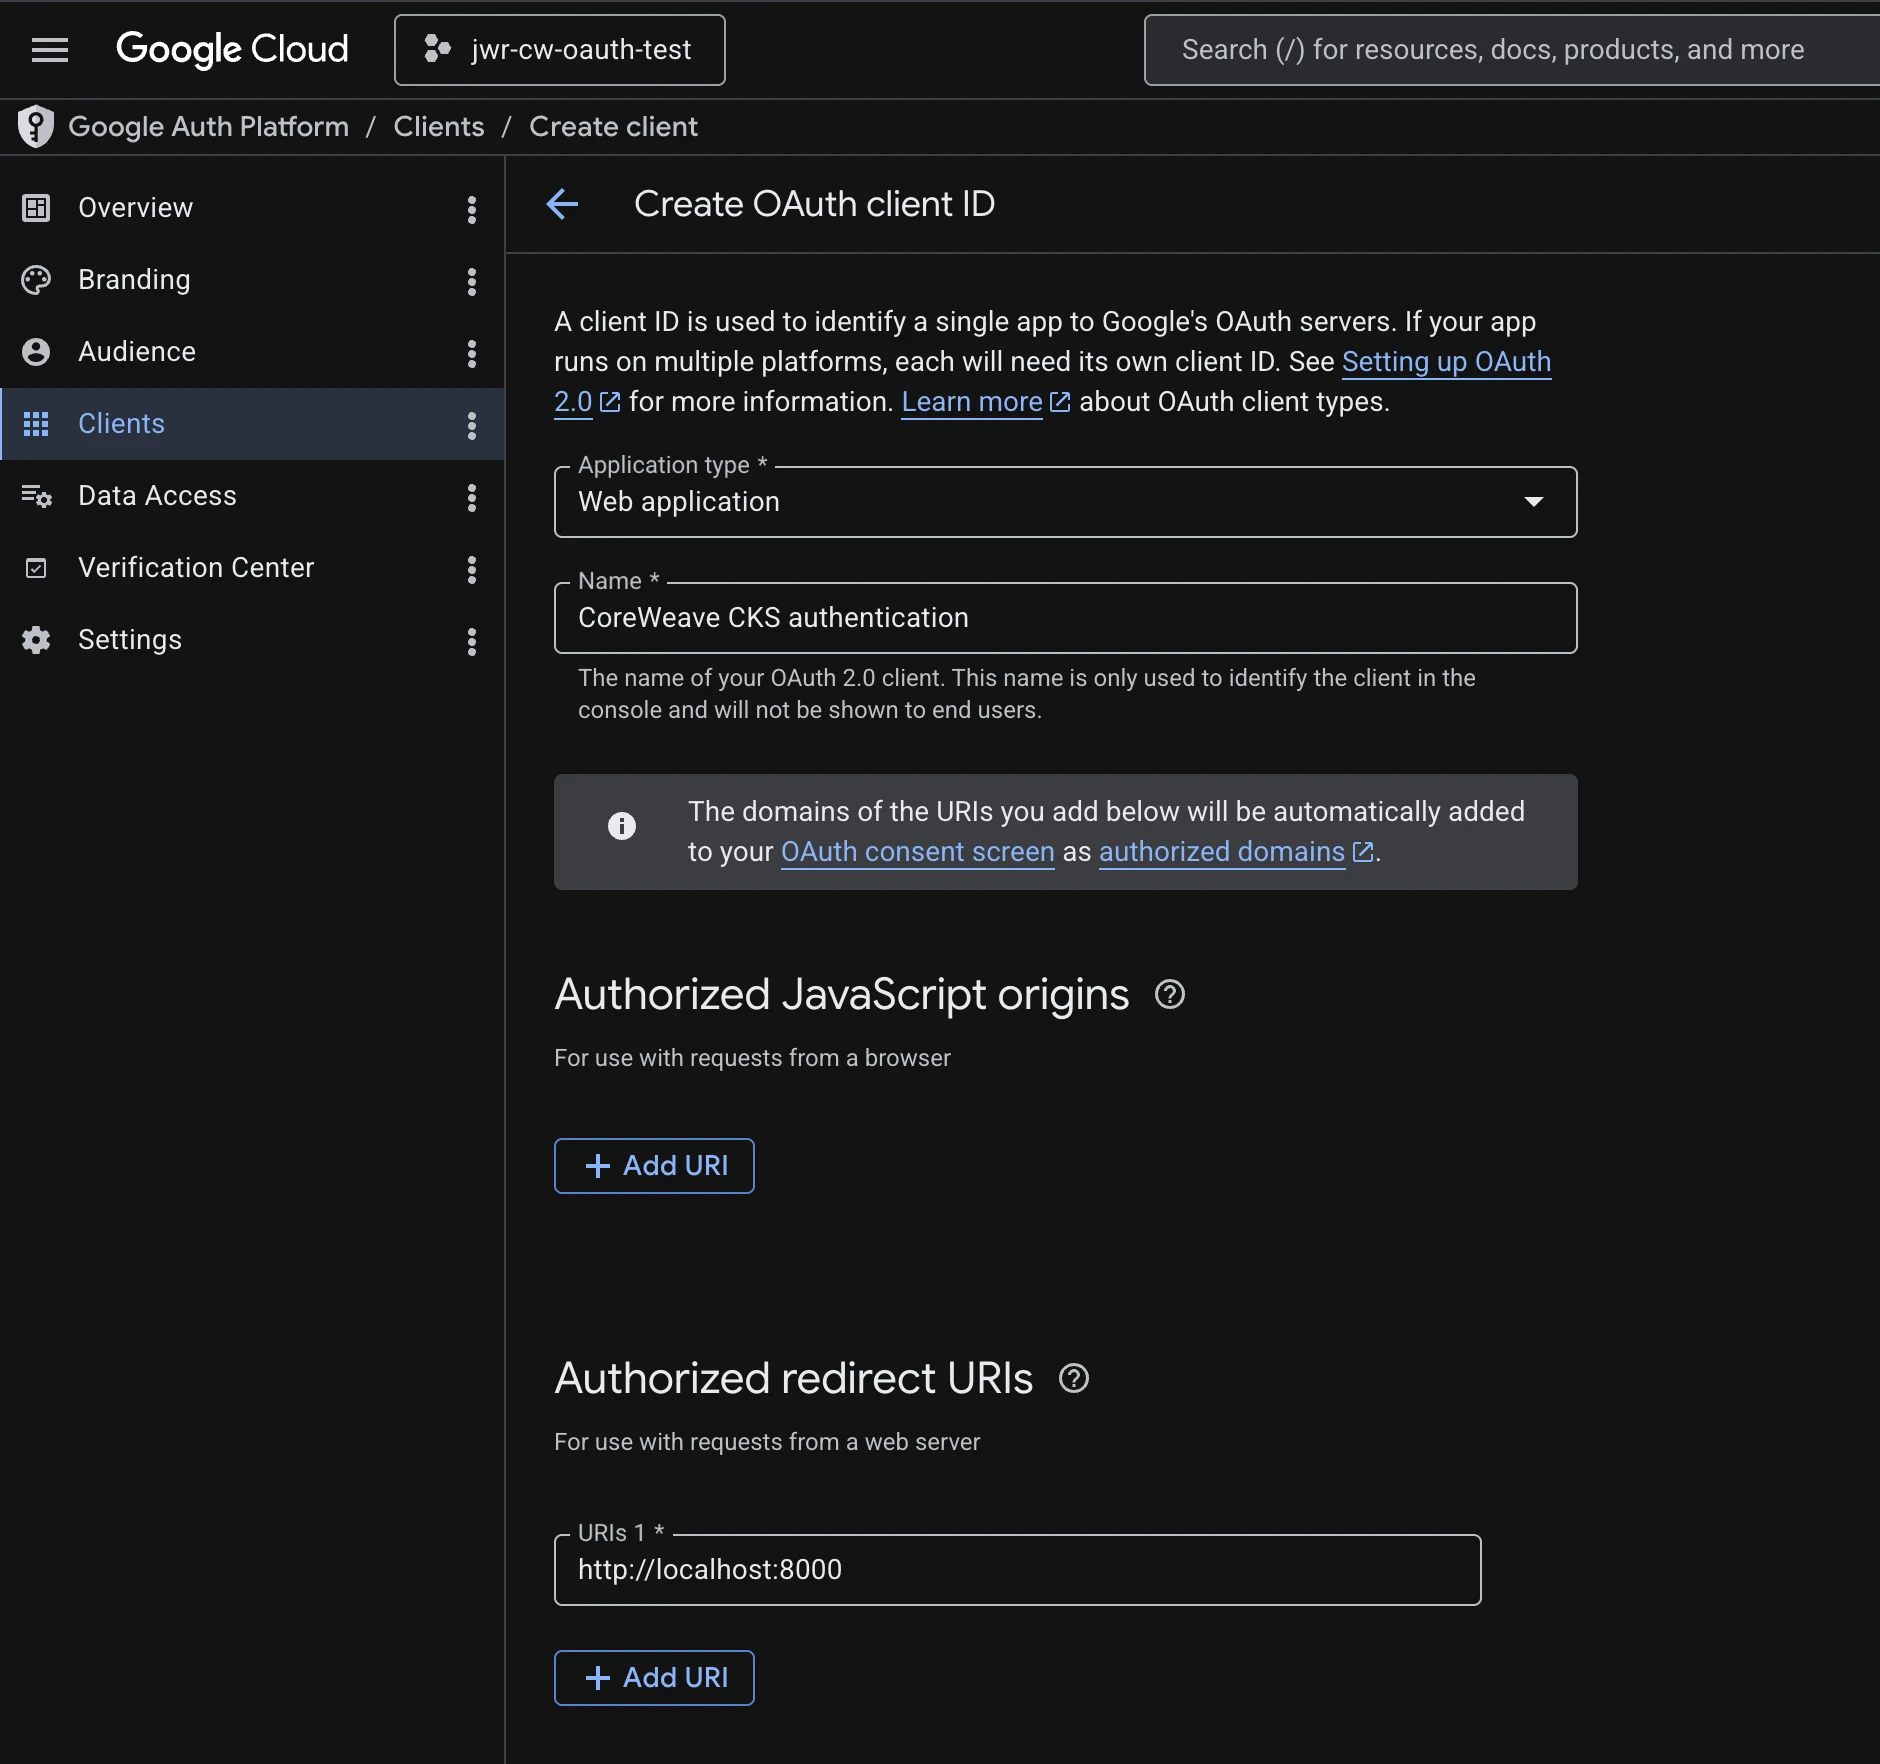 Google OAuth client configuration with the
 http://localhost:8000 authorized redirect URI used by kubelogin.
The redirect URI is used by kubelogin during local browser authentication.
The test users list is only for Google’s OAuth app testing mode; it is not the
same thing as an identity provider group or a Kubernetes RBAC group.
During login, Google shows the OAuth app name from the Google Auth Platform
consent screen. That name is cosmetic from Kubernetes’ perspective, but it is
worth setting it to something recognizable, such as cks-kubelogin-prod or
<org>-<cluster>-kubelogin, so users can tell they are approving the expected
application.
For the Google example in this post, the issuer URL is:
1
https://accounts.google.com
Step 2: Find your CKS cluster ID and version
Set your CoreWeave API token:
1
export TOKEN="<COREWEAVE_API_ACCESS_TOKEN>"
List your CKS clusters:
1
2
3
4
curl -s https://api.coreweave.com/v1beta1/cks/clusters \
  -H "Authorization: Bearer $TOKEN" \
  -H "Content-Type: application/json" \
  | jq '.items[] | {id, name, version, apiServerEndpoint}'
For non-production or staging environments, use the corresponding CoreWeave API base URL instead.
Record these values:
idversionapiServerEndpoint
You will use the cluster id and version in the PATCH request. You will use
the API server endpoint later when configuring kubectl.
 CKS cluster details showing the cluster ID, version, and API server endpoint needed for OIDC configuration.
Step 3: Configure OIDC trust on the cluster
The cluster must be configured to trust your OIDC issuer. For the Google
example, PATCH the cluster with this oidc block:
1
2
3
4
5
6
7
8
9
10
11
12
13
14
15
16
17
18
export CLUSTER_ID="<CLUSTER_ID>"
export CLUSTER_VERSION="<CLUSTER_VERSION>"
export OIDC_ISSUER_URL="https://accounts.google.com"
export OIDC_CLIENT_ID="<GOOGLE_OIDC_CLIENT_ID>"

curl -s -X PATCH "https://api.coreweave.com/v1beta1/cks/clusters/$CLUSTER_ID" \
  -H "Authorization: Bearer $TOKEN" \
  -H "Content-Type: application/json" \
  -d "{
    \"id\": \"$CLUSTER_ID\",
    \"version\": \"$CLUSTER_VERSION\",
    \"oidc\": {
      \"issuerUrl\": \"$OIDC_ISSUER_URL\",
      \"clientId\": \"$OIDC_CLIENT_ID\",
      \"usernameClaim\": \"email\"
    },
    \"updateMask\": \"oidc.issuerUrl,oidc.clientId,oidc.usernameClaim\"
  }"
There are three details worth calling out:
idandversionare required in the PATCH body.updateMaskmust name the specific OIDC fields being updated.usernameClaimcontrols the Kubernetes username derived from the OIDC token.
Using email is convenient for this walkthrough because it makes the
Kubernetes username easy to recognize, such as alice@example.com.
If you want to authorize users through OIDC group claims, configure the group claim fields supported by your provider:
1
2
3
4
5
6
7
8
9
{
  "oidc": {
    "issuerUrl": "<OIDC_ISSUER_URL>",
    "clientId": "<OIDC_CLIENT_ID>",
    "usernameClaim": "email",
    "groupsClaim": "<GROUPS_CLAIM>",
    "groupsPrefix": "<GROUPS_PREFIX>"
  }
}
Step 4: Verify the OIDC configuration
After the PATCH request, the cluster may briefly enter an updating state. Query
the cluster until it is no longer updating and the oidc block is present:
1
2
3
4
curl -s "https://api.coreweave.com/v1beta1/cks/clusters/$CLUSTER_ID" \
  -H "Authorization: Bearer $TOKEN" \
  -H "Content-Type: application/json" \
  | jq '.cluster | {status, oidc}'
Example response when up and running:
1
2
3
4
5
6
7
8
{
  "status": "STATUS_RUNNING",
  "oidc": {
    "issuerUrl": "https://accounts.google.com",
    "clientId": "my-id.apps.googleusercontent.com",
    "usernameClaim": "email"
  }
}
Step 5: Create an RBAC binding for the OIDC user
Authentication is now configured, but authorization still needs to be granted. Kubernetes will not automatically give the OIDC user permissions.
Using an existing admin kubeconfig, create a binding for the OIDC identity:
1
2
3
4
5
6
export KUBECONFIG="<PATH_TO_EXISTING_ADMIN_KUBECONFIG>"
export OIDC_USERNAME="<USER_EMAIL_ADDRESS>"

kubectl create clusterrolebinding oidc-user-admin \
  --clusterrole=cluster-admin \
  --user="$OIDC_USERNAME"
For a production setup, scope this more narrowly than cluster-admin. The
important part is that the --user value must exactly match the username claim
that Kubernetes will read from the OIDC token.
For this Google example, because the cluster is configured with
usernameClaim: email, the RBAC subject should be the user’s email address.
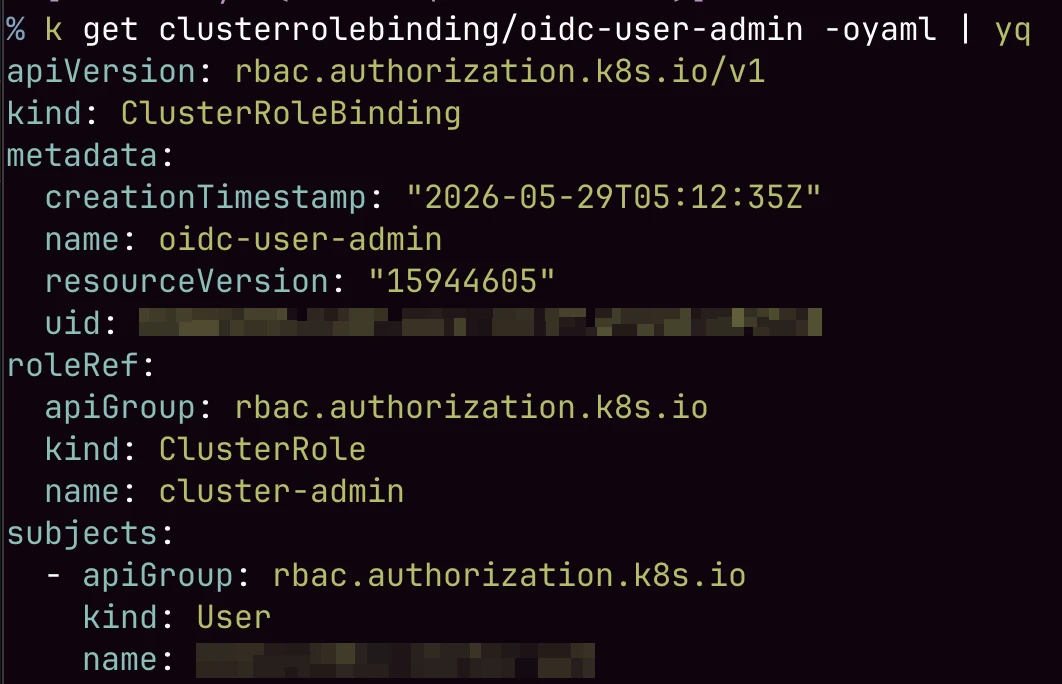 Creating an RBAC binding for the OIDC user or group that will authenticate through
 kubelogin.
If your identity provider includes group claims and you configured
groupsClaim, you can bind RBAC to a group instead. The RBAC group name must
match the claim value after Kubernetes applies any configured groupsPrefix.
For example:
1
2
3
kubectl create clusterrolebinding oidc-platform-admins \
  --clusterrole=cluster-admin \
  --group="<GROUPS_PREFIX><GROUP_NAME>"
For production, group-based RBAC is usually easier to operate than creating individual bindings for each user.
Step 6: Configure a kubectl context that uses kubelogin
Now create a new kubectl context that points at the unmanaged CKS API endpoint. The unmanaged endpoint is the endpoint that accepts Kubernetes-native auth methods such as OIDC tokens.
Start from the exact cluster endpoint hostname returned by the CKS API. Then
add the api. prefix to the hostname. Do not substitute the cluster display
name for the endpoint hash.
The resulting endpoint format is:
1
https://api.<cluster-endpoint-hostname>
For example, if the cluster endpoint hostname is:
1
<org-id>-<cluster-hash>.k8s.<zone>.coreweave.com
then the unmanaged API endpoint uses:
1
https://api.<org-id>-<cluster-hash>.k8s.<zone>.coreweave.com
Set a few variables:
1
2
3
4
export OIDC_CONTEXT="cks-oidc"
export OIDC_CREDENTIAL="cks-oidc-user"
export UNMANAGED_API_SERVER="https://api.<org-id>-<cluster-hash>.k8s.<zone>.coreweave.com"
export OIDC_CLIENT_SECRET="<GOOGLE_OIDC_CLIENT_SECRET>"
The api. prefix is required. Without it, kubectl will use the managed CKS
endpoint instead of the unmanaged endpoint that accepts Kubernetes-native OIDC
tokens.
Configure the cluster:
1
2
kubectl config set-cluster "$OIDC_CONTEXT" \
  --server="$UNMANAGED_API_SERVER"
Configure credentials with kubelogin:
1
2
3
4
5
6
7
8
9
kubectl config set-credentials "$OIDC_CREDENTIAL" \
  --exec-api-version=client.authentication.k8s.io/v1beta1 \
  --exec-command=kubectl \
  --exec-arg=oidc-login \
  --exec-arg=get-token \
  --exec-arg=--oidc-issuer-url="$OIDC_ISSUER_URL" \
  --exec-arg=--oidc-client-id="$OIDC_CLIENT_ID" \
  --exec-arg=--oidc-client-secret="$OIDC_CLIENT_SECRET" \
  --exec-arg=--oidc-extra-scope=email
Create and select the context:
1
2
3
4
5
kubectl config set-context "$OIDC_CONTEXT" \
  --cluster="$OIDC_CONTEXT" \
  --user="$OIDC_CREDENTIAL"

kubectl config use-context "$OIDC_CONTEXT"
Before testing, verify that the new context is pointed at the unmanaged endpoint:
1
2
kubectl config view --minify --context="$OIDC_CONTEXT" \
  -o jsonpath='{.clusters[0].cluster.server}{"\n"}'
Expected:
1
https://api.<org-id>-<cluster-hash>.k8s.<zone>.coreweave.com
The --oidc-extra-scope=email argument matters for Google OAuth. Without it,
the ID token may not include the email claim, and the Kubernetes API server
will reject the token because it cannot resolve the configured
usernameClaim.
For other OIDC providers, confirm which scopes are needed for the token to
include the claim you configured as usernameClaim.
Step 7: Test kubectl authentication
Run a simple Kubernetes API request:
1
kubectl get nodes
kubelogin should open a browser window and send you through your OIDC
provider’s login flow.
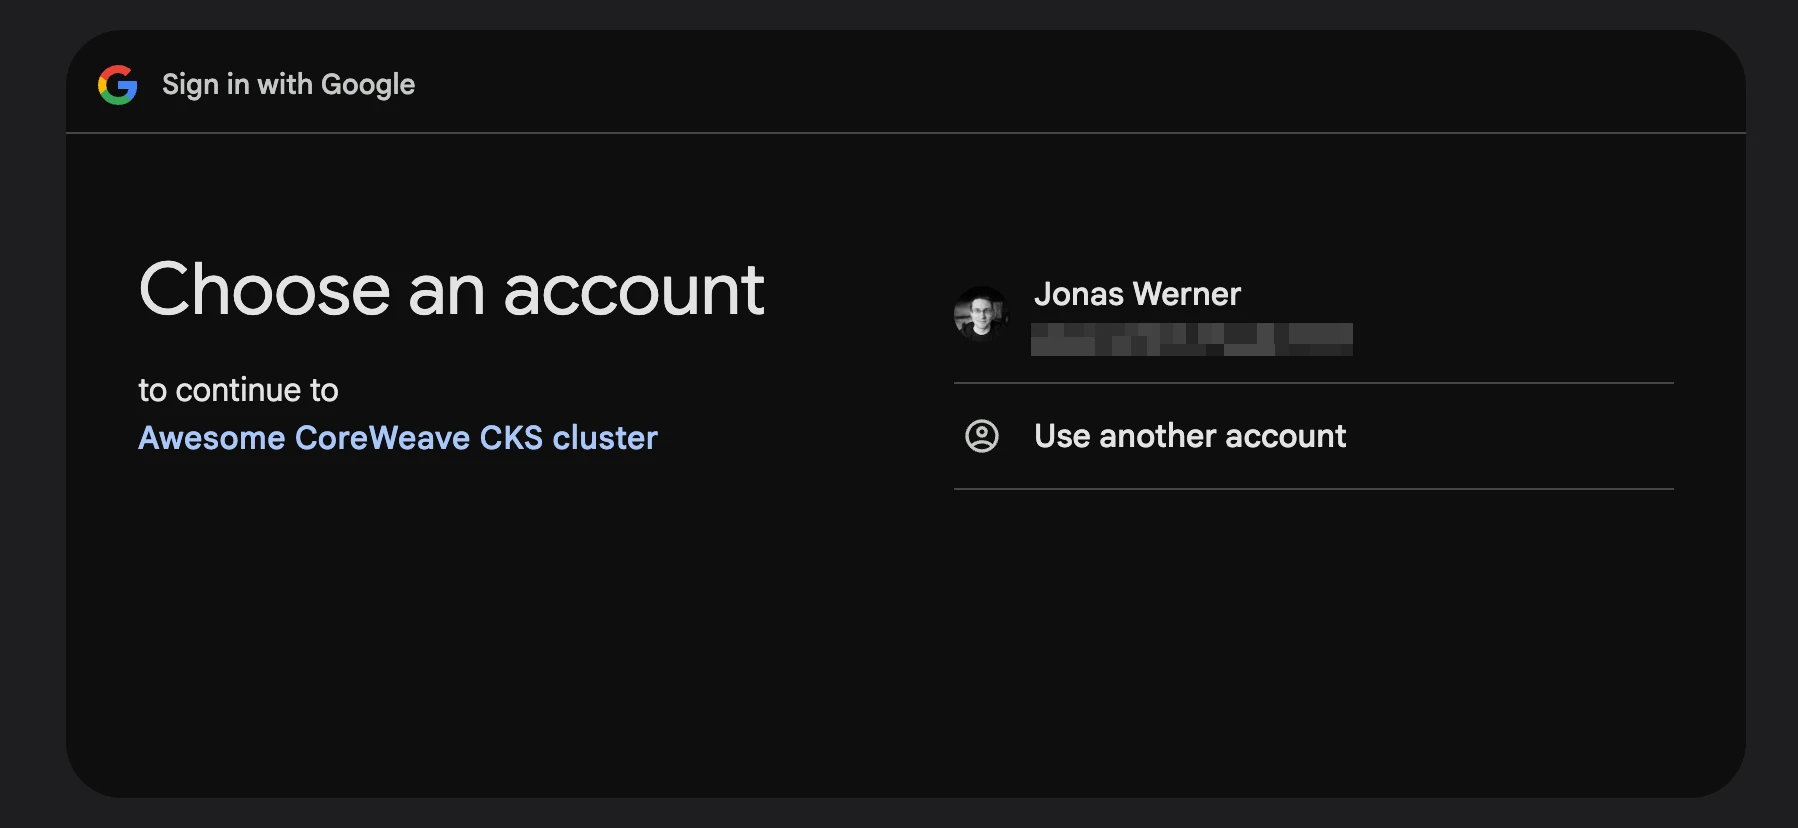 After the browser login flow completes,
 kubectl get nodes succeeds against the CKS unmanaged API endpoint.
After authentication completes, kubectl should receive an ID token and retry the Kubernetes API request.
Expected result:
1
2
3
NAME       STATUS   ROLES    AGE   VERSION
<node-1>   Ready    <none>   10d   v1.34.x
<node-2>   Ready    <none>   10d   v1.34.x
If this works, kubectl is now authenticating to the CKS unmanaged API endpoint using your external OIDC provider.