Normally during long car races the drivers enter the pit do change to fresh tires, fill up fuel etc. Metaphorically speaking, Nutanix Cloud Clusters on AWS can change the entire car – without the need for a pit stop. The driver can just keep driving while the bare metal is replaced underneath, as if nothing has happened with the exception of getting more power. All the benefits – none of the downtime. And, it can be done with a single command through the Nutanix MCM portal.
Introduction
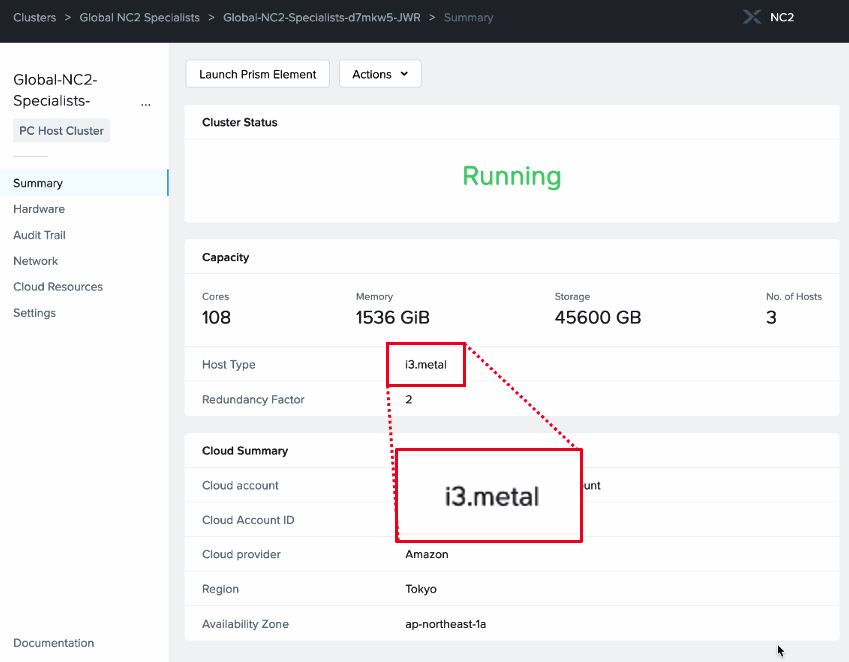
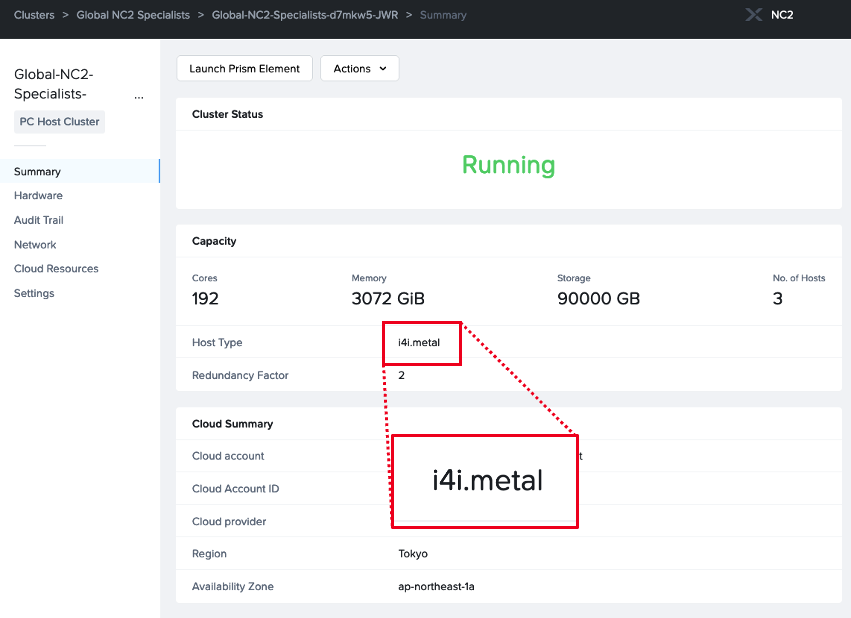
In this example we swap out i3.metal nodes to more powerful i4i.metal while the cluster is running. The starting point is a cluster with three i3.metal nodes and the end state is the same cluster, but now with three i4i.metal nodes. The change is seamless for the workloads running on top of NC2. Apart from a few packets dropped during the network change they experience no disruption.
Starting point
We start out with a plain NC2 on AWS cluster with three i3.metal nodes. In addition to the basic cluster components we have also opted to deploy Prism Central and Flow overlay networking.
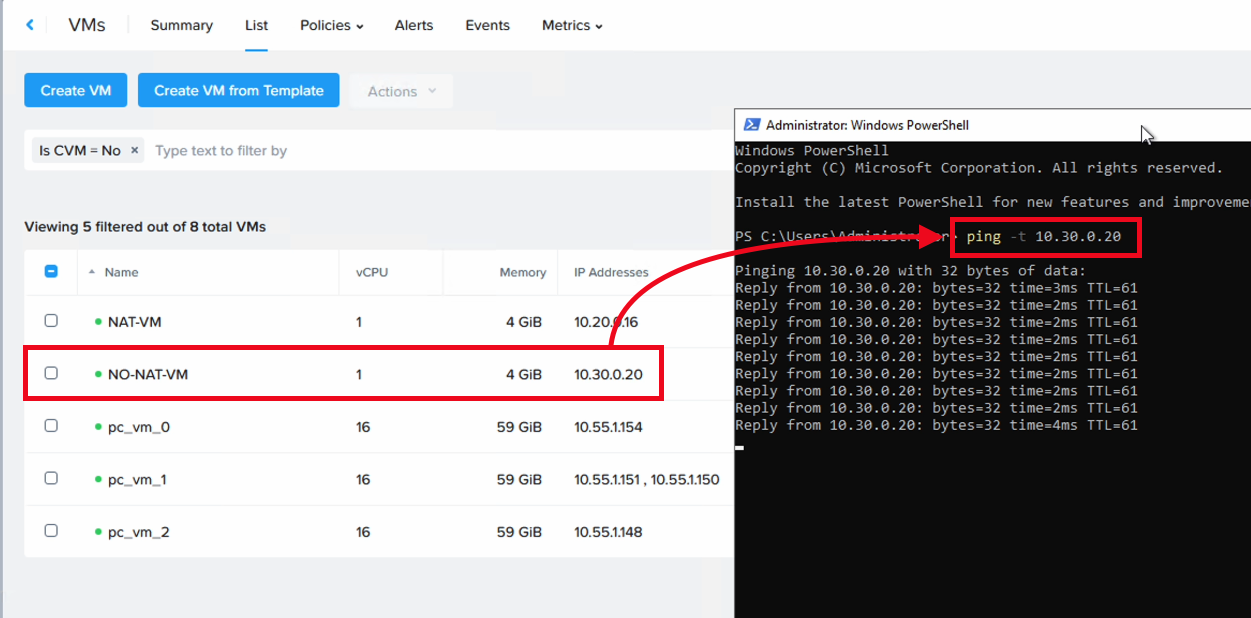
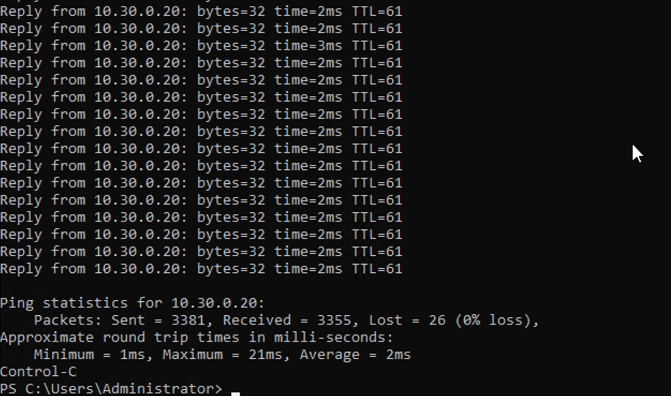
Multiple VMs are running on the NC2 cluster. To monitor their health we start a continuous ping which statistics can be evaluated after the cluster nodes have been replaced.
On the networking side we have set up No-NAT networking with Flow and as such the subnet the test VM is attached to is accessible also from the native AWS VPC. In this case we are pinging the NC2 test VM from an EC2 instance in a separate AWS VPC.
Updating the Cluster Capacity settings in the Nutanix MCM portal
The management portal for NC2 allows for easy updates to the cluster capacity and configuration. We highlight our cluster and navigate to Cluster Capacity where the node types and the number of nodes can be changed.
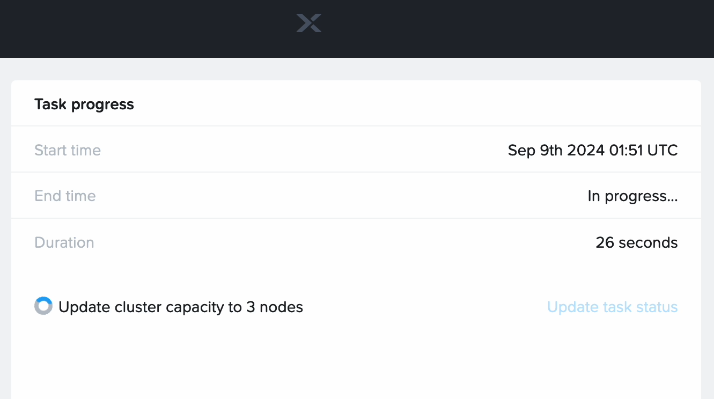
A few clicks later we have added three new i4i nodes to our original configuration of three i3 nodes and we have also set the number of i3 nodes to zero. This way we get three new nodes of a more powerful configuration added and after all data has been transferred over, the old cluster nodes will be removed and billing for them stopped.
The task has now been accepted by the MCM portal and is being executed in the background. VMs running on NC2 continue working as usual, unaware of the big changes to the system which are under way.
EC2 bare-metal changes as seen from the AWS console
In the AWS console it is possible to witness the process of the i4i.metal nodes being added, i3 and i4i nodes running at the same time while the cluster shifts to run on the new nodes and finally the decommissioning of the i3.metal nodes.
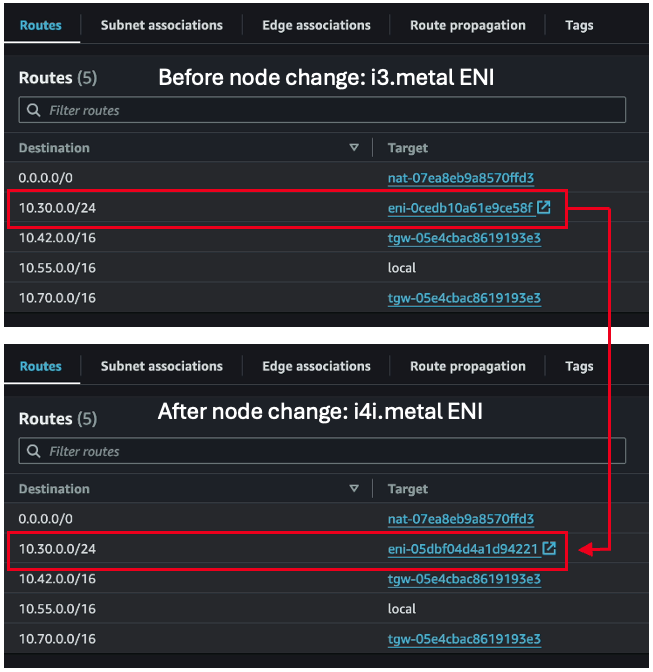
From a networking perspective: The i3.metal ENI which was the active point of North-South communication for the cluster, and therefore part of the AWS VPC route table, has been shifted to an ENI on one of the new i4i.metal hosts post migration.
Result
The node swap has completed without a hitch and without any need of input from the IT administrator managing the NC2 cluster – well, apart from initiating the change at the start. The entire process took just under one hour to complete:
More importantly, the workloads have experienced just a blip in network connectivity and no downtime or reboots.
The Linux VM which we started pinging at the beginning of the blog post is still up and the pings are still getting through. Throughout the hour-long change a total of 3381 pings were sent. 26 of these were lost (0% loss).
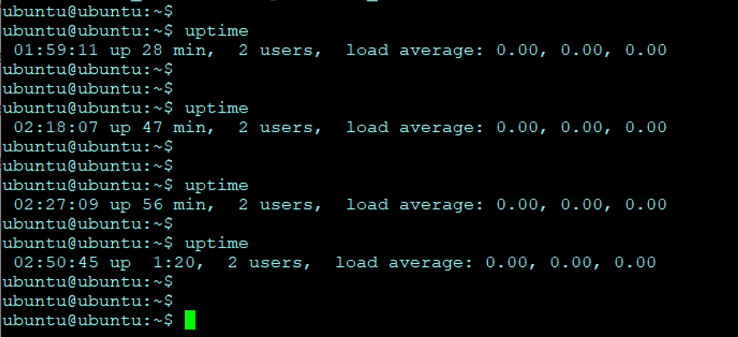
The uptime command on the Linux host also show that there was no rebooting of VMs involved.
Conclusion
This was an example showing of how quick and easy it is to migrate from one EC2 bare metal instance type to another when using Nutanix Cloud Clusters on AWS. For more information, please visit the Nutanix Cloud Clusters page below:
Nutanix Cloud Clusters (NC2) on AWS support native AWS networking but it is also possible to deploy Flow overlay networking as part of the cluster creation process. Flow overlay networking enables many powerful features. One of those is the ability to create completely new Flow VPCs with subnets using entirely different CIDR ranges than the native AWS VPC. This gives great flexibility in handling networking for Virtual Machines (VMs) running on NC2 on AWS.
When Flow overlay networking is used, VMs can communicate with the outside world in a few different ways. One is through NAT:ed networking, where the overlay subnet which the VMs are connected to is internal to NC2 only and is not visible outside the cluster from the AWS native side.
The other is to use No-NAT. In that case the overlay subnet which the VMs are connecting to is added to the native AWS VPC routing table. Thereby it is possible for entities in the native AWS VPC, or elsewhere, to access VMs on NC2. This is despite those VMs being connected to overlay networks with CIDR ranges which doesn’t exist on the AWS native side.
Architecture
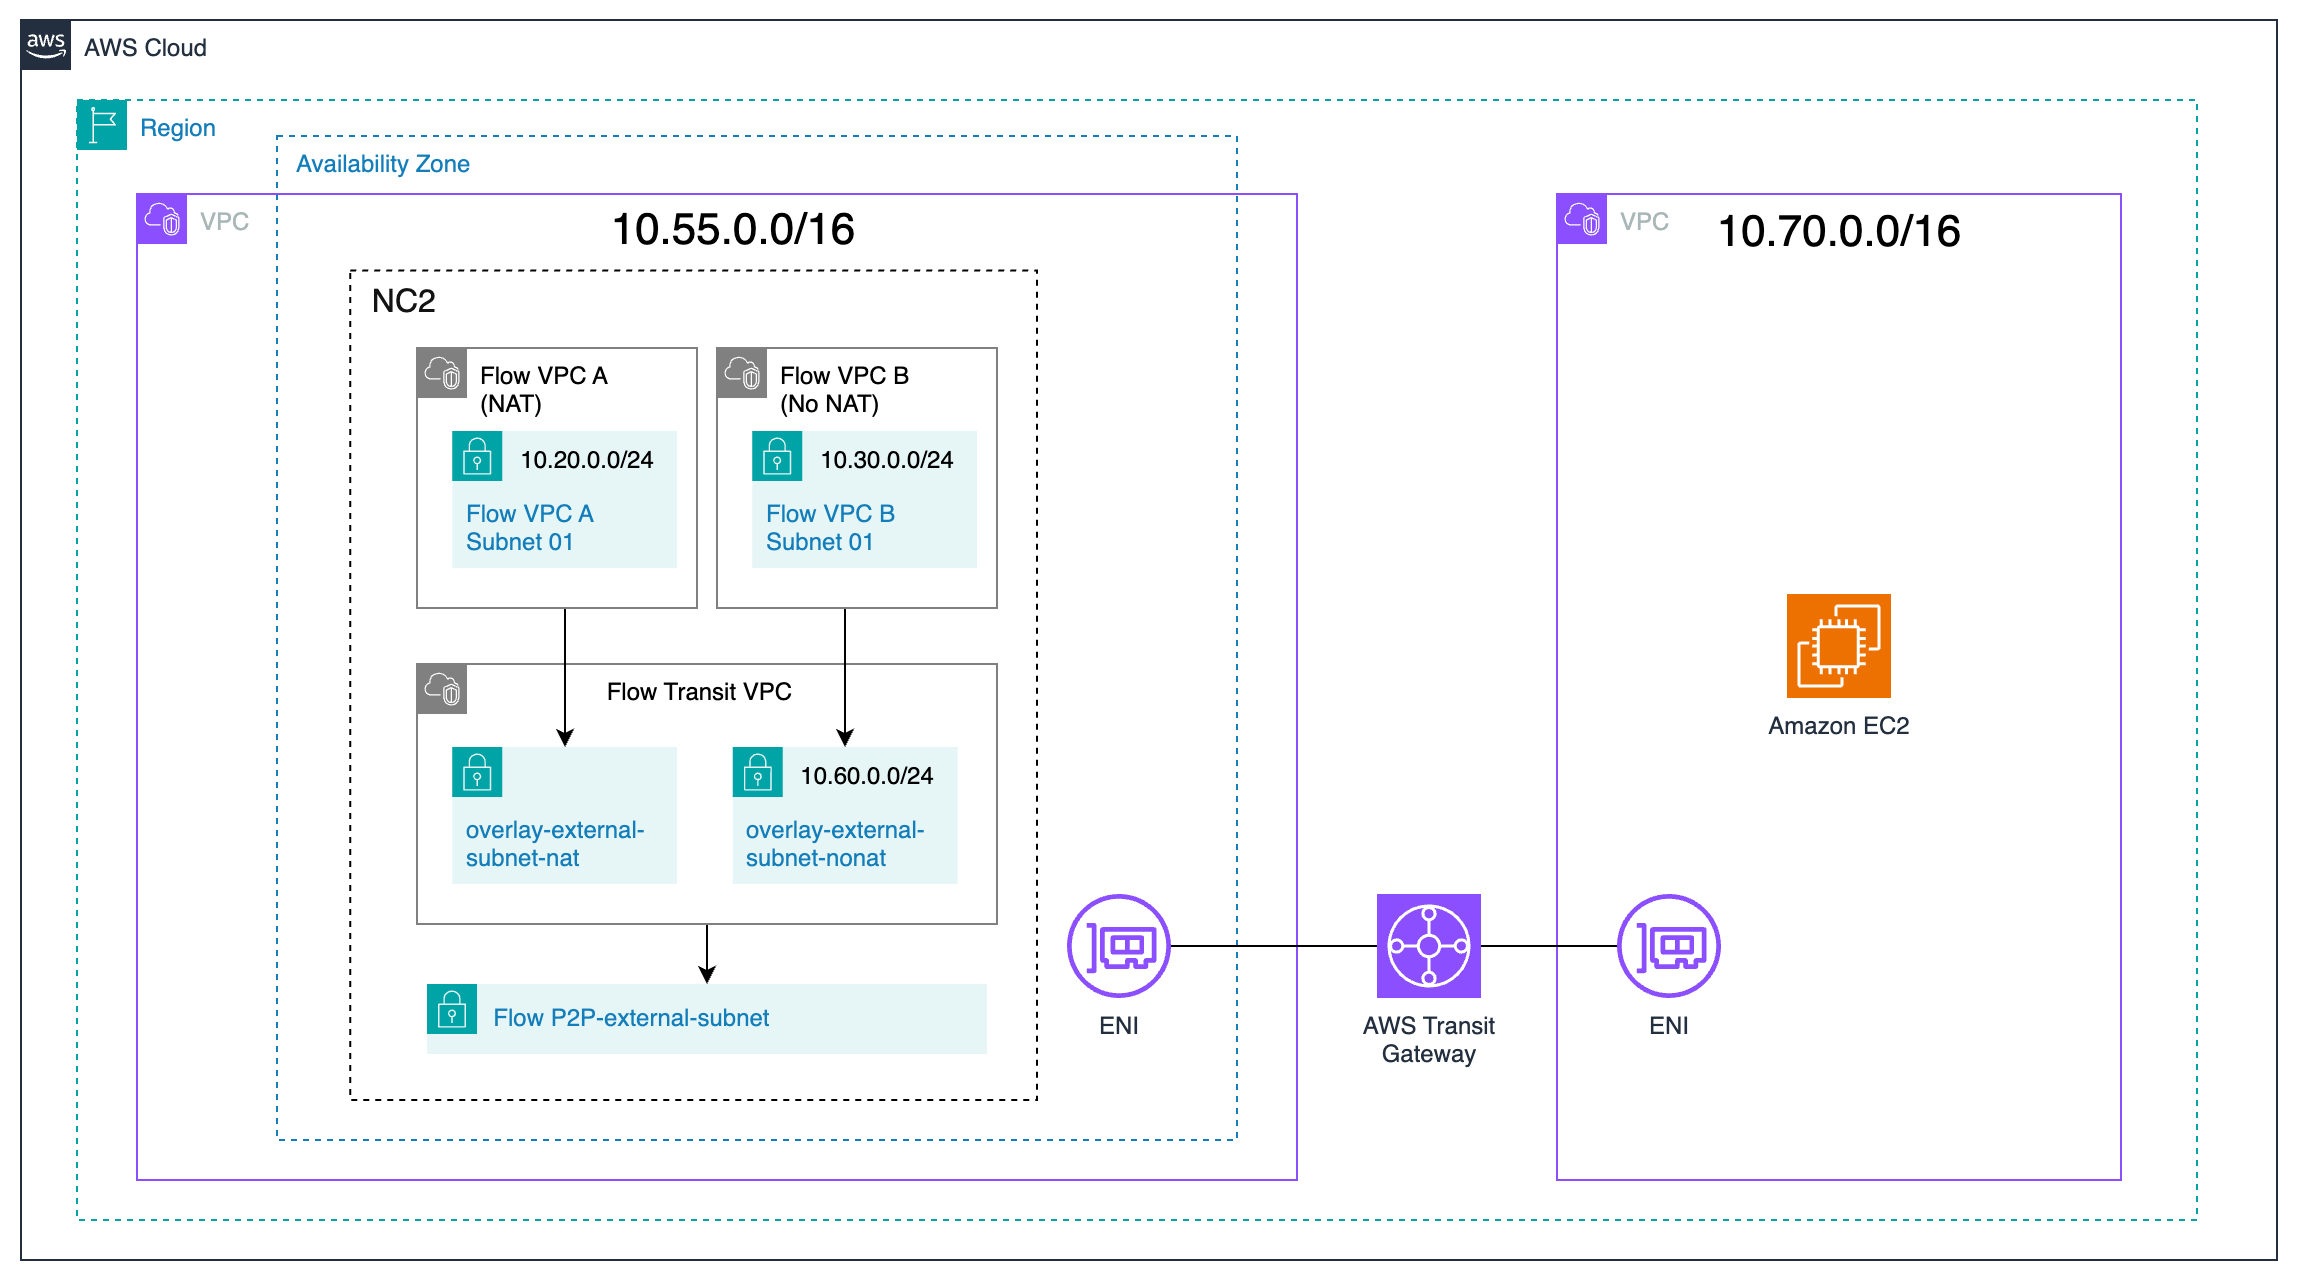
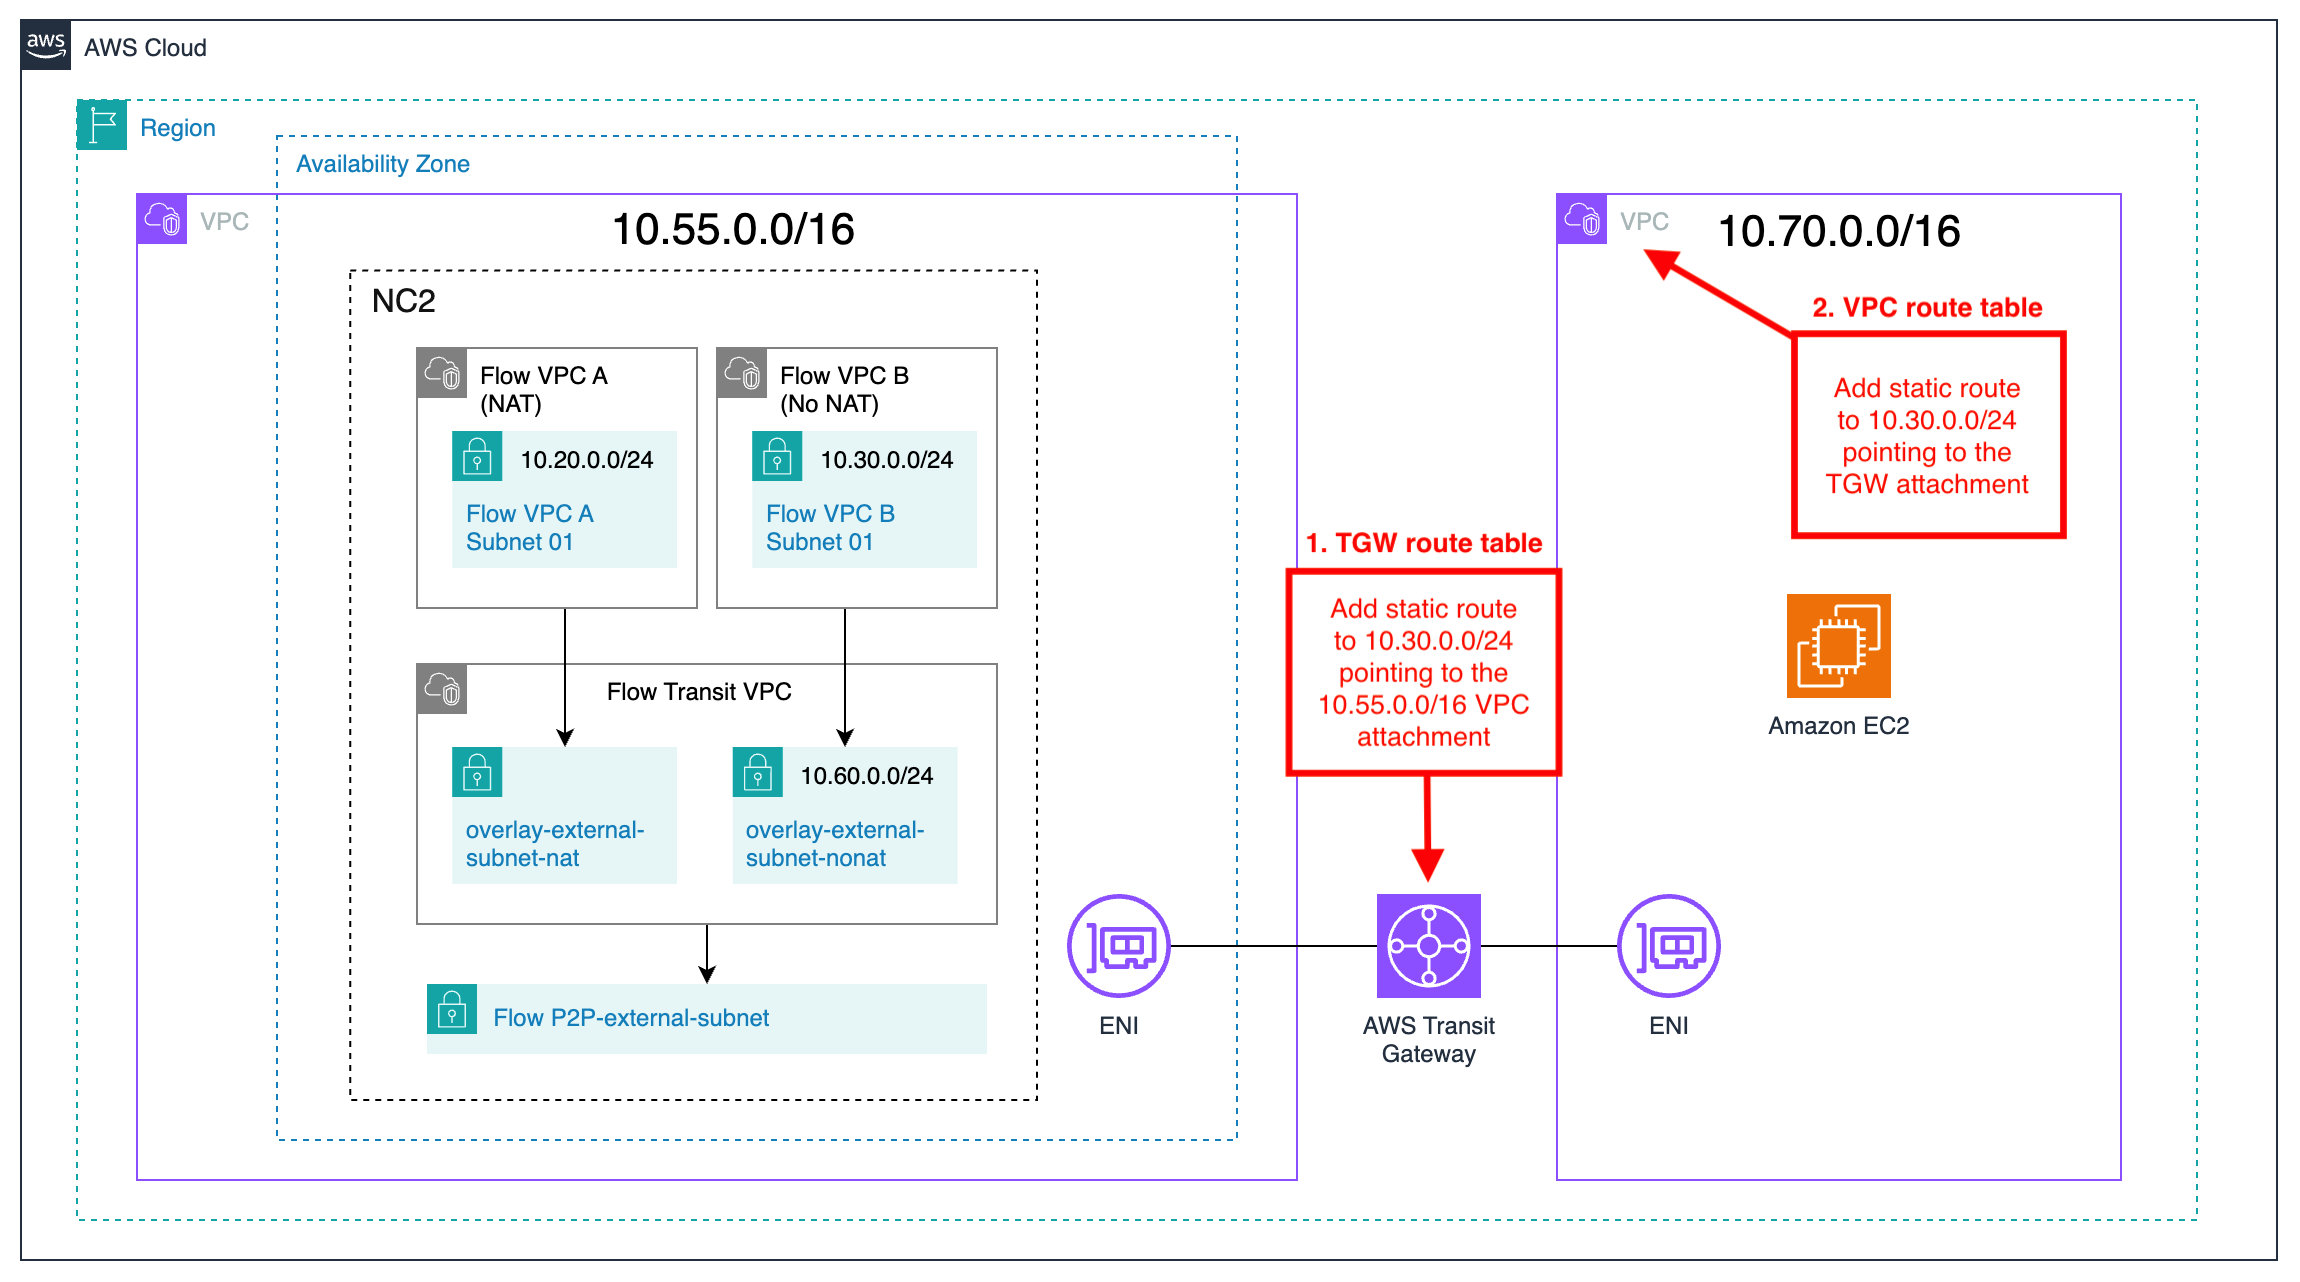
In this example, two Flow overlay VPC’s are created with one subnet each. One is the NAT:ed network with a CIDR range of 10.20.0.0/24 and the other is a No-NAT network with a CIDR range of 10.30.0.0/24.
The neighboring VPC with CIDR 10.70.0.0/16 is connected to the VPC holding the NC2 cluster via an Amazon Transit Gateway (TGW). A Windows EC2 instance will be used to verify connectivity once routing has been set up for the No-NAT network.
Flow Transit VPC
To handle North-South connectivity for the workloads on NC2 there is a Flow Transit VPC deployed as part of the cluster creation. It is a special VPC in that while it handles external connectivity for VMs on NC2, those VMs don’t connect to it directly. Instead separate Flow VPC’s are created for VM connectivity and those VPCs are in turn attached to the Flow Transit VPC.
NAT network connectivity
In this section a new Flow VPC called “VPC A” is created and attached to the Flow Transit VPC. VPC A will be used for VMs which use NAT:ed communication with the outside world.
In Prism Central on NC2 on AWS, navigate to “Network and Security” and create a new VPC.
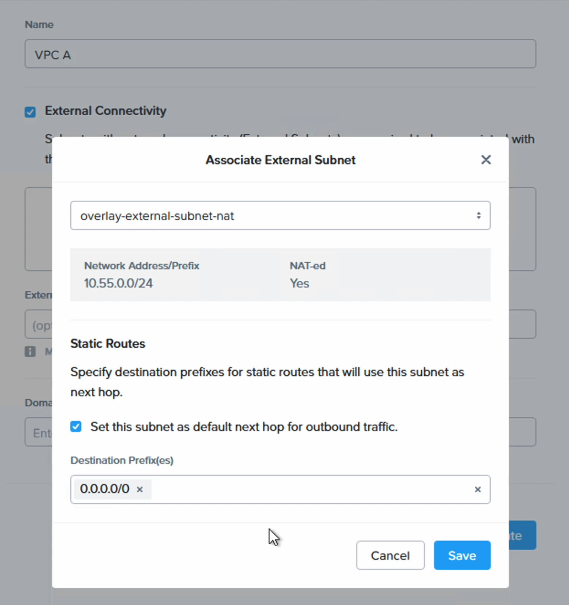
The VPC is given the name “VPC A” and for “External Connectivity” the already existing “overlay-external-subnet-nat” subnet is used. Check the box for using this subnet as the next hop / default route for all outbound traffic.
The VPC is now created but we also need a subnet for VMs to attach to. Click on “VPC A” and then “Create Subnet” from the “Subnet” tab. In this case the CIDR range 10.20.0.0/24 is used.
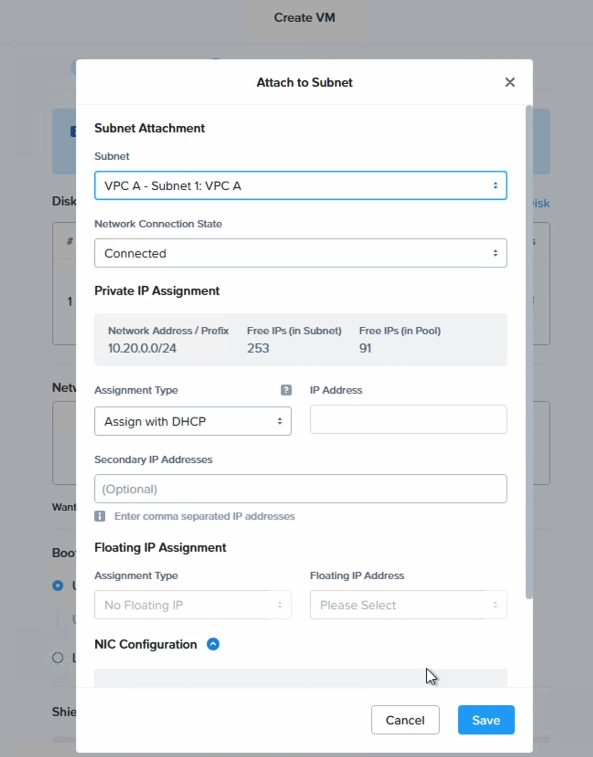
Now the NAT network configuration is complete. We can test connectivity by creating a new VM and attaching it to the new “VPC A – Subnet 1” NAT network.
In Prism Central, navigate to “VM” and create a new VM
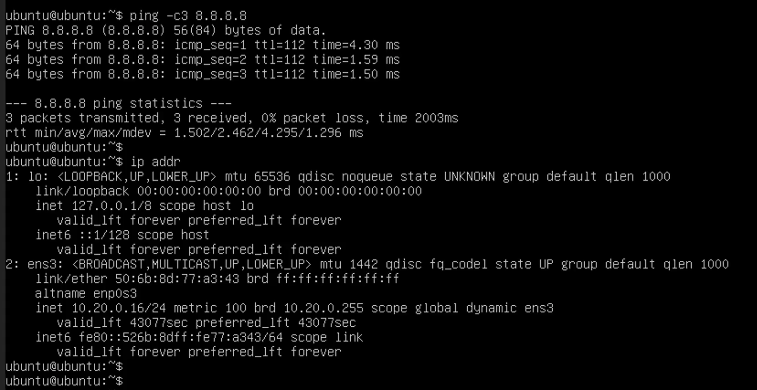
Once the VM is created, power it on and verify that it can connect to the outside world.
In this case we get an IP of “10.20.0.16” and can verify North-South connectivity by pinging a Google DNS server.
This concludes the NAT portion of the setup.
No-NAT network connectivity
For No-NAT connectivity, the steps are very similar to those just performed for the NAT:ed portion. However, there are two additional steps to perform. The first is to create a new subnet in the Flow Transit VPC specifically for No-NAT connectivity. The second is to add the Flow overlay network CIDR range that we want to use for No-NAT as an Externally Routable Prefix, or ERP, to both the Flow Transit VPC and the Flow VPC we will create for No-NAT connectivity. Please read on to see how to set this up.
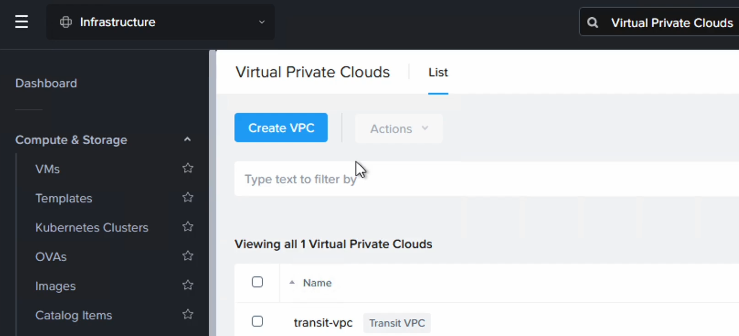
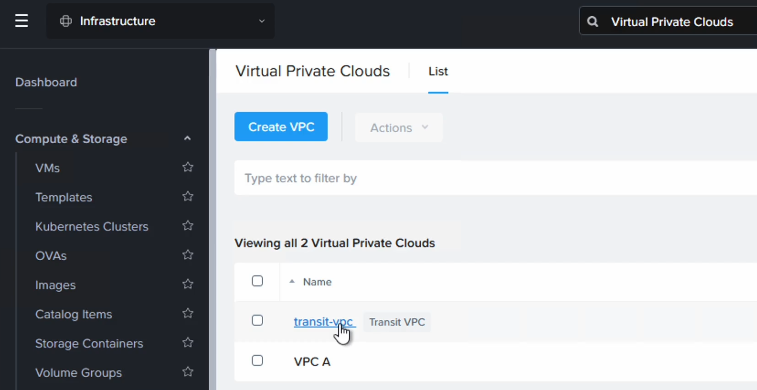
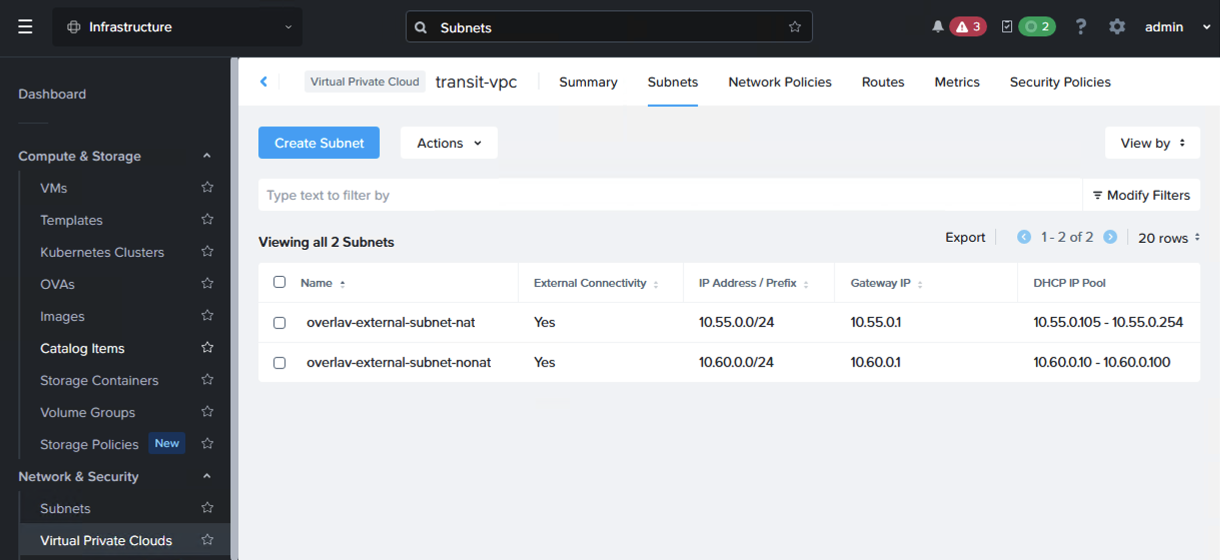
First we create a new subnet in the Flow Transit VPC and call it “overlay-external-subnet-nonat”. Navigate to “Network and Security”, select “Virtual Private Clouds” and click on the “transit-vpc”.
Go to the “Subnets” tab and select “Create Subnet”. Give it a name, like “overlay-external-subnet-nonat” and for IP address management, add any CIDR range which isn’t used elsewhere in your organization. This CIDR range will be used internally in NC2 but will not be routable or visible outside the cluster.
The “transit-vpc” will now have two subnets, like the below. The “overlay-external-subnet-nat” CIDR range will depend on the AWS native subnet NC2 has been deployed into.
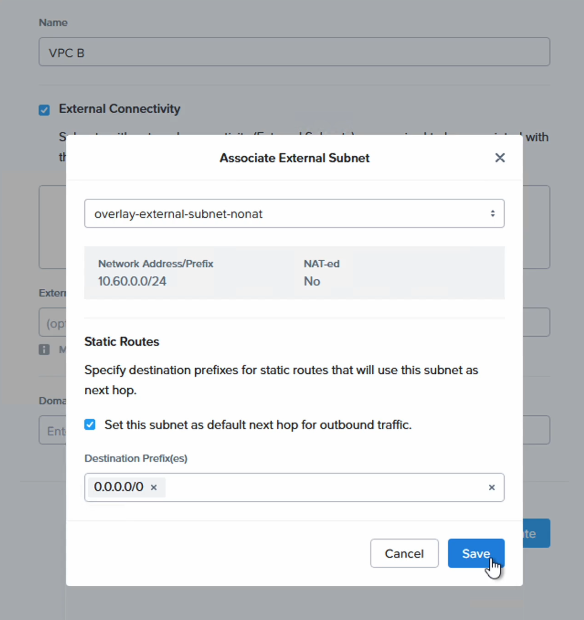
Next, create a new VPC, called “VPC B” in this example and for external connectivity use the newly created “overlay-external-subnet-nonat”. Note that “NAT-ed” is set to “No”.
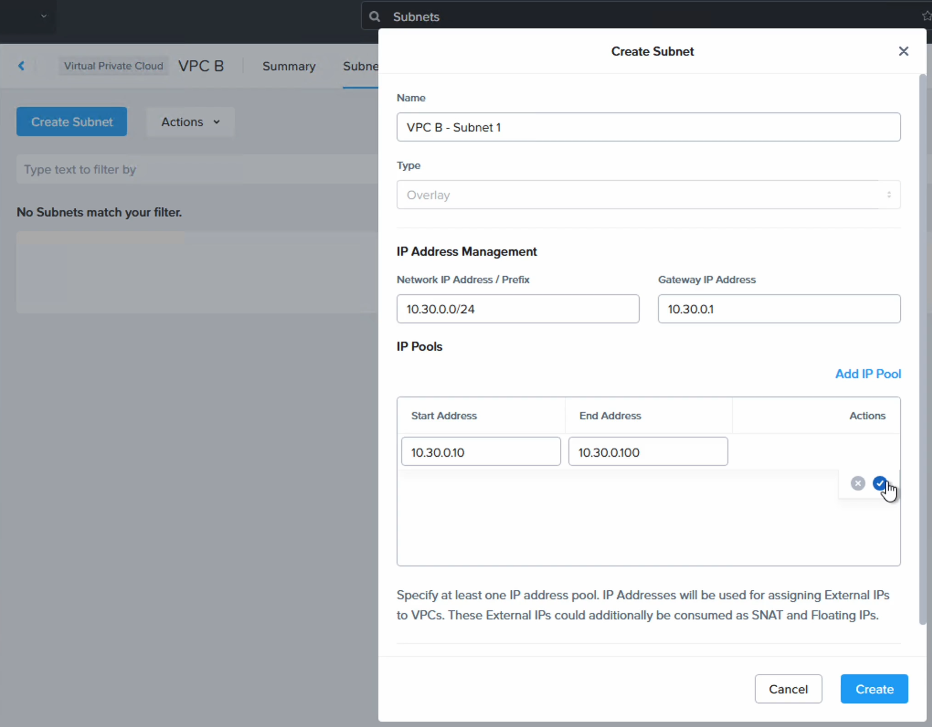
We also create a new subnet in that VPC so VMs have something to connect to. In this case we use a CIDR range of “10.30.0.0/24”.
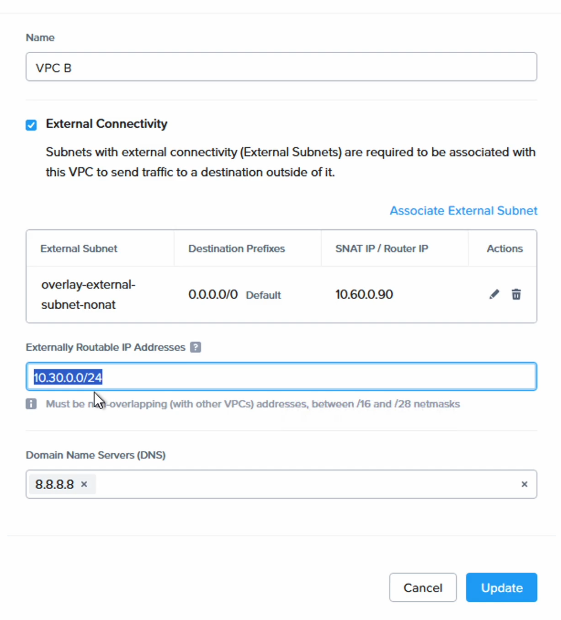
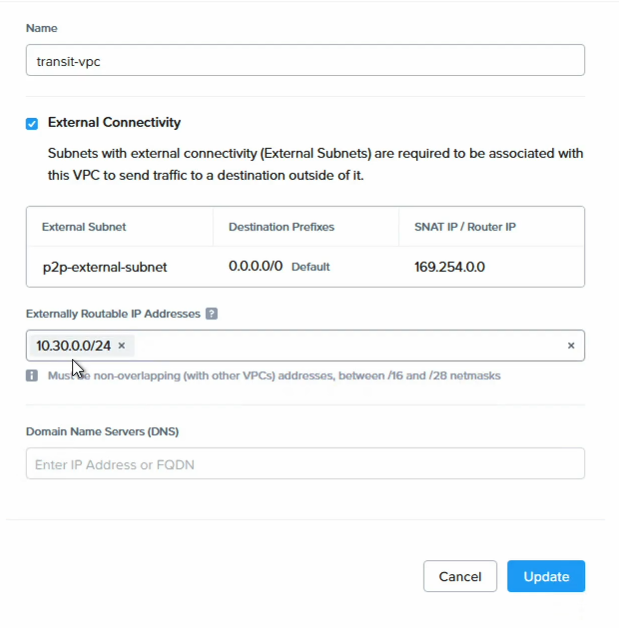
Finally, the most important point is to add the CIDR range of the newly created subnet to both the Flow Transit VPC and to VPC B as an ERP or Externally Routable Prefix.
Select “VPC B” and click “Update” to add “10.30.0.0/24” as the ERP
Next, do the same to the “transit-vpc”
That is all we need to do on the configuration side. Congratulations!
Verify that the new No-NAT network shows up in the native AWS route table
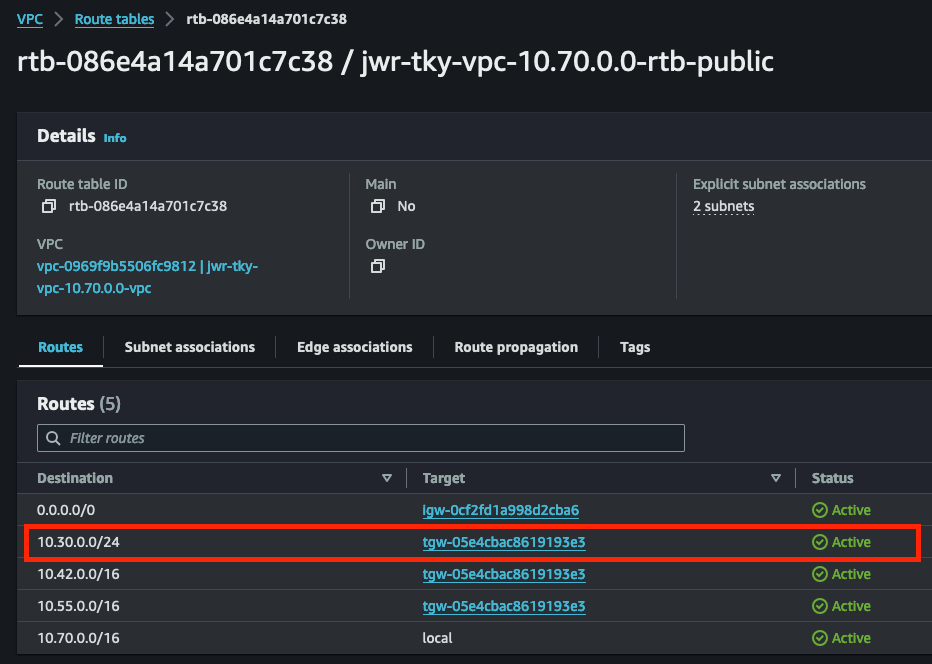
In the AWS console, go to the default route table of the VPC which NC2 is deployed into and verify that the “10.30.0.0/24” network has been automatically added to the route table. It will be pointing to the ENI (Elastic Network Interface) of the currently active NC2 bare-metal node.
Verifying No-NAT routing and connectivity
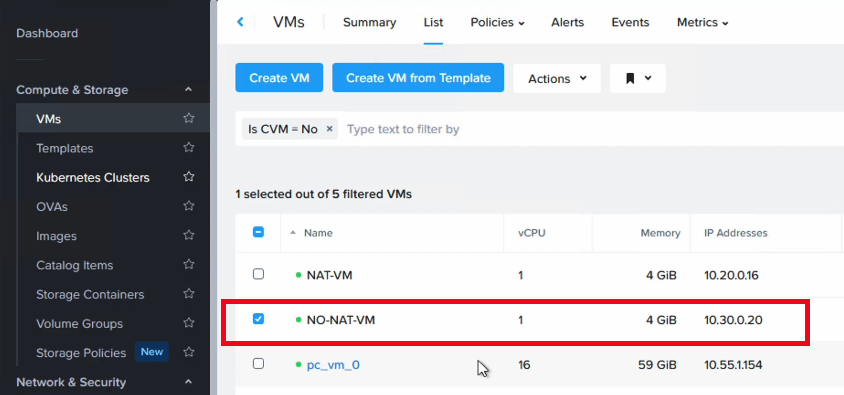
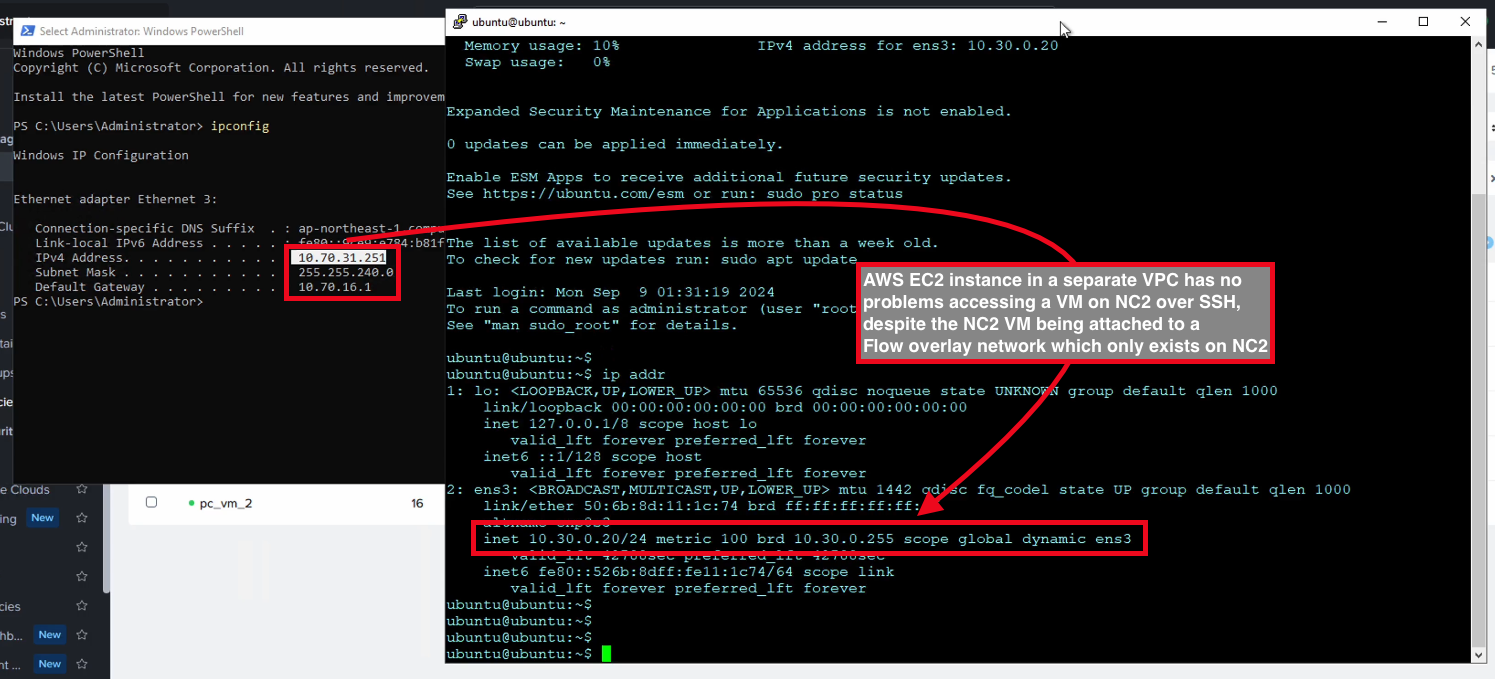
For testing purposes, deploy a VM in NC2 and attach it to the newly created No-NAT network. In this case the VM received an IP of “10.30.0.20”.
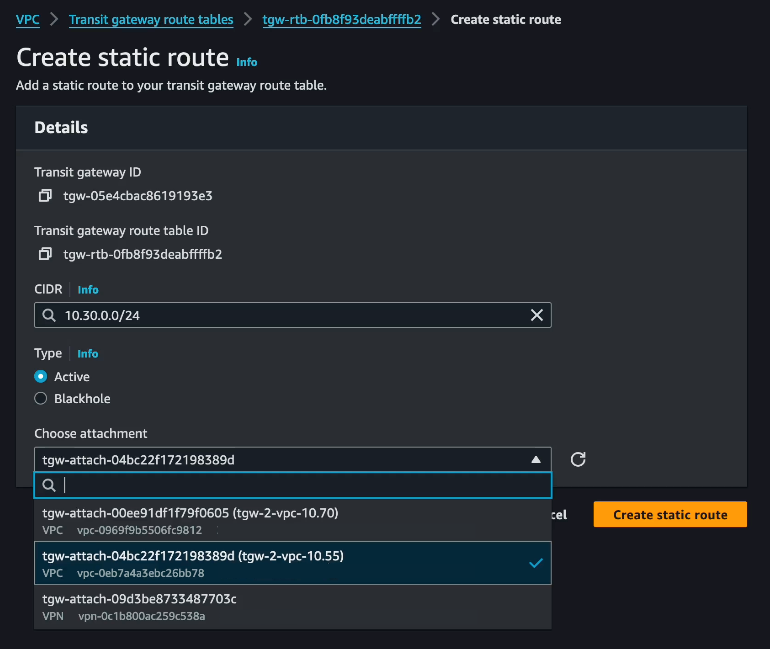
Next we add a static route to 10.30.0.0/24 in the TGW route table, marked as step 1 in the diagram below.
In the AWS console, navigate to “Transit Gateway route tables”, select the route table for the TGW used to provide connectivity between the two AWS native VPCs and add a static route for “10.30.0.0/24” pointing to the VPC attachment for the VPC holding the NC2 cluster.
Finally, we add a static route for “10.30.0.0/24” to the route table of the native AWS VPC with CIDR “10.70.0.0/16” to enable the EC2 instances there to communicate with the test VM running on NC2. The route here will be pointing to the TGW attachment since the TGW will be handling the communication between the NC2 cluster VMs and the attached AWS native VPC.
This concludes the routing configuration. As the final step we can verify connectivity by connecting from the AWS native Windows EC2 instance to the Ubuntu test VM on NC2 on AWS (with IP 10.30.0.20″) using SSH.
As shown in the screenshot, there is no problem to access the NC2 VM from an AWS EC2 instance, despite the NC2 VM being attached to a Flow overlay network which doesn’t exist outside NC2. The No-NAT configuration makes connectivity from the outside world possible.
This guide has been written in cooperation with Steve Loh, Advisory Solutions Architect, Network & Security at Nutanix in Singapore, gentleman extraordinaire and master of the Cisco Dark Arts.
Introduction
Organizations frequently choose to extend on-premises networks to the cloud as part of retaining connectivity between virtual machines (VMs) during migrations. This is called L2 or Layer 2 extension. With an extended network, VMs connected to the same subnet can communicate as usual even when some of them have been migrated to the cloud and others are still on-premises awaiting migration.
L2 extension is sometimes used on a more permanent basis when the same network segment contain VMs to be migrated as well as appliances which must remain on-prem. If the organization doesn’t want to change the IP addresses of any of these entities and still need part of them migrated, they might chose to maintain L2 extension of some subnets indefinitely. However, this is generally considered a risk and is not recommended.
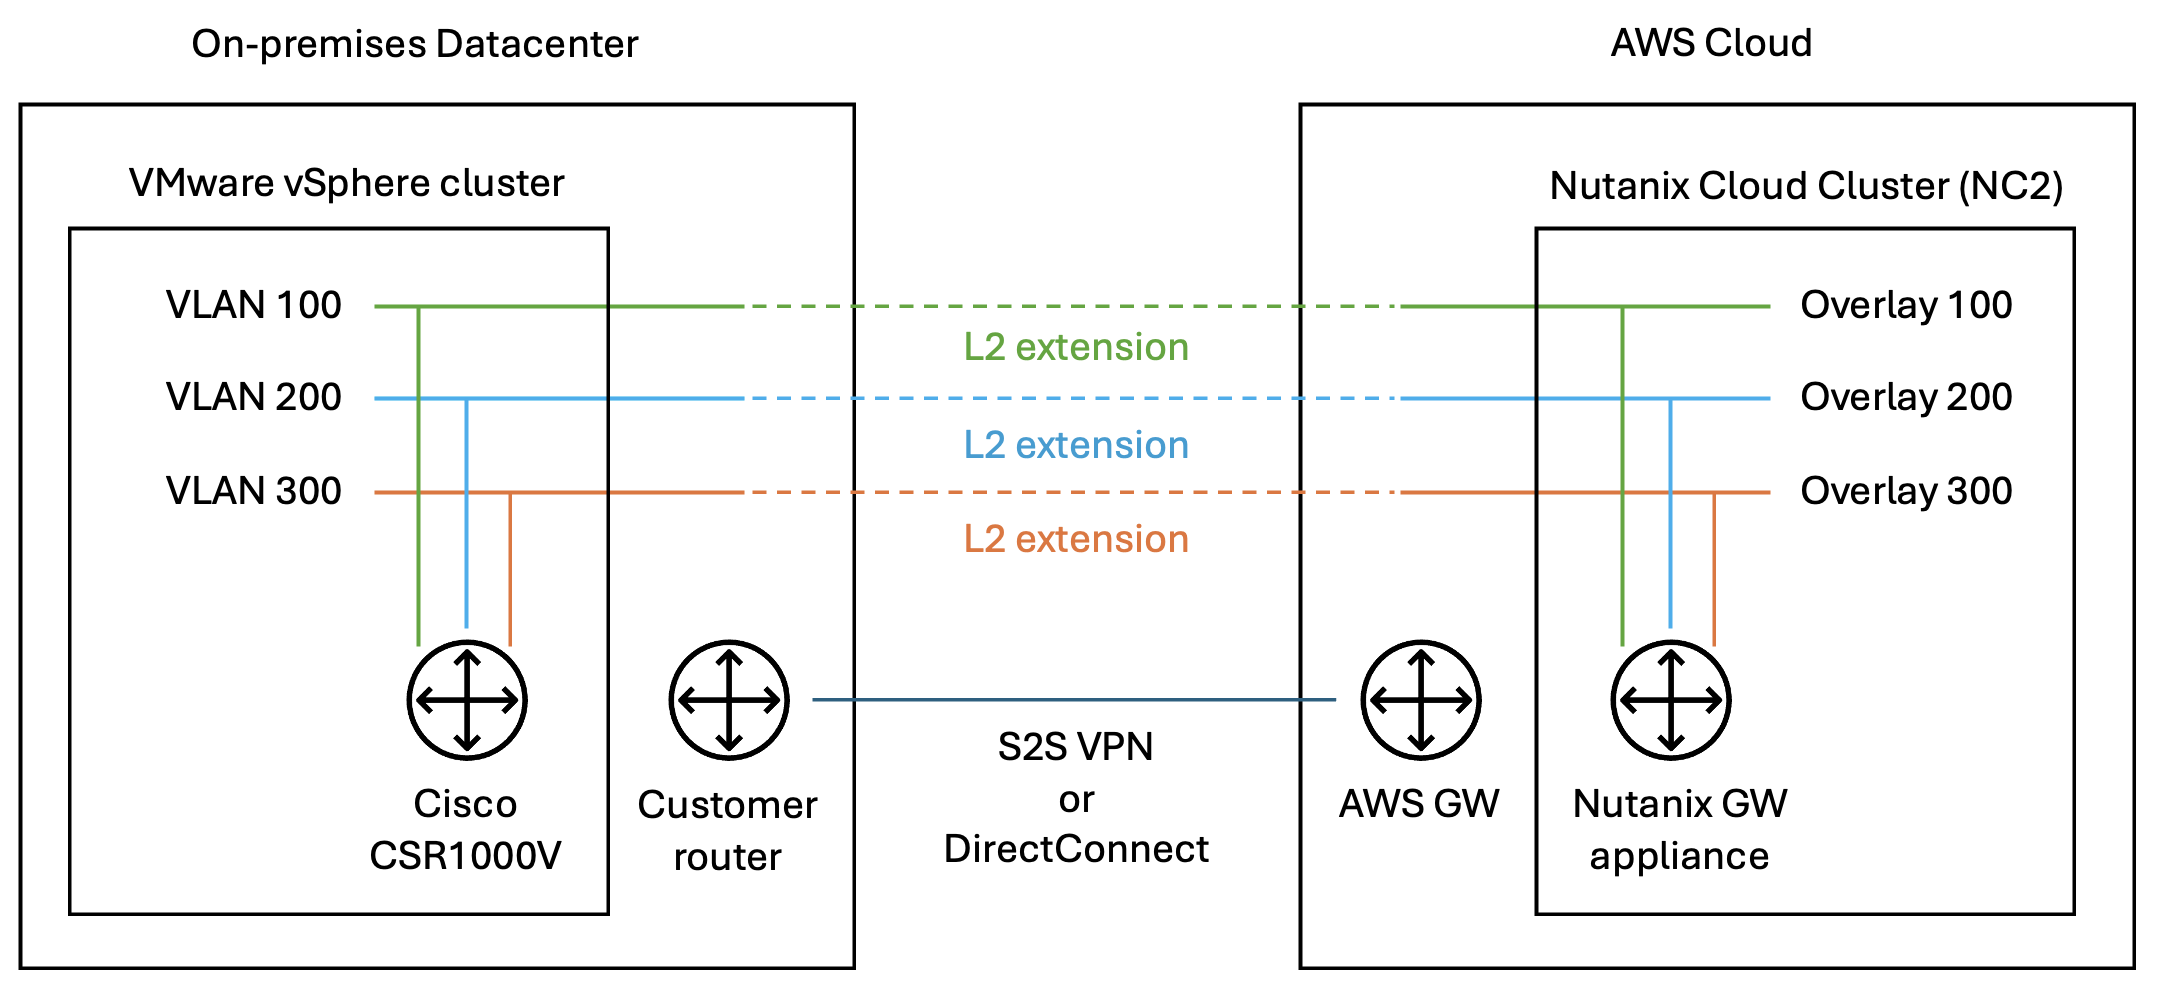
Architecture diagram
This is a graphical representation of the network stretch from on-prem VMware to Nutanix Cloud Clusters in AWS which is covered in this blog post. Other configurations are also possible, especially when Nutanix is also deployed on-prem.
Video of process
For those preferring watching a demo video of this process rather than reading the blog, please refer to the below.
Limitations and considerations
While L2 extension is a useful tool for migrations, please keep the following points in mind when deciding whether or not to utilize this feature:
L2 extension will complicate routing and thereby also complicate troubleshooting in case there are issues
L2 extension may introduce additional network latency. This takes the shape of trombone routing where traffic need to go from the cloud via a gateway on the on-premises side and then back to the cloud again. Nutanix Flow Policy Based Routing (PBR) may be used to alleviate this.
If routing is set to go via one default gateway either on-premises or in the cloud, if the network connecting the on-premises DC with the cloud environment has downtime, the VMs on the side without the default gateway will no longer be able to communicate with networks other than their own
The Nutanix L2 extension gateway appliance does not support redundant configurations at time of writing
A Nutanix L2 extension gateway can support up to five network extensions
A single Prism Central instance can support up to five Nutanix L2 extension gateways
Always keep MTU sizes in mind when configuring L2 extension to avoid unnecessary packet fragmentation. MTU settings can be configured when extending a network.
Even though VMs are connected to an extended network, if the current version of Move is used for migration, VM IP addresses will not be retained. A Move release in the near future will enable IP retention when migrating from VMware ESXi to NC2 on AWS.
Types of L2 extension
Various methods of extending a network exist. This blog will cover one of these cases – on-premises VMware with Cisco CSR1000V as VTEP to Nutanix Cloud Clusters (NC2) on AWS with a Nutanix gateway appliance.
On-premises VLANs or Flow overlay networks can be extended using Nutanix GW appliances to Flow overlay networks in NC2. It is also possible to extend using Nutanix VPN appliances in case the network underlay is not secure (directly over the internet). Finally, when the on-premises environment does not run Nutanix, using a virtual or physical router with VXLAN and VTEP capabilities is possible. This blog focuses on the last use case as it is a commonly discussed topic among customers considering NC2 and L2 extension.
Routing
When extending networks, the default gateway location and routing to and from VMs on an extended network become important to understand. Customers used to extending networks with VMware HCX or NSX Autonomous Edge are familiar with the concept of trombone routing over a default gateway located on-premises. With Nutanix it is possible to use Policy Based Routing (PBR) to control how routing should be performed for different networks. In many ways, Nutanix PBR offers more detailed tuning of routes than can be done with VMware MON in HCX.
A key difference between extending networks with HCX vs. with Nutanix is that with HCX the extended network appears as a single entity, although it exists on both sides (on-prem and cloud). The default gateway would generally be on-prem and both DHCP and DNS traffic would be handled by on-prem network entities, regardless if a VM was on-prem or in the cloud.
For L2 extension with Nutanix, things work a bit differently. The on-prem network will be manually recreated as an overlay network on NC2, with the same default gateway as the on-prem network but with a different DHCP range. The on-prem and cloud networks are then connected through a Nutanix GW appliance deployed as a VM in Prism Central.
Prerequisites
This guide assumes that an on-premises VMware vSphere 7.x environment and an NC2 version 6.8.1 cluster are already present. It also assumes that the on-prem and NC2 environments are connected over a L3 routed network, like a site-to-site (S2S) VPN or DirectConnect (DX). The two environments have full IP reachability and can ping each other.
In this case we are extending a VLAN which has been configured as a port group with VLAN tagging on standard vSwitches on the ESXi hosts.
Overview of steps
Recreate the network to be extended using Flow overlay networking on NC2
Deploy the Nutanix gateway appliance on NC2
Deploy the Cisco CSR1000V in the on-premises VMware cluster
Enable Promiscuous mode and Forged transmits on the vSwitch portgroup of the VLAN to be extended
Register the CSR1000V routable IP address as a Remote Gateway in NC2
Configure the CSR1000V IP leg on the VLAN to be extended and set up VNI and other settings required to extend the network
Extend the network from NC2 with the CSR1000V as the on-prem VTEP
In the demo video included in this post we also perform a migration of a VM from on-prem to NC2 and verify connectivity with ICMP.
Step 1: Recreate the network to be extended using Flow overlay networking on NC2
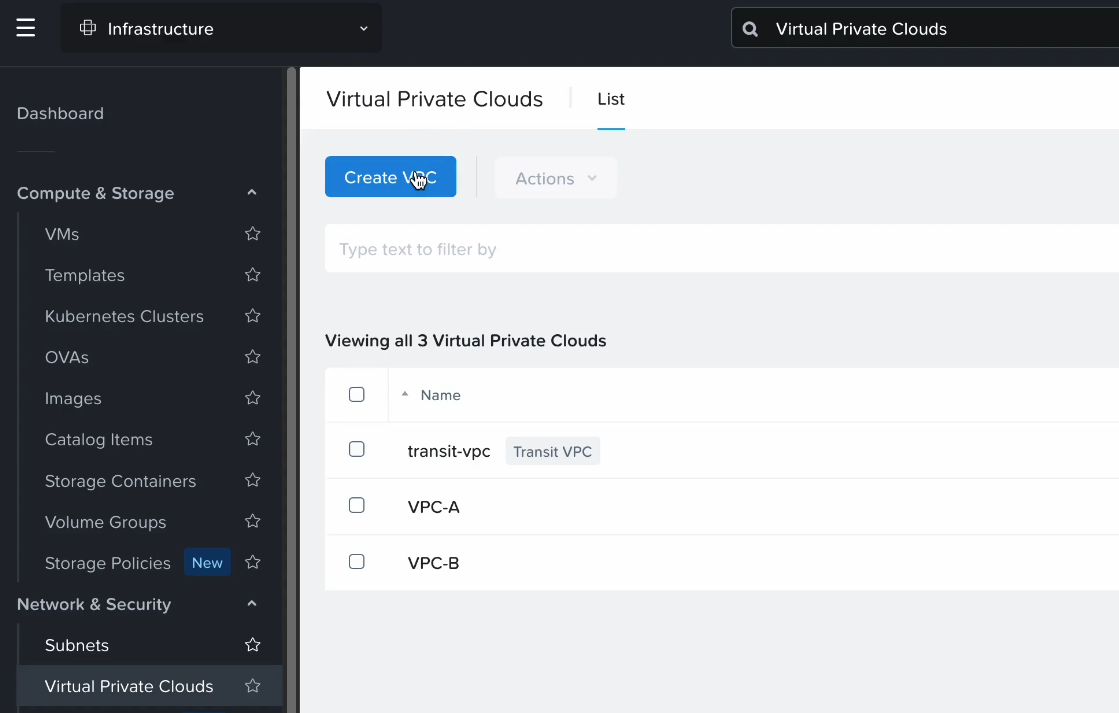
Access Prism Central, navigate to Network and Security. Select “Create VPC” to add a new Nutanix Flow VPC to hold the subnet we want to extend.
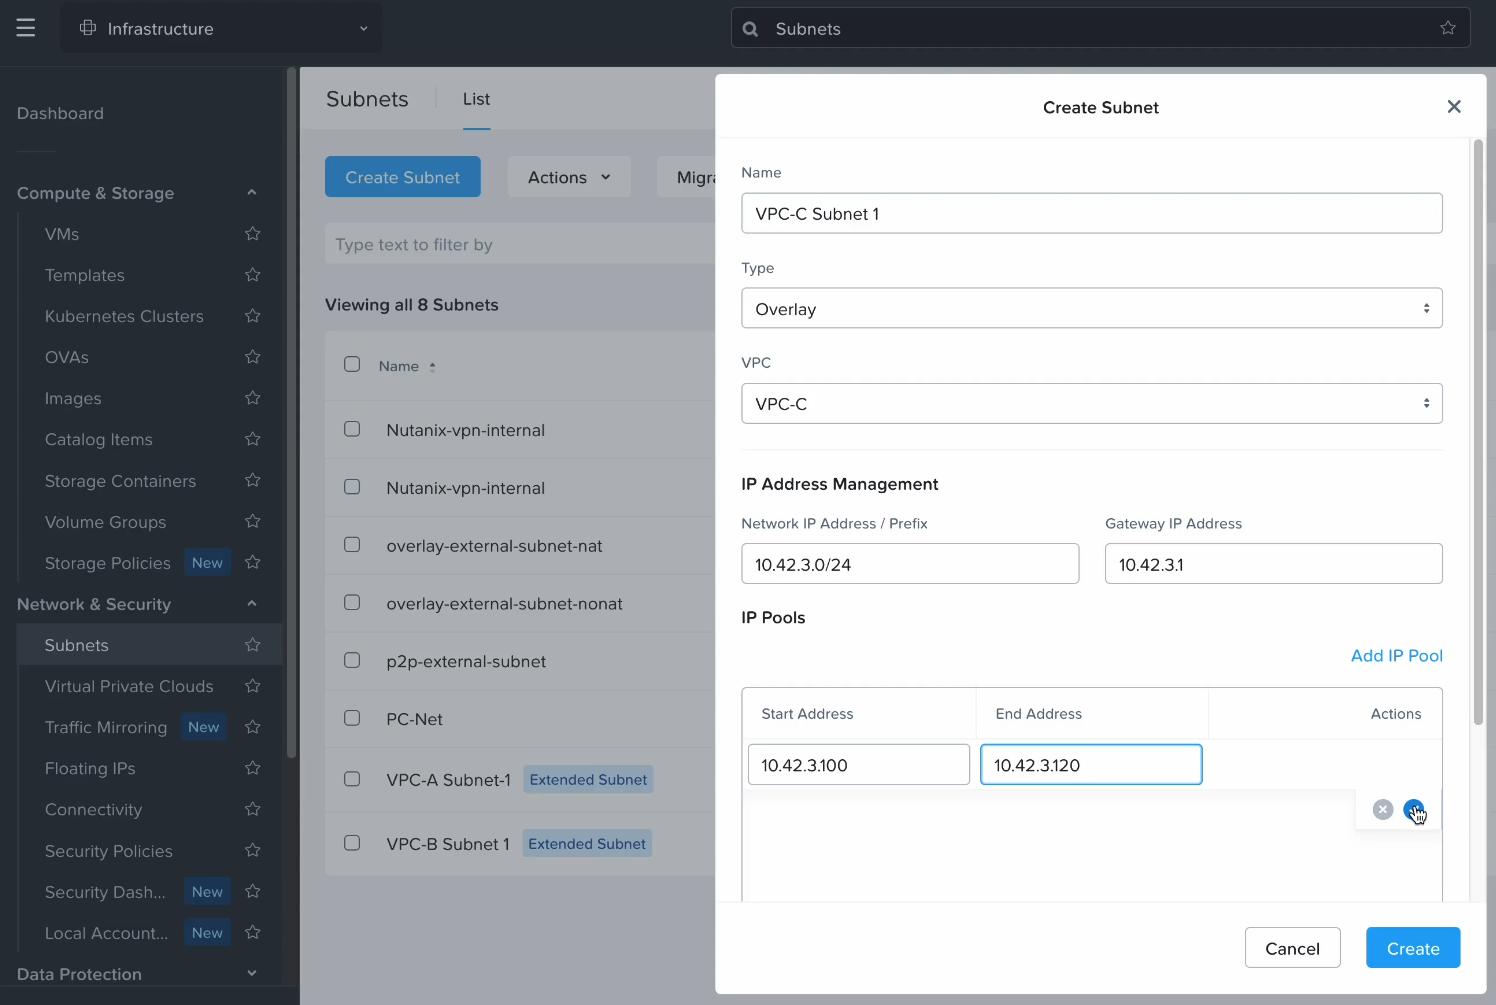
After the VPC has been created, go to Subnets and create a subnet in the newly created VPC with settings matching the network which will be extended. In this case we create “VPC-C” and a subnet with a CIDR of “10.42.3.0/24”. The default gateway is configured to be the same as on-prem but the DHCP range is set to not overlap.
Step 2: Deploy the Nutanix gateway appliance on NC2
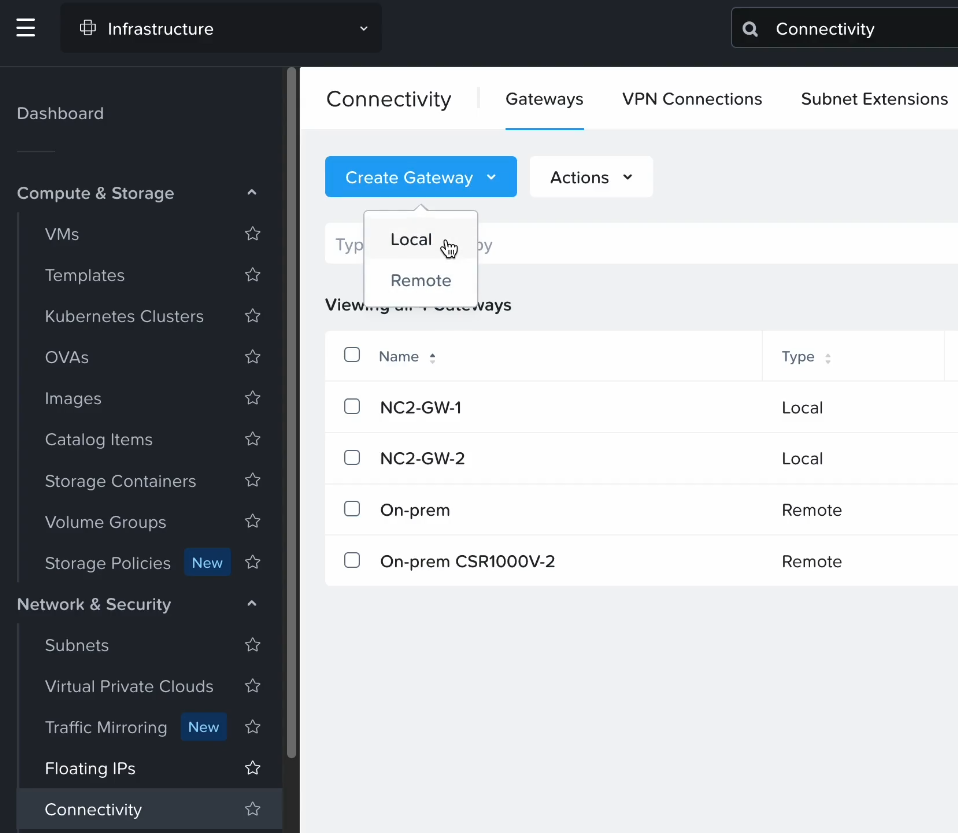
In Prism Central, navigate to “Network and Security” and select “Connectivity”. From here click “Create Gateway” and select “Local” to create the gateway on the NC2 side.
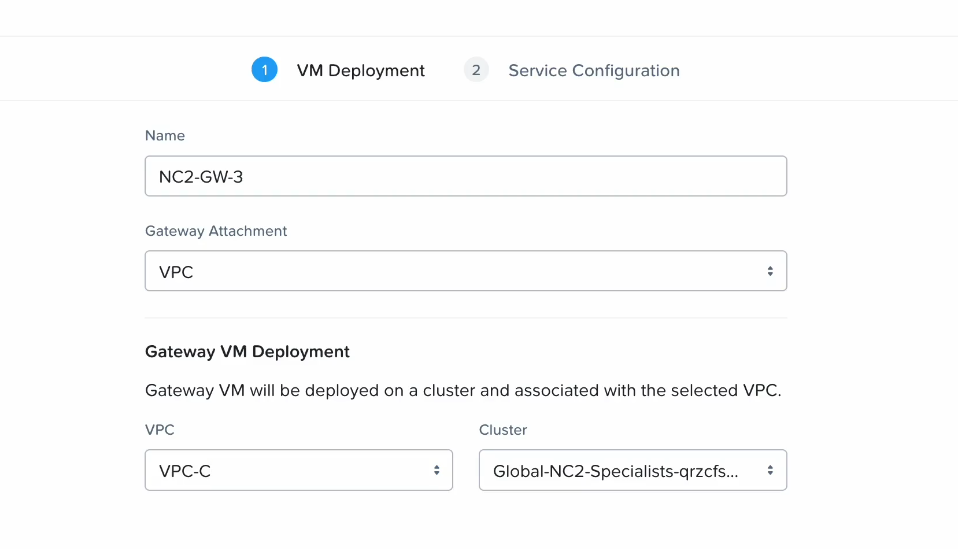
Add a name, set the Gateway Attachment to VPC and select the VPC which was just created in the previous steps.
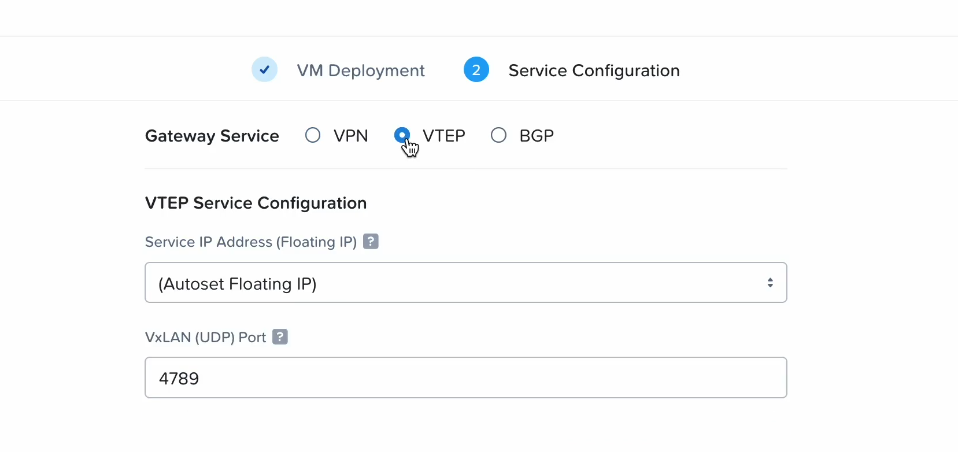
For Gateway Service, select VTEP and allow NC2 to automatically assign a Floating IP from the AWS VPC CIDR. This IP will be accessible from the on-prem environment and will be used as the anchor point for the L2E when configuring the CSR1000V in a later step
Note that a new VM (the gateway appliance) will automatically be deployed on the NC2 cluster by Prism Central.
Step 3: Deploy the Cisco CSR1000V in the on-premises VMware cluster
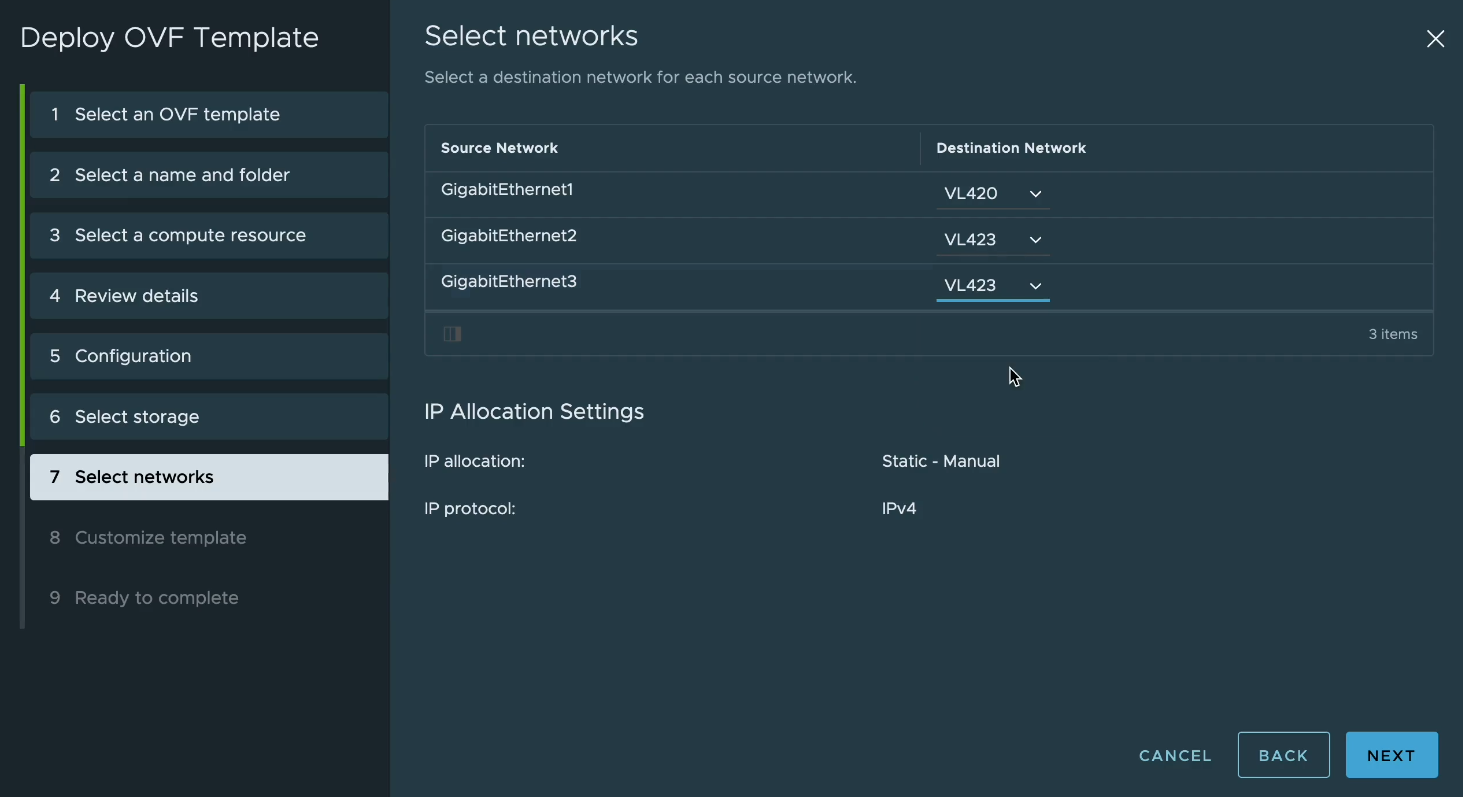
Deploy the Cisco appliance on the VMware cluster and select the first network interface to connect to the routable underlay network (IP connectivity to NC2) and the second and third interfaces to connect into the port group of the VLAN to be extended.
In this case VL420 is routable underlay network and VL423 the VLAN to be extended
Configure an IP address on the management network and make note of it as we will use it in a subsequent step. In this case we use “10.42.0.106” as the management IP address on VL420.
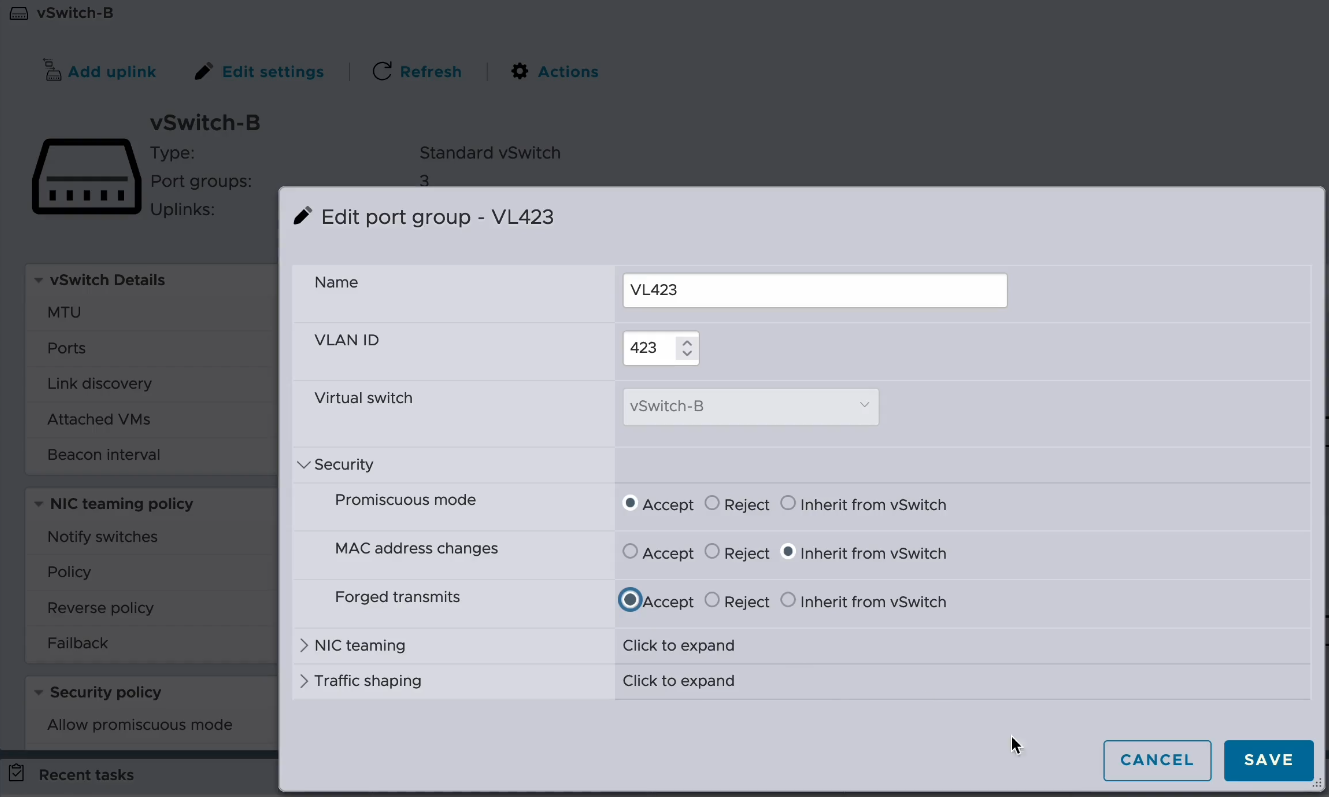
Step 4: Enable Promiscuous mode and Forged transmits on the vSwitch portgroup of the VLAN to be extended
In order to pass traffic from the on-premises network to the NC2 network it is necessary to enable Promiscuous mode and Forged transmits on the vSwitch port group on the VMware cluster. In this case we are using standard vSwitches.
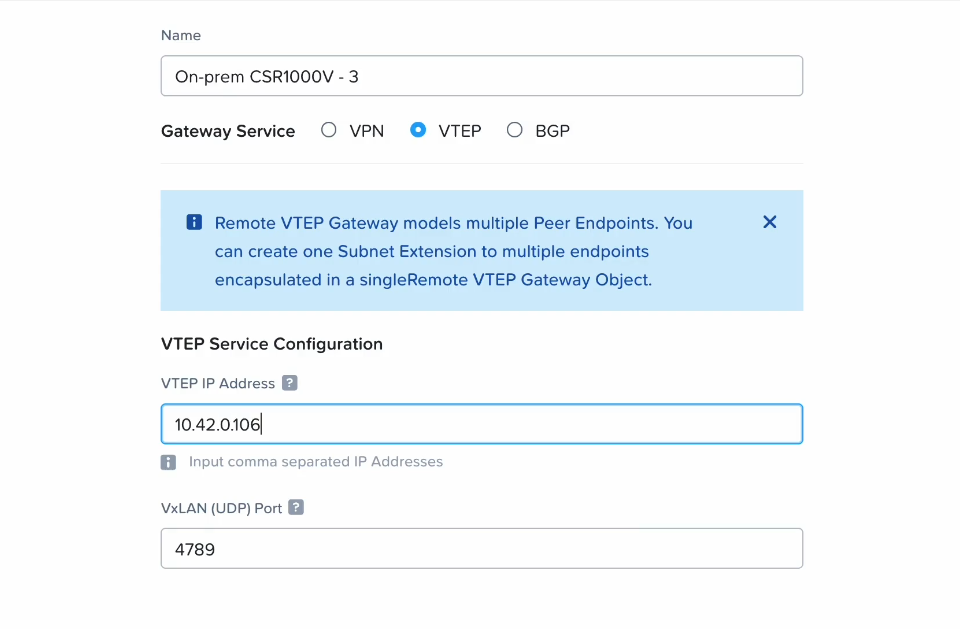
Step 5: Register the CSR1000V routable IP address as a Remote Gateway in NC2
We need to create a representation of the on-premises CSR1000V appliance in NC2 so that we can refer to it when extending the network in a later step. This is essentially just a matter of adding in the IP address as a “Remote Gateway”.
In Prism Central, navigate to “Network and Security”, select “Connectivity” and “Create Gateway”. Select “Remote” and add the details for the on-prem Cisco appliance. Give it a name, select “VTEP” as the “Gateway Service” and add the IP address. Let the VxLAN port remain as “4789”.
Step 6: Configure the CSR1000V IP leg on the VLAN to be extended and set up VNI and other settings required to extend the network
In this step we do the configuration of the CSR1000V over SSH. To enable SSH you may need to to the following through the console for the virtual appliance first.
Enable SSH
en
conf t
username cisco password Password1!
line vty 0 4
login local
transport input ssh
end
Now when SSH is available, SSH to the appliance as the user “cisco” with password “Password1!” and complete the remaining configurations.
Configure interface in VLAN to be extended
Configure the 2nd interface to be a leg into the VLAN to be extended by giving it an IP address and enabling the interface
CSR1000V3#
CSR1000V3#conf t
Enter configuration commands, one per line.  End with CNTL/Z.
CSR1000V3(config)#
CSR1000V3(config)#int gi2
CSR1000V3(config-if)#
CSR1000V3(config-if)#ip address 10.42.3.2 255.255.255.0
CSR1000V3(config-if)#no shut
Configure NVE 1 and the VNI to be used + link with the NC2 gateway IP
For ingress-replication, use the Floating IP from the AWS VPC CIDR range which was assigned to the gateway appliance after deploying on NC2.
CSR1000V3#
CSR1000V3#conf term
Enter configuration commands, one per line.  End with CNTL/Z.
CSR1000V3(config)#
CSR1000V3(config)#
CSR1000V3(config)#int NVE 1
CSR1000V3(config-if)#no shutdown
CSR1000V3(config-if)#source-interface gigabitEthernet 1
CSR1000V3(config-if)#member vni 4300
CSR1000V3(config-if-nve-vni)#ingress-replication 10.70.177.192
CSR1000V3(config-if-nve-vni)#
CSR1000V3(config-if-nve-vni)#end
CSR1000V3(config-if)#end
Configure bridge domain and L2E via the 3rd interface (Gi3)
CSR1000V3#
CSR1000V3#conf t
Enter configuration commands, one per line. End with CNTL/Z.
CSR1000V3(config)#bridge-dom
CSR1000V3(config)#bridge-domain 12
CSR1000V3(config-bdomain)#member VNI 4300
CSR1000V3(config-bdomain)#member gigabitEthernet 3 service-instance 1
CSR1000V3(config-bdomain-efp)#end

CSR1000V3#conf t
Enter configuration commands, one per line. End with CNTL/Z.
CSR1000V3(config)#int
CSR1000V3(config)#interface giga
CSR1000V3(config)#interface gigabitEthernet 3
CSR1000V3(config-if)#no shut

CSR1000V3(config-if)#
CSR1000V3(config-if)#service instance 1 ethernet
CSR1000V3(config-if-srv)# encapsulation untagged
CSR1000V3(config-if-srv)#no shut
CSR1000V3(config-if-srv)#end
CSR1000V3#
CSR1000V3#
Configure a default route
We set the default route to go over the default gateway for the underlay we use to connect to AWS and NC2 on AWS
CSR1000V3#
CSR1000V3#conf t
Enter configuration commands, one per line.  End with CNTL/Z.
CSR1000V3(config)#
CSR1000V3(config)#
CSR1000V3(config)#ip route 0.0.0.0 0.0.0.0 10.42.0.1
CSR1000V3(config)#
CSR1000V3(config)#
CSR1000V3(config)#end
Step 7: Extend the network from NC2 with the CSR1000V as the on-prem VTEP
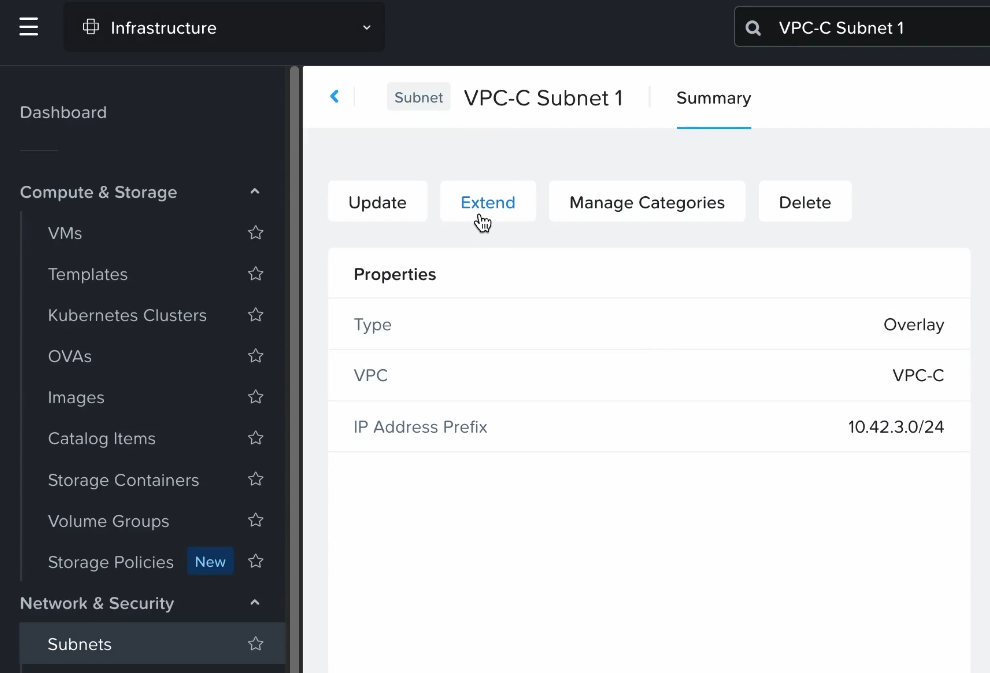
In Prism Central, navigate to “Network and Security” and select “Subnets”. From here we will create the network extension.
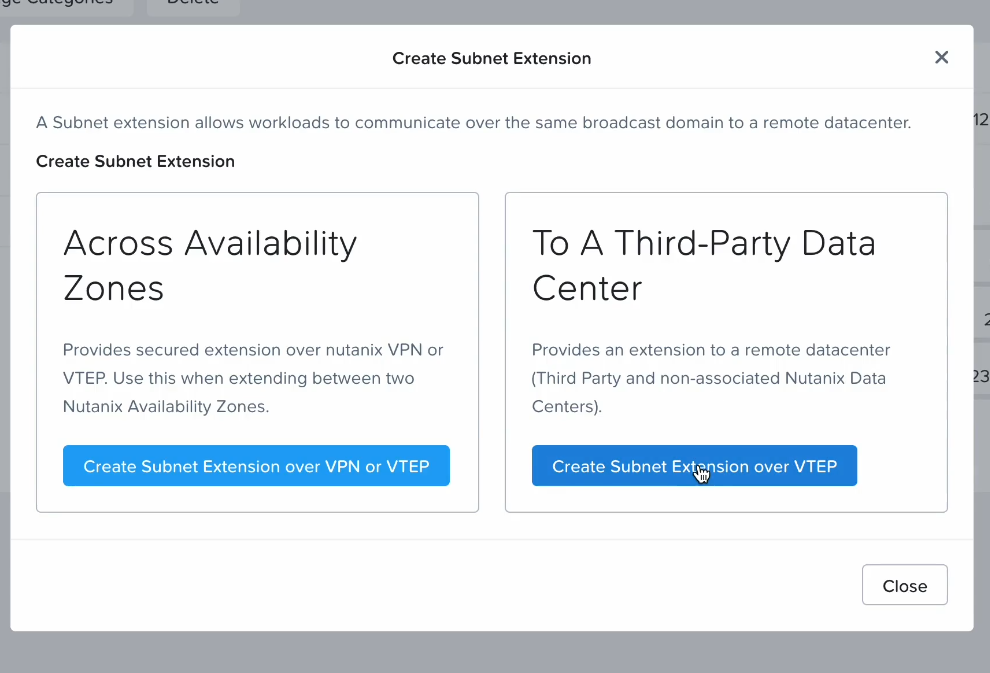
Click the subnet to be extended and then select “Extend”
If we were extending a network between two Nutanix clusters we would select “Across Availability Zones” but in this case we extend from a pure VMware environment and a 3rd party (Cisco) appliance, so we select “To A Third-Party Data Center”.
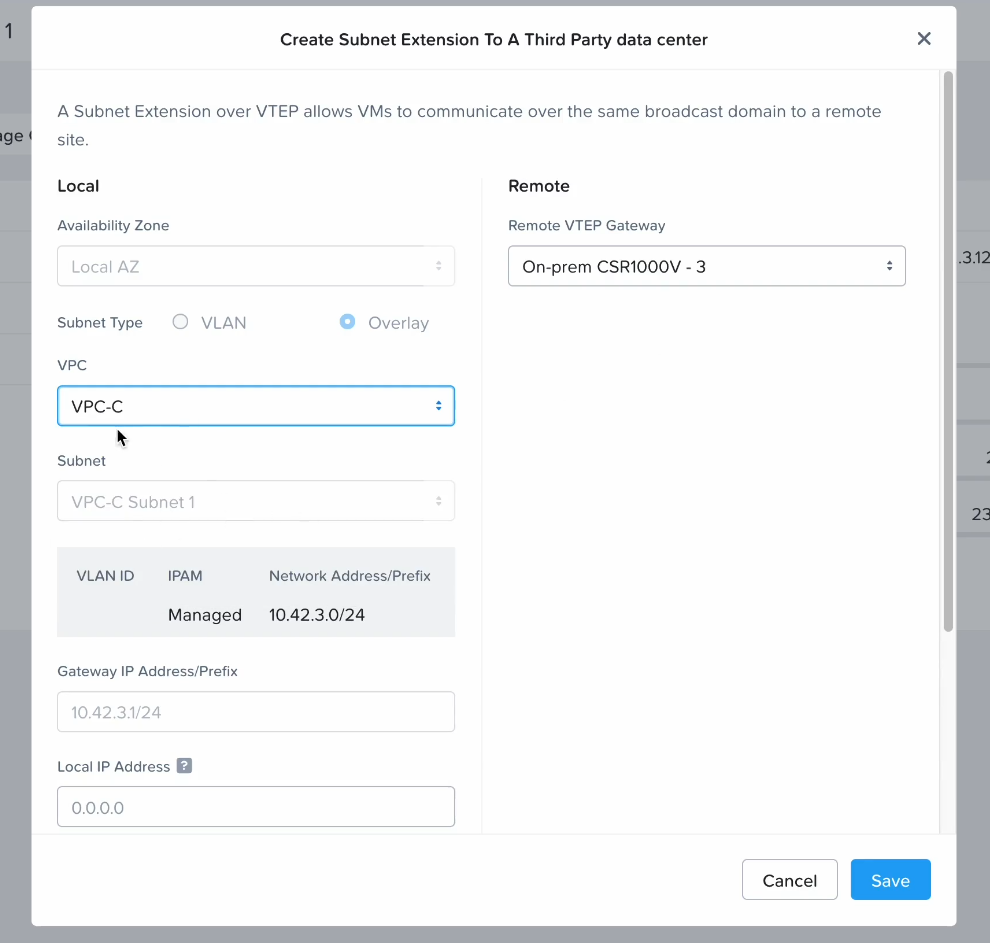
Select the CSR1000V as the remote VTEP gateway and the VPC which contains the subnet we want to extend.
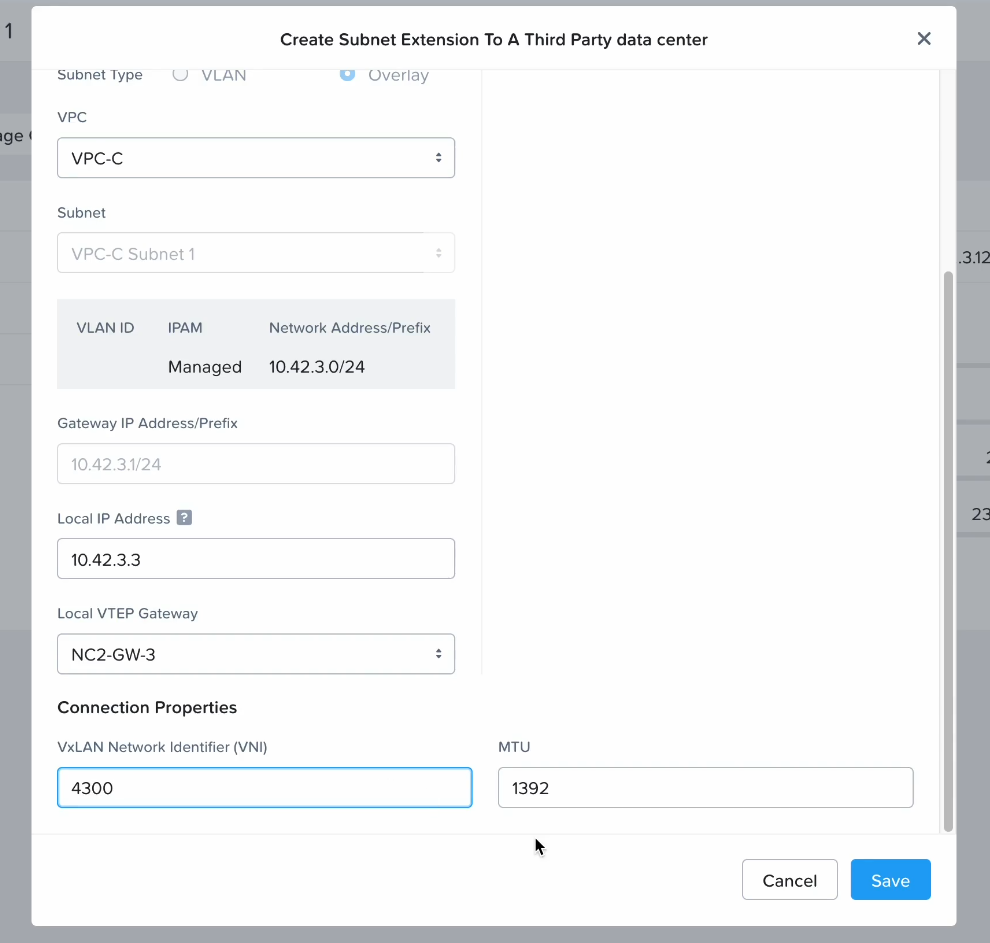
For “Local IP Address”, enter a free IP in the subnet to be extended. This will be the leg the Nutanix gateway appliance extends into that subnet.
Also set the VxLAN VNI we used when configuring the CSR1000V earlier. Adjust the MTU to ensure there is no packet fragmentation. The default is 1392 but this will vary depending on the connectivity provider between on-prem and the AWS cloud.
Configuration of the Layer 2 extension is now complete. In the following section we verify connectivity from on-prem to the cloud using the newly extended network.
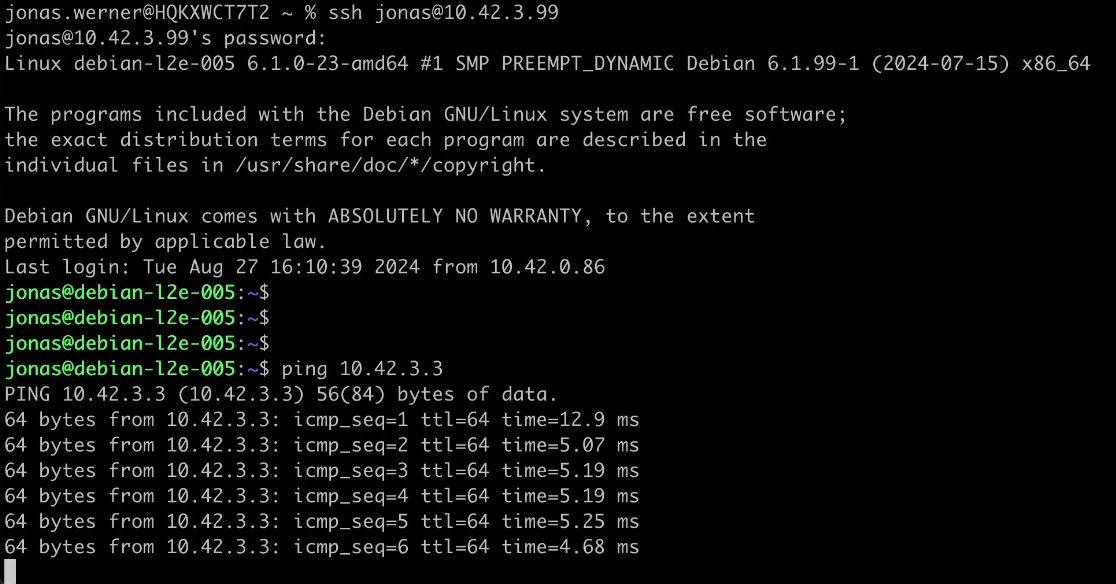
Verifying connectivity
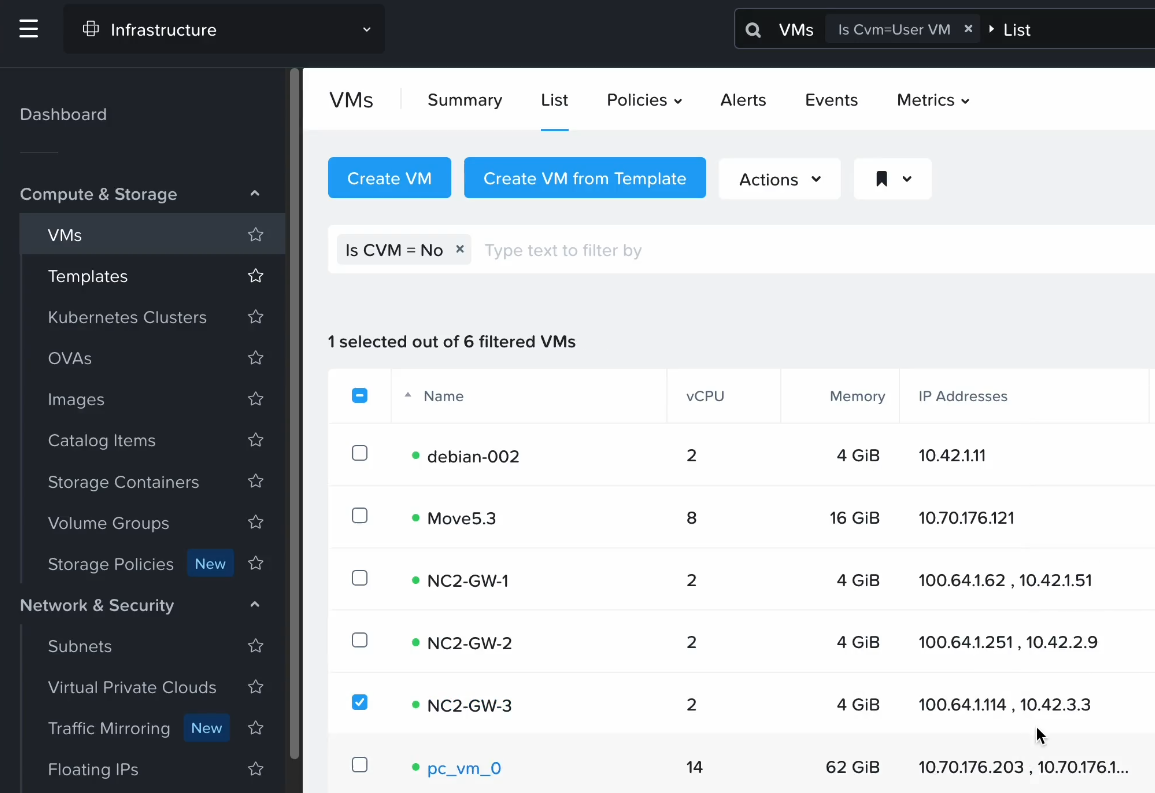
As a first step it’s good to ping the IP address in the extended network which is assigned to the Nutnix Gateway appliance. We can verify that the “Local IP Address” is configured for the gateway VM by navigating to “VM” in Prism Central and checking that “10.42.3.3” shows up as an IP for the gateway
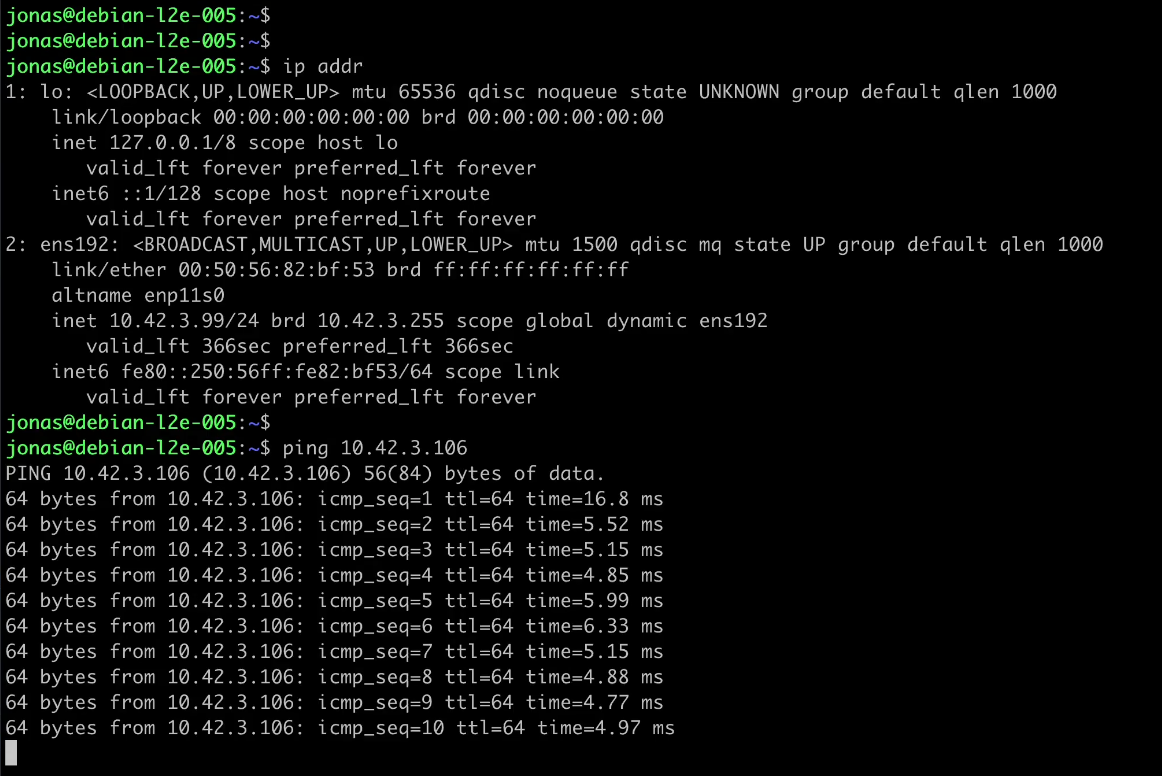
Pinging this IP address from a VM in the on-premises VMware environment shows that it can reach the gateway appliance across the extended network without problems. The local VM has an IP of 10.42.3.99, in the same VLAN which has been extended. Latency is about 5ms across the S2S VPN + L2 extension.
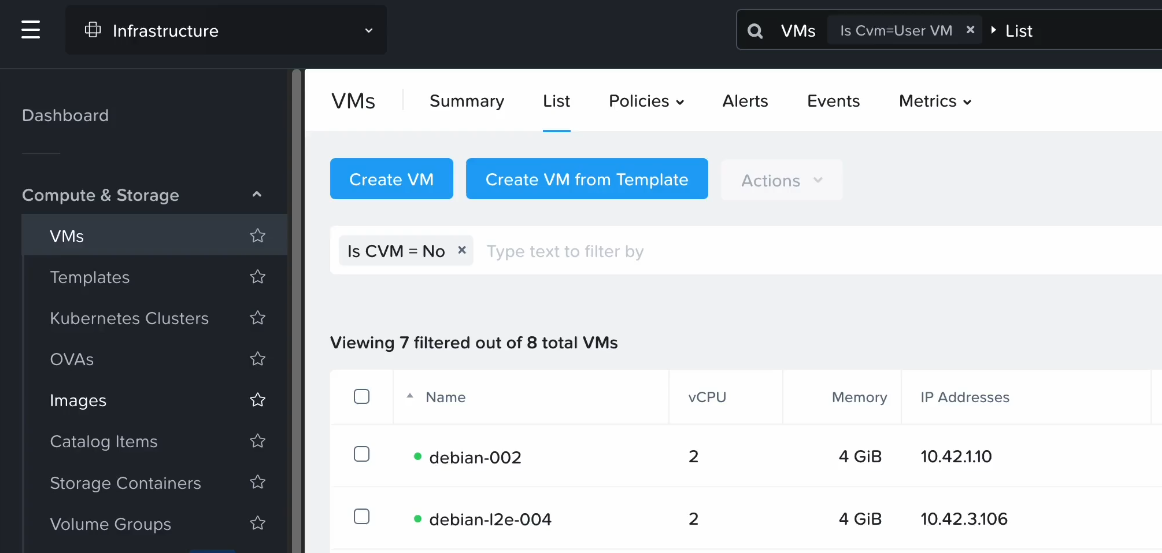
As a next step I have migrated a VM using Move from the on-prem VMware environment to NC2. After migration it was assigned an IP of “10.42.3.106” as per the screenshot below
Pinging this VM from on-prem also works just fine
Conclusion
That concludes the walkthrough of configuring L2 extension from on-premises VMware with Cisco CSR1000V to Nutanix Cloud Clusters (NC2). Hopefully this was helpful.
For reference, please refer to the below links to Nutanix and Cisco pages about L2 extension
One of the great things about running a virtualized infrastructure on NC2 on AWS is the close proximity to all the cloud native services. One of those highly useful services is the AWS ELB or Elastic Load Balancer.
In this post we show how to get floating IP addresses from the VPC in which NC2 is located and to assign them to a number of web servers running as VMs on NC2. Then we create a Load Balancer target group and finally we create an Application Load Balancer (ALB) and attach it to the target group.
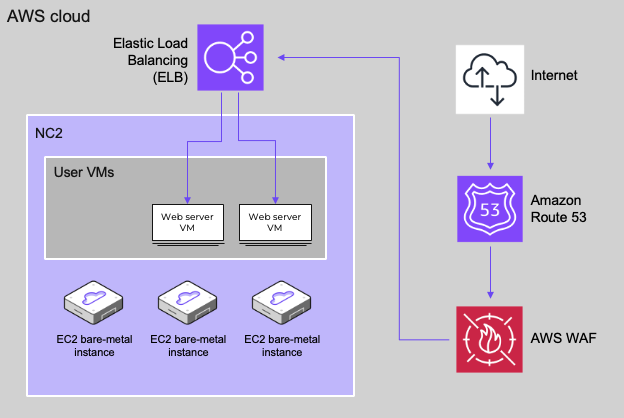
Architecture
In this blog post we only cover the deployment of the web servers and the load balancer, however, Route 53 can also be leveraged for DNS and AWS WAF for security and DDOS protection purposes as illustrated below
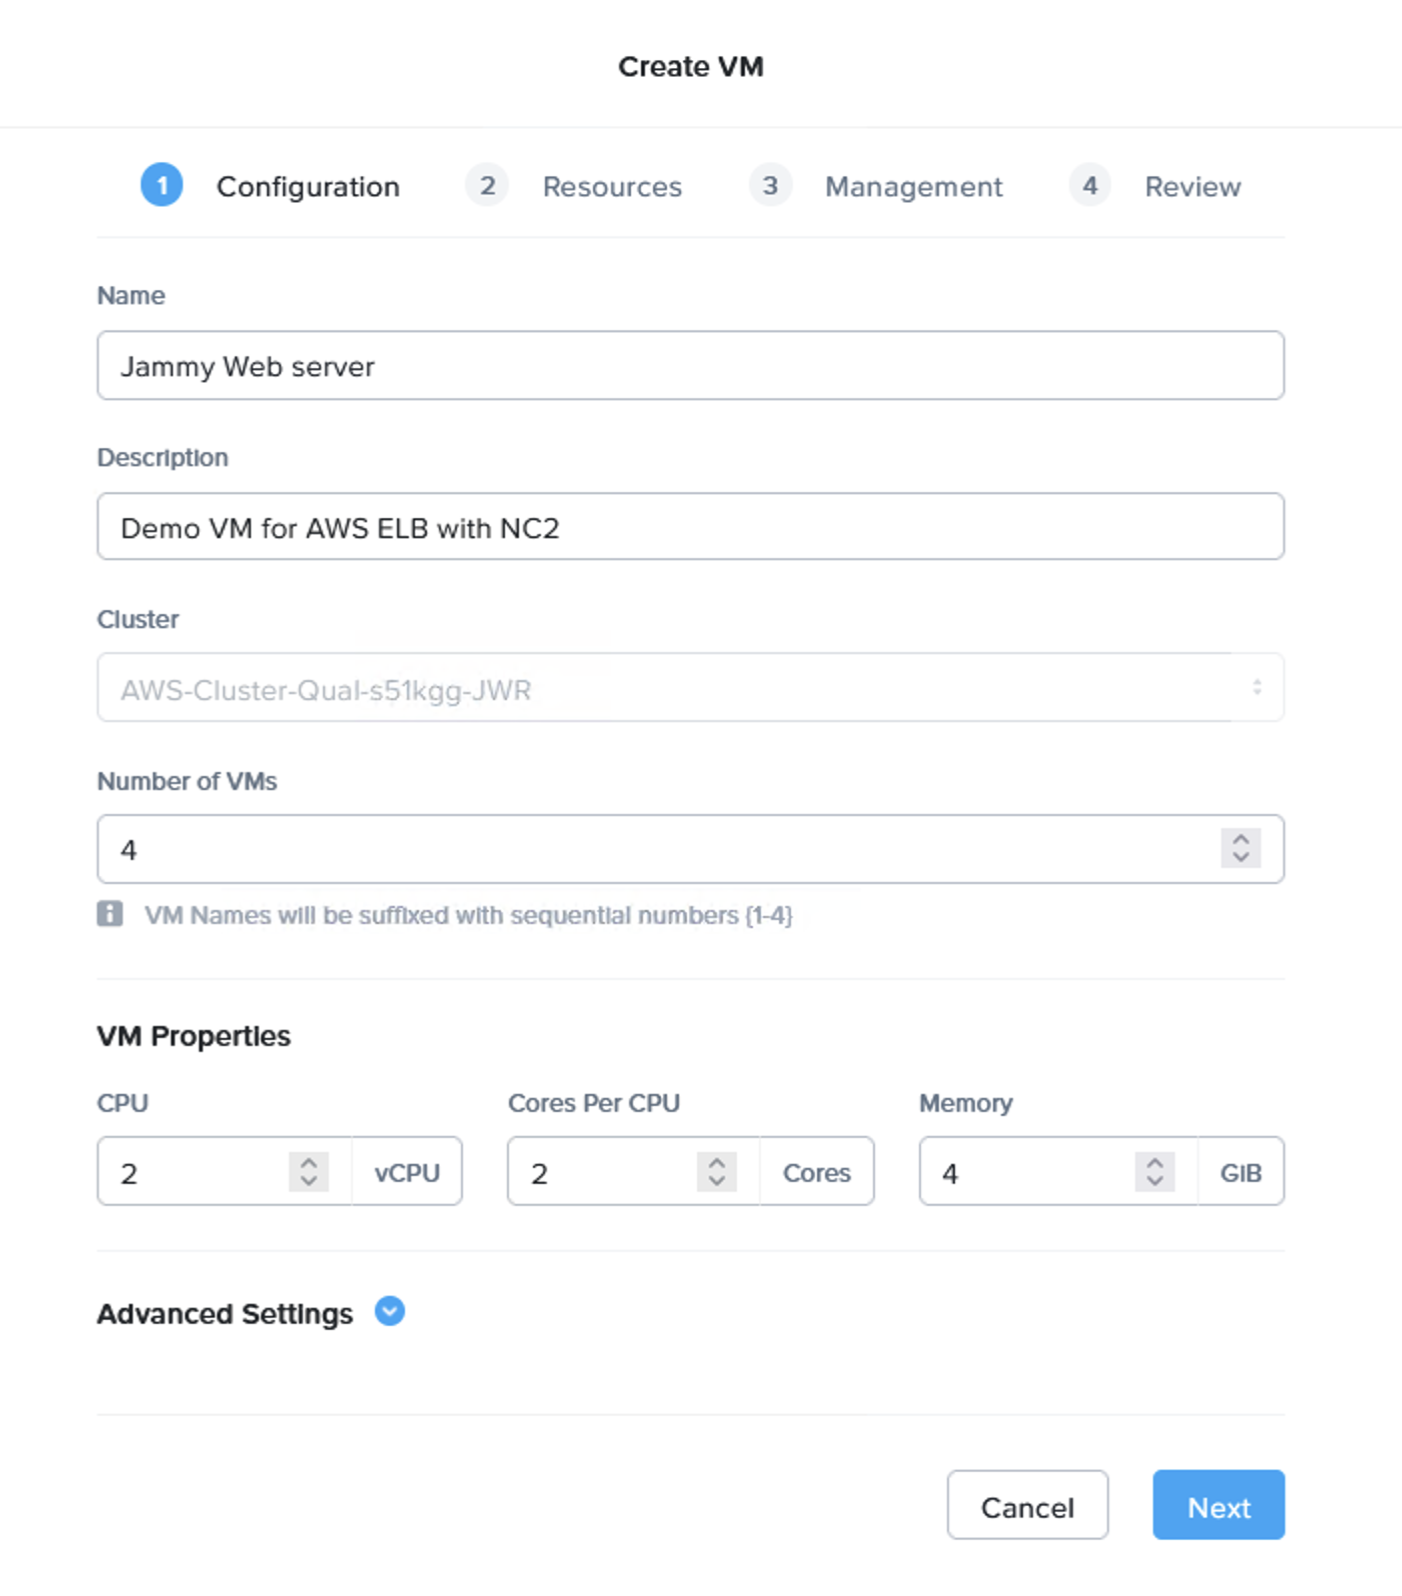
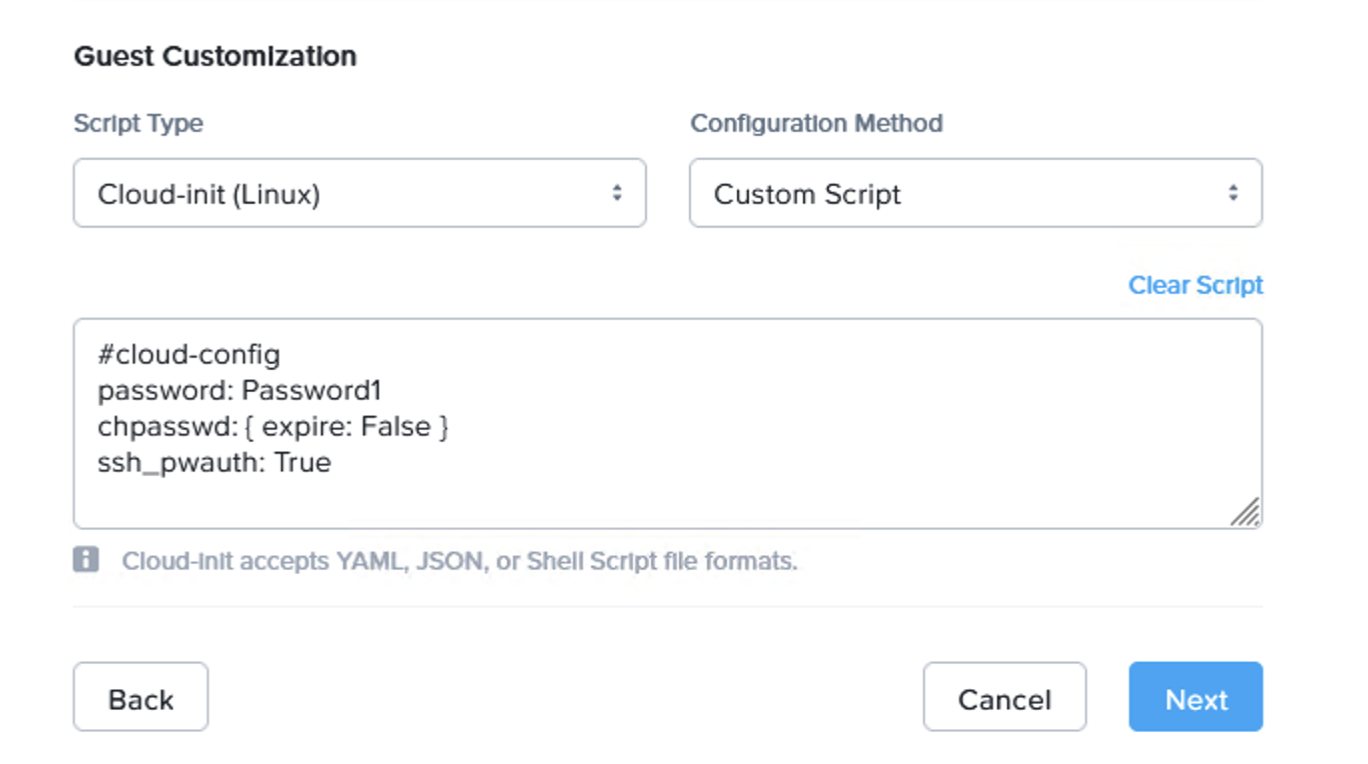
Preparing some web servers
We first deploy a few test web servers. In this case the wonderfully named Jammy Jellyfish edition of Ubuntu Server as a cloud image. Feel free to download the image from here:
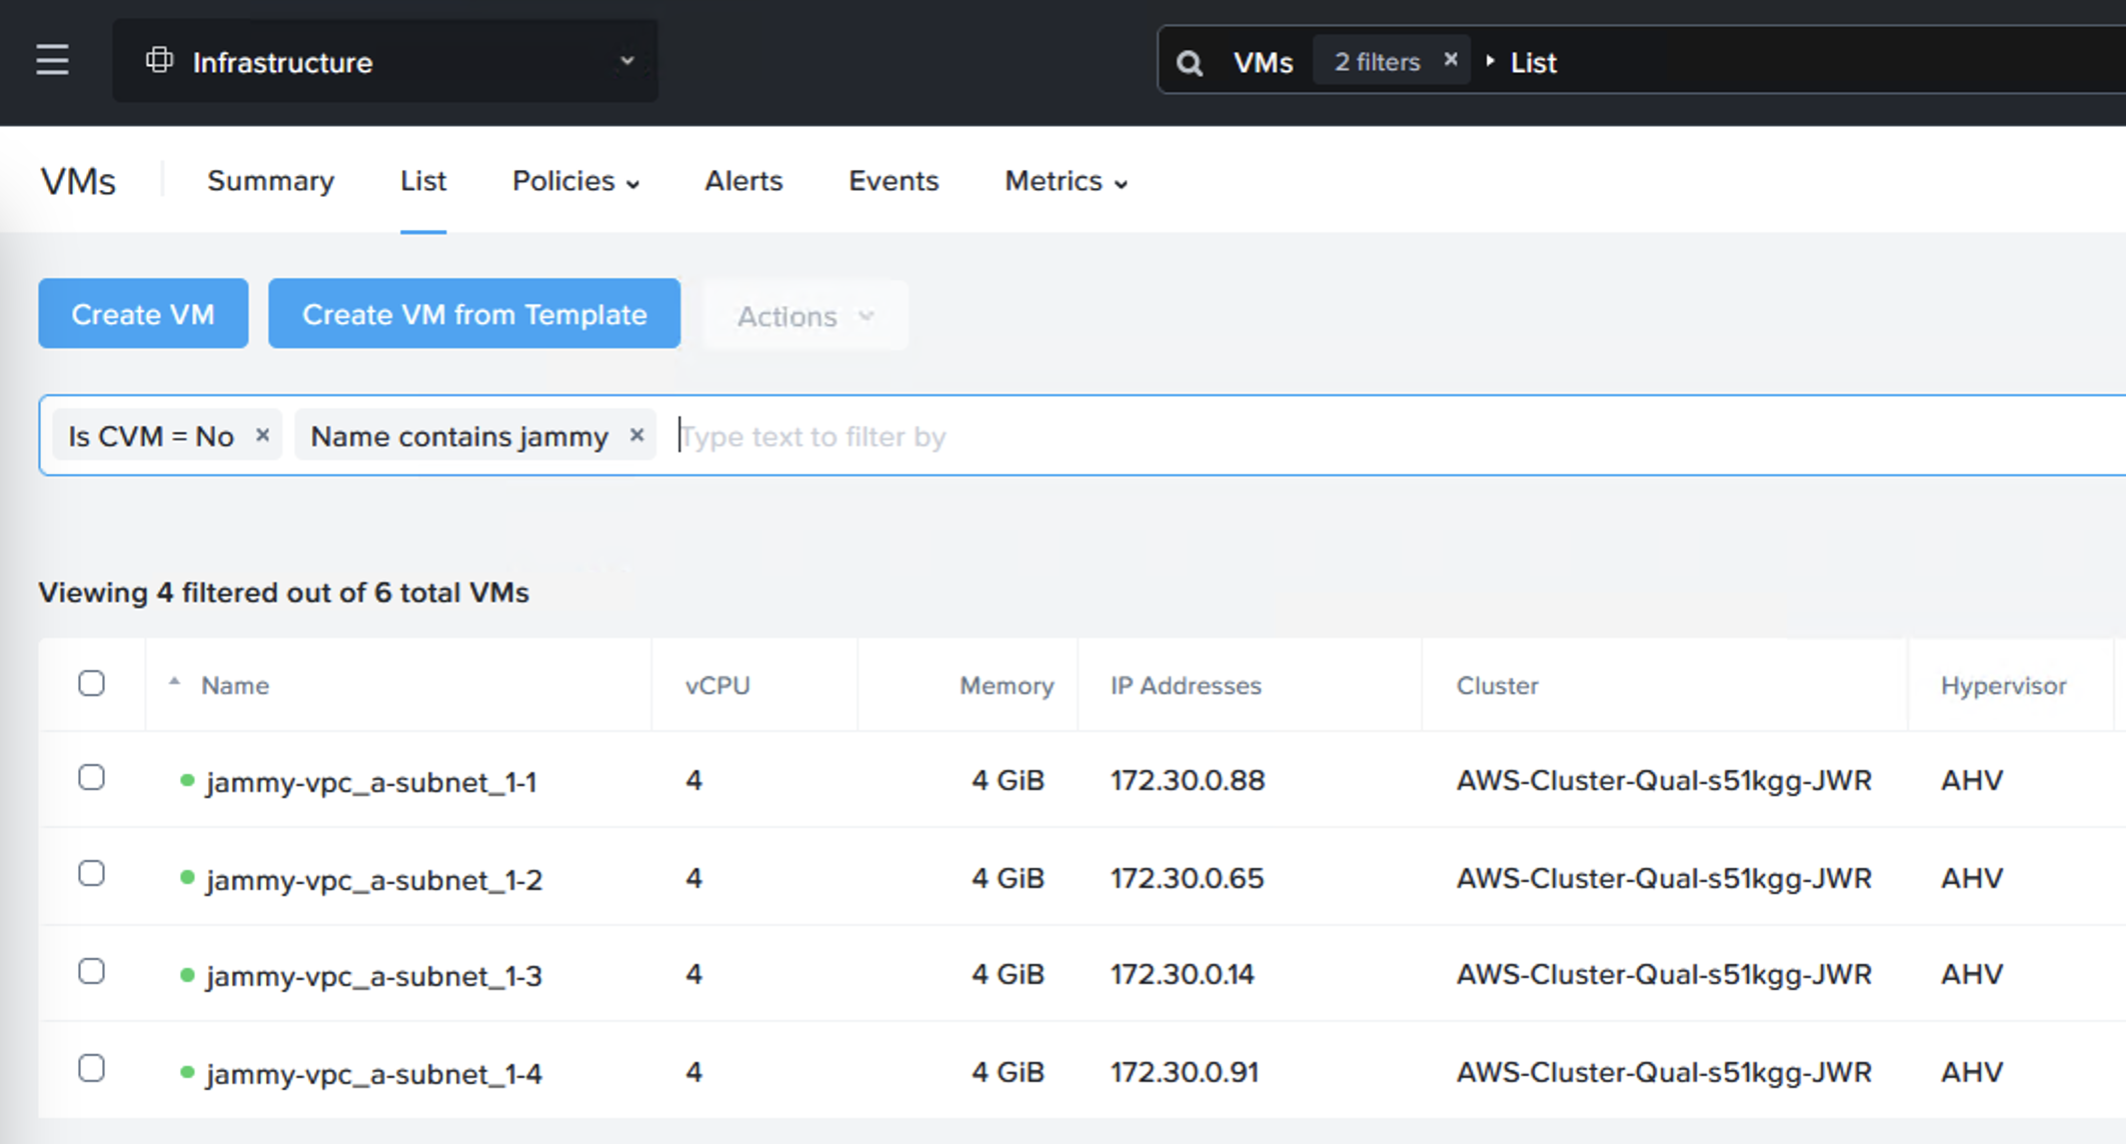
Now we have our VMs ready. I’ve installed the Apache web server to serve pages (apt install apache2) but feel free to use whatever works best in your setup.
I used the following index.html code to show the server ID
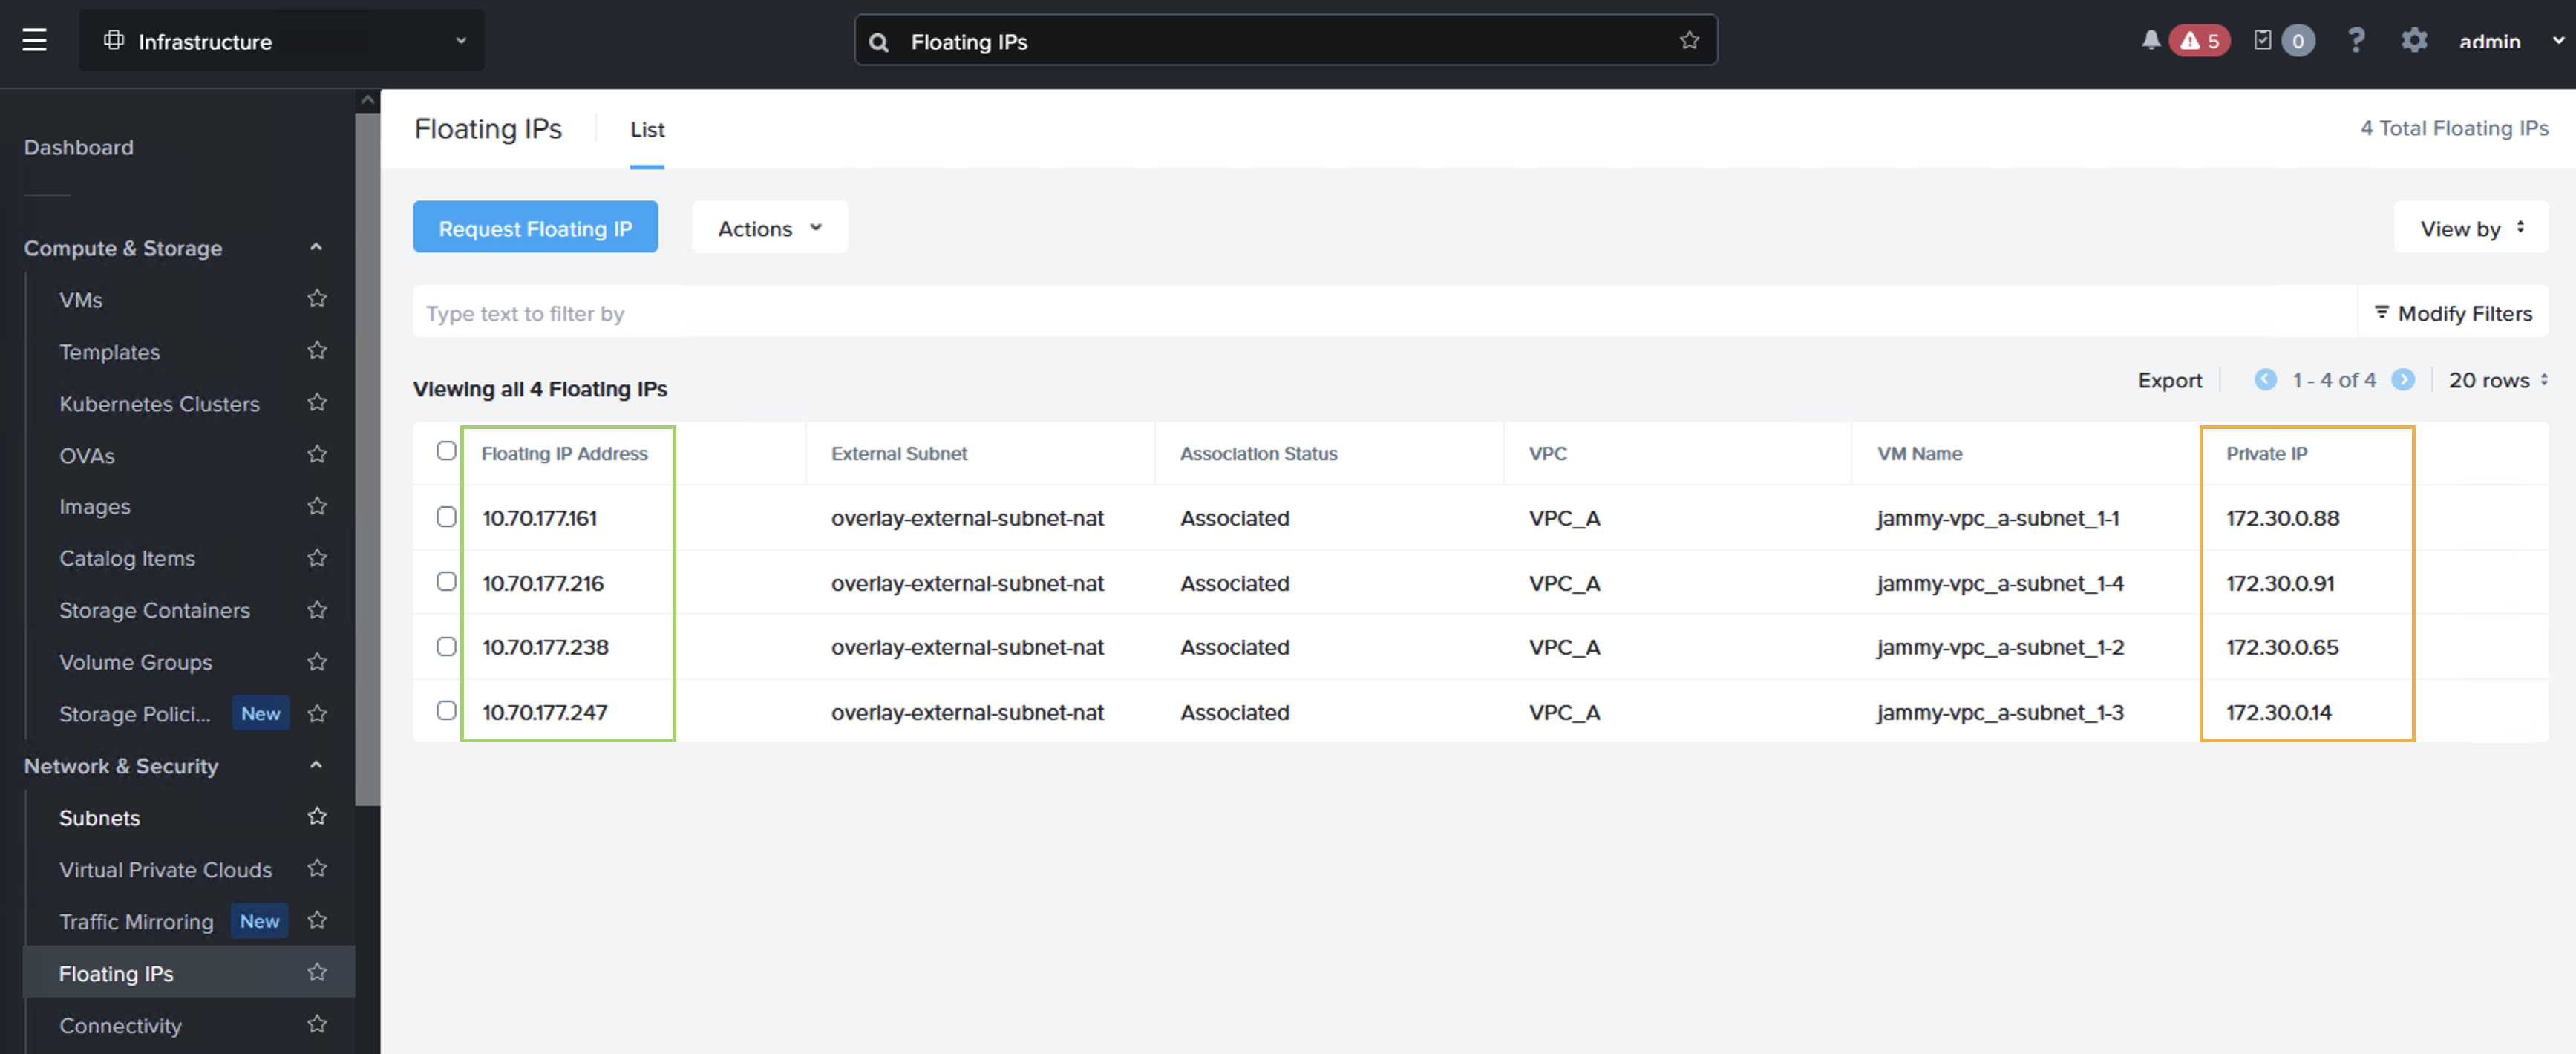
Configure floating IP addresses for the web servers
Next we request a few floating IP addresses from the VPC which NC2 is deployed into and then assign one IP each to our web servers. Luckily Prism Central makes also this very easy to do – in a single step! From “Compute & Storage”, select “Floating IPs” under “Network & Security”:
After assigning the IPs we can see that each VM have both an internal and an external IP address, where the “external” IP comes from the AWS VPC CIDR range
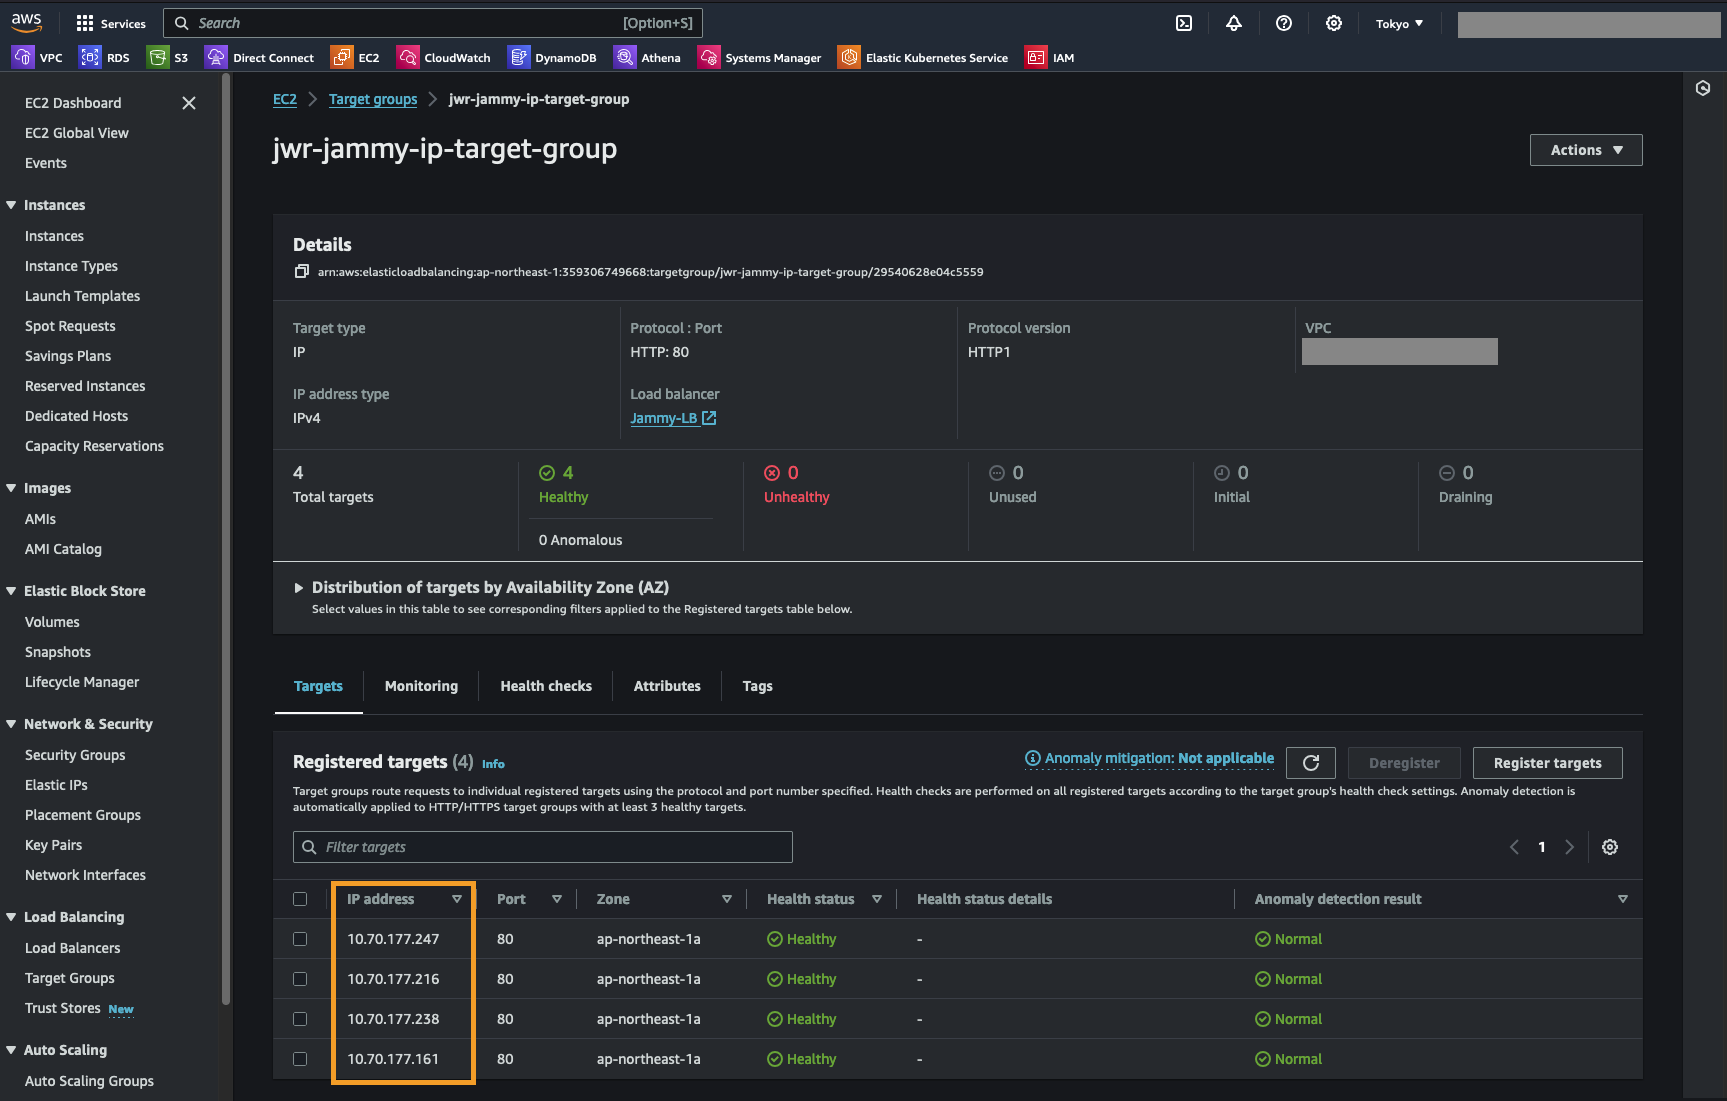
Creating an AWS LB target group
Next we create a target group for the AWS ALB which we deploy in the next step. The LB target group simply contain the Floating IP addresses we just assigned as well as a health check for the web root of these web servers.
We create an “IP address” target group and set the health check to be HTTP, port 80 and the path as “/” or the web root.
We then add the Floating IP addresses we created previously
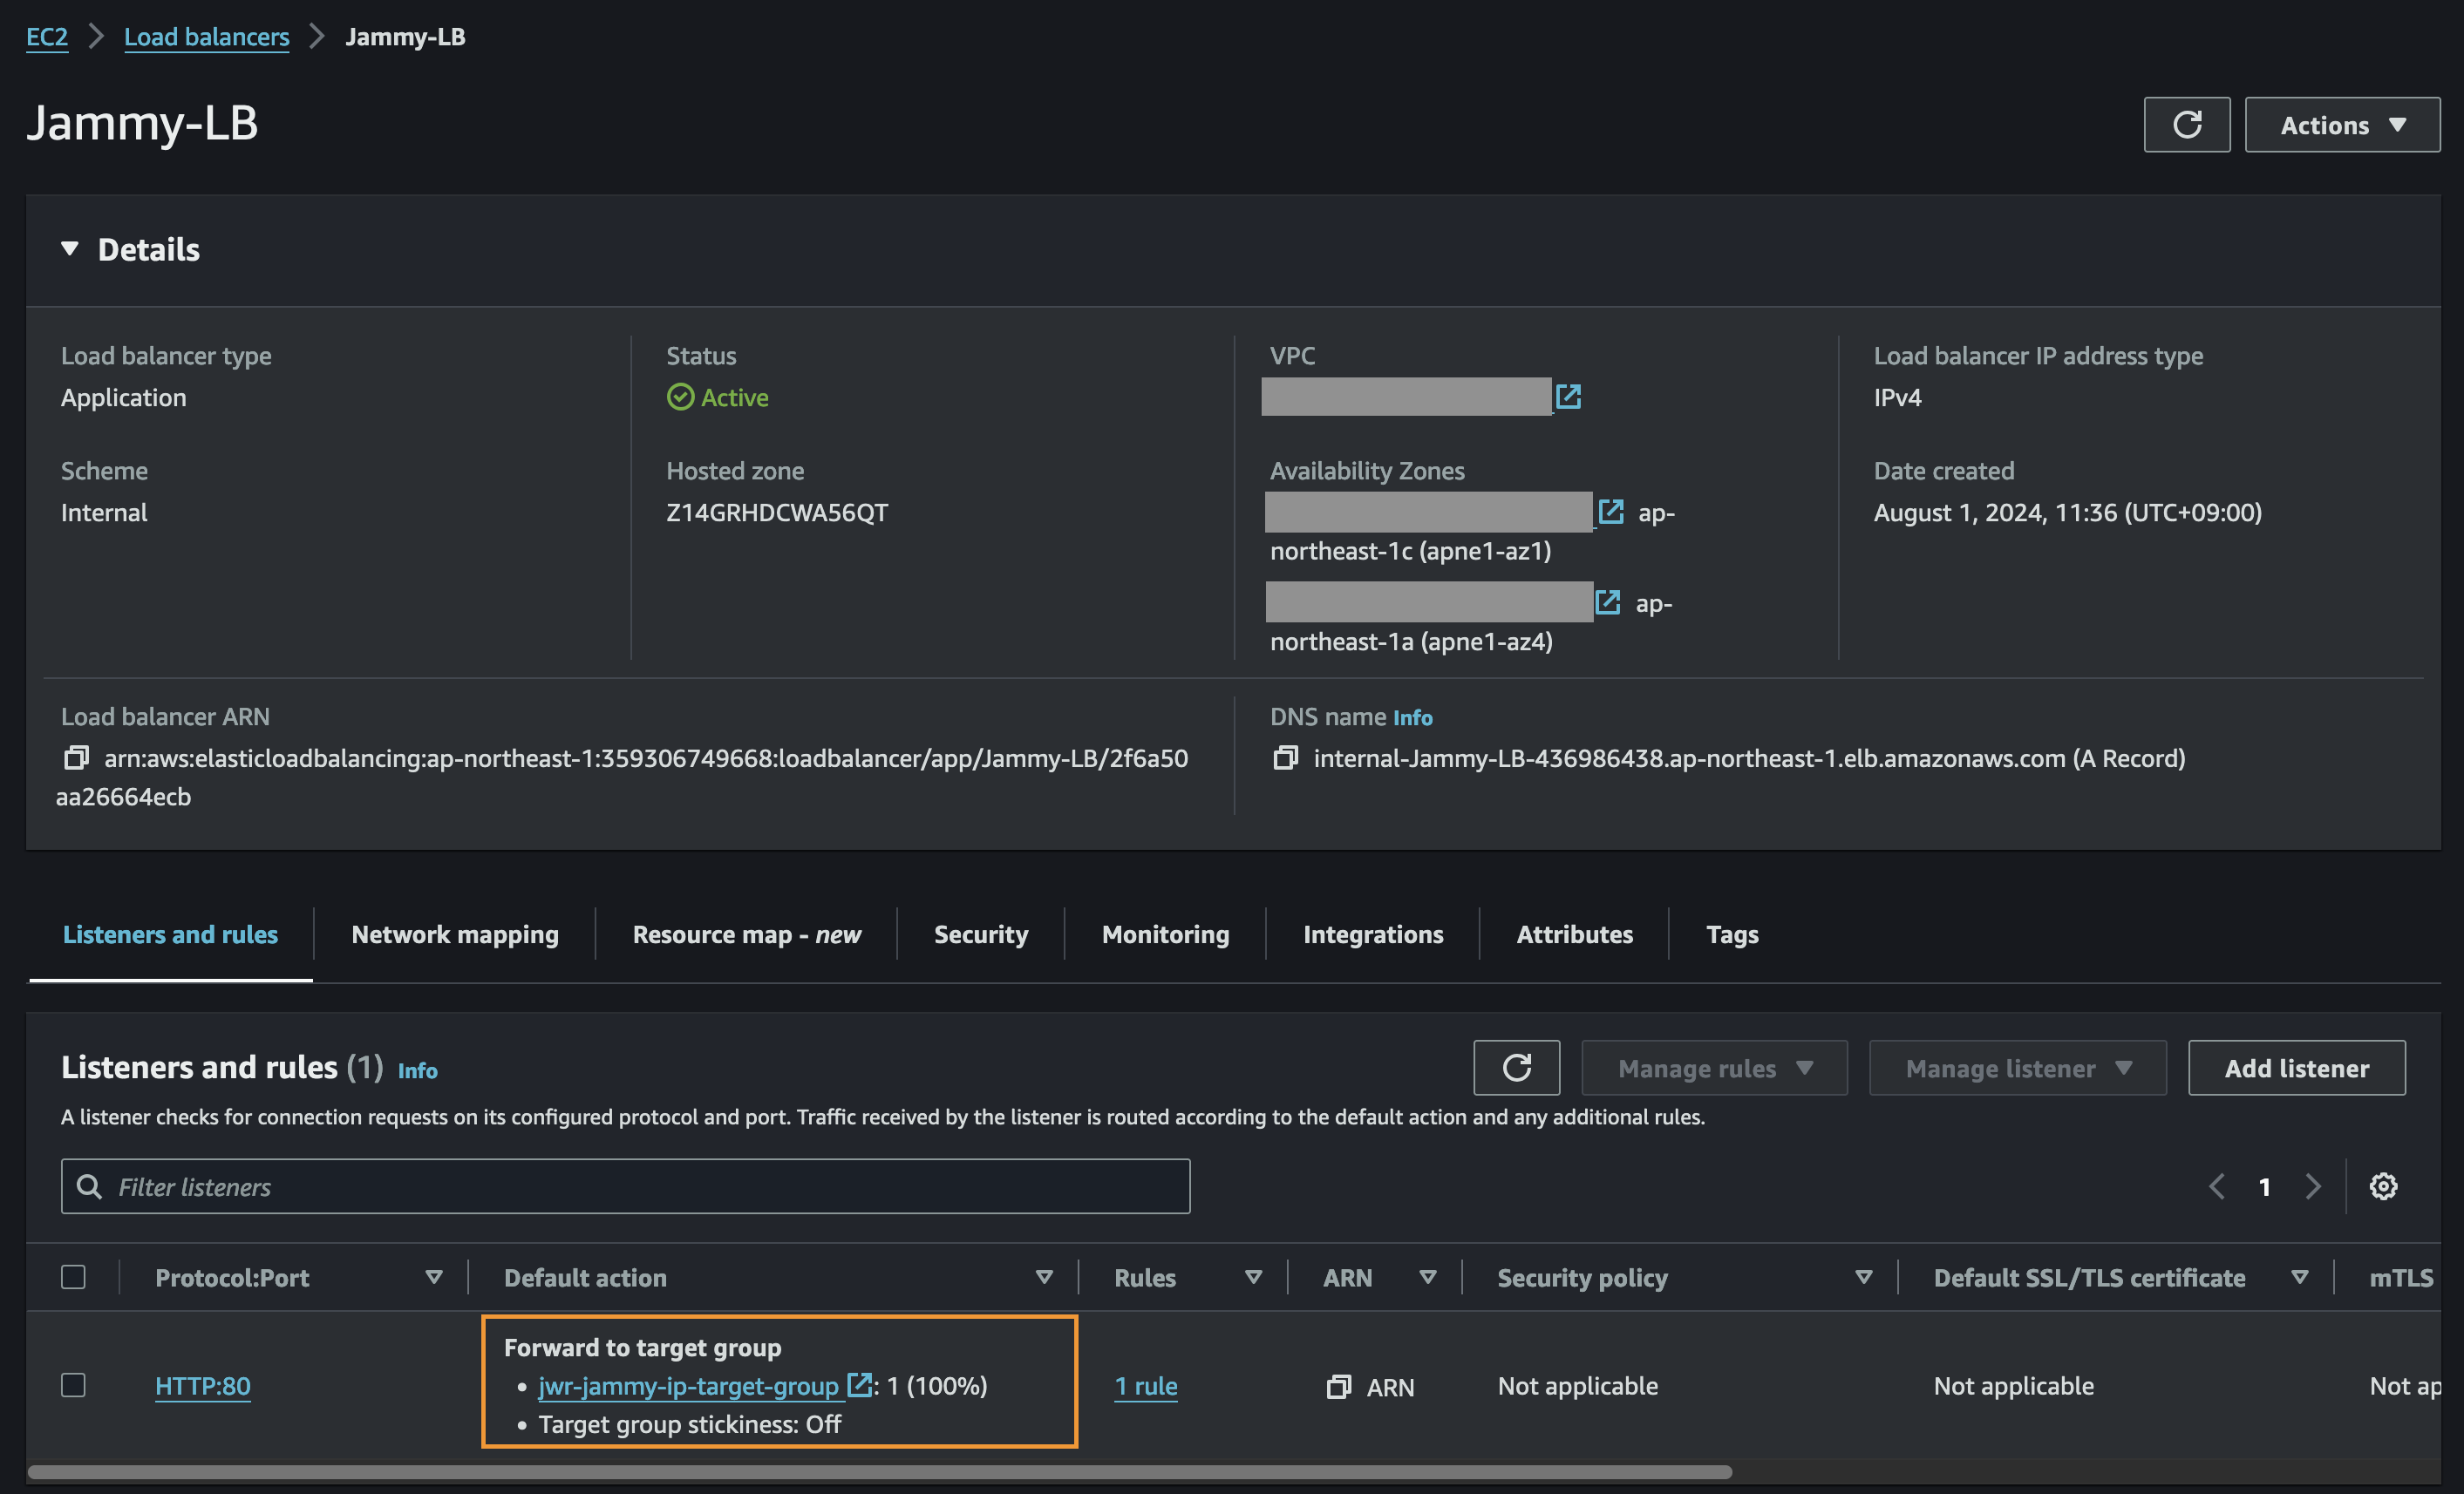
Create the Application Load Balancer (ALB)
Finally we create the ALB and assign it to our target group
Test of the ALB
Now we’re all done and can access our ALB to see if it shows balances between the NC2 VMs as expected.
We’re getting a different web server each time we refresh the page – all good!
That’s all for now. Hope that was helpful and thank you for reading!
In this blog post we explore two ways to use Nutanix Move 5.3 to migrate Virtual Machines from an existing VMware Cloud on AWS (VMC) environment to Nutanix Cloud Clusters on AWS (NC2). This is done while preserving both IP and MAC addresses of the VMs being migrated.
The most straight forward method is to deploy NC2 into the Connected VPC. This is a VPC which is attached at time of deployment of the VMware Cloud on AWS environment and is owned by the customer. Alternatively, we can deploy NC2 into a completely separate VPC and connect to the VMware Cloud on AWS cluster through a VMware Transit Connect (VTGW).
Architecture overview
The two methods are illustrated below. Method 1 is recommended due to the ease of setup, simple networking and no data transfer charges. However, care need to be taken to ensure there is no overlap with any existing resources deployed into the Connected VPC. For example by creating new private subnets in the Connected VPC specifically for the NC2 deployment.
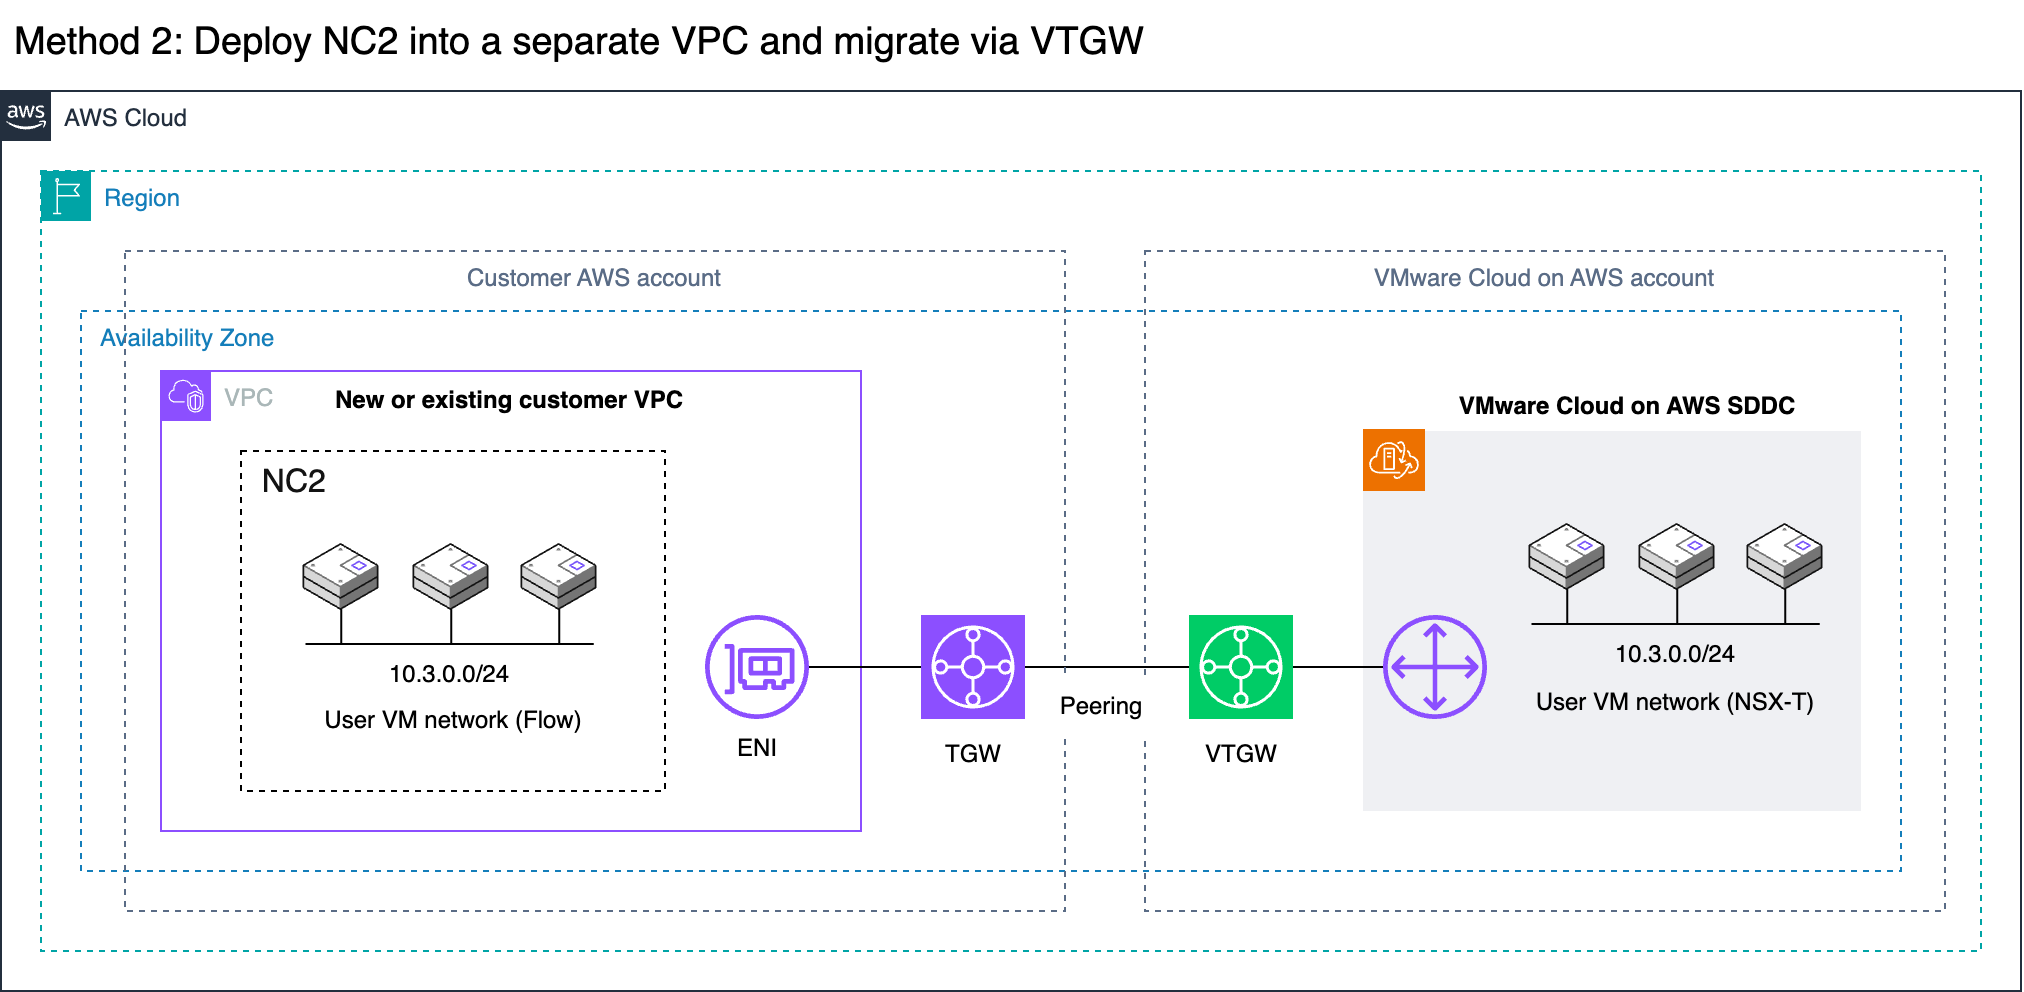
Method 2 covers migrating via a VMware Transit Connect (VTGW). Although it has additional routing considerations, this is also a fully viable option. In this example we peer the VTGW with a normal customer-controlled AWS Transit Gateway (TGW). Note that with Method 2 the VTGW can also connect directly to a VPC without the need for a TGW, but this will limit the routing options for the customer.
It’s important to keep in mind that both options can migrate VMs from VMC without changing IP or MAC addresses. Neither option require L2 Extension of user VM networks. This underlines the ease of which a migration like this can be done. There are of course some caveats. Refer to the VM networking section below for more detail.
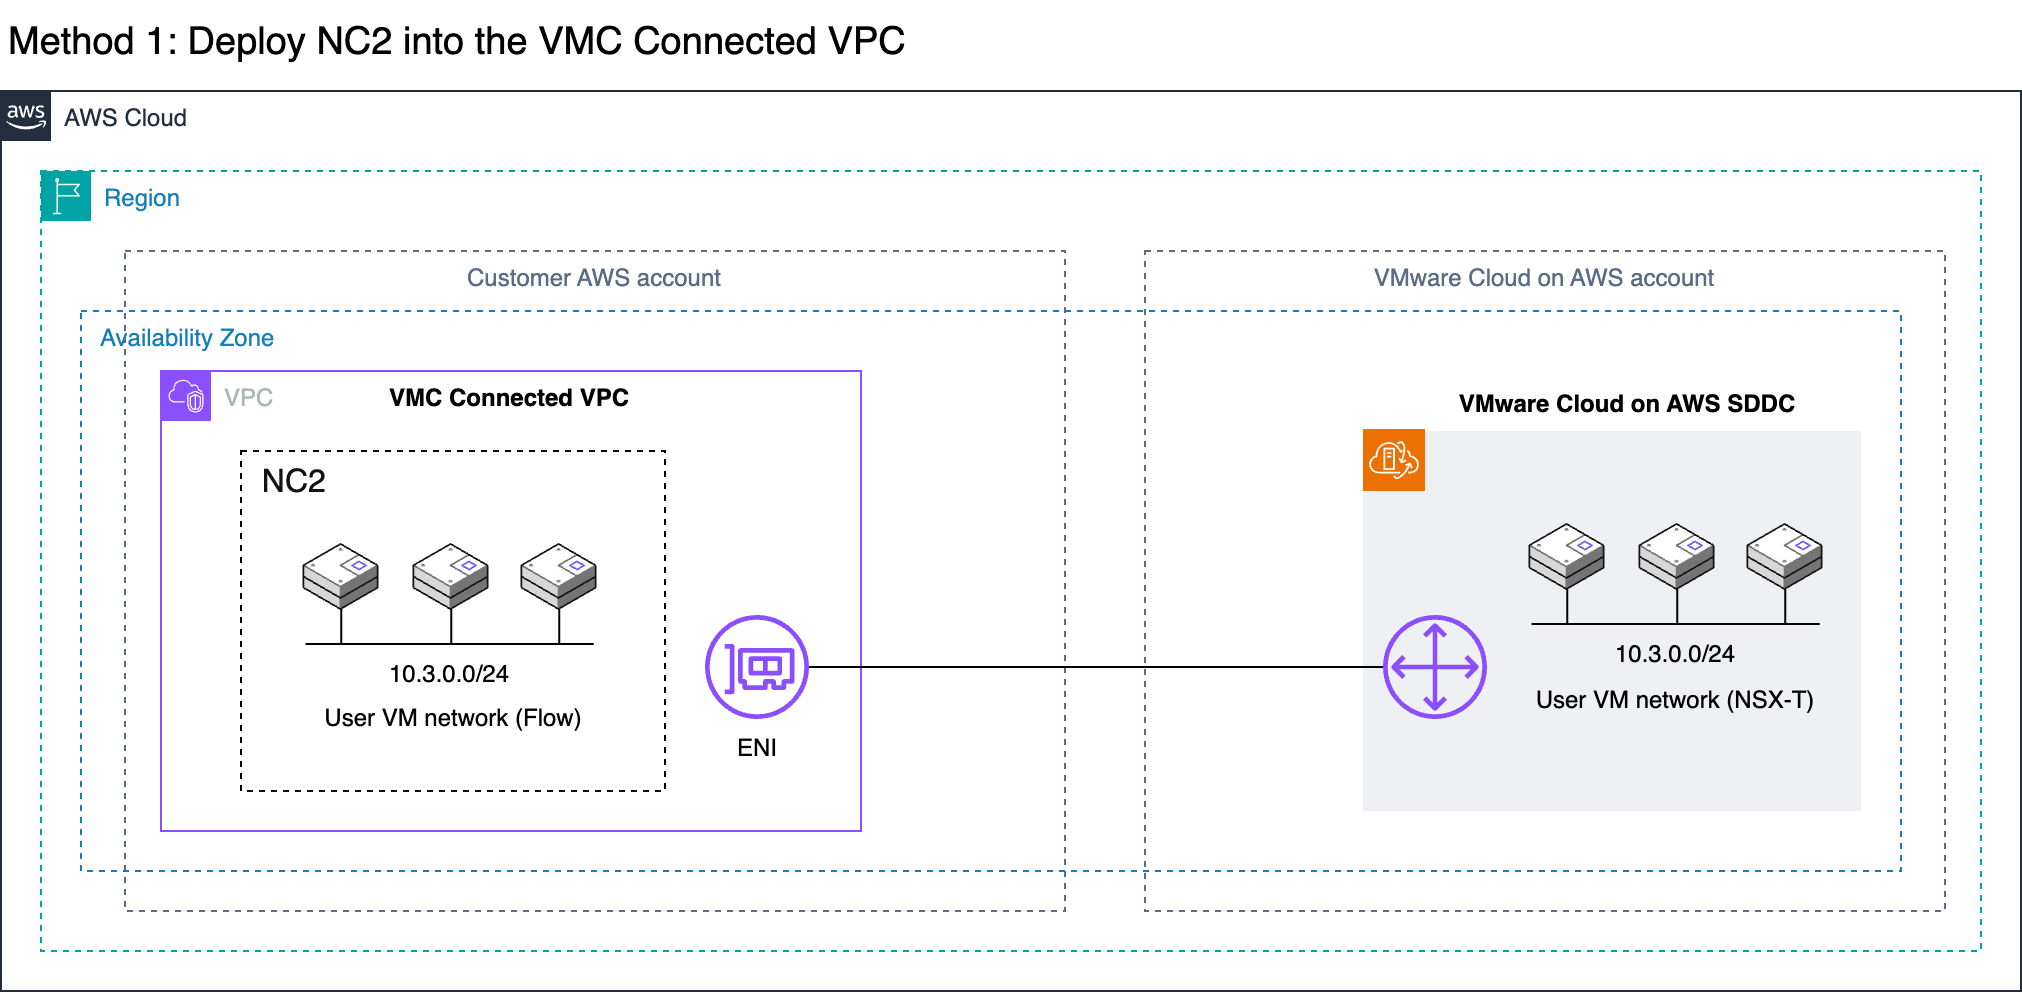
Method 1: Migrate from VMC to NC2 deployed into the VMC Connected VPCMethod 2: Migrate VMs via VTGW into a separate or new VPC
VM networking
The whole migration can be done without L2 extension of VM networks. On the VMware Cloud on AWS side Virtual Machines in VMC are connected to overlay networks created with NSX-T using the VMC management console. These are represented by the “10.3.0.0/24” network in this example. The same CIDR ranges can be created as overlay networks by using Nutanix Flow on the NC2 cluster. Thereby, when VMs are migrated from VMC to NC2, they don’t need to change their IP or MAC addresses.
Note that if L2 Extension is not used, there is no communication between the overlay networks in NC2 and the overlay networks in VMC. Therefore, plan the migration so that VMs which need to communicate are moved together.
Also note that Flow does not advertise the overlay networks into the VPC route table. As long as VMware Cloud on AWS is attached to the connected VPC, the routes for the VMs will point to the active ENI created during the VMC cluster deployment. Destroying the VMC cluster will remove these ENIs and the corresponding routes from the Connected VPC route table.
Migration tool: Move
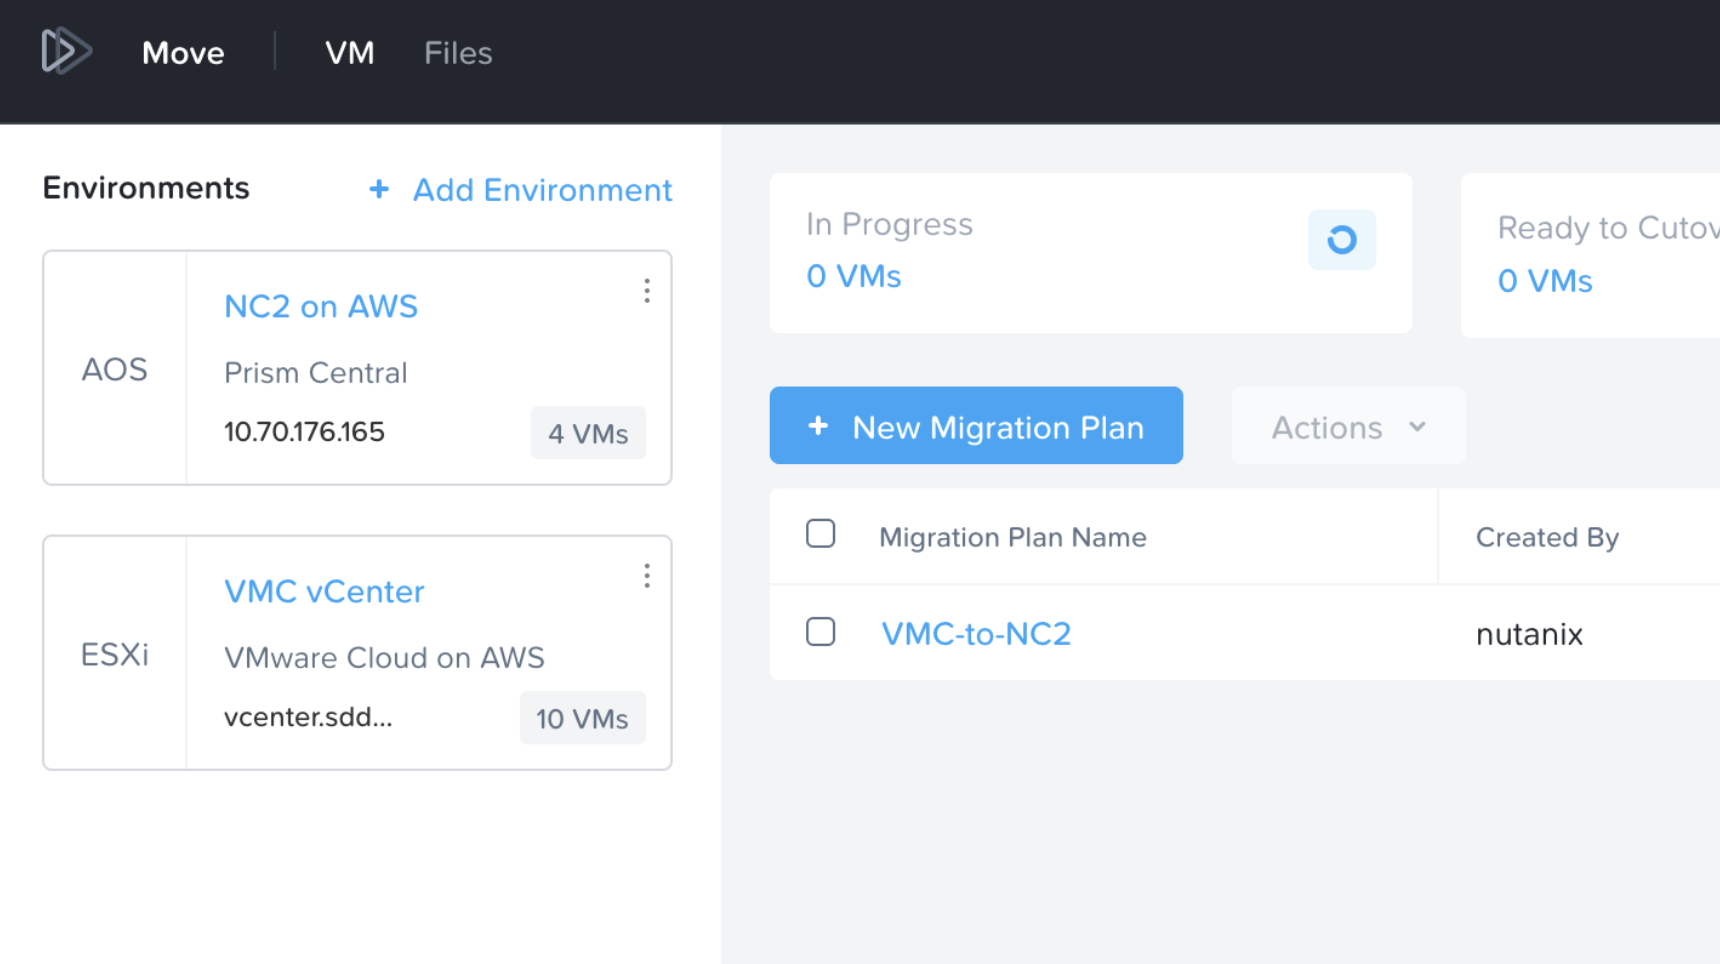
The Nutanix Move migration tool has with the recent 5.3 release added support for migrations from VMware Cloud on AWS. In this example, Move is deployed into the NC2 cluster. Both the VMC and the NC2 environments have been registered with Move and the inventories of both show up and are available for migration. More details in the Move deployment section below.
Method 1: Deploy NC2 into the Connected VPC
If there is enough space to deploy NC2 into the already existing Connected VPC in the customer account, this is the easiest and most straight-forward option. Connectivity and routing between the Connected VPC and the VMware Cloud on AWS environment is already configured as part of the VMC deployment. Do make sure that the CIDR ranges of any existing subnets are sufficient for deployment of NC2 and that there aren’t already resources deployed into those subnets which could interfere with the NC2 components. If the VPC CIDR range has space for new subnets, consider creating new private subnets to hold the NC2 deployment.
Benefits
No need to create new VPC and subnets
VPC is already connected to VMC and routing is configured
Data transfer is free of charge
High link / data transfer speed
Drawbacks
VPC may already be fully populated with resources
VPC may not have the correct CIDR ranges for NC2
Method 1: Steps to deploy
Simply sign up for NC2 or start a trial and deploy through the NC2 deployment wizard. Select the latest version – 6.8, to get Flow overlay networking and the centralized management through Prism Central included.
Note that NC2 can only be deployed into private AWS subnets and that internet connectivity need to be present. If no direct internet connectivity is available, proxy support is also available through the deployment wizard.
VMware Cloud on AWS automatically updates the default route table in the connected VPC with the routes to vCenter, ESXi and the user networks. However, if NC2 is deployed into a subnet which doesn’t use the default route table those routes won’t be present. Ensure the subnet NC2 is deployed into is updated with the routes to the VMware Cloud on AWS environment. Particularly the management subnet which holds vCenter and the ESXi hosts. Also, if necessary, update the security group on the active VMC ENI to allow access from the NC2 subnet.
After the NC2 cluster is deployed, follow the steps further down in this article to open the VMC firewall for vCenter and ESXi, deploy Move 5.3 on top of NC2 and register both the NC2 cluster and the VMC vCenter instance.
Method 2: Deploy NC2 into a separate VPC and migrate through a VTGW
If deploying NC2 into the Connected VPC is not possible or desirable, there is another option available. VMware Cloud on AWS supports creating a VMware Transit Connect (VTGW). The VTGW is a VMware-controlled Transit Gateway (TGW) – basically a regional cloud router. The VTGW can in turn be attached either directly to another VPC or peered with a customer controlled TGW. The TGW can then be attached to one or several VPCs of the customers choosing. Do keep cross-AZ and cross-region charges in mind when planning the architecture so that they can be minimized or avoided.
Benefits
Once set up, migration is straight forward
The customer can use any VPC for the NC2 deployment, including a new one
Although this example use a TGW and a VTGW, data transfer charges do not end up being doubled. The peering attachment does not incur data transfer charges unlessthey go across AZs or regions.
Unless already present, go to the AWS console and deploy a Transit Gateway (TGW) in the same region as VMC. Then, in the VMware Cloud on AWS management console, go to “SDDC groups” and deploy a new VTGW. Once deployed, navigate to the “External TGW” tab, click “Add TGW” and enter the account number and the ID of the customer TGW to connect to as well as the regions to use.
In the “Routes” box, enter the CIDR range of the VPC which NC2 is to be deployed into. In this example, “10.90.0.0/16”.
This will advertise the NC2 VPC CIDR to VMware Cloud on AWS and also create a peering attachment invitation from the VMware AWS account to the customer AWS account.
Method 2: Steps to deploy: Configure the TGW
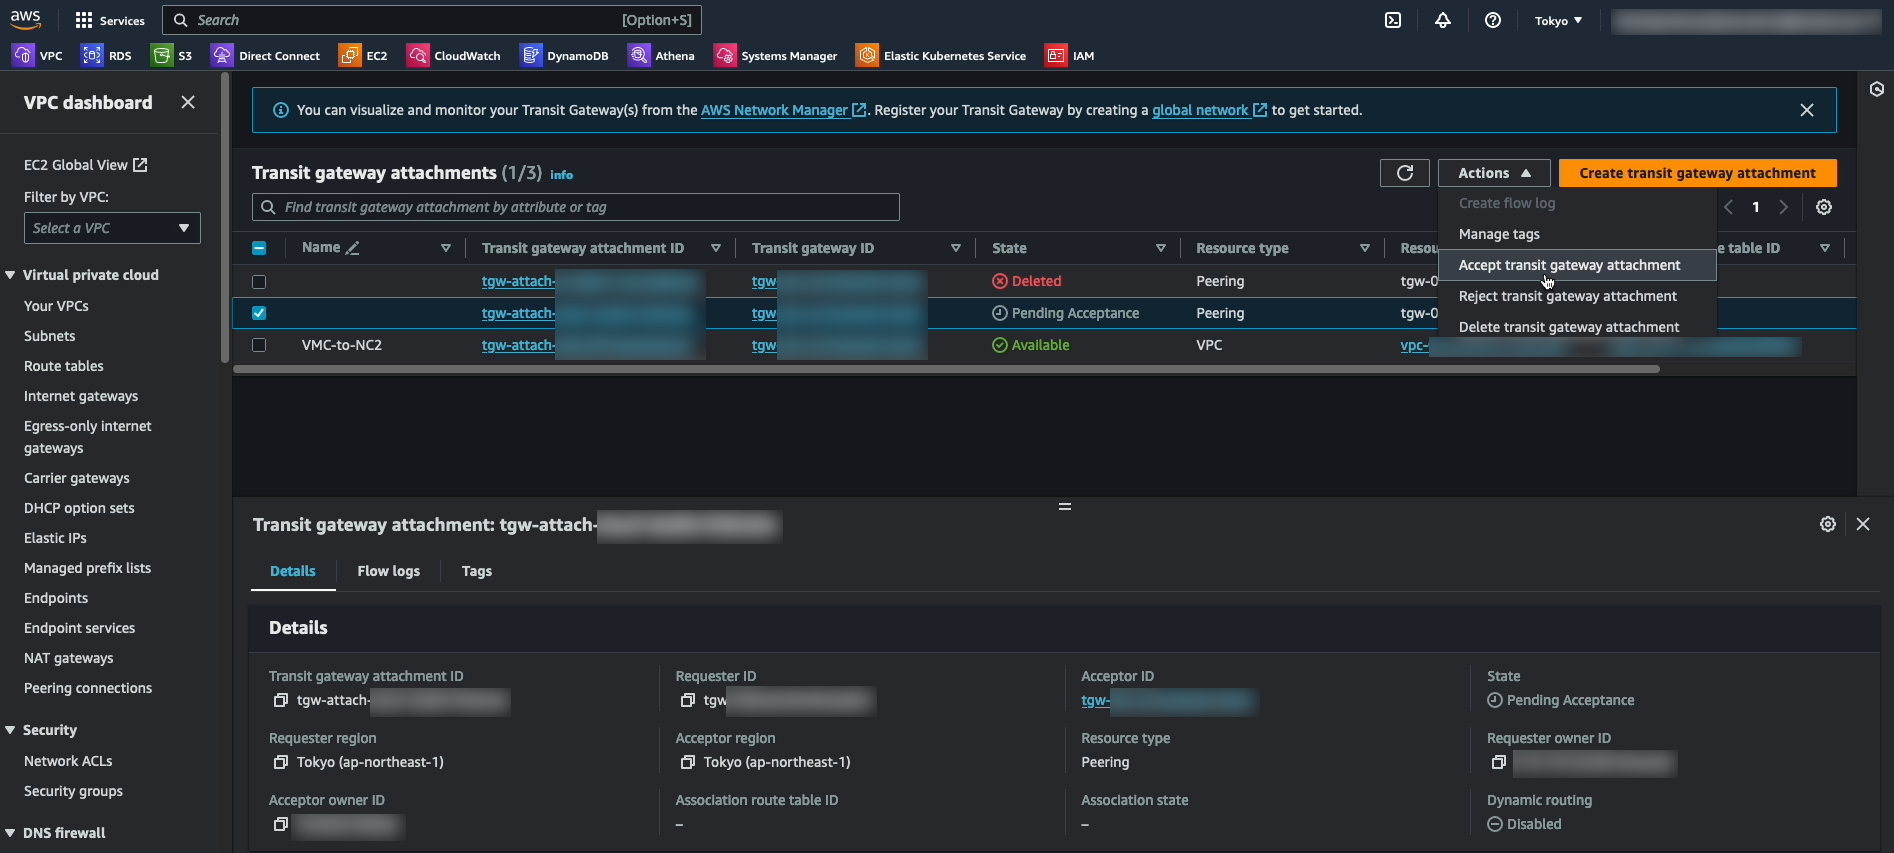
The invitation to add the peering attachment can be accepted through “Transit Gateway Attachments” in the AWS console in the customer account.
While here, take the opportunity to add an attachment to the VPC into which NC2 will be deployed.
Accepting the peering invitation in the AWS console
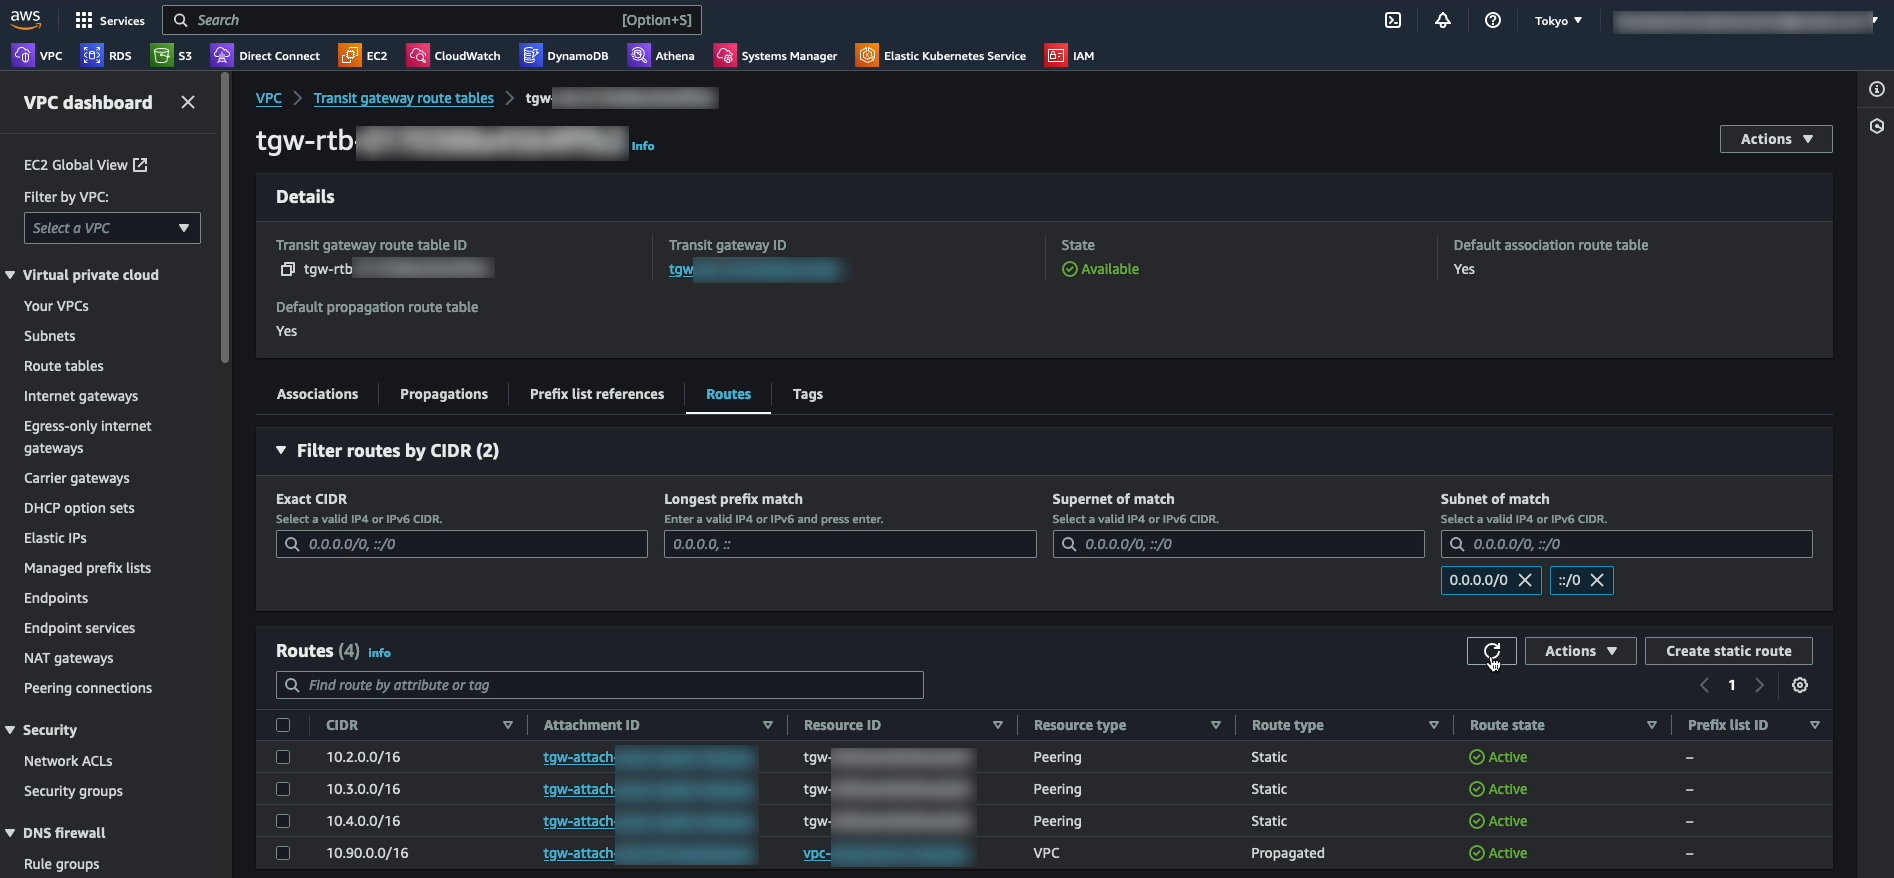
In the customer AWS account, navigate to the Transit Gateway route table section, select the route table for the TGW peered with VMC and add the routes for the VMC networks. In this case “10.2.0.0/16”, “10.3.0.0/16” and “10.4.0.0/16”. Note that these are added as Static routes.
In addition we have the “10.90.0.0/16” network added via the VPC attachment. There is no need to add static routes for this network as it is propagated automatically.
Method 2: Steps to deploy: Configure the routes to the VMC cluster in the NC2 VPC
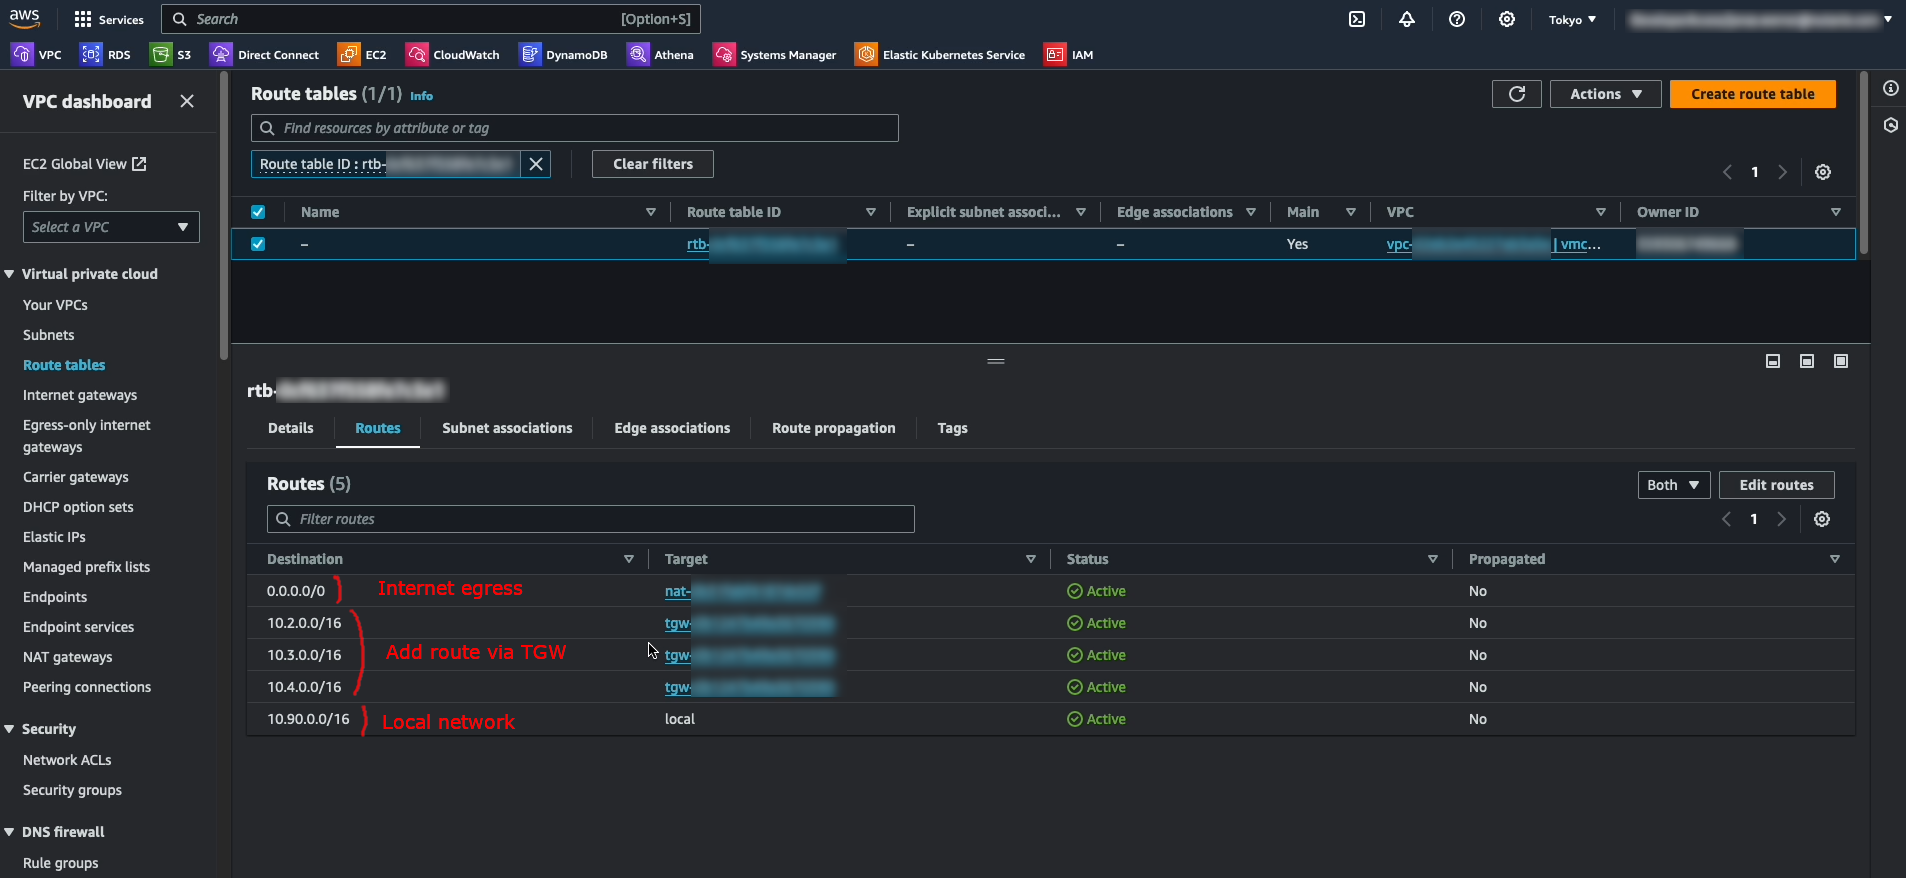
The final step for the routing is to add the routes for VMware Cloud on AWS into the route table(s) of the VPC which NC2 is to be deployed into. In our example, “10.2.0.0/16”, “10.3.0.0/16” and “10.4.0.0/16” are added as routes via the TGW attachment. “10.90.0.0/16” is our local network and there is a quad-zero route to the internet via a NAT GW.
This concludes the setup steps specific to Method 2. Please continue with the firewall settings, NC2 cluster deployment and Move installation below.
Firewall settings: Allow Move to access the VMC vCenter and ESXi hosts
Move requires access to the VMC vCenter instance and the ESXi hosts in order to migrate virtual machines. Through the VMware Cloud on AWS console, add a Management Gateway firewall rule to allow the NC2 VPC to access these resources.
Add the NC2 VPC CIDR range to an MGW inventory group
Navigate to “Networking & Security”
Click “Groups” under “Inventory”
Click “Management Groups” to edit the groups pertaining to the MGW
Add or modify a group and add the CIDR range of the VPC which NC2 is deployed into
To modify an existing group, click the 3-dot menu on the left of the group and select “Edit”
Adding the NC2 VPC CIDR range to an MGW inventory group
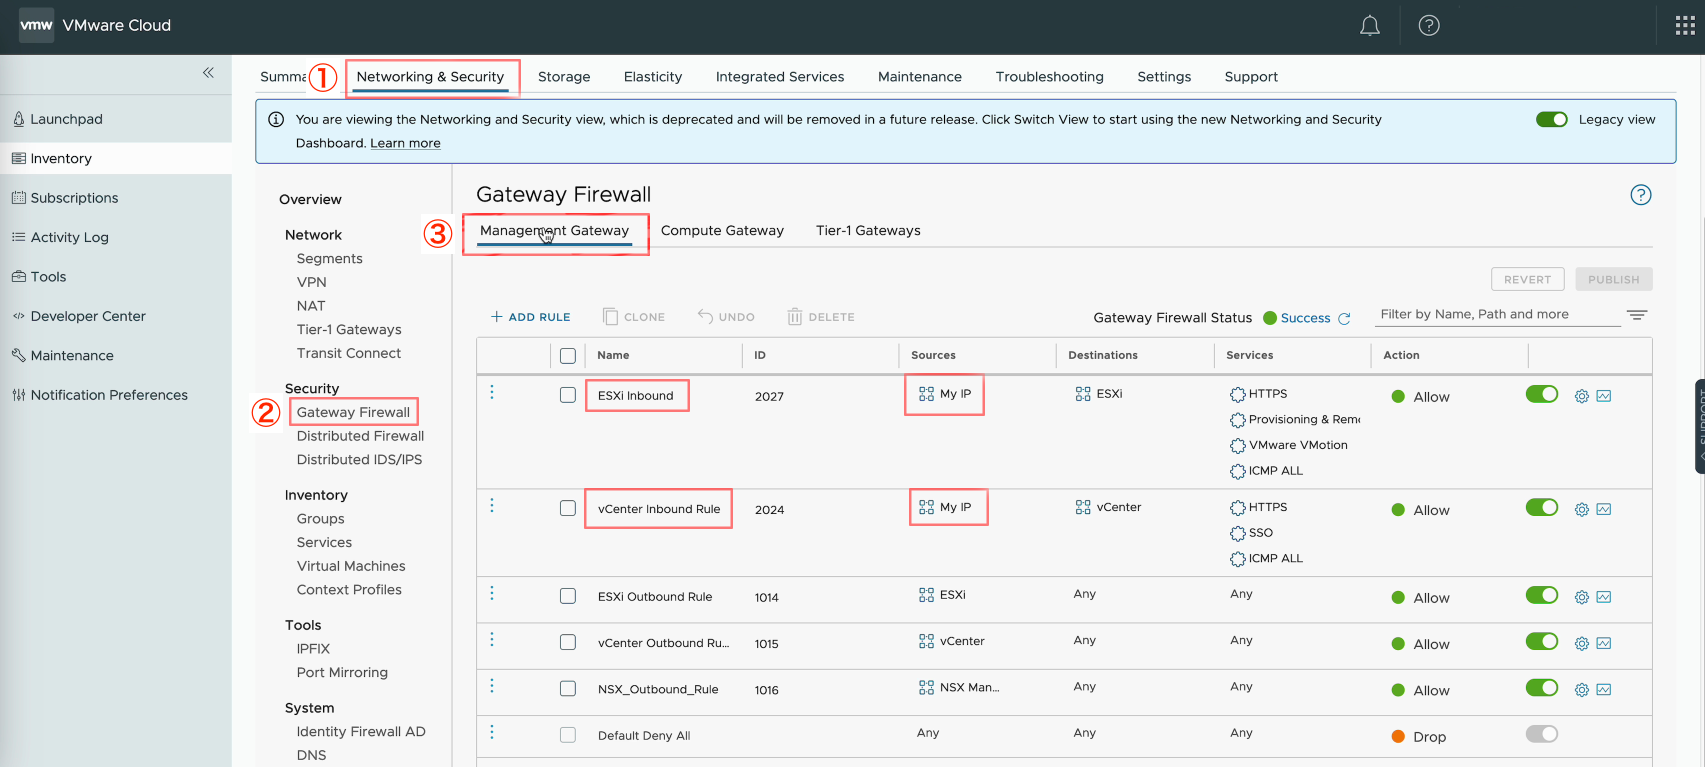
Add the MGW inventory group to the MGW firewall rules
Navigate to “Networking & Security”
Click “Gateway Firewall” under “Security”
Click “Management Gateway” to edit rules for the MGW
Update the rules for ESXi and vCenter by adding the MGW inventory group containing the NC2 VPC CIDR range with the action “Allow”
Adding the MGW inventory group to a MGW firewall rule allowing access to ESXi and vCenter from the NC2 VPC
Deploy the NC2 cluster
Sign up for NC2 or start a trial and deploy through the NC2 deployment wizard. Select the latest version – 6.8, to get Flow overlay networking and the centralized management through Prism Central included. When asked, select the VPC and the private subnets desired. In this case subnets in the “10.90.0.0/16” VPC.
After the NC2 cluster is deployed, deploy Move 5.3 on top of NC2 and register both the NC2 cluster and vCenter from the VMC environment.
VDDK upload: After Move is deployed, add the NC2 and VMC environments. After adding the VMC environment it will prompt for a VDDK file. This file can be downloaded from the VMware support site. The version used in this example is: “VMware-vix-disklib-7.0.3-19513565.x86_64”. Please use the Linux version.
Migrate the VMs to NC2
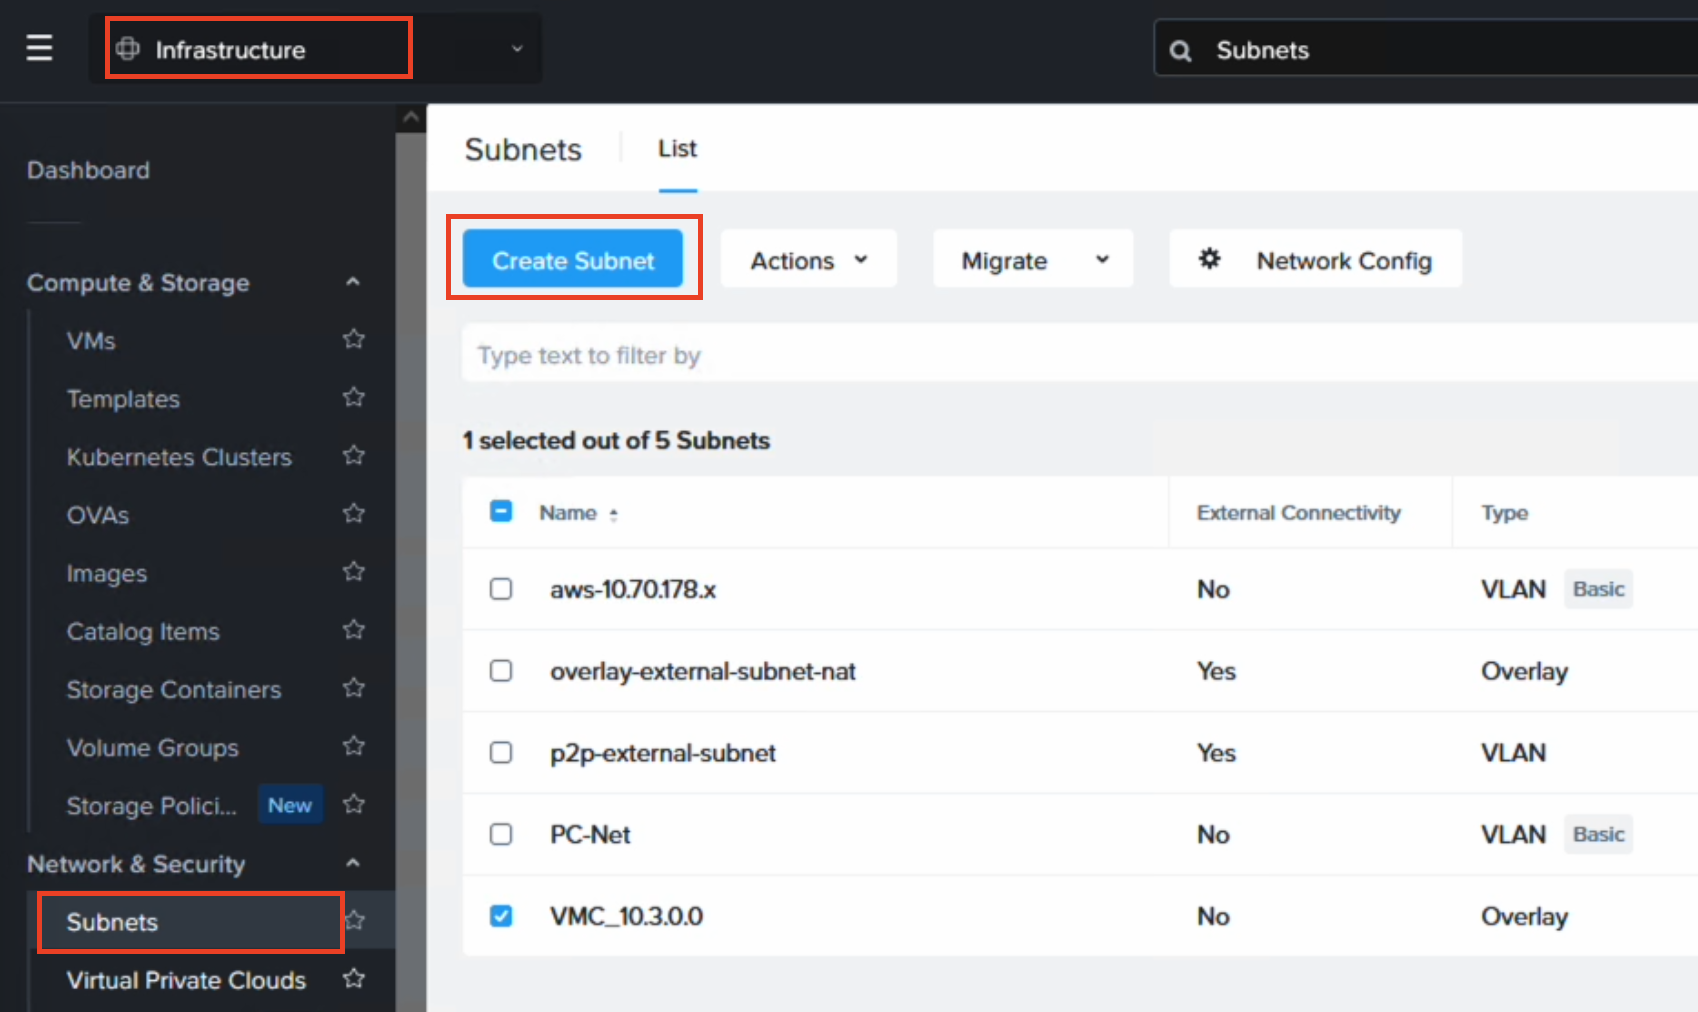
If IP retention is desired, use Flow in Prism Central to create an overlay VPC and subnet which matches the CIDR range of the NSX-T subnet in VMC from which the VMs will be migrated. In this example “10.3.0.0/24” is used.
Now the only thing remaining is to create a Migration Plan in Move where VMC is the source and NC2 is the target. Ensure to select the correct target network to ensure IP retention works as expected.
Wrap up
This has been an example of the steps required for migrating Virtual Machines from VMware Cloud on AWS (VMC) to Nutanix Cloud Clusters (NC2) without changing the IP or MAC addresses of the migrated VMs. For more information or for a demo, please reach out to your Nutanix representative or partner.