This is a quick note to show a concept of using the ChatGPT API for translation. In this case for English to Japanese, but it could be changed into any language. Since we want to talk to it we use Amazon Transcribe to turn speech into text. That text is sent to ChatGPT for translation. When the translated text comes back we feed it into Amazon Polly to turn it into speech again.
In this blog post we explore two ways to use Nutanix Move 5.3 to migrate Virtual Machines from an existing VMware Cloud on AWS (VMC) environment to Nutanix Cloud Clusters on AWS (NC2). This is done while preserving both IP and MAC addresses of the VMs being migrated.
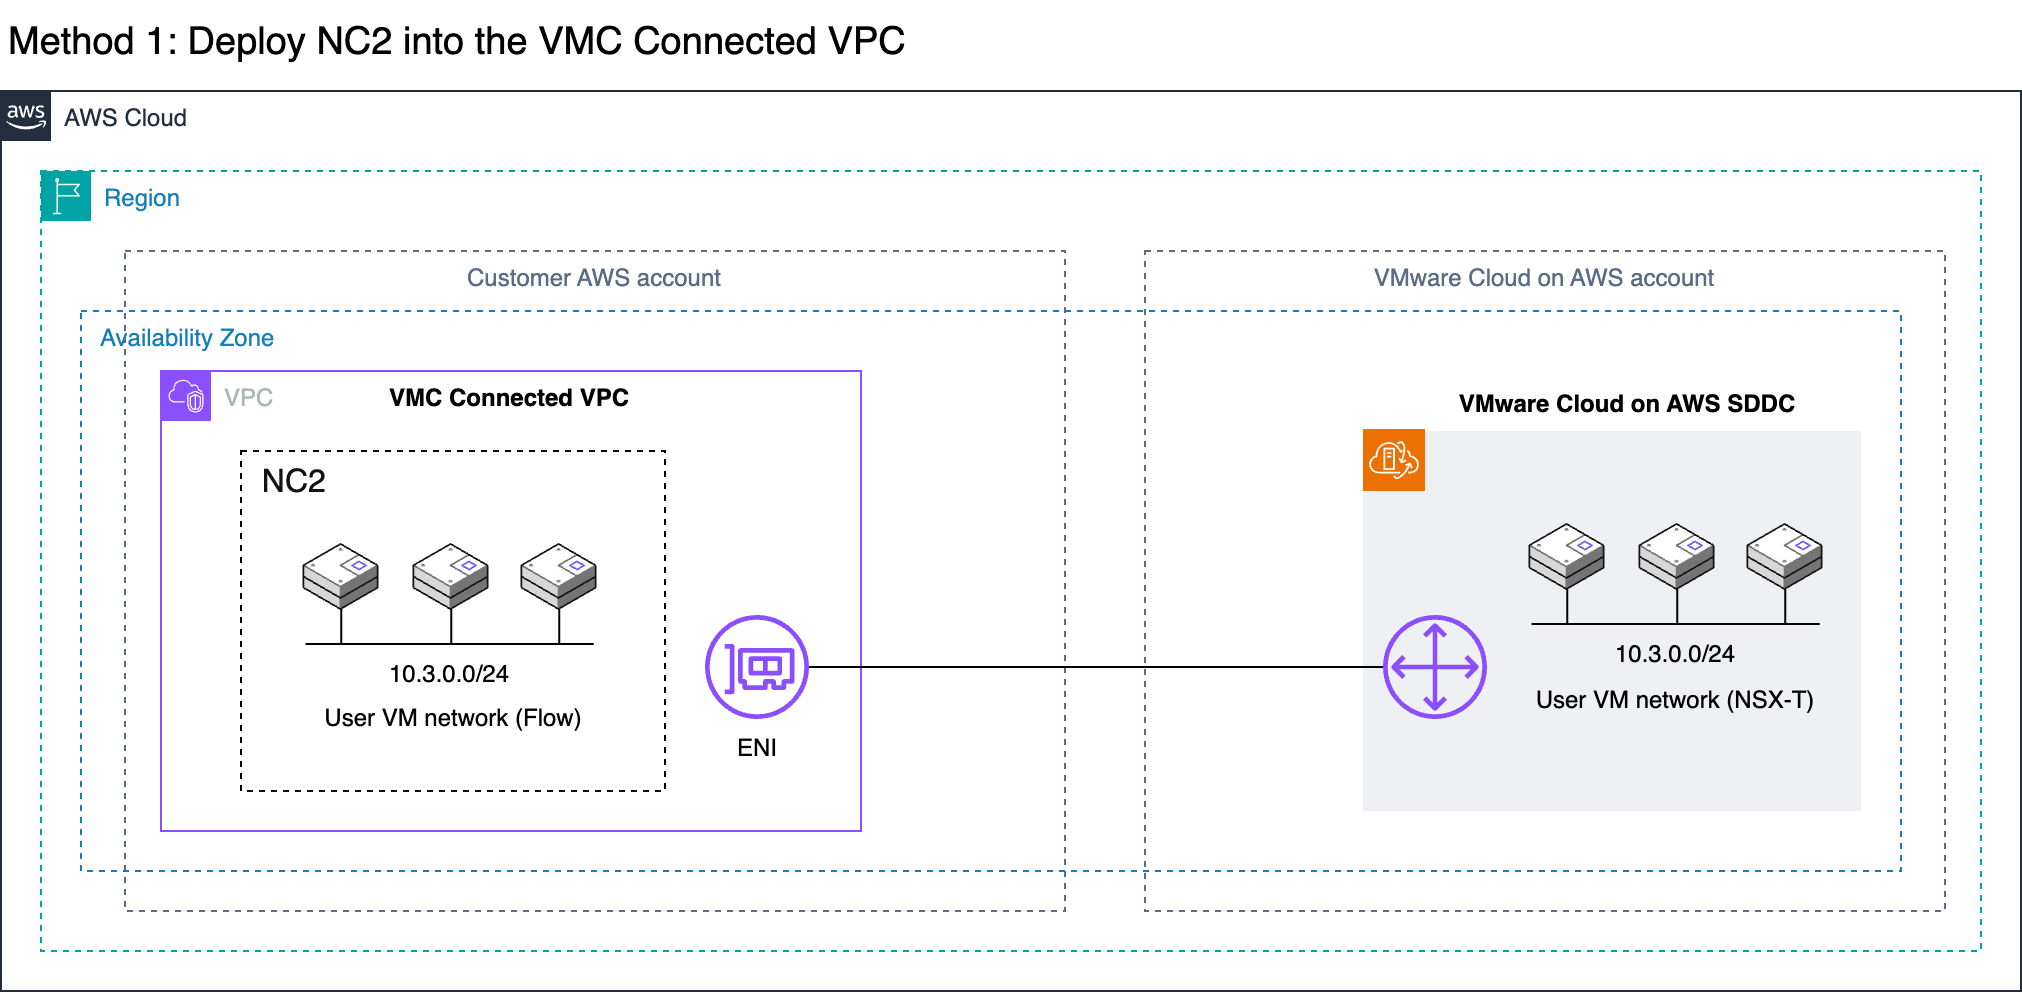
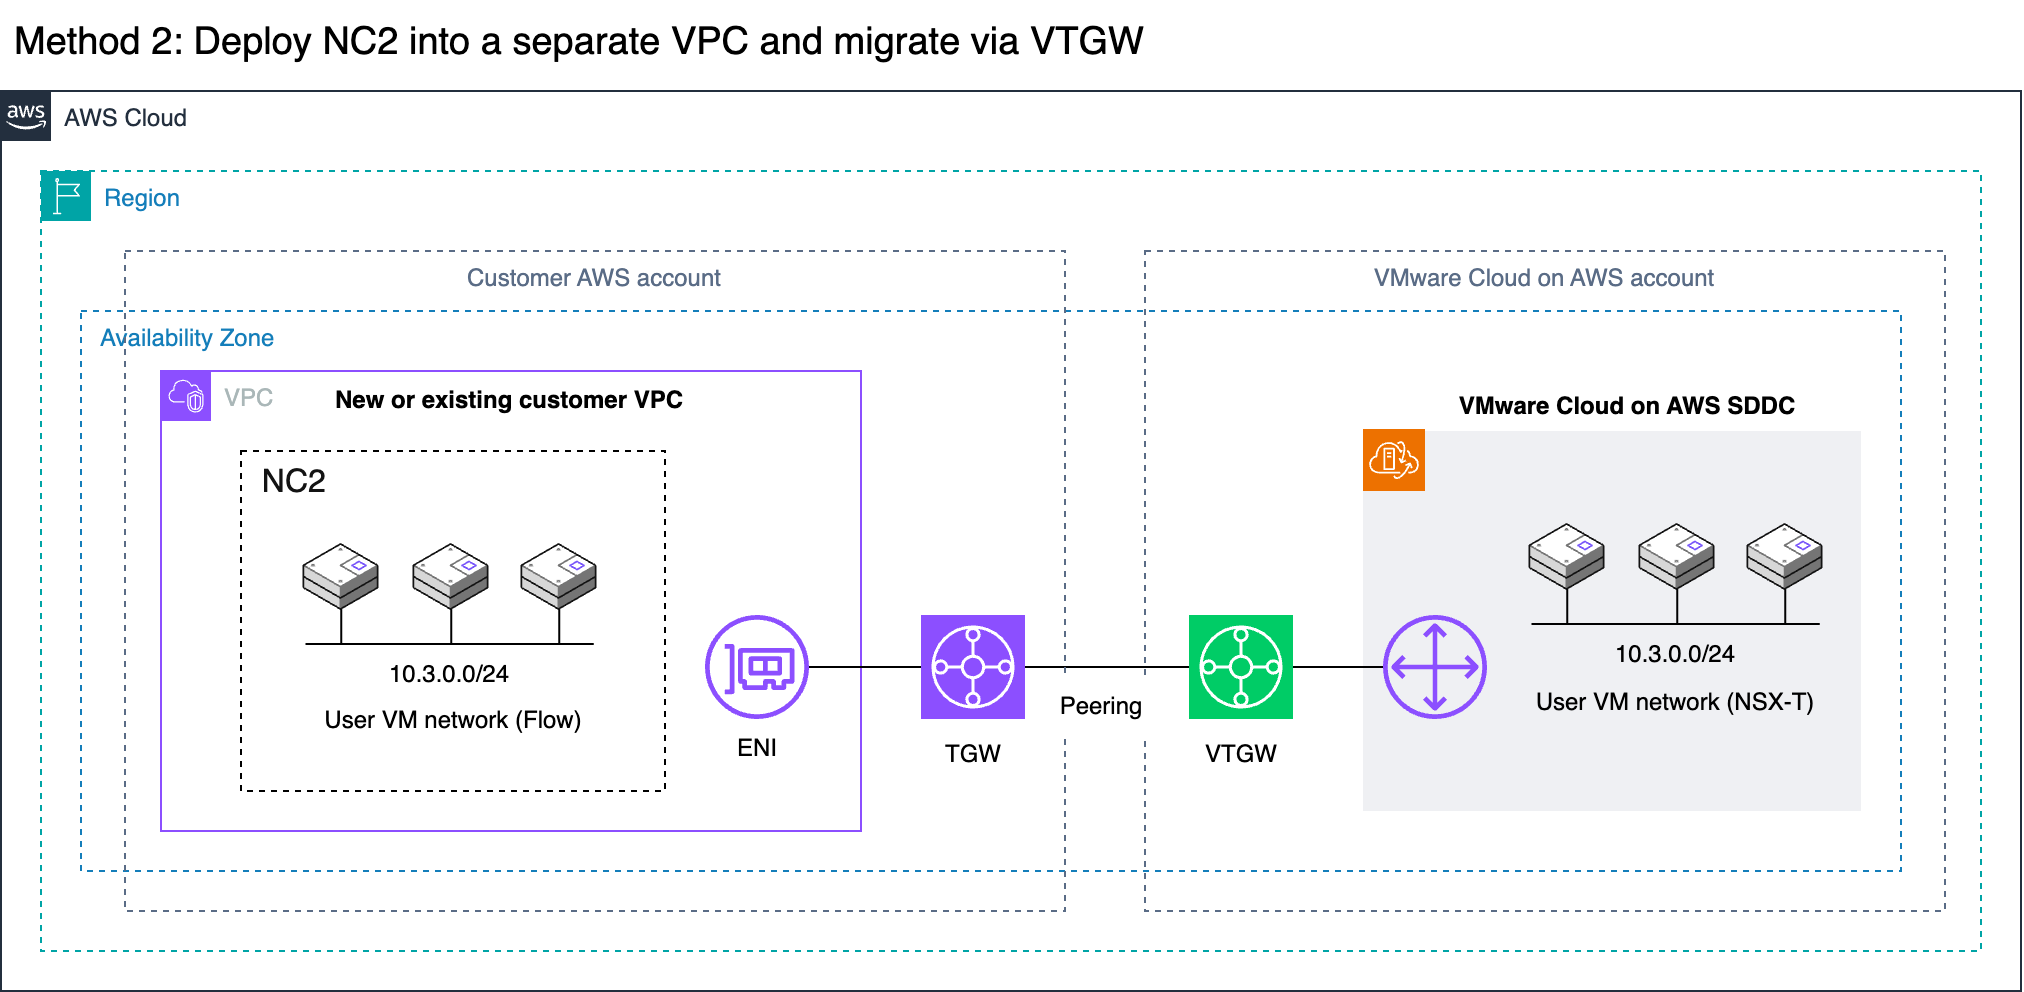
The most straight forward method is to deploy NC2 into the Connected VPC. This is a VPC which is attached at time of deployment of the VMware Cloud on AWS environment and is owned by the customer. Alternatively, we can deploy NC2 into a completely separate VPC and connect to the VMware Cloud on AWS cluster through a VMware Transit Connect (VTGW).
Architecture overview
The two methods are illustrated below. Method 1 is recommended due to the ease of setup, simple networking and no data transfer charges. However, care need to be taken to ensure there is no overlap with any existing resources deployed into the Connected VPC. For example by creating new private subnets in the Connected VPC specifically for the NC2 deployment.
Method 2 covers migrating via a VMware Transit Connect (VTGW). Although it has additional routing considerations, this is also a fully viable option. In this example we peer the VTGW with a normal customer-controlled AWS Transit Gateway (TGW). Note that with Method 2 the VTGW can also connect directly to a VPC without the need for a TGW, but this will limit the routing options for the customer.
It’s important to keep in mind that both options can migrate VMs from VMC without changing IP or MAC addresses. Neither option require L2 Extension of user VM networks. This underlines the ease of which a migration like this can be done. There are of course some caveats. Refer to the VM networking section below for more detail.
Method 1: Migrate from VMC to NC2 deployed into the VMC Connected VPCMethod 2: Migrate VMs via VTGW into a separate or new VPC
VM networking
The whole migration can be done without L2 extension of VM networks. On the VMware Cloud on AWS side Virtual Machines in VMC are connected to overlay networks created with NSX-T using the VMC management console. These are represented by the “10.3.0.0/24” network in this example. The same CIDR ranges can be created as overlay networks by using Nutanix Flow on the NC2 cluster. Thereby, when VMs are migrated from VMC to NC2, they don’t need to change their IP or MAC addresses.
Note that if L2 Extension is not used, there is no communication between the overlay networks in NC2 and the overlay networks in VMC. Therefore, plan the migration so that VMs which need to communicate are moved together.
Also note that Flow does not advertise the overlay networks into the VPC route table. As long as VMware Cloud on AWS is attached to the connected VPC, the routes for the VMs will point to the active ENI created during the VMC cluster deployment. Destroying the VMC cluster will remove these ENIs and the corresponding routes from the Connected VPC route table.
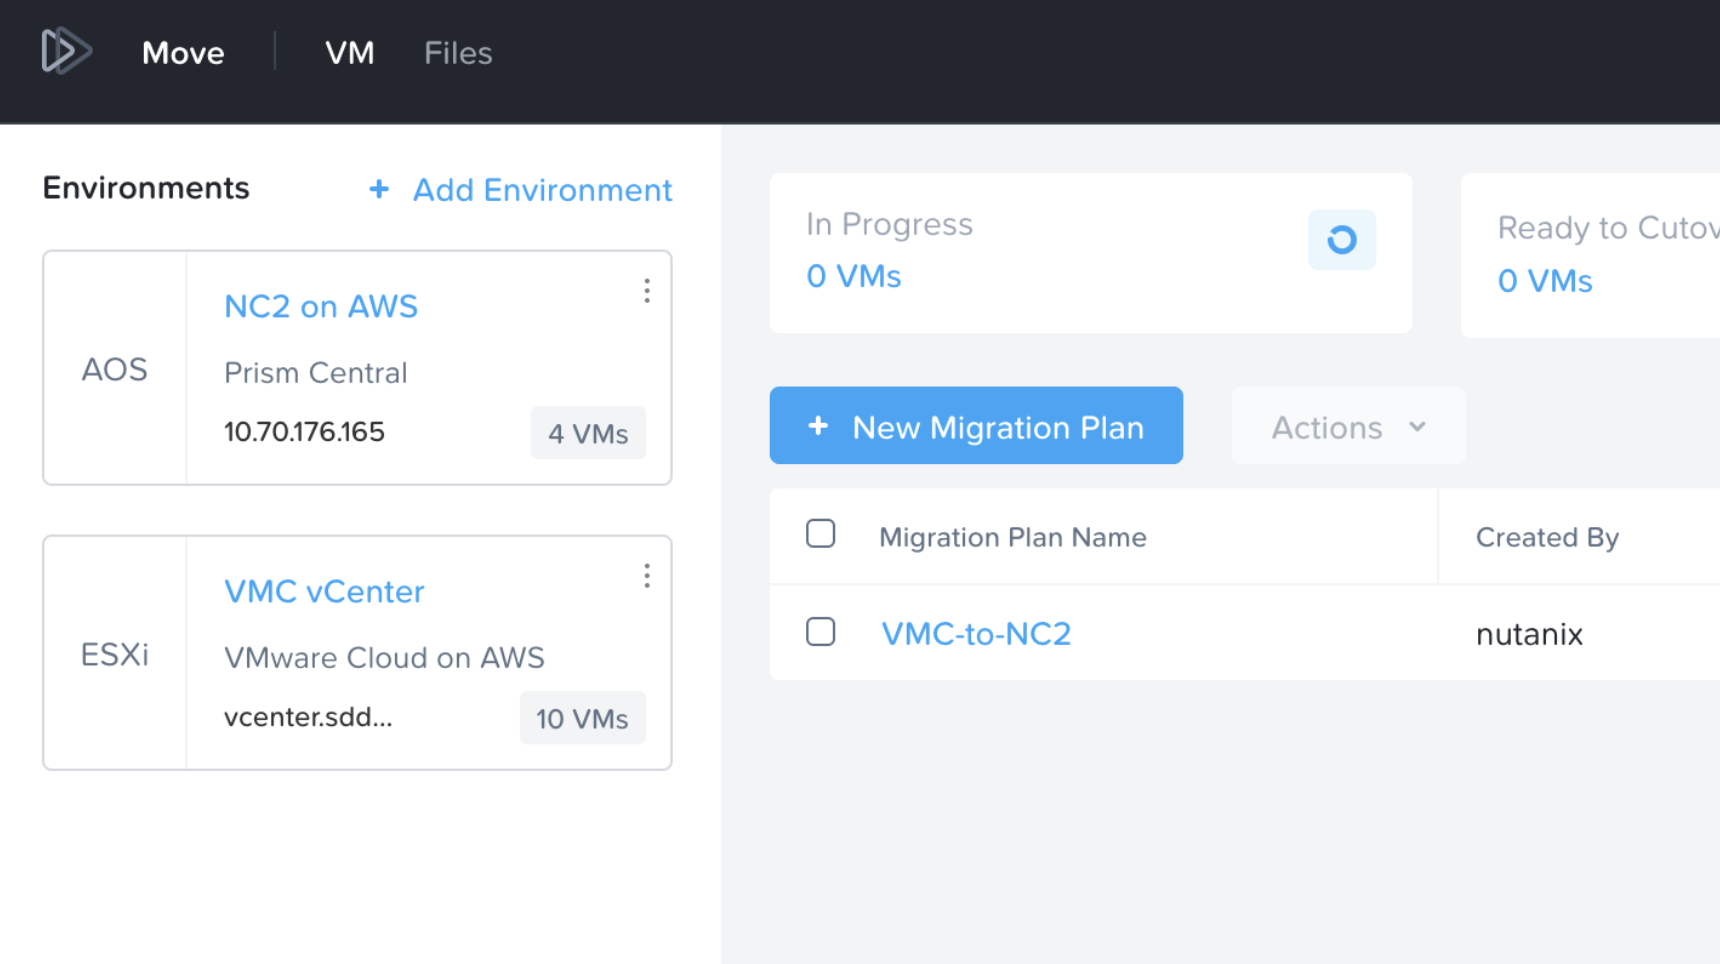
Migration tool: Move
The Nutanix Move migration tool has with the recent 5.3 release added support for migrations from VMware Cloud on AWS. In this example, Move is deployed into the NC2 cluster. Both the VMC and the NC2 environments have been registered with Move and the inventories of both show up and are available for migration. More details in the Move deployment section below.
Method 1: Deploy NC2 into the Connected VPC
If there is enough space to deploy NC2 into the already existing Connected VPC in the customer account, this is the easiest and most straight-forward option. Connectivity and routing between the Connected VPC and the VMware Cloud on AWS environment is already configured as part of the VMC deployment. Do make sure that the CIDR ranges of any existing subnets are sufficient for deployment of NC2 and that there aren’t already resources deployed into those subnets which could interfere with the NC2 components. If the VPC CIDR range has space for new subnets, consider creating new private subnets to hold the NC2 deployment.
Benefits
No need to create new VPC and subnets
VPC is already connected to VMC and routing is configured
Data transfer is free of charge
High link / data transfer speed
Drawbacks
VPC may already be fully populated with resources
VPC may not have the correct CIDR ranges for NC2
Method 1: Steps to deploy
Simply sign up for NC2 or start a trial and deploy through the NC2 deployment wizard. Select the latest version – 6.8, to get Flow overlay networking and the centralized management through Prism Central included.
Note that NC2 can only be deployed into private AWS subnets and that internet connectivity need to be present. If no direct internet connectivity is available, proxy support is also available through the deployment wizard.
VMware Cloud on AWS automatically updates the default route table in the connected VPC with the routes to vCenter, ESXi and the user networks. However, if NC2 is deployed into a subnet which doesn’t use the default route table those routes won’t be present. Ensure the subnet NC2 is deployed into is updated with the routes to the VMware Cloud on AWS environment. Particularly the management subnet which holds vCenter and the ESXi hosts. Also, if necessary, update the security group on the active VMC ENI to allow access from the NC2 subnet.
After the NC2 cluster is deployed, follow the steps further down in this article to open the VMC firewall for vCenter and ESXi, deploy Move 5.3 on top of NC2 and register both the NC2 cluster and the VMC vCenter instance.
Method 2: Deploy NC2 into a separate VPC and migrate through a VTGW
If deploying NC2 into the Connected VPC is not possible or desirable, there is another option available. VMware Cloud on AWS supports creating a VMware Transit Connect (VTGW). The VTGW is a VMware-controlled Transit Gateway (TGW) – basically a regional cloud router. The VTGW can in turn be attached either directly to another VPC or peered with a customer controlled TGW. The TGW can then be attached to one or several VPCs of the customers choosing. Do keep cross-AZ and cross-region charges in mind when planning the architecture so that they can be minimized or avoided.
Benefits
Once set up, migration is straight forward
The customer can use any VPC for the NC2 deployment, including a new one
Although this example use a TGW and a VTGW, data transfer charges do not end up being doubled. The peering attachment does not incur data transfer charges unlessthey go across AZs or regions.
Unless already present, go to the AWS console and deploy a Transit Gateway (TGW) in the same region as VMC. Then, in the VMware Cloud on AWS management console, go to “SDDC groups” and deploy a new VTGW. Once deployed, navigate to the “External TGW” tab, click “Add TGW” and enter the account number and the ID of the customer TGW to connect to as well as the regions to use.
In the “Routes” box, enter the CIDR range of the VPC which NC2 is to be deployed into. In this example, “10.90.0.0/16”.
This will advertise the NC2 VPC CIDR to VMware Cloud on AWS and also create a peering attachment invitation from the VMware AWS account to the customer AWS account.
Method 2: Steps to deploy: Configure the TGW
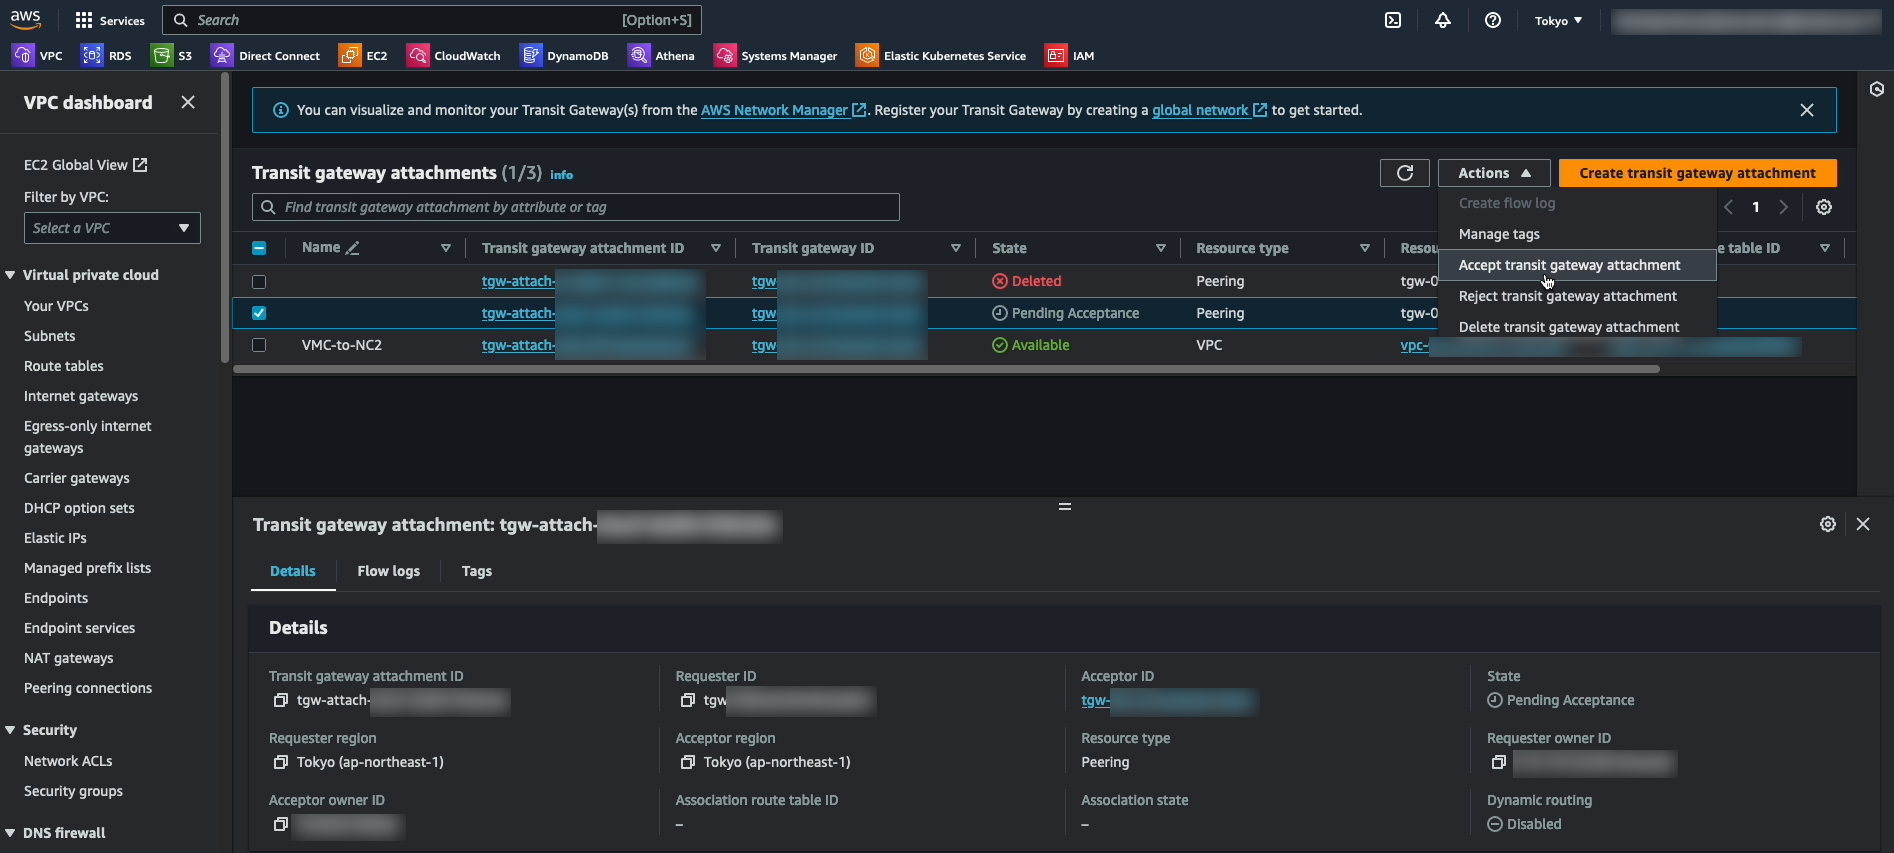
The invitation to add the peering attachment can be accepted through “Transit Gateway Attachments” in the AWS console in the customer account.
While here, take the opportunity to add an attachment to the VPC into which NC2 will be deployed.
Accepting the peering invitation in the AWS console
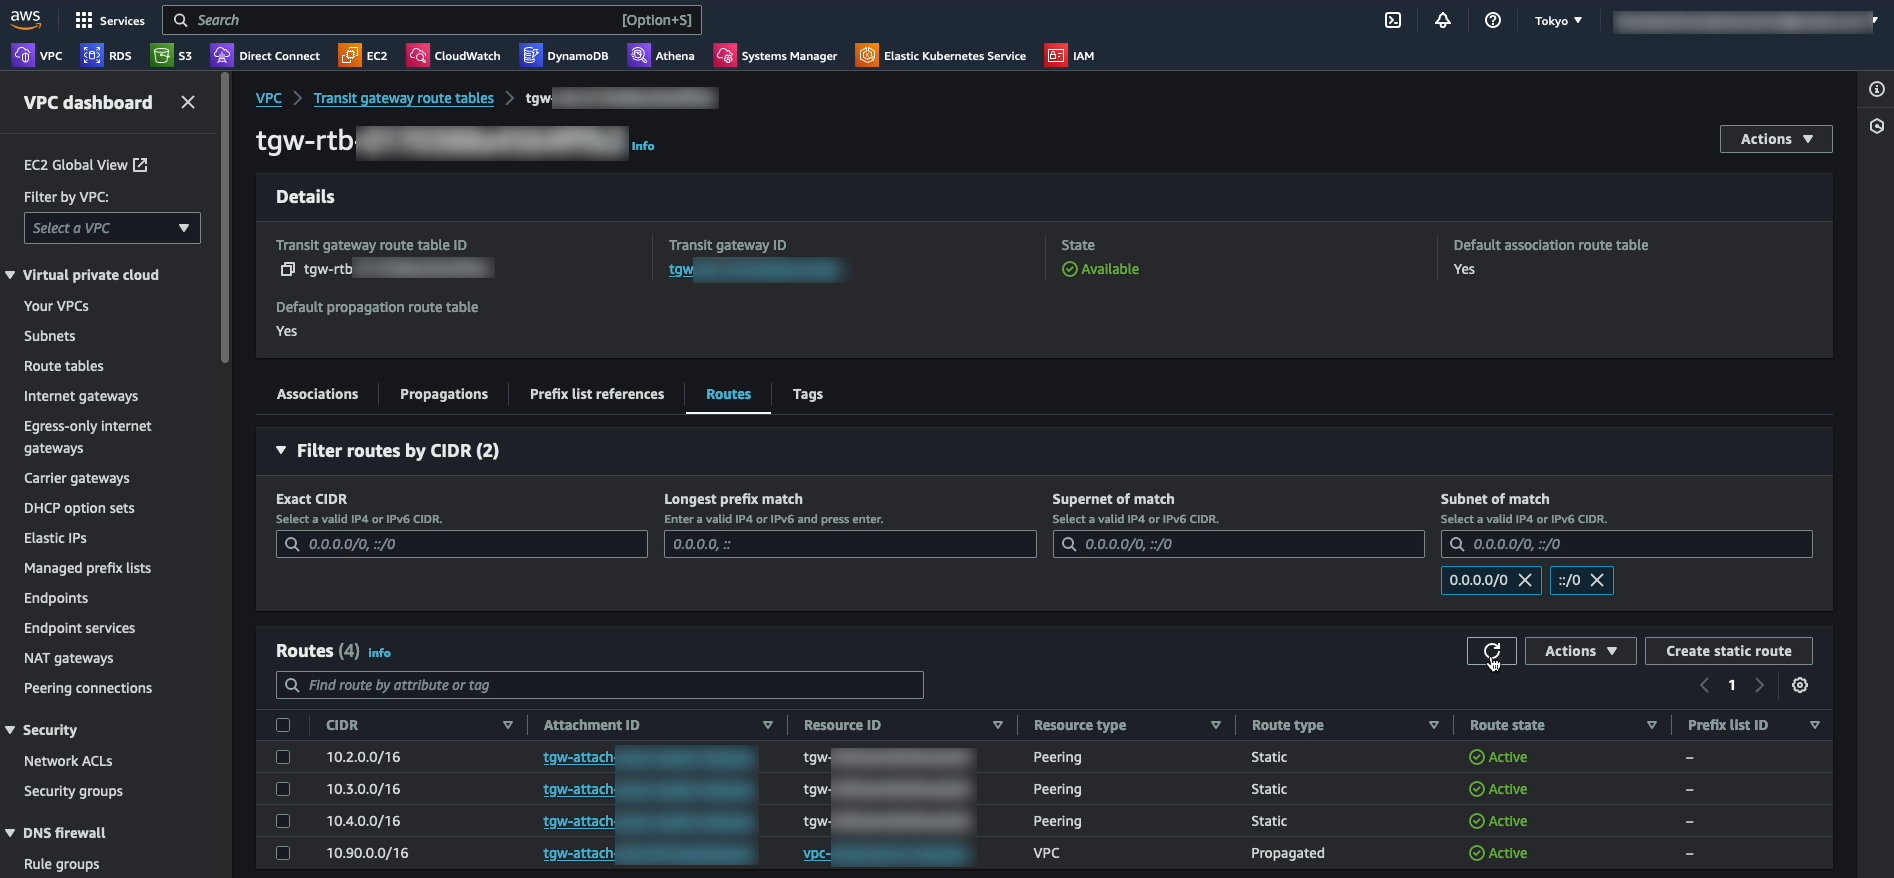
In the customer AWS account, navigate to the Transit Gateway route table section, select the route table for the TGW peered with VMC and add the routes for the VMC networks. In this case “10.2.0.0/16”, “10.3.0.0/16” and “10.4.0.0/16”. Note that these are added as Static routes.
In addition we have the “10.90.0.0/16” network added via the VPC attachment. There is no need to add static routes for this network as it is propagated automatically.
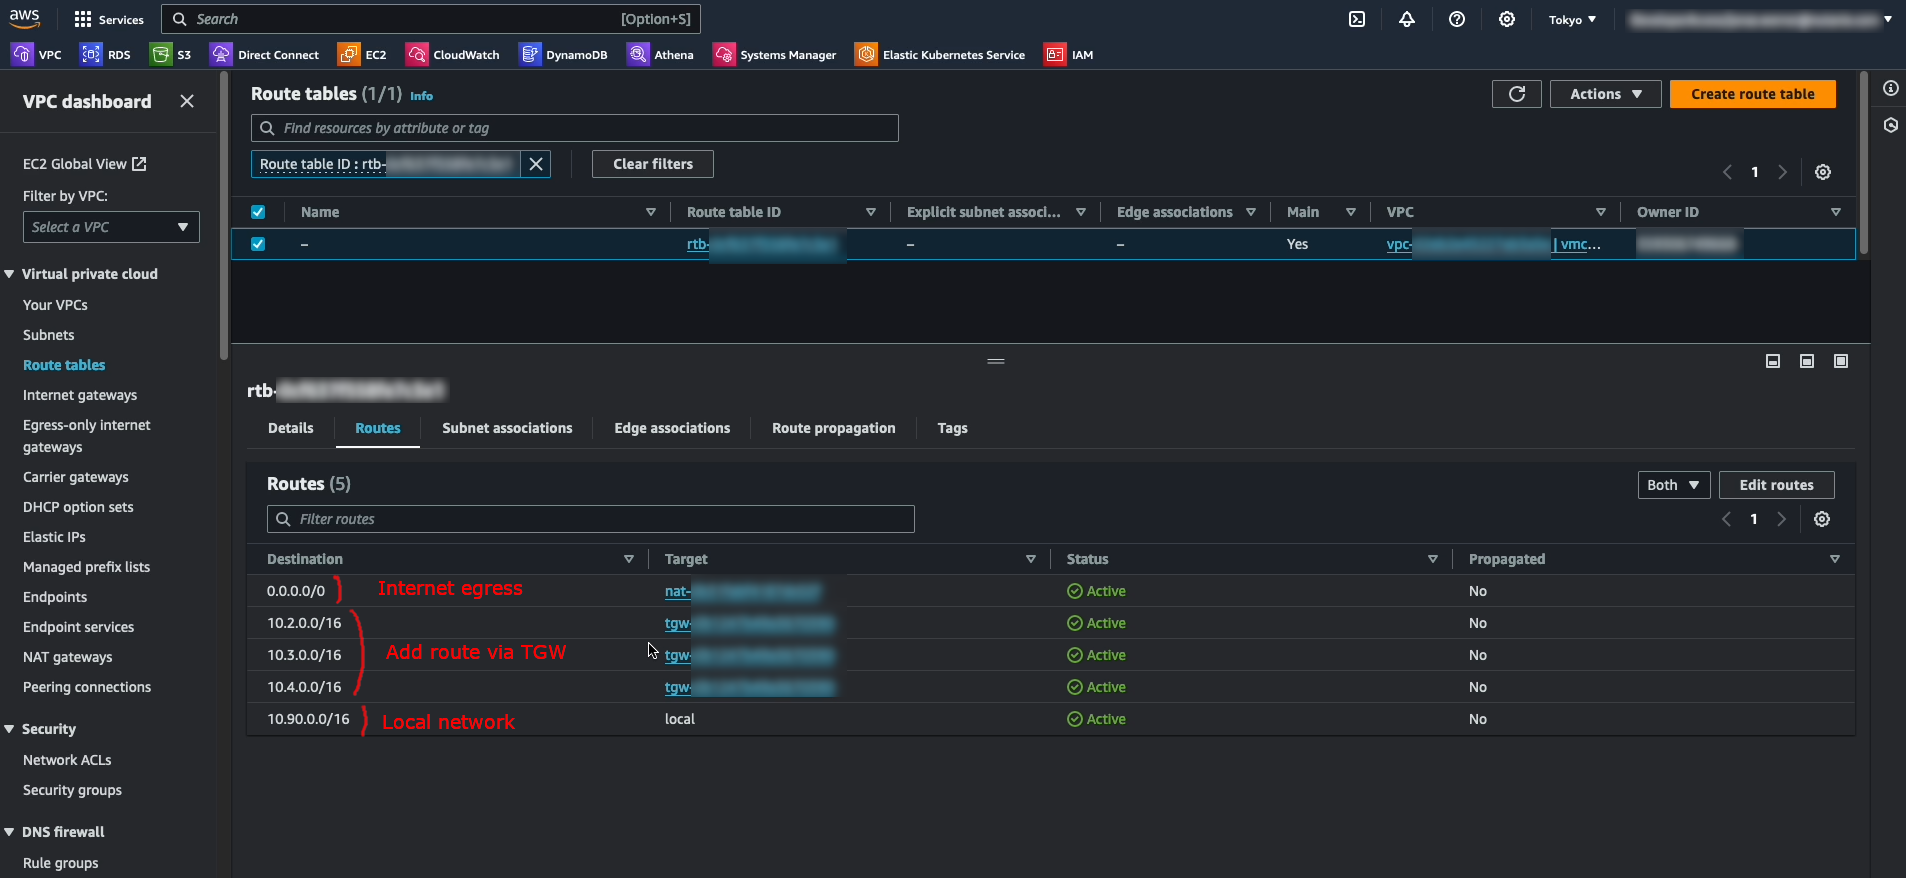
Method 2: Steps to deploy: Configure the routes to the VMC cluster in the NC2 VPC
The final step for the routing is to add the routes for VMware Cloud on AWS into the route table(s) of the VPC which NC2 is to be deployed into. In our example, “10.2.0.0/16”, “10.3.0.0/16” and “10.4.0.0/16” are added as routes via the TGW attachment. “10.90.0.0/16” is our local network and there is a quad-zero route to the internet via a NAT GW.
This concludes the setup steps specific to Method 2. Please continue with the firewall settings, NC2 cluster deployment and Move installation below.
Firewall settings: Allow Move to access the VMC vCenter and ESXi hosts
Move requires access to the VMC vCenter instance and the ESXi hosts in order to migrate virtual machines. Through the VMware Cloud on AWS console, add a Management Gateway firewall rule to allow the NC2 VPC to access these resources.
Add the NC2 VPC CIDR range to an MGW inventory group
Navigate to “Networking & Security”
Click “Groups” under “Inventory”
Click “Management Groups” to edit the groups pertaining to the MGW
Add or modify a group and add the CIDR range of the VPC which NC2 is deployed into
To modify an existing group, click the 3-dot menu on the left of the group and select “Edit”
Adding the NC2 VPC CIDR range to an MGW inventory group
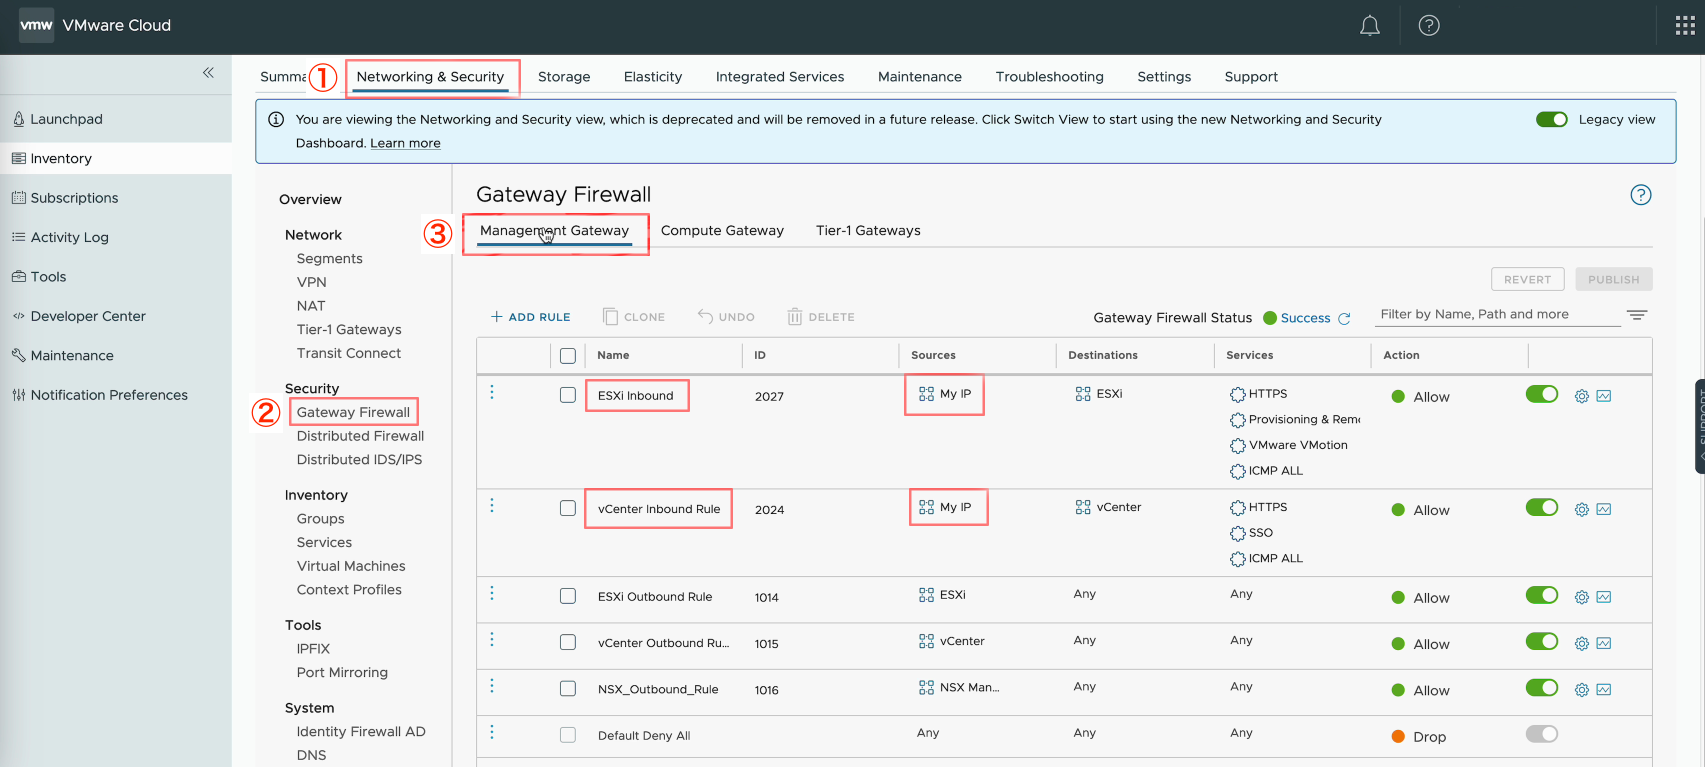
Add the MGW inventory group to the MGW firewall rules
Navigate to “Networking & Security”
Click “Gateway Firewall” under “Security”
Click “Management Gateway” to edit rules for the MGW
Update the rules for ESXi and vCenter by adding the MGW inventory group containing the NC2 VPC CIDR range with the action “Allow”
Adding the MGW inventory group to a MGW firewall rule allowing access to ESXi and vCenter from the NC2 VPC
Deploy the NC2 cluster
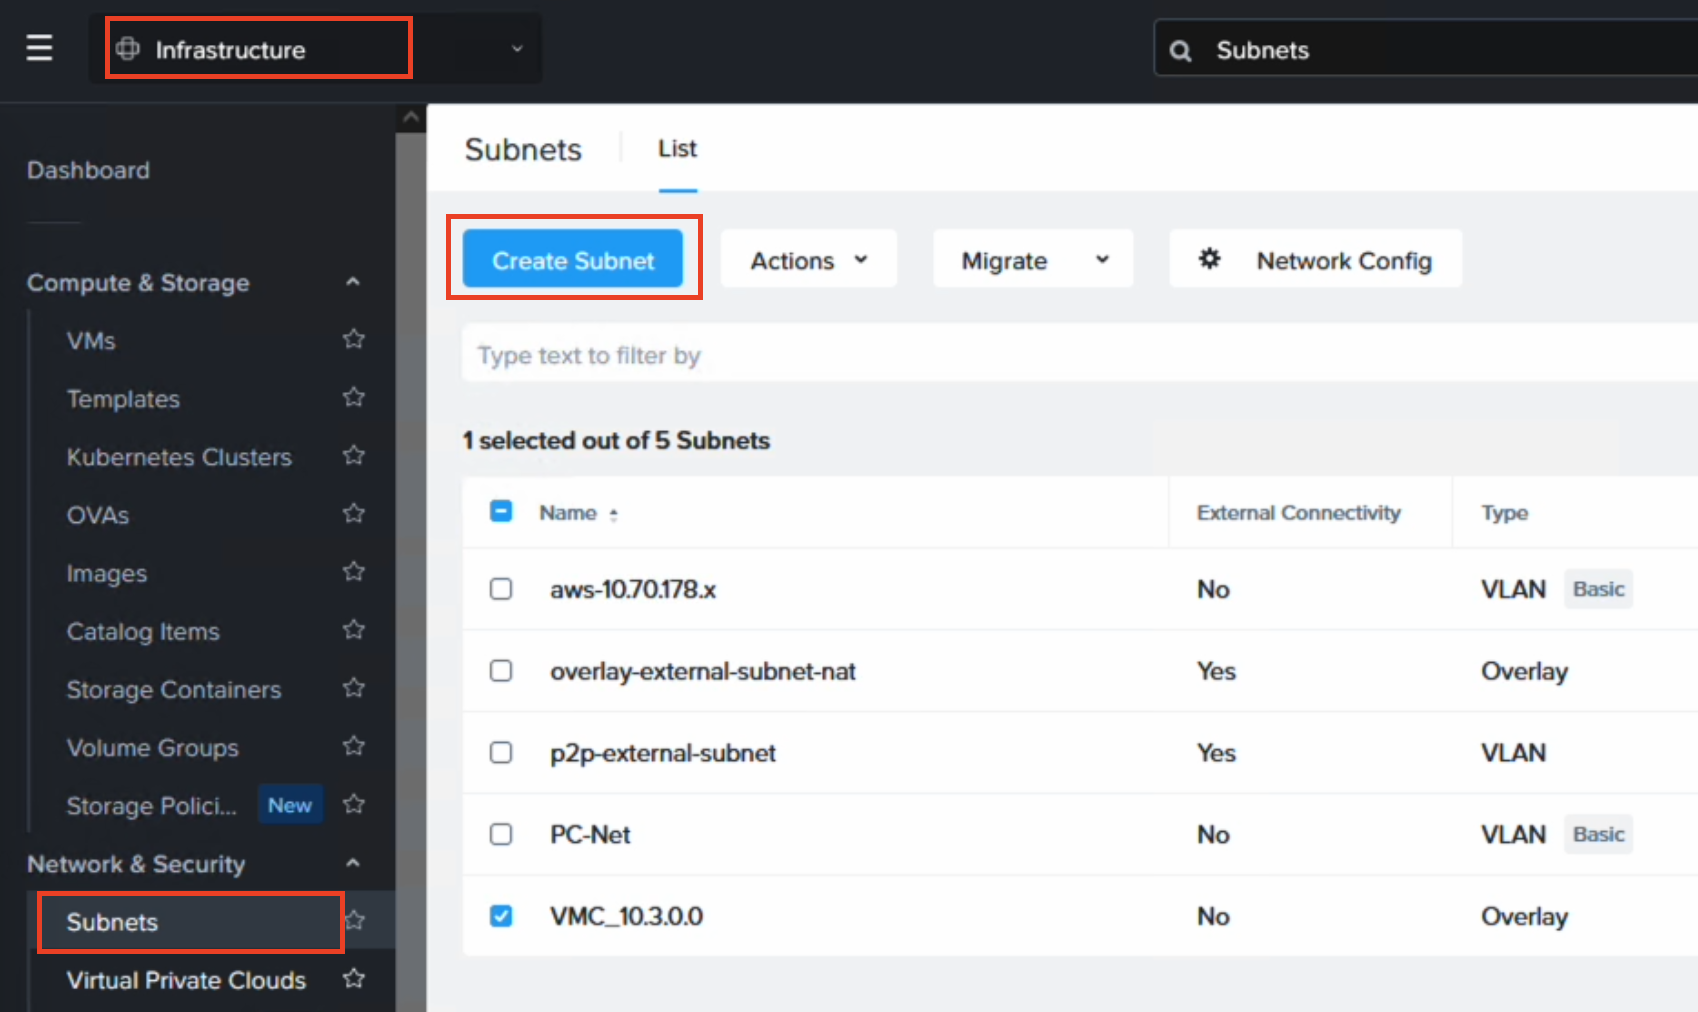
Sign up for NC2 or start a trial and deploy through the NC2 deployment wizard. Select the latest version – 6.8, to get Flow overlay networking and the centralized management through Prism Central included. When asked, select the VPC and the private subnets desired. In this case subnets in the “10.90.0.0/16” VPC.
After the NC2 cluster is deployed, deploy Move 5.3 on top of NC2 and register both the NC2 cluster and vCenter from the VMC environment.
VDDK upload: After Move is deployed, add the NC2 and VMC environments. After adding the VMC environment it will prompt for a VDDK file. This file can be downloaded from the VMware support site. The version used in this example is: “VMware-vix-disklib-7.0.3-19513565.x86_64”. Please use the Linux version.
Migrate the VMs to NC2
If IP retention is desired, use Flow in Prism Central to create an overlay VPC and subnet which matches the CIDR range of the NSX-T subnet in VMC from which the VMs will be migrated. In this example “10.3.0.0/24” is used.
Now the only thing remaining is to create a Migration Plan in Move where VMC is the source and NC2 is the target. Ensure to select the correct target network to ensure IP retention works as expected.
Wrap up
This has been an example of the steps required for migrating Virtual Machines from VMware Cloud on AWS (VMC) to Nutanix Cloud Clusters (NC2) without changing the IP or MAC addresses of the migrated VMs. For more information or for a demo, please reach out to your Nutanix representative or partner.
For infrequent VPN connectivity between on-prem labs / data centers and AWS it doesn’t make sense to have a permanent VPN connection up 24/7. However, configuring the on-premises Mikrotik router each time is time consuming and error-prone when done manually.
Functionality
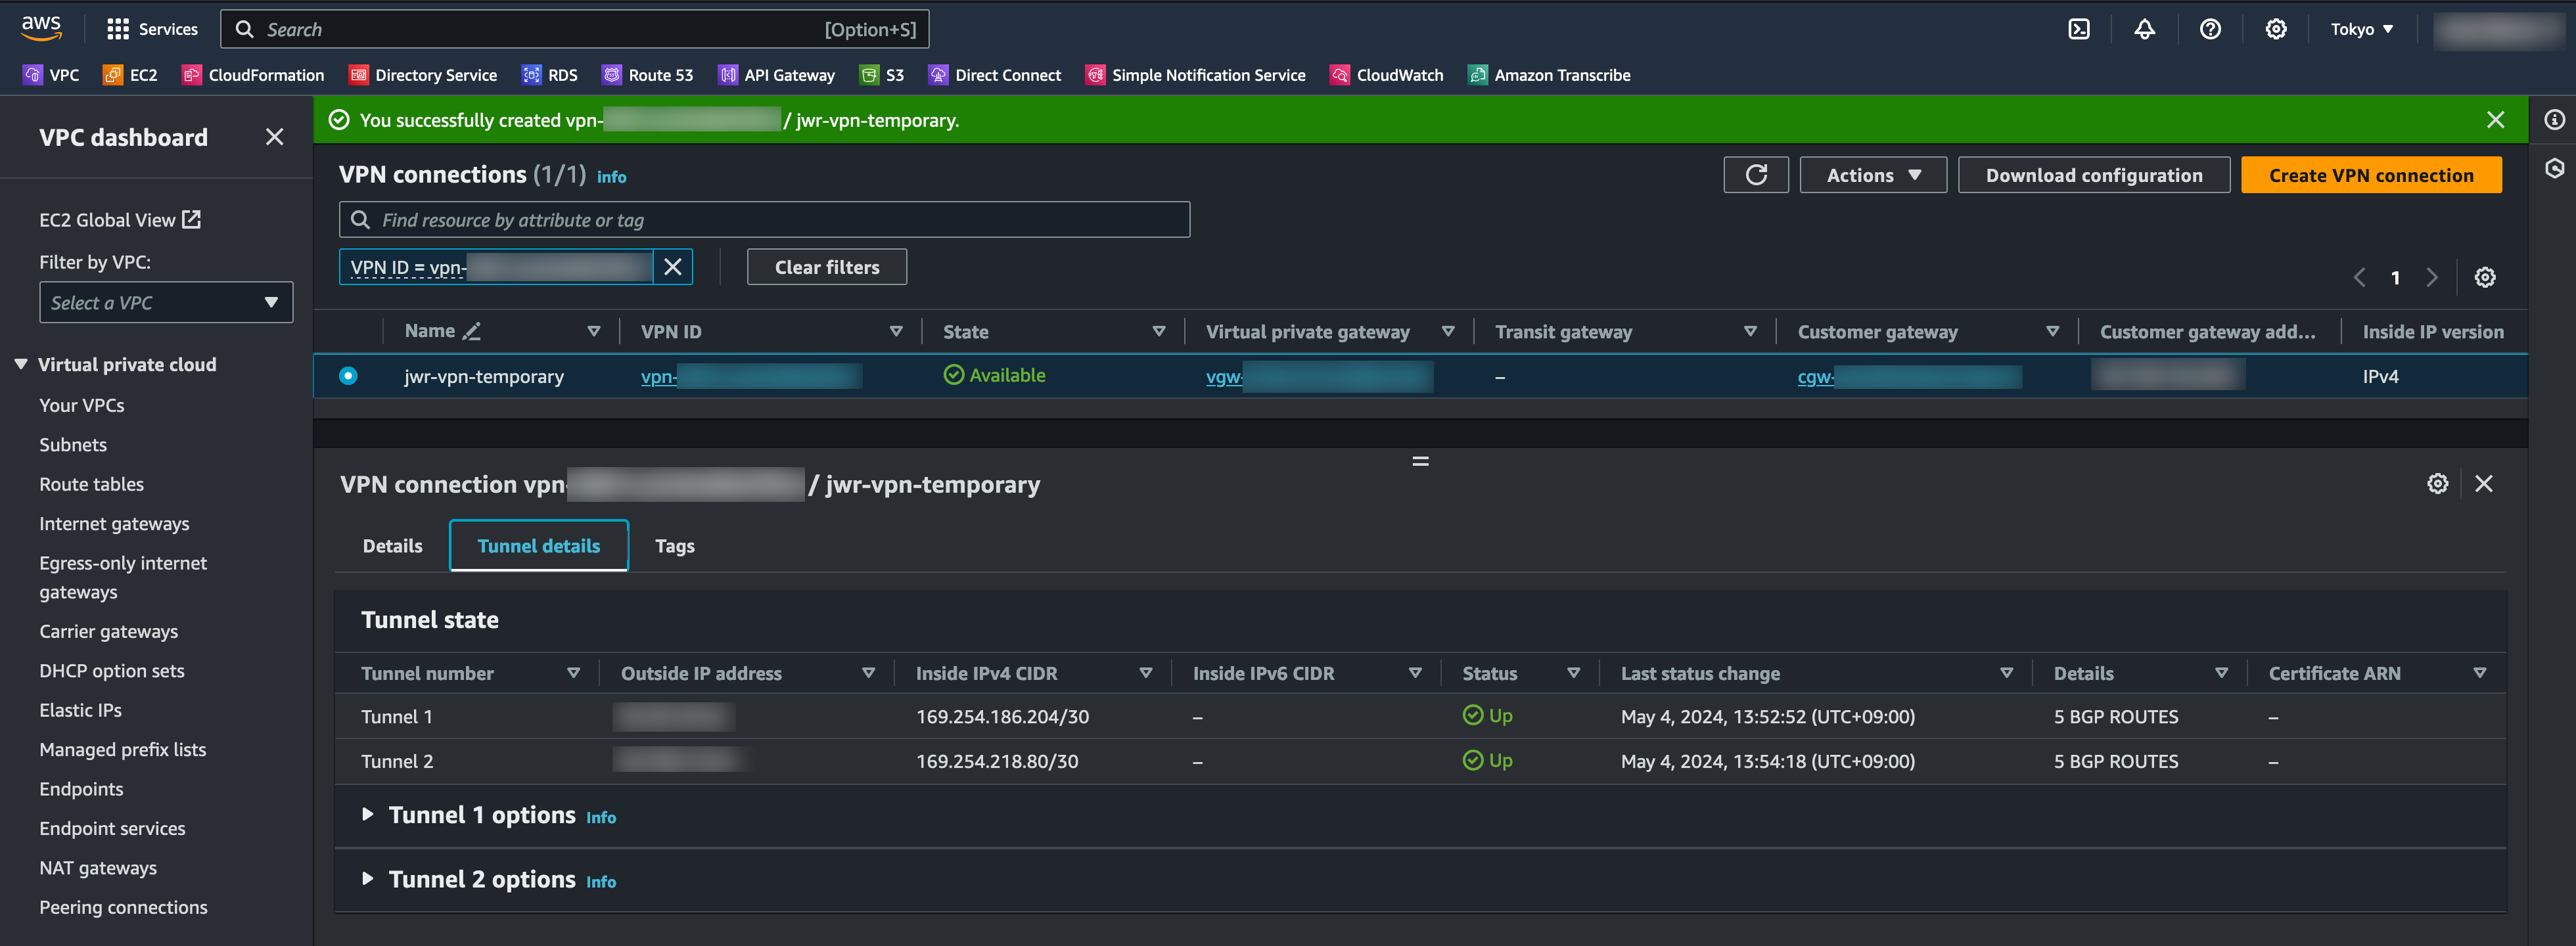
This Python script connects to AWS using boto3, reads the details for the first VPN connection it can find and then generates the commands required to set up:
Inside IP addresses for the VPN tunnel
IPsec proposal settings
IPset profile settings
IPsec peers
IPsec secrets
BGP peers
BGP networks to advertise
Firewall setting
etc.
After the commands are generated, simply copy and paste into a Mikrotik CLI window over SSH or similar and the connection will come up in a couple of minutes.
Prerequisites
This script only handles the on-prem side of the connectivity. It assumes the following is already in place at the AWS side:
VPC with subnets
CGW (Customer Gateway)
VGW (Virtual Private Gateway) which is attached to the VPC
The AWS side has been configured but IPSEC and BGP are both down
Running the script generates the commands required to connect the Mikrotik to AWS
Copy and paste the generated commands into the Mikrotik CLI
After a couple of minutes, IPSEC is up and routes are dynamically shared over BGP
More information
For more information, including how to set up the AWS VPN configuration and a more detailed explanation of the manual steps to configure the Mikrotik router, please refer to this blog post: https://jonamiki.com/2022/05/04/mikrotik-vpn-to-aws-vpc/
Did you ever wish you could host your own multi-player gaming servers with k8s? In that case I have great news, because in this post we’re covering how to deploy online multi-player game server containers with EKS Anywhere on Nutanix infrastructure.
Components
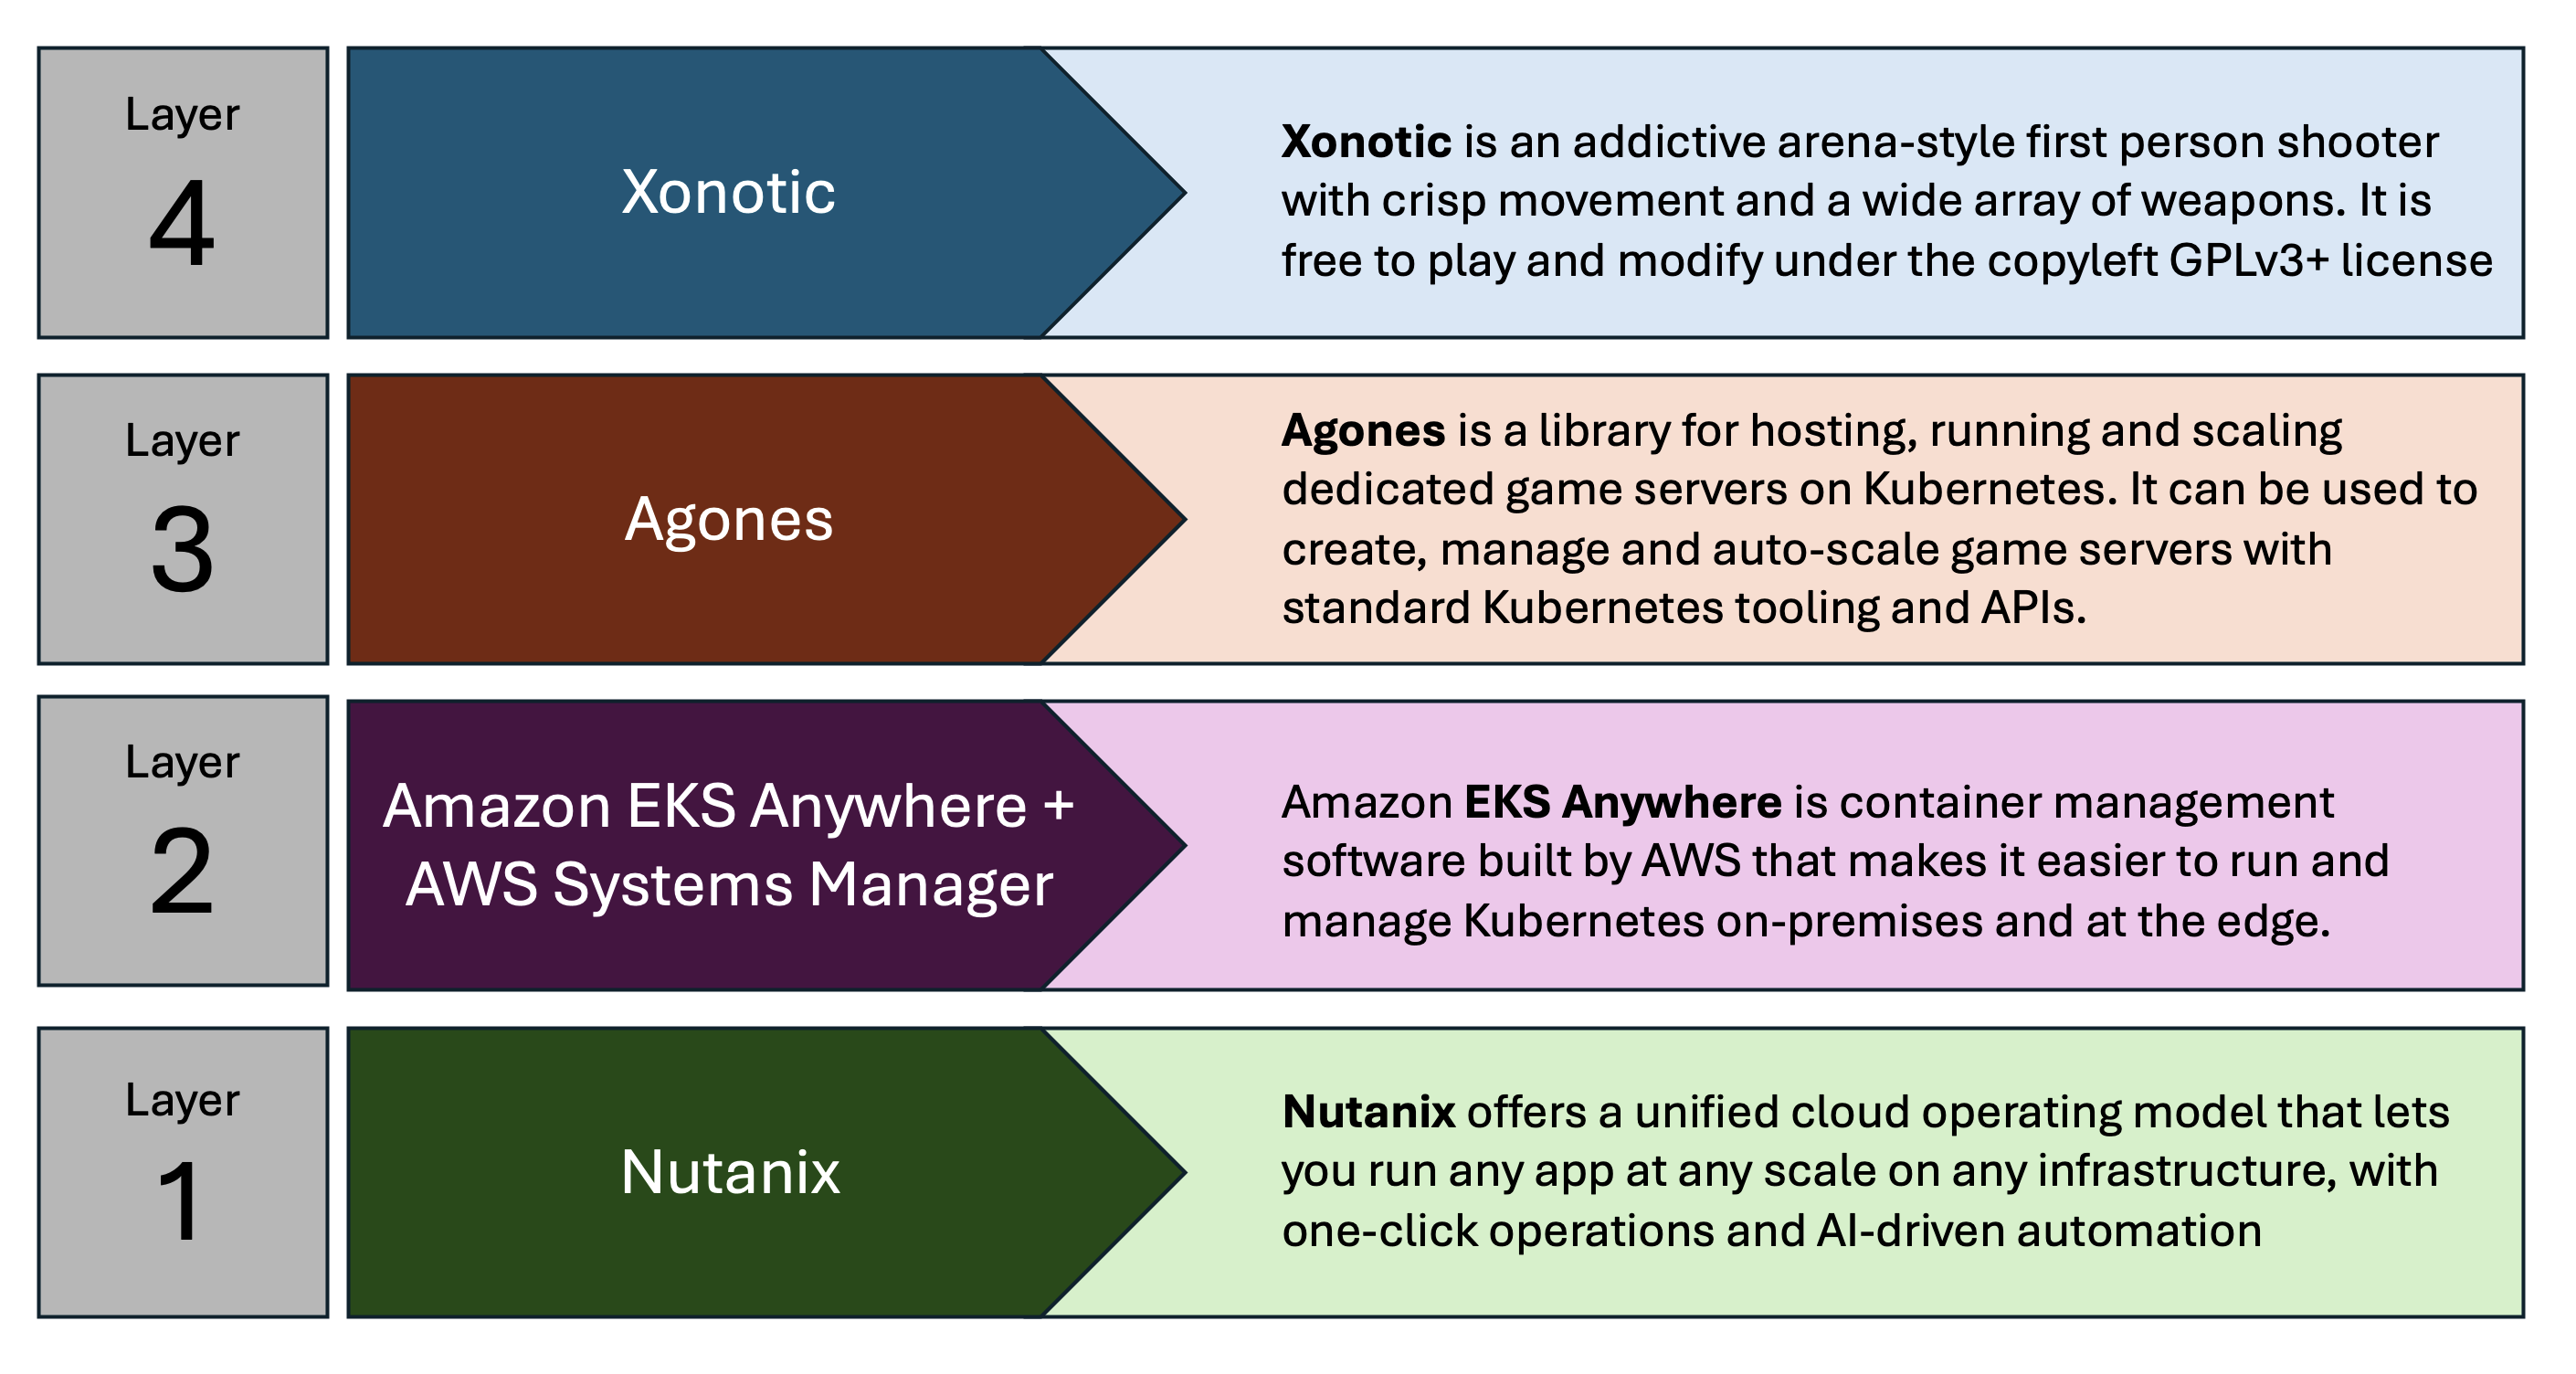
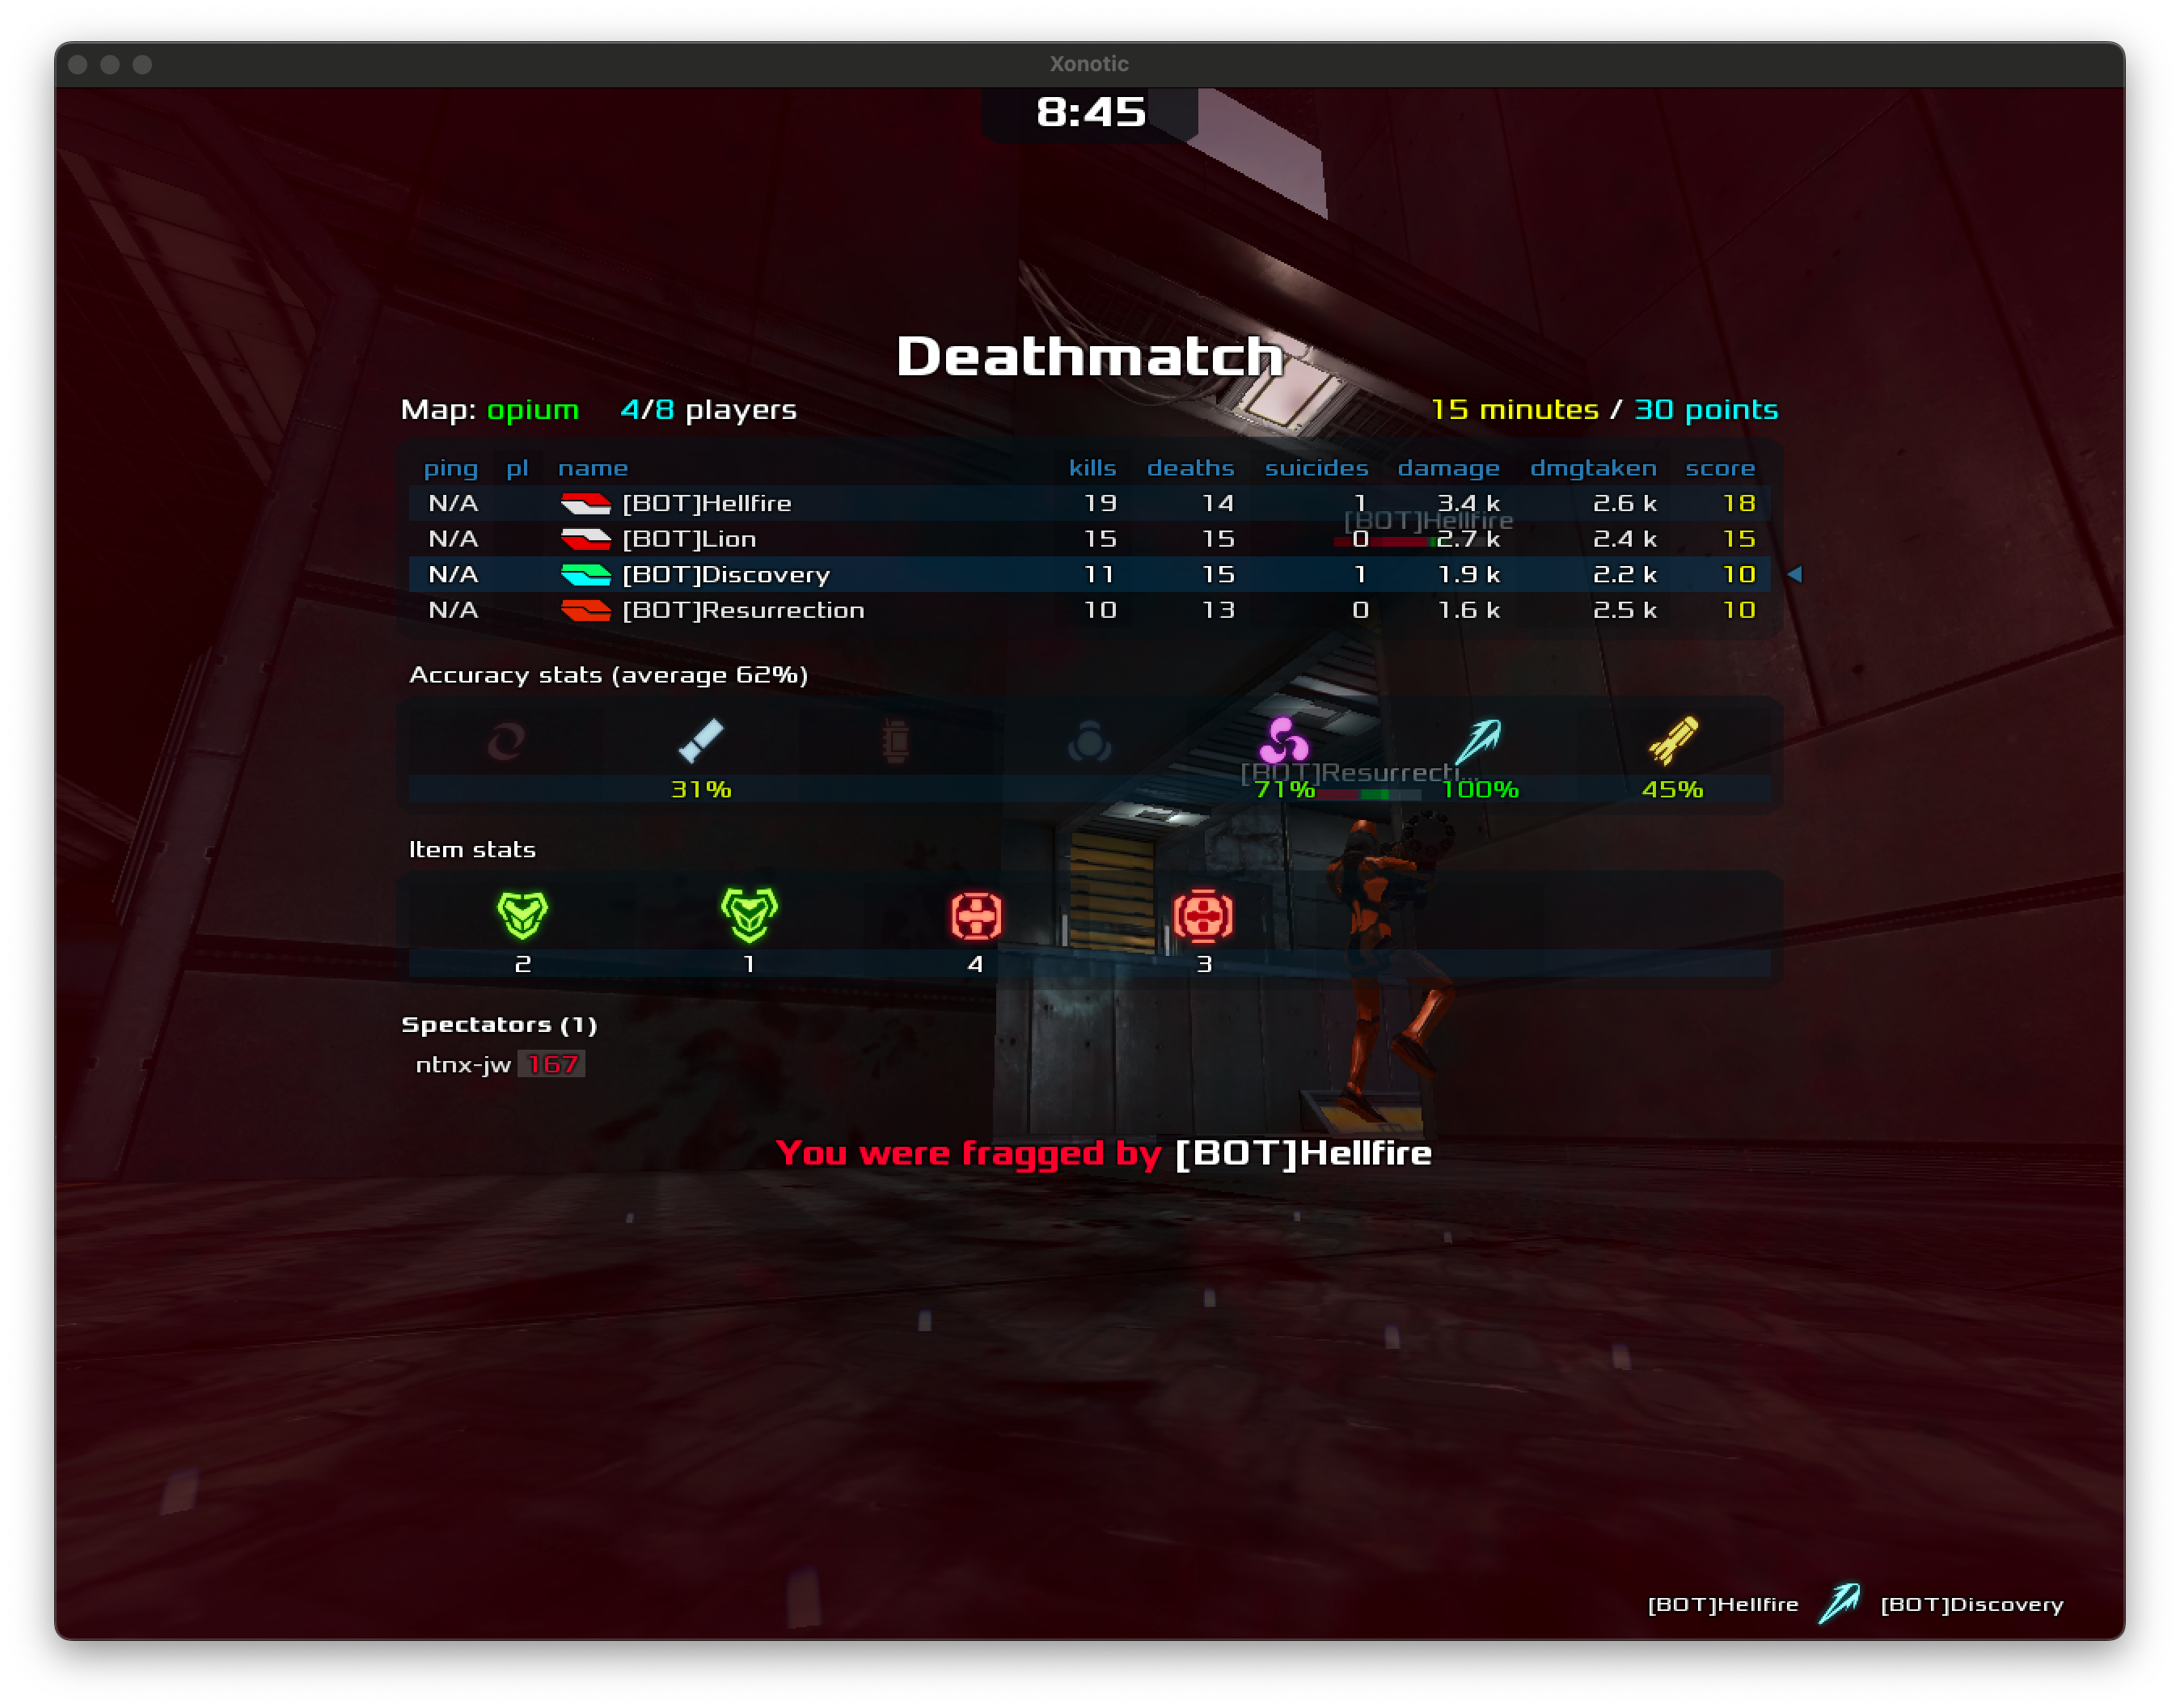
The game in question is Xonotic, which is a classic, fast-paced, multi-player shooting game based on the Quake engine. To deploy it we use Agones – a platform for running, scaling and orchestrate multi-player gaming containers on k8s.
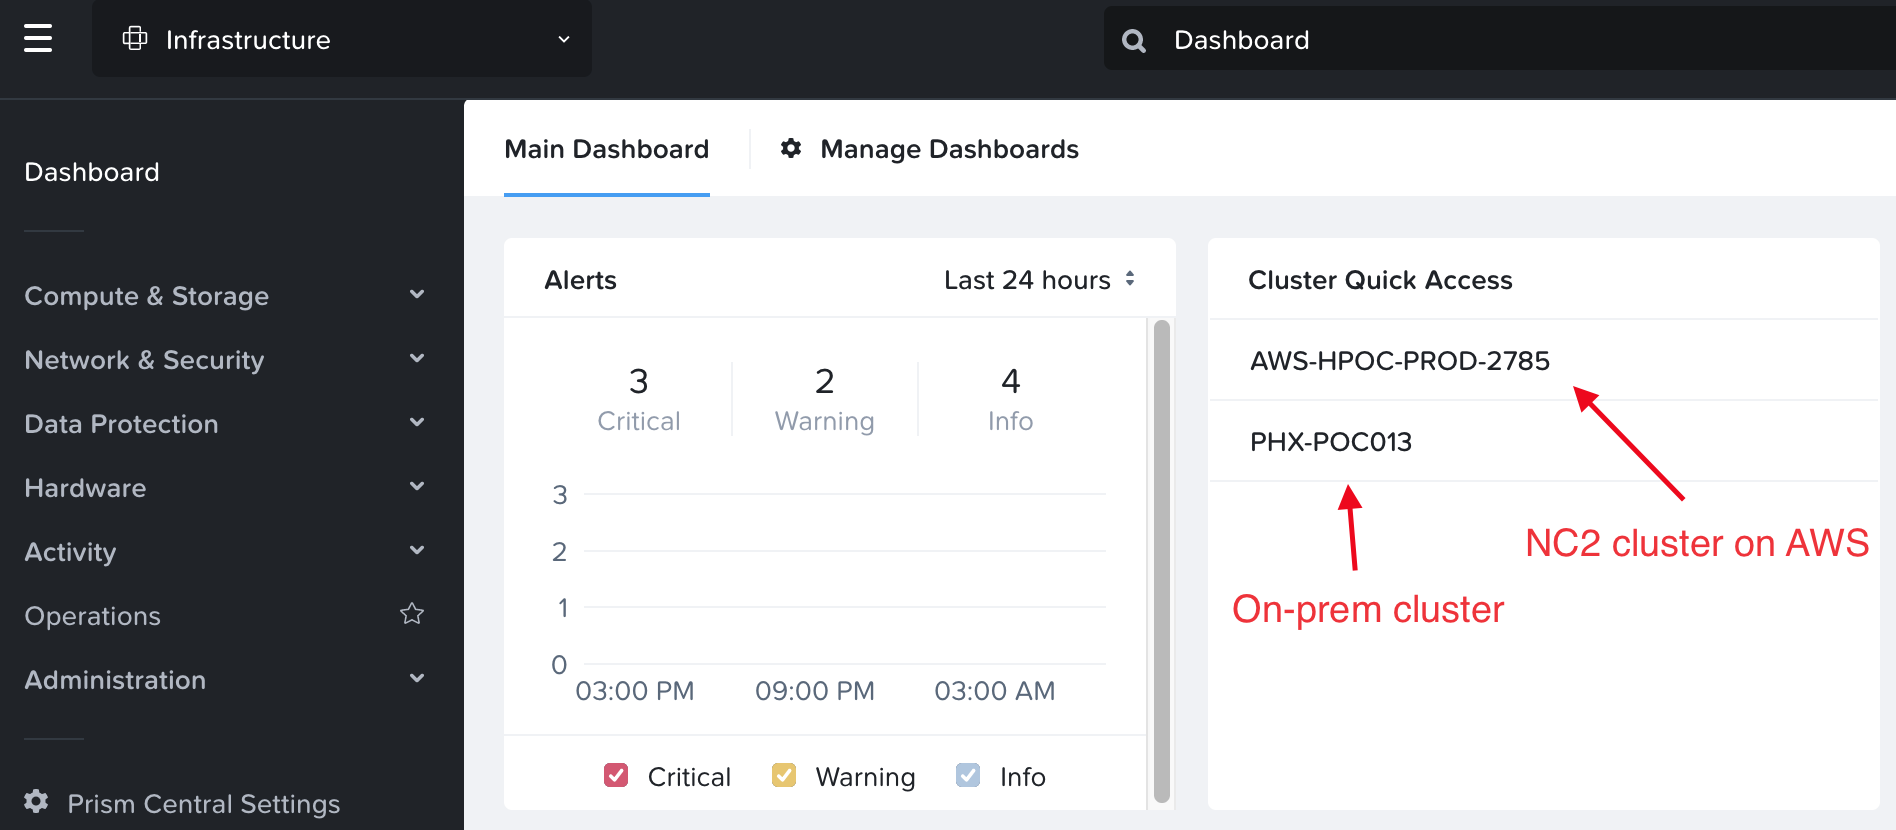
Agones, in turn, goes on top of EKS Anywhere which runs on a Nutanix cluster. In this case we have deployed a cluster in our Phoenix DC, which is also linked with a Nutanix NC2 cluster on AWS.
Nutanix clusters on-prem in Phoenix and in AWS are managed holistically through the Nutanix Prism Central management console. K8s management is done by registering the EKS Anywhere with the EKS service in AWS. K8s node management is done through SSM or Amazon Systems Manager.
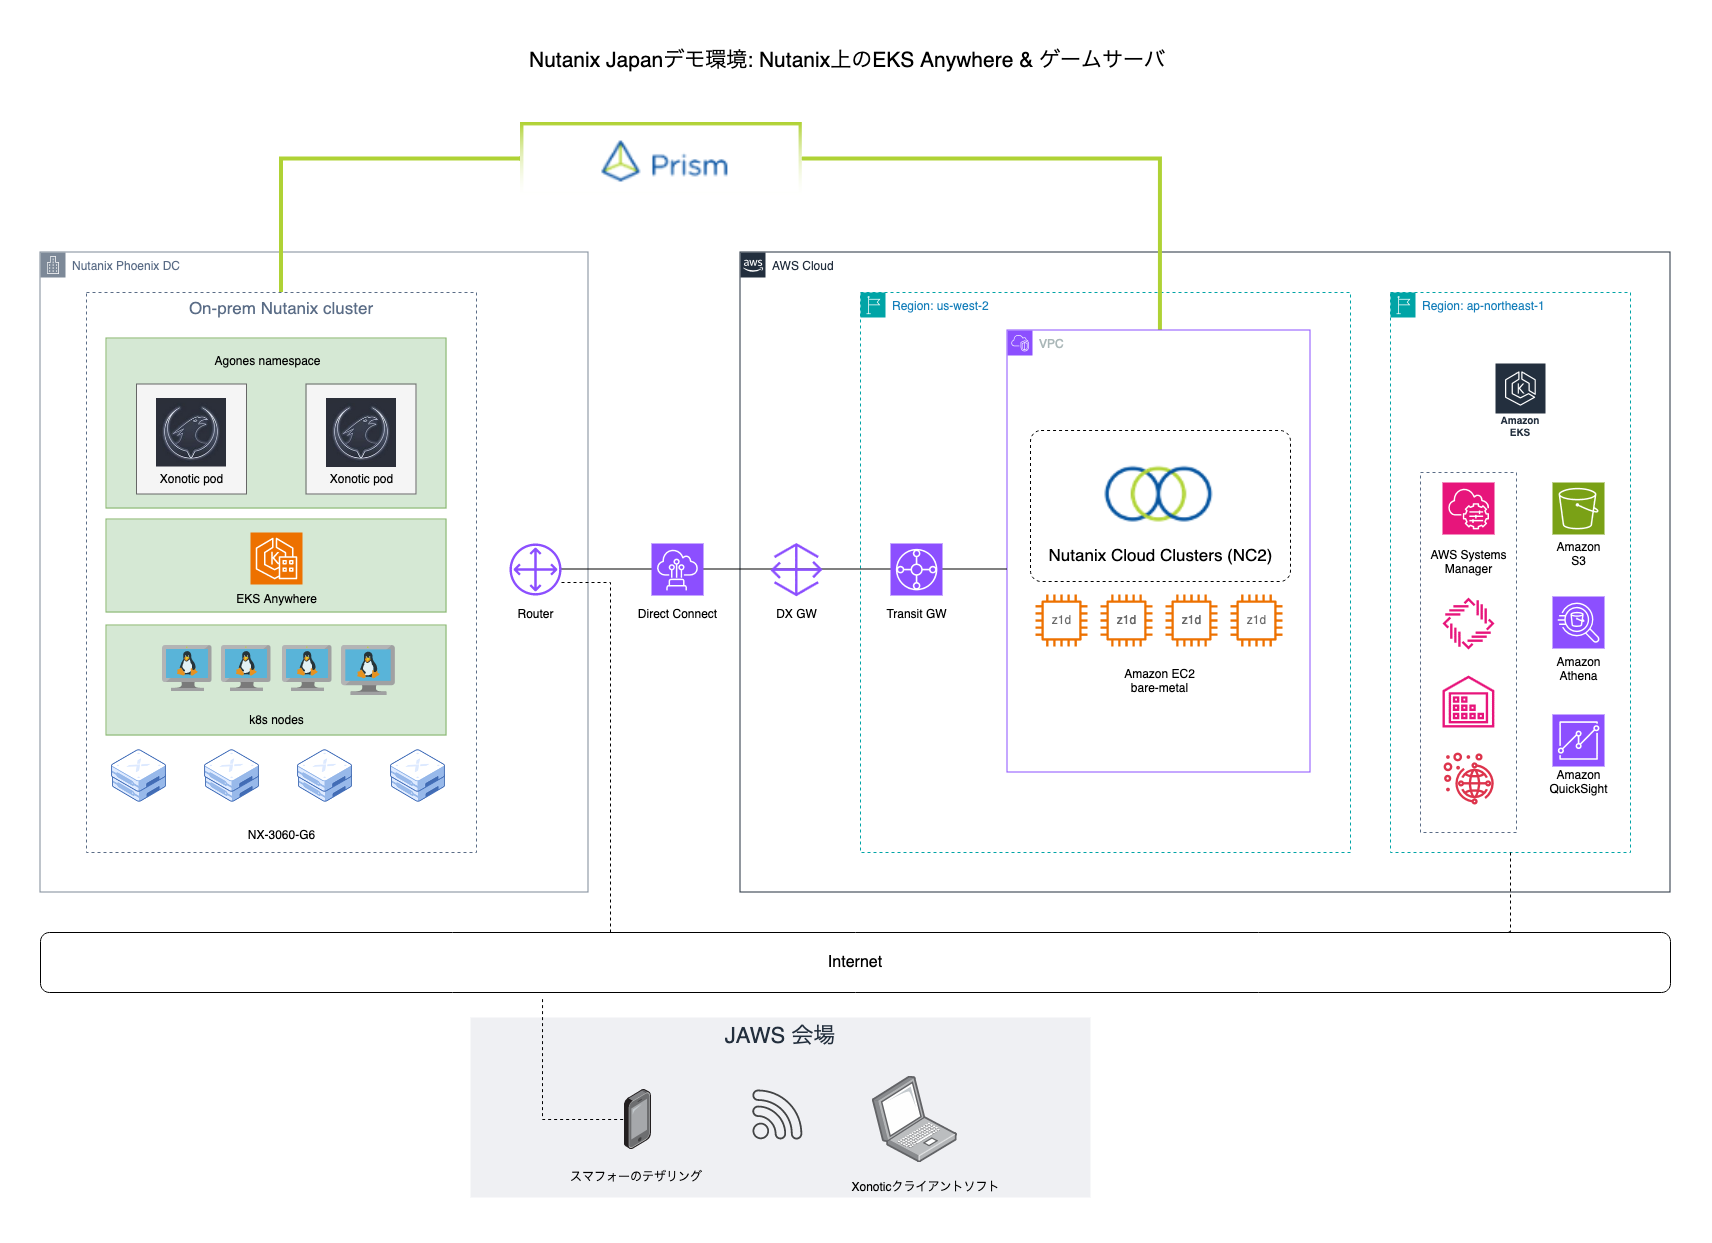
Architecture
The two Nutanix clusters (on-prem and cloud) are linked via a Direct Connect line and can be managed holistically using private networking.
The gaming components are managed through standard the k8s toolset while EKS in the AWS console is used for monitoring of the cluster.
The k8s nodes run as virtual machines on Nutanix and each have the SSM (AWS Systems Manager) agent installed. This makes it possible to monitor the VMs, do patch management and even remote connectivity through the AWS console
Disclaimer: Inventory data from SSM can be sent to an S3 bucket, converted with Athena and then displayed in graphical form through Amazon Quicksight, as is shown to the right in the diagram. This guide doesn’t go through those particular steps, but they are well documented on the Amazon website.
Overview of the architecture both on-prem and in the cloud. Pardon the Japanese script here and there -this was created for a Japanese event after all
The EKS management and SSM connectivity is done to public AWS endpoints in this case, so it goes over the internet. It would also have been possible to do this over private networking through the DX connection, but I don’t have the IAM privileges to create anything new in the account NC2 is running in.
Overview of steps
The following steps will be covered while building the environment
Step
Goal
Task
1
Holistic Nutanix cluster management
Prism Central download and configuration
2
Building EKS Anywhere node image #1
Download and deploy Ubuntu 22.04 image
3
Building EKS Anywhere node image #2
Create VM and follow image-builder steps
4
EKS Anywhere deployment
Run EKS Anywhere installer from Ubuntu
5
k8s cluster management
Register EKS Anywhere with AWS
6
k8s node management
Install SSM agent on EKS Anywhere nodes
7
Game platform orchestration
Installation of Agones platform
8
Game server deployment
Creation of Xonotic pods through Agones
9
Good-old fun!
Install the Xonotic client and go fragging!
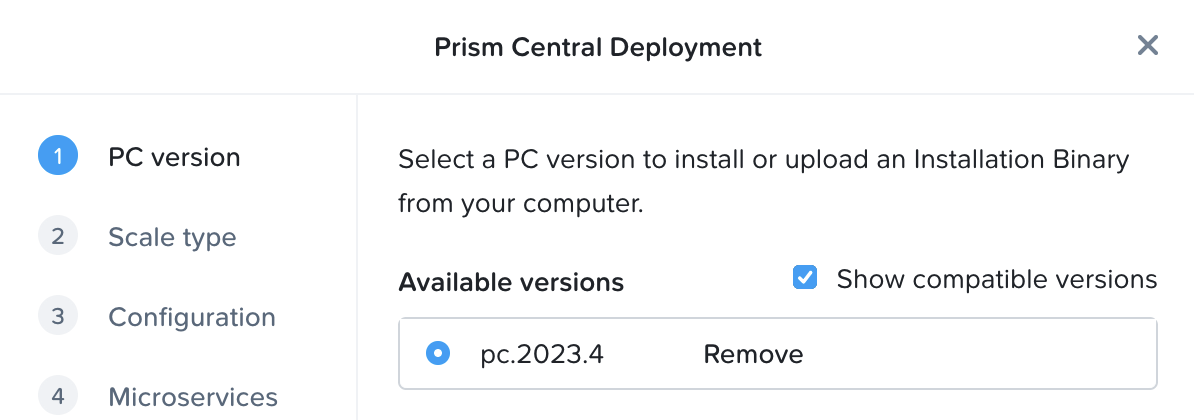
Step 1: Prism Central download and configuration
If not yet deployed, download and deploy Prism Central through the Prism Element UI as per the below.
Once Prism Central has been deployed, reset the admin password over the CLI. SSH to the Prism Central IP using the user “nutanix” and the password “nutanix/4u”. Reset the password using:
ncli user reset-password user-name=admin password=yourpassword
On each cluster, register with Prism Central through the Prism Element UI. Once registered, the clusters show up in Prism Central as per the below
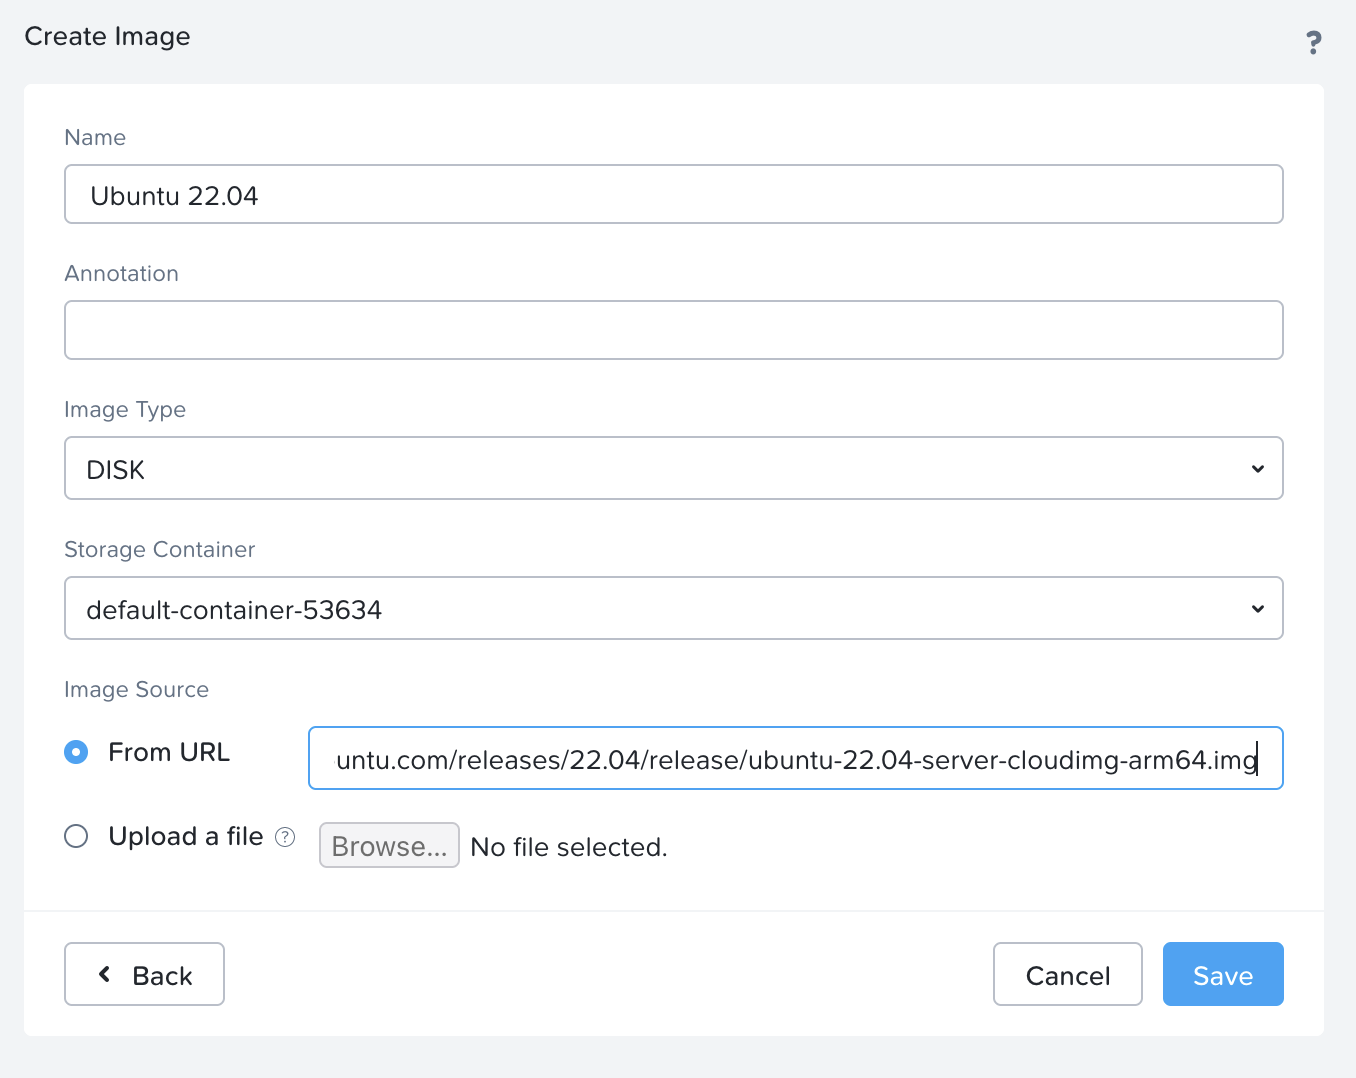
Step 2: Download and deploy Ubuntu 22.04 image
From the Ubuntu website, copy the URL to the Ubuntu image (Jammy Jellyfish) from here:
Be sure to pick the ubuntu-22.04-server-cloudimg-amd64.img and not the disk-kvm image as the kvm image won’t boot.
Add it as a DISK image from URL in the Nutanix web UI:
Step 3: Create VM and follow image-builder steps
Use the image to create a new Ubuntu VM.
I used 2 CPUs with 2 cores each and 8 Gb of RAM.
Delete the CD-ROM drive
Add a NIC.
Set the disk to clone from the image created above
Set boot mode to UEFI rather than the default BIOS.
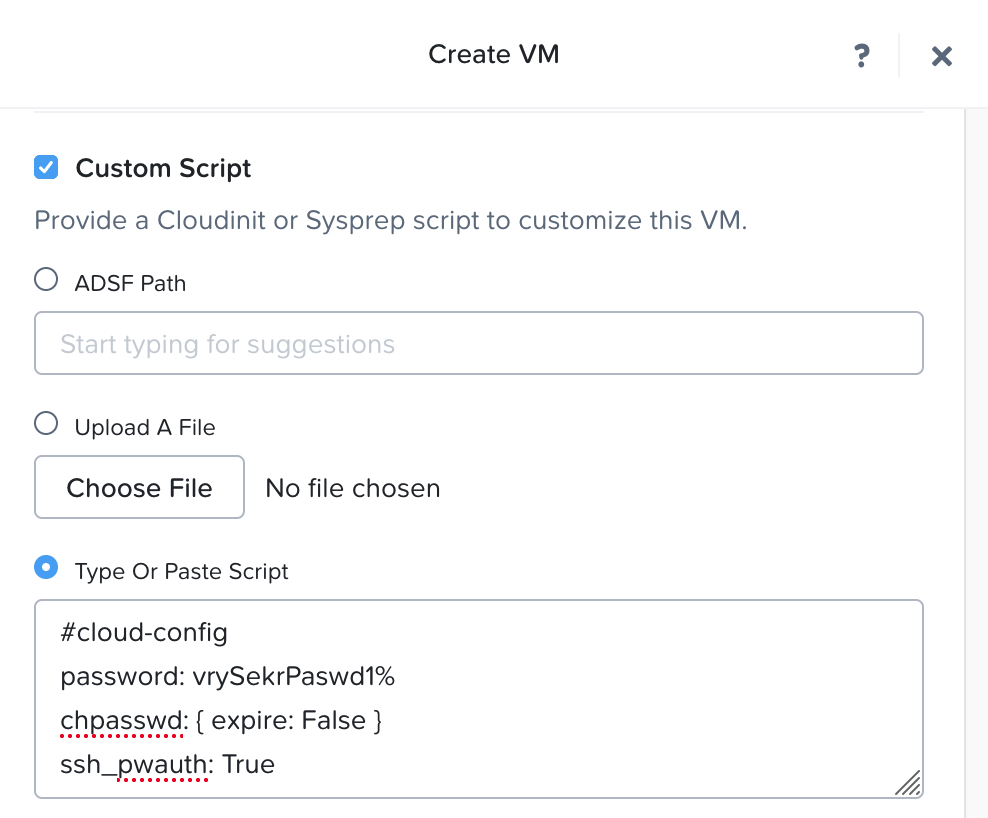
When given the option to add a Custom Script, add a cloud init snippet as per the below to enable SSH (with password rather than key) and set your password
Disk update: You’ll note that the disk created from the image is very small – just 2.2 Gb. Changing the disk size during VM creation isn’t supported, but it can be made larger afterwards. Just accept the size for now and update the disk size once the VM shows up in the inventory. I set mine to 50 Gb.
Don’t start the VM just yet. First we want to add a serial port to the VM through the Nutanix CLI. SSH to any CVM in the cluster and issue the below command:
Now we can power on the VM and log in over SSH using the password set through the cloud init script.
For the image creation, there are official instructions from AWS here. However, I found that some of the official steps needed to be modified to work. Please refer to the below if you want to do the same as I used when creating the image:
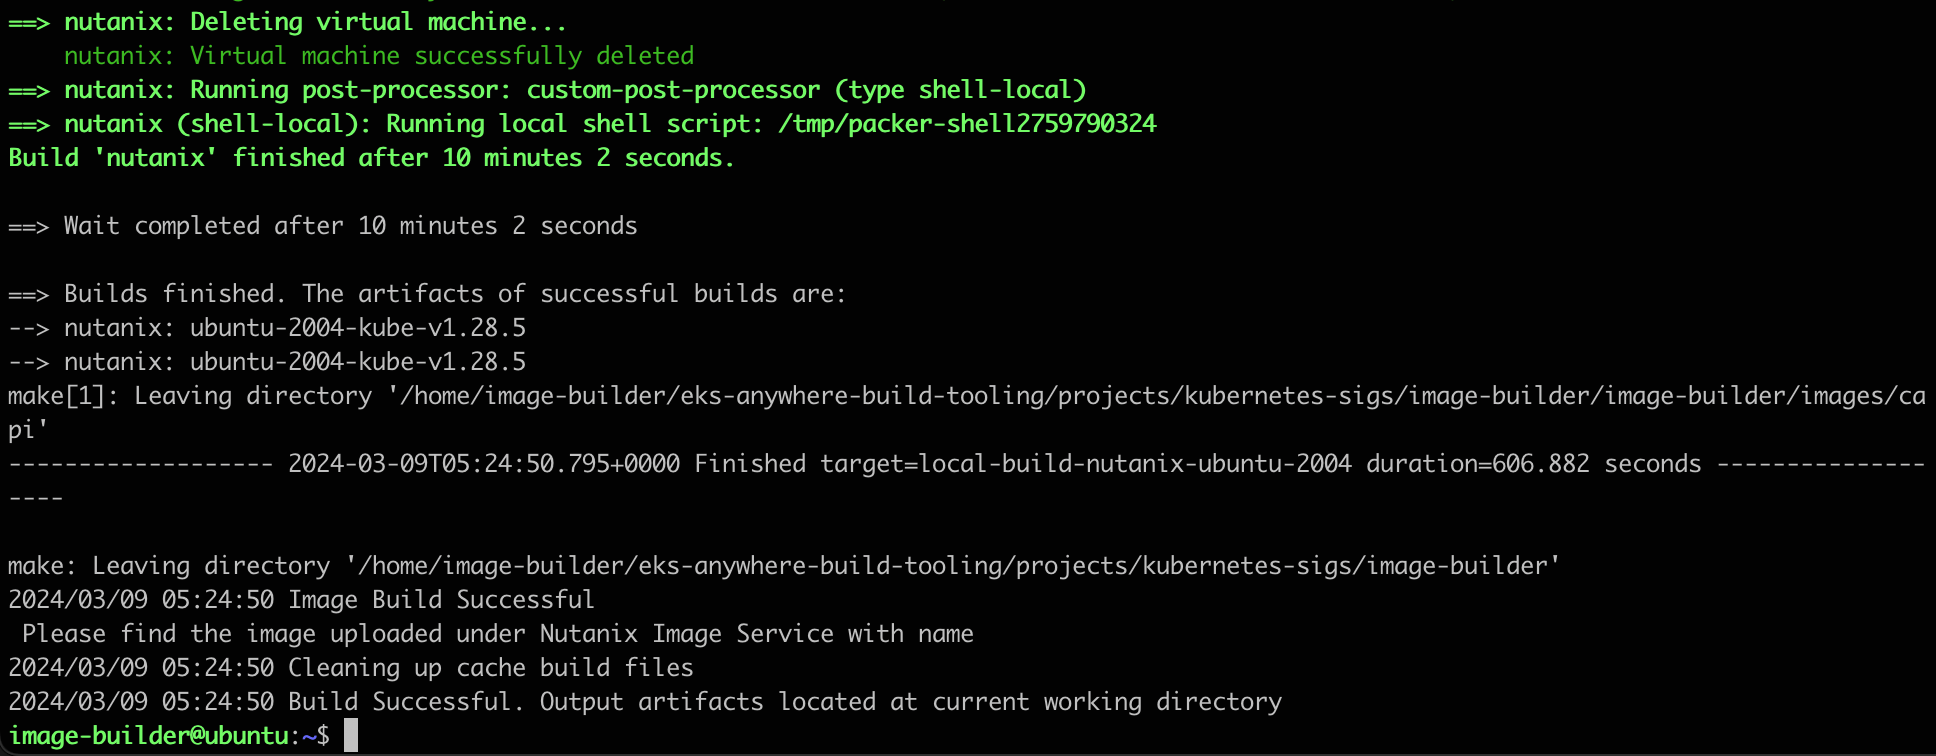
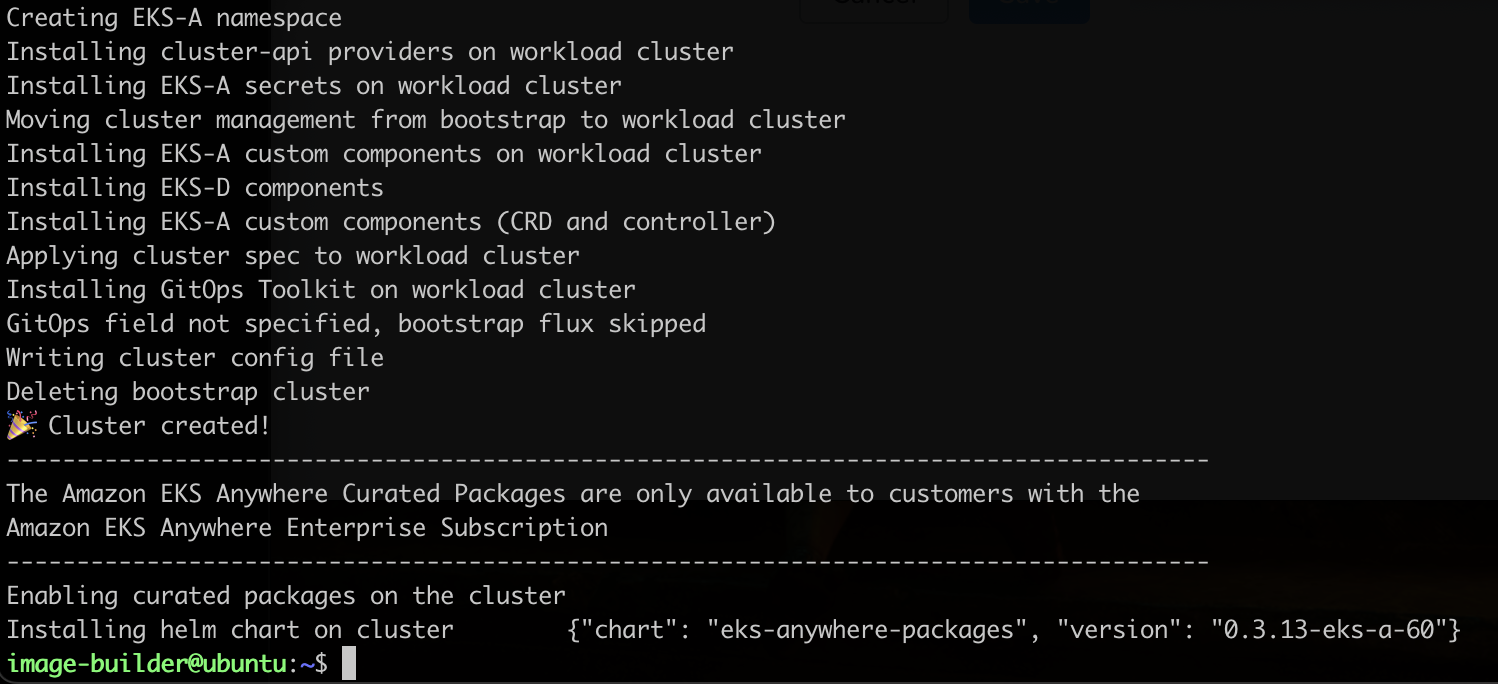
Now we are ready to execute image-builder and create the image. In this case we create an image for version 1.28. This will take around 10 minutes to complete
Once complete you should be greeted with the following message:
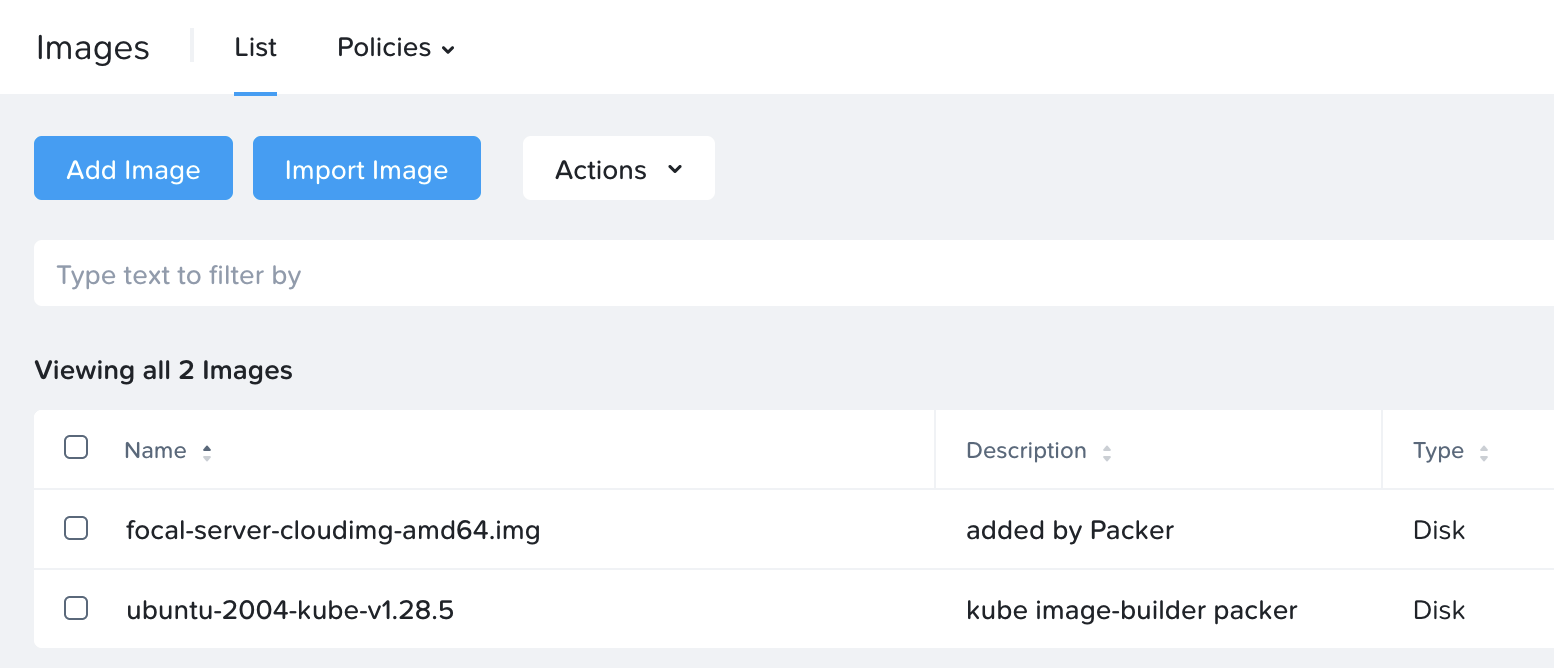
In the list of images in Prism, the new k8s image will show up as follows
Step 4: EKS Anywhere deployment
Now we have an image and are ready to start deploying EKS Anywhere …. well, almost. First we create a configuration file which then is used as the template for the deployment.
Edit the cluster-config.yaml file to adjust to your local environment
Update the cluster-config.yaml file created in the previous step to point to the Prism Central environment you’d like to use. For a lab environment you may also want to disable TLS certificate check. Official instructions for how to modify the file are listed here.
The entire file is too long to upload here, but the fields I’ve modified are:
Key
Value
controlPlaneConfiguration.count
3
controlPlaneConfiguration.endpoint.host
Floating IP to use for control plane VM
kubernetesVersion
1.28 (to match with the image built)
workerNodeGroupConfigurations.count
3
spec.endpoint
Prism Central IP / FQDN
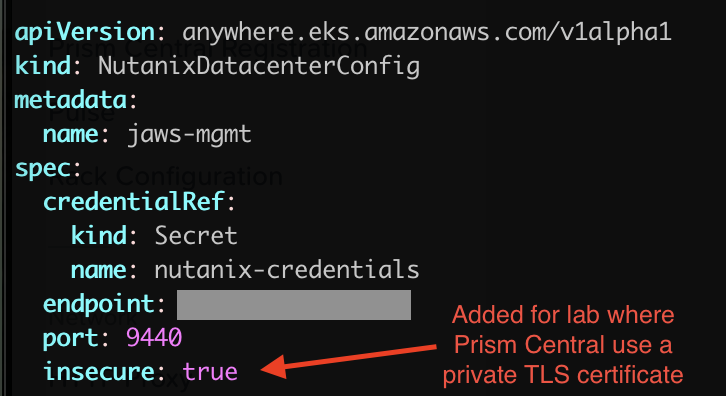
spec.insecure
true (spec.insecure is a new entry)
spec.cluster.name
Prism Element cluster name
spec.image.name
Name of k8s image created earlier
spec.subnet.name
Name of subnet to use for k8s nodes
spec.users.name.sshAuthorizedKeys
Copy and paste your RSA SSH key here
Quick screenshot showcasing the addition of the “spec.insecure” parameter for lab clusters without a valid SSH/TLS cert:
Deploying the cluster
First export the credentials to Prism Central as per the below:
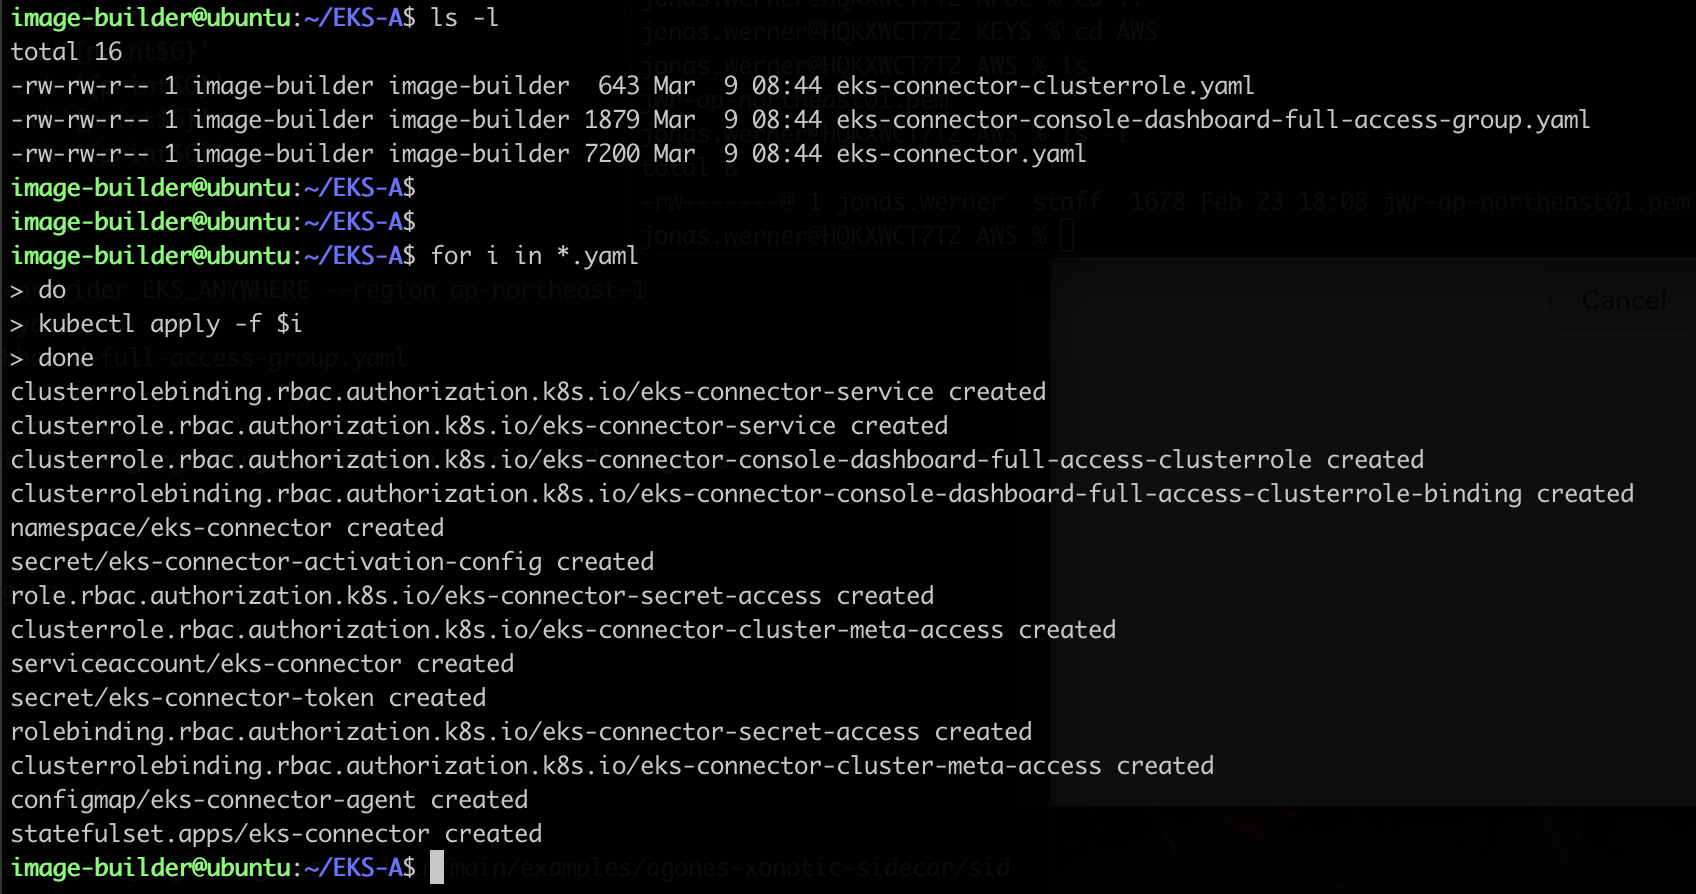
image-builder@ubuntu:~/EKS-A$ ls -1
eks-connector-clusterrole.yaml
eks-connector-console-dashboard-full-access-group.yaml
eks-connector.yaml
image-builder@ubuntu:~/EKS-A$
Then apply the configuration files with kubectl
kubectl apply -f CONFIG-FILE
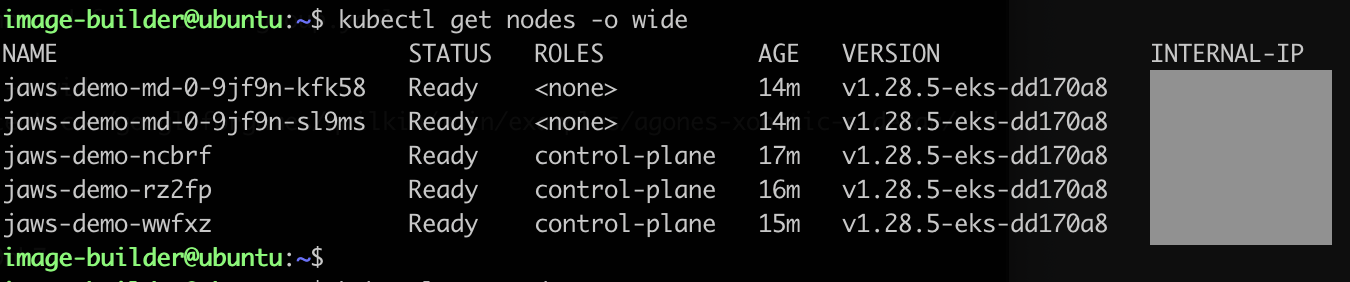
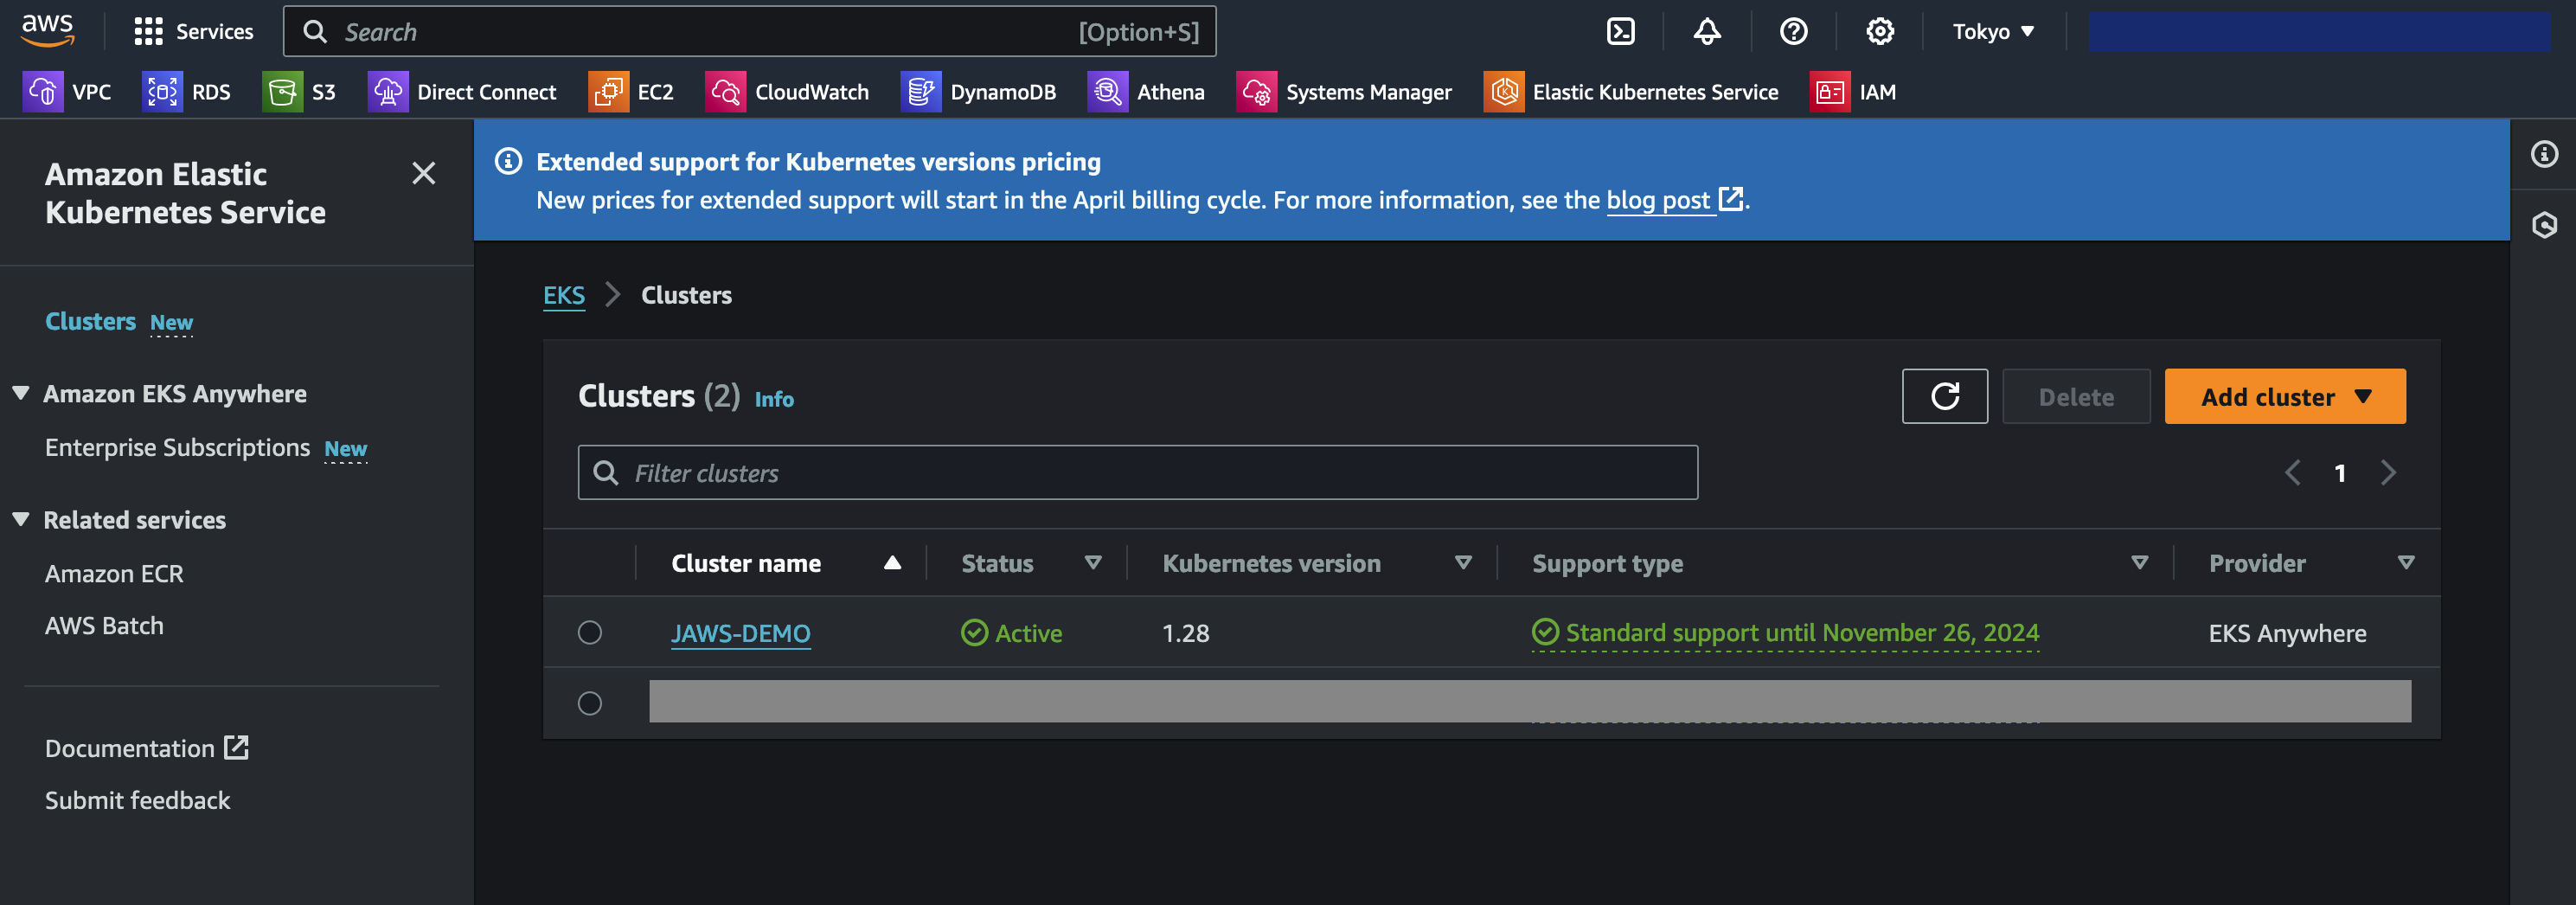
Access the AWS console, navigate to Amazon Elastic Kubernetes Service and verify that the cluster shows up as it should. Ensure you are in the region you selected when generating the yaml config files
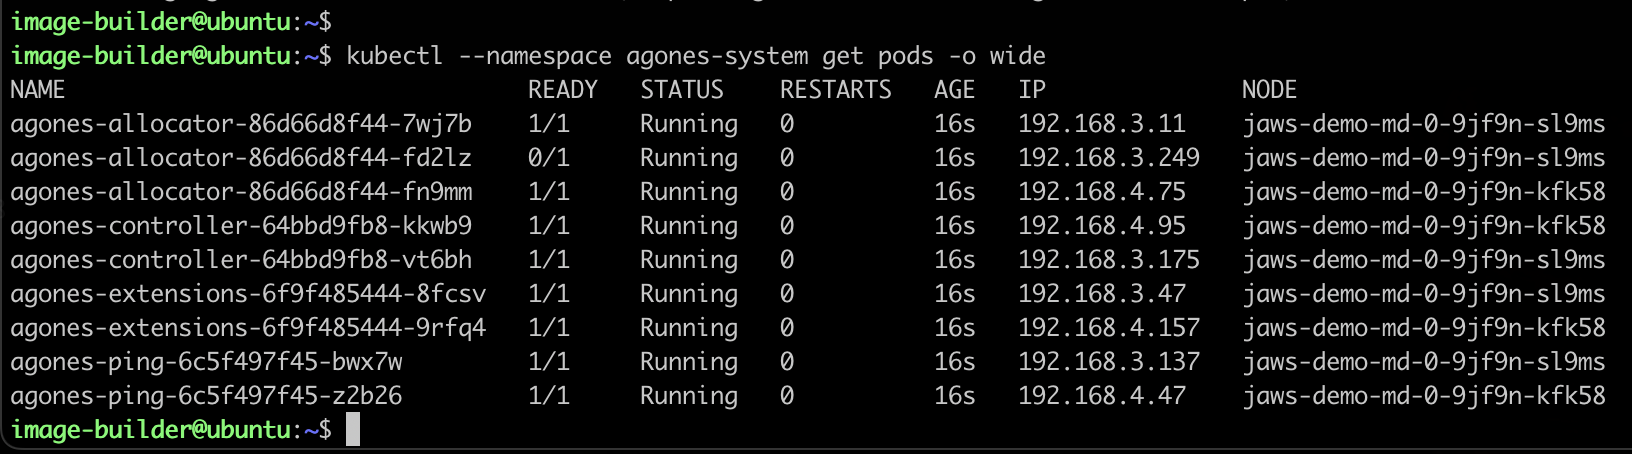
Click the cluster name , go to the Resources tab and select Pods. Here you filter to find the Xonotic game pods as per the below
Step 6: Install SSM agent on EKS Anywhere nodes
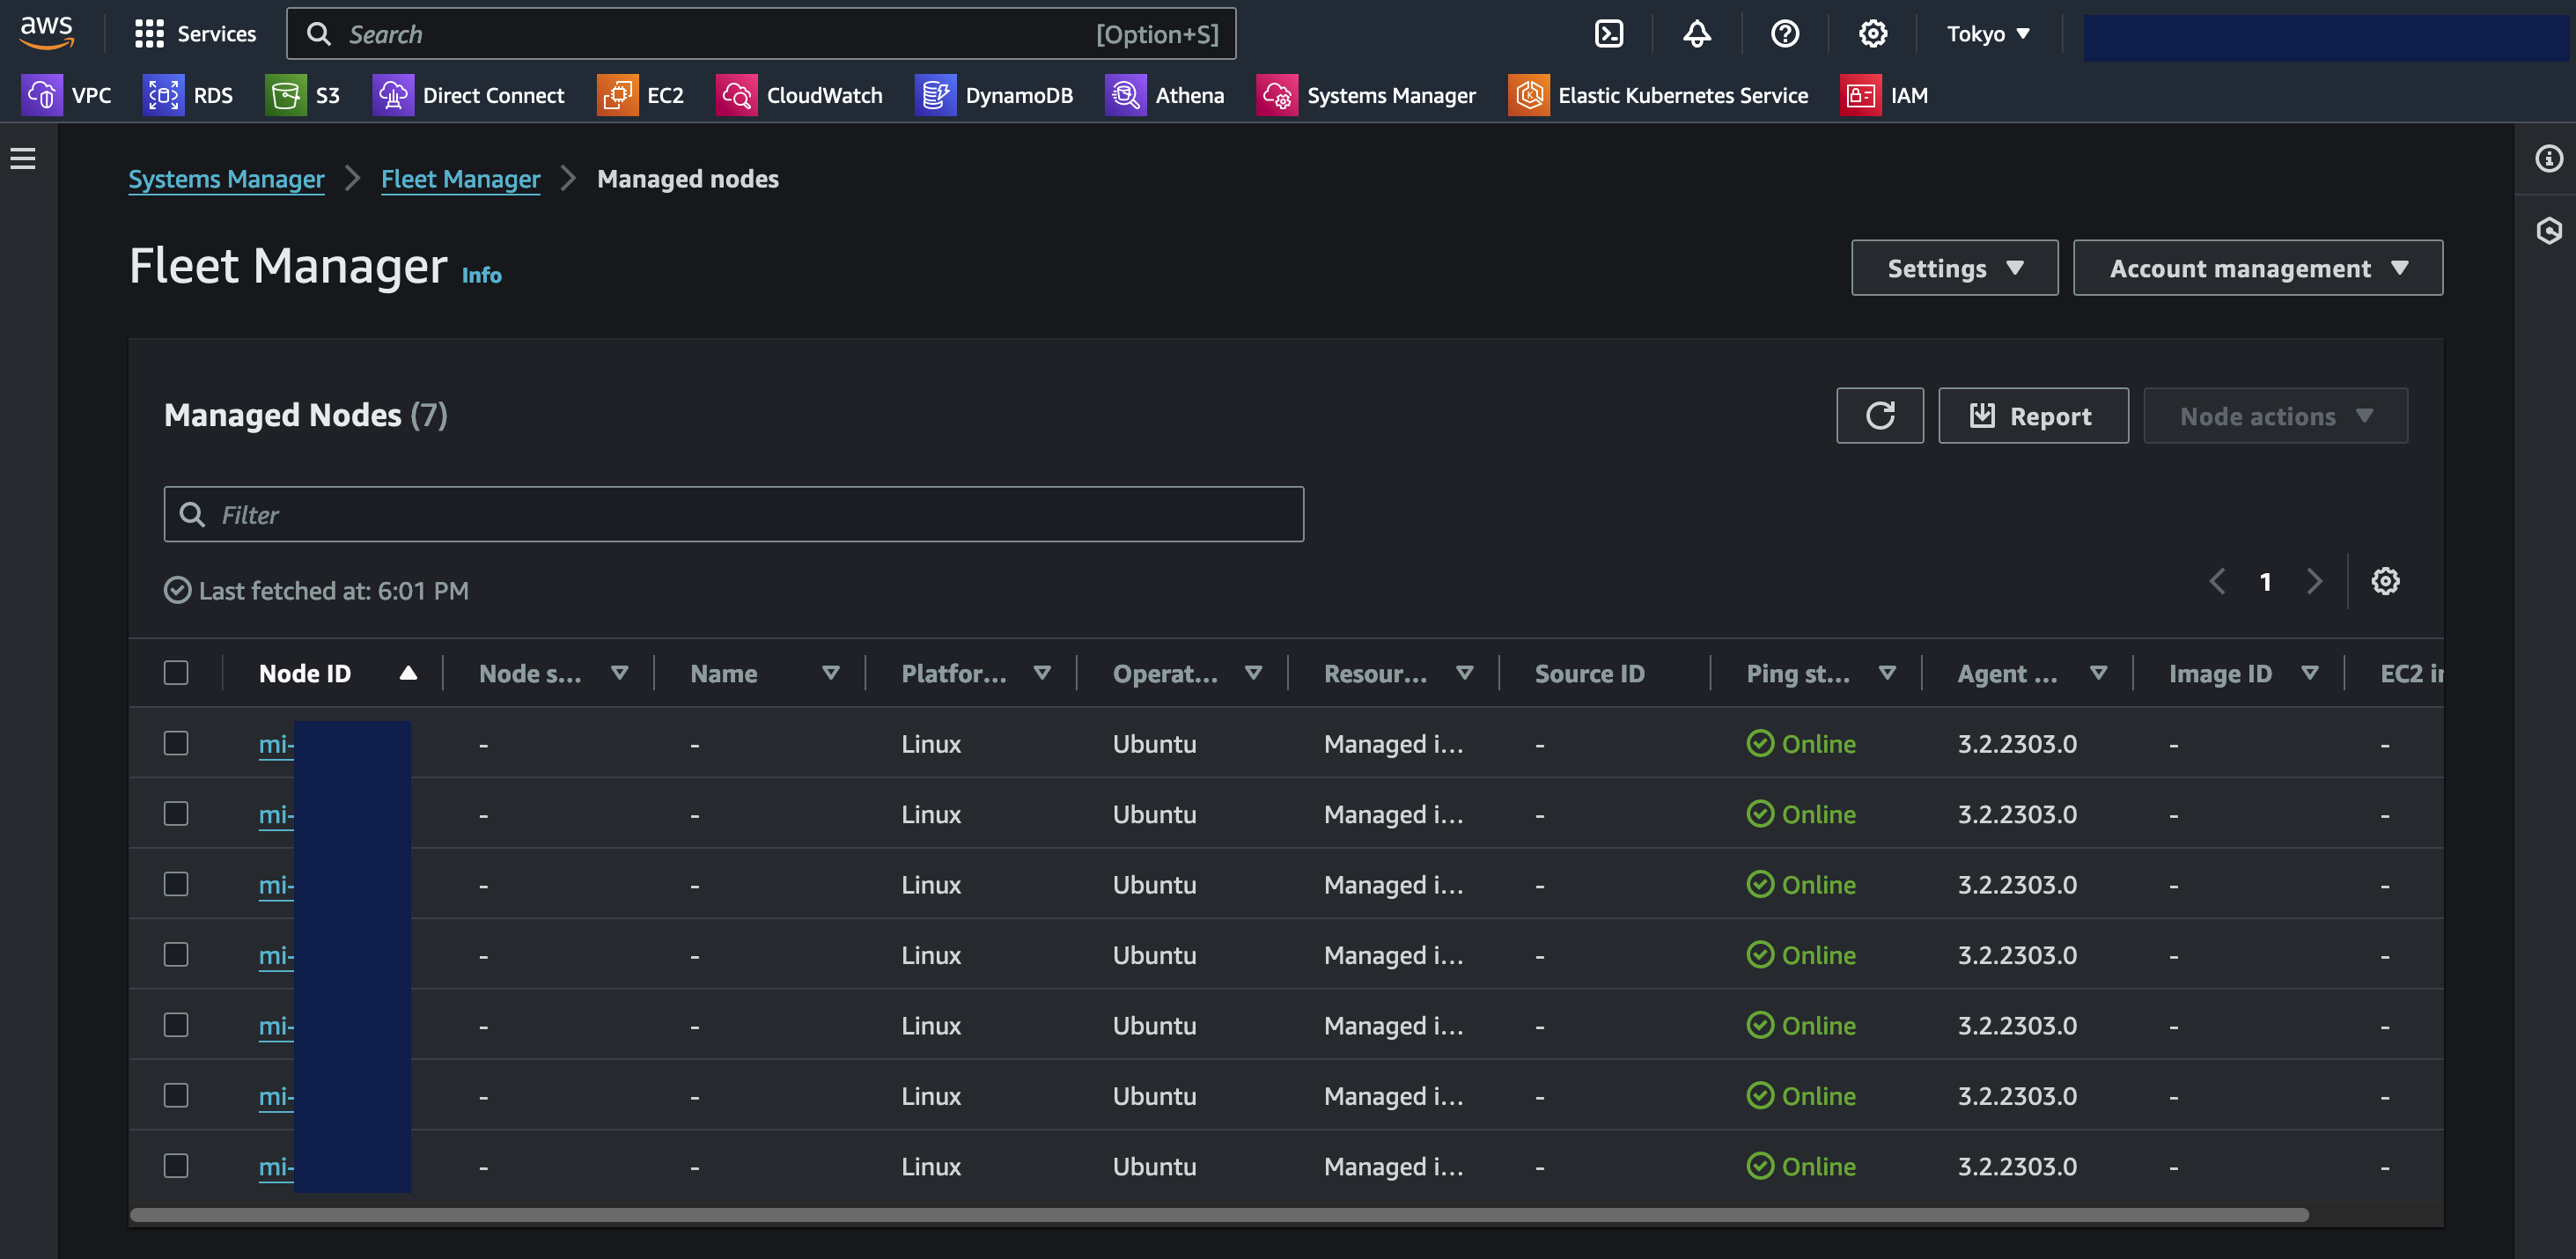
With the AWS Systems Manager agent installed, it is possible to monitor the k8s cluster nodes, get their software inventory, do patch management, remote access and various other things
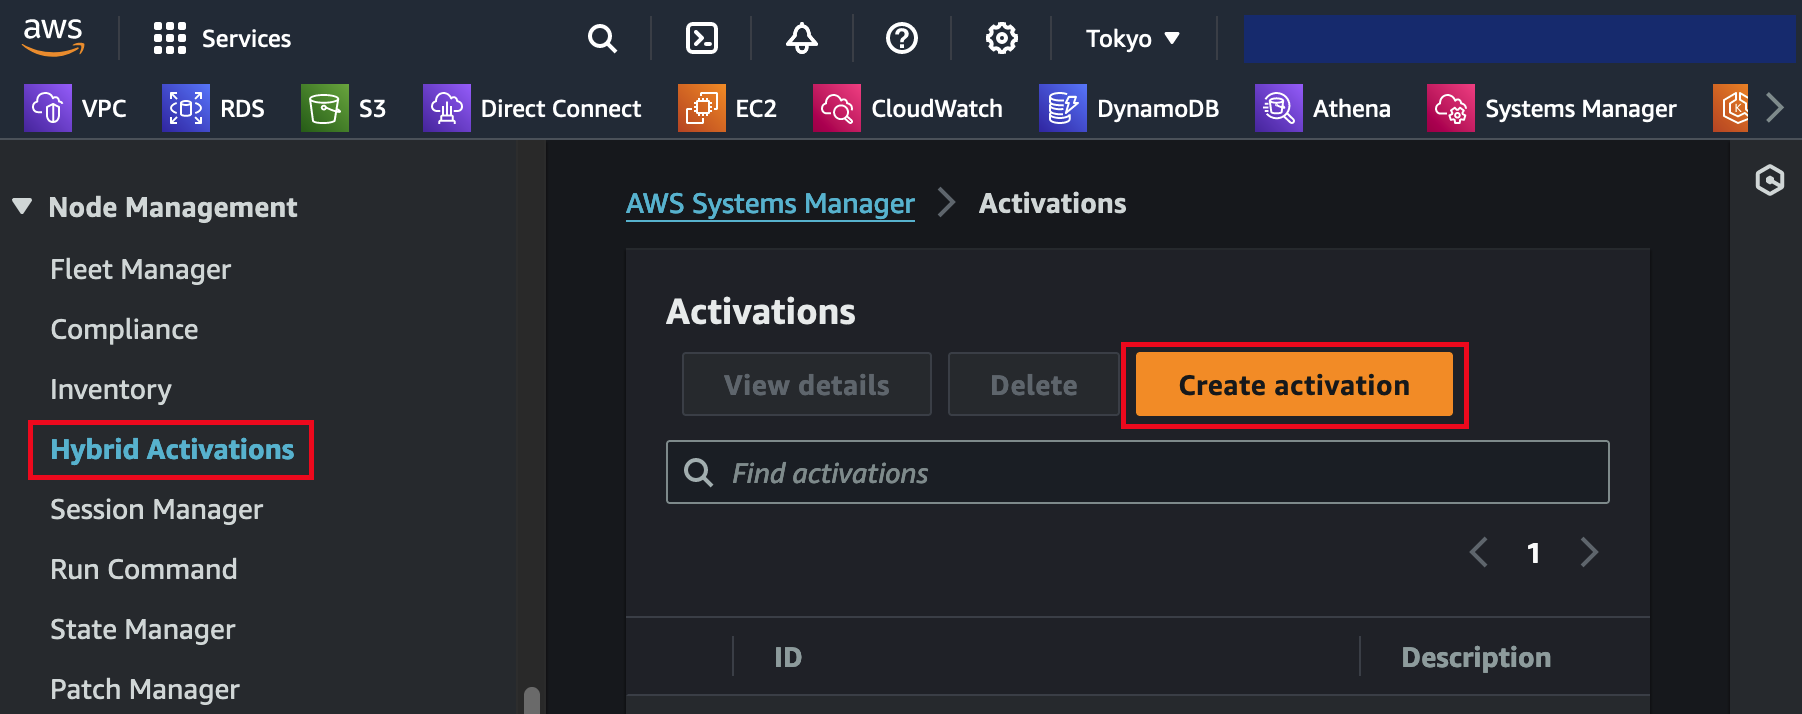
The first thing we do is to create a managed node activation in the AWS Console. Navigate to Systems Manager and select Hybrid Activations. Be sure to pick the right region.
Save the resulting activation details as they are used when registering installing the SSM agent and registering the the k8s nodes
For the agent installation and registration, please follow the official guide here:
Mac users on Apple silicon can install the client with Brew
brew install xonotic
Start the client, select multi-player and add the IP and port of your game server
Play the game!
Closing
This has been a somewhat lengthy guide on configuring k8s on top of Nutanix with the intent of running containerized game servers. Hopefully it has been informative. Originally I wanted to expand the section on SSM and other features on managing the cluster through AWS but thought this blog post was long enough already. Perhaps those areas will be worth re-visiting later on if there’s interest.
This is a beginner-friendly intro to creating (and destroying!) VMs on VMware vSphere using Terraform. It includes code with plenty of comments to show what option does what.
Bonus: Want to run a script or execute PowerShell commands after VM creation? Perhaps download and install some software? No problems – the code includes a section on this as well (for Windows that is).
Download the code
The annotated TF files used in this example can be found on GitHub here:
To start with we want to initialize Terraform and download any providers required to run our VM deployment. In this case we’re using the vSphere provider since we’re interacting with a VMware vCenter server.
Enter the directory with the downloaded TF files. Pick either the Windows or Linux example. After that, initialize Terraform with:
terraform init
Creating a plan
Start by updating the vSphere login information and other details to match your local vSphere environment. For example what DC, Resource Pool and template VM to use.
When that’s done, proceed to create plan based on the TF file(s) in the current directory by using:
terraform plan -out win.plan
In this case we use the name “win.plan” but any name is OK. The output will show what Terraform will do when the plan is applied. Among other things it will list the outputs requested for this particular .tf file. In this example we have asked for the VM names and the IP addresses as per the below:
Plan: 3 to add, 0 to change, 0 to destroy.
Changes to Outputs:
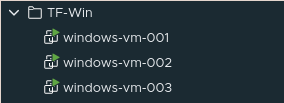
+ vmnames = [
+ "windows-vm-001",
+ "windows-vm-002",
+ "windows-vm-003",
]
+ vmnameswip = [
+ (known after apply),
+ (known after apply),
+ (known after apply),
]
Apply the plan
Now when we have a plan created, apply it with:
terraform apply win.plan
After the deployment is complete it’ll show the updated information for the VM:s as follows:
If these are test VMs you may want to remove them after testing is done. To clean up, simply issue:
terraform destroy
or, if you want to skip the confirmation prompt:
teraform destroy --auto-approve
Troubleshooting
“Failed to verify certificate”: Most lab environments wouldn’t use a proper TLS certificate for vCenter. In those cases the below error will show when running “terraform plan”:
│ Error: error setting up new vSphere SOAP client: Post "https://vcenter.lab.jonamiki.com/sdk": tls: failed to verify certificate: x509: certificate signed by unknown authority
│
│ with provider["registry.terraform.io/hashicorp/vsphere"],
│ on main_win.tf line 3, in provider "vsphere":
│ 3: provider "vsphere" {
The solution is simple – Just uncomment the line below in the vsphere provider section in the terraform .tf file:
allow_unverified_ssl = true
Customization of guest OS fails: One of the following errors may show up if the source VM don’t have VMware Tools installed. The fix, of course, is to install VMware tools in the template VM and then run Terraform again:
Customization of the guest operating system is not supported due to the given reason: Tools is not installed in the GuestOS. Please install the latest version of open-vm-tools or VMware Tools to enable GuestCustomization.
Error: error sending customization spec: Customization of the guest operating system is not supported
VMs boot to a black screen without starting the OS: This is usually down to using EFI vs. BIOS in the VM settings in the .tf file. Try switching to BIOS from EFI or vice versa if the newly created VMs won’t start up.