

Quick (?) steps for connecting a Mikrotik router in an on-premises lab or DC to an AWS VPC using a VPN. All commands done over AWS CLI and Mikrotik CLI.
Note: The values for tunnel IP addresses and secrets etc. can be found in your VPN configuration file (downloaded later). Please don’t use the ones in this guide or an IT fairy will jump to her death from a VAX system in some remote DC. The values used here are already invalid as the resources have been deleted by the time of writing. Do think of the fairies though.
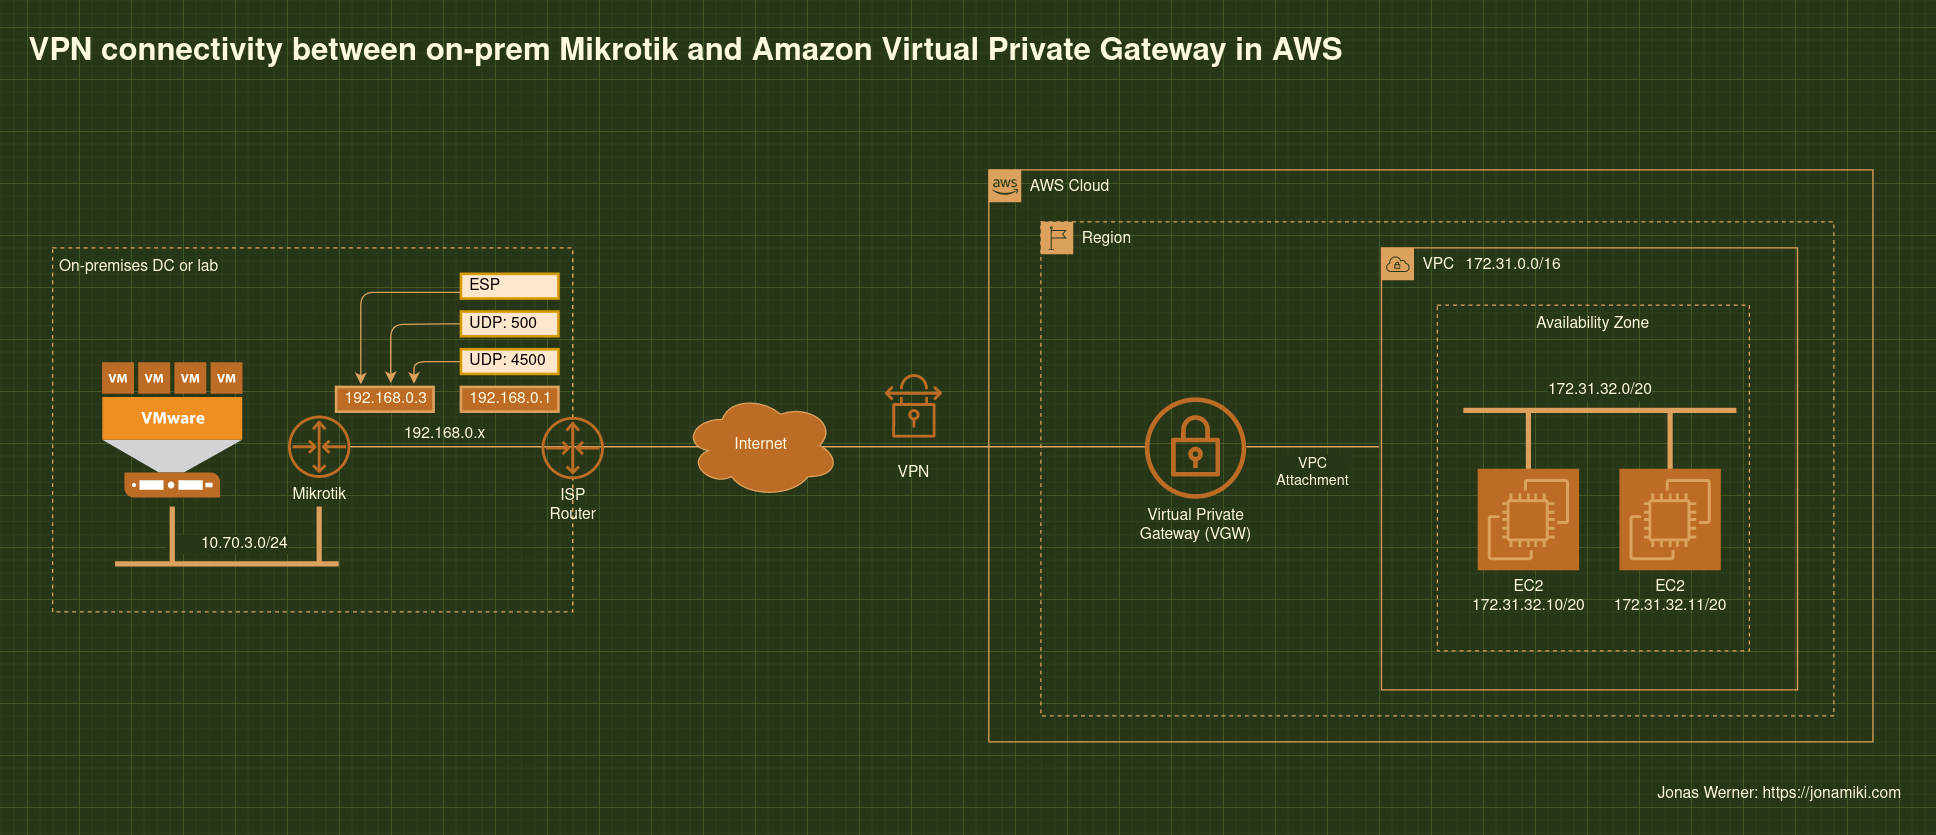
Architecture diagram
In this case the Mikrotik is not directly attached to the internet. It goes via an ISP router. If your setup is the same, please configure port forwarding for ESP, UDP port 500 and UDP port 4500 from the ISP public interface to the Mikrotik router as per the diagram.
If the Mikrotik is directly attached to the internet please open the firewall ports accordingly for ESP and UDP 500 / 4500.
AWS-side configuration
Creating the VGW (Virtual Private Gateway but called vpn-gateway on the CLI). I used 65011 here for the AWS-side ASN but feel free to use something different as long as it is supported
jonas@frantic-aerobics:~$ aws ec2 create-vpn-gateway --type ipsec.1 --amazon-side-asn 65011 | jq
{
  "VpnGateway": {
    "State": "available",
    "Type": "ipsec.1",
    "VpcAttachments": [],
    "VpnGatewayId": "<your-vgw-id>",
    "AmazonSideAsn": 65011
  }
}
jonas@frantic-aerobics:~$
Verify the ID of the AWS VPC you want to connect to
jonas@frantic-aerobics:~$ aws ec2 describe-vpcs | jq
{
  "Vpcs": [
    {
      "CidrBlock": "172.31.0.0/16",
      "DhcpOptionsId": "dopt-d9bcfeb0",
      "State": "available",
      "VpcId": "<your-vpc-id>",
      "OwnerId": "111222333444555",
      "InstanceTenancy": "default",
      "CidrBlockAssociationSet": [
        {
          "AssociationId": "vpc-cidr-assoc-fdf9af94",
          "CidrBlock": "172.31.0.0/16",
          "CidrBlockState": {
            "State": "associated"
          }
        }
      ],
      "IsDefault": true
    }
  ]
}
jonas@frantic-aerobics:~$
Attach VGW to VPC
jonas@frantic-aerobics:~$ aws ec2 attach-vpn-gateway --vpn-gateway-id <your-vgw-id> --vpc-id <your-vpc-id> | jq
{
  "VpcAttachment": {
    "State": "attaching",
    "VpcId": "<your-vpc-id>"
  }
}
Verify that attachment is successful
jonas@frantic-aerobics:~$ aws ec2 describe-vpn-gateways --vpn-gateway-id <your-vgw-id> | jq
{
  "VpnGateways": [
    {
      "State": "available",
      "Type": "ipsec.1",
      "VpcAttachments": [
        {
          "State": "attached",
          "VpcId": "<your-vpc-id>"
        }
      ],
      "VpnGatewayId": "<your-vgw-id>",
      "AmazonSideAsn": 65011,
      "Tags": []
    }
  ]
}
jonas@frantic-aerobics:~$
Create the CGW (register your public IP in AWS basically). I used 65010 here for the on-prem ASN but feel free to use something different as long as it is supported
jonas@frantic-aerobics:~$ curl icanhazip.com
<your-onprem-public-ip>
jonas@frantic-aerobics:~$
jonas@frantic-aerobics:~$ aws ec2 create-customer-gateway --type ipsec.1 --public-ip <your-onprem-public-ip> --bgp-asn 65010 | jq
{
  "CustomerGateway": {
    "BgpAsn": "65010",
    "CustomerGatewayId": "<your-cgw-id>",
    "IpAddress": "<your-onprem-public-ip>",
    "State": "available",
    "Type": "ipsec.1",
    "Tags": []
  }
}
jonas@frantic-aerobics:~$
Create the VPN connection
jonas@frantic-aerobics:~$ aws ec2 create-vpn-connection --type ipsec.1 --customer-gateway-id <your-cgw-id> --vpn-gateway-id <your-vgw-id>
{
"VpnConnection": {
"CustomerGatewayConfiguration": "<?xml version=\"1.0\" encoding=\"UTF-8\"?>\n<vpn_connection id=\"<your-vpn-connection-id>\">\n <cus
..... <shortened for brevity>
"OutsideIpAddress": "15.152.99.137",
"TunnelInsideCidr": "169.254.19.152/30",
"PreSharedKey": "<tunnel-1-secret-or-key>"
}
]
},
"Routes": [],
"Tags": []
}
}
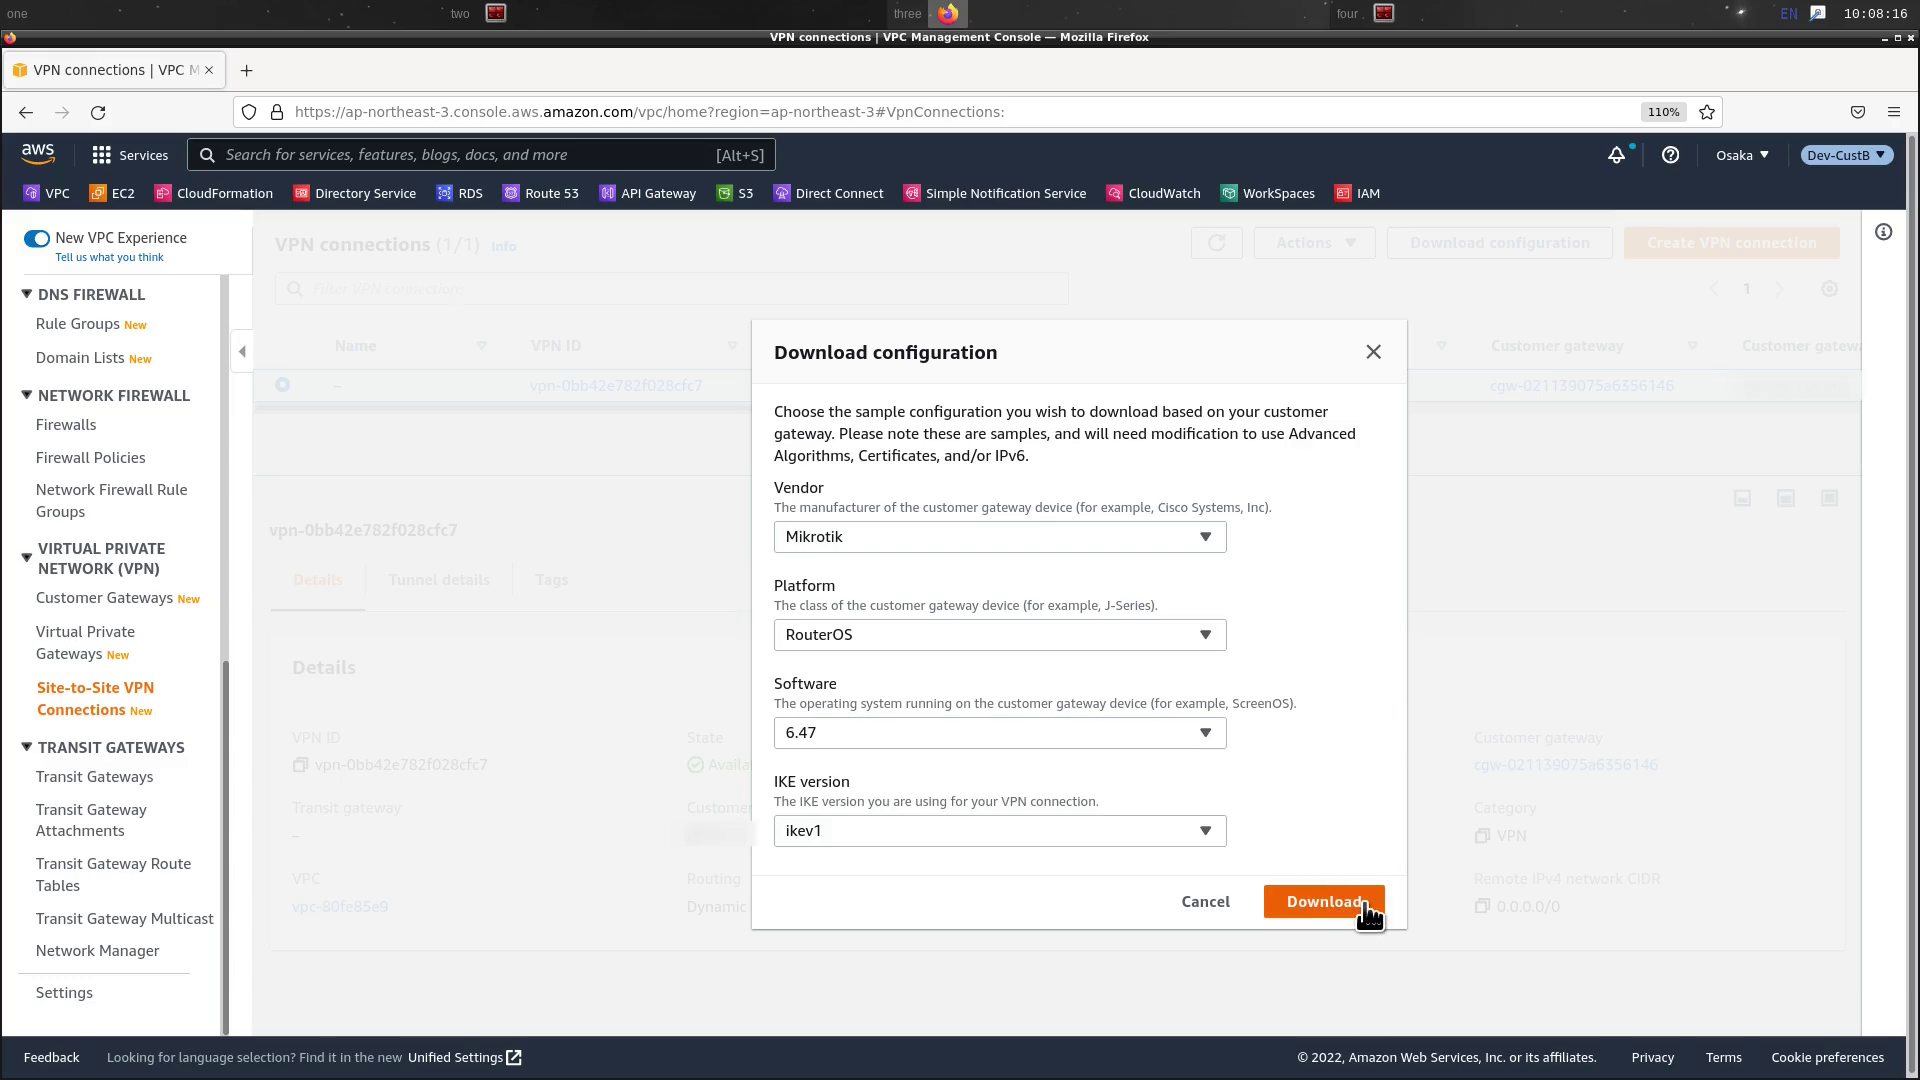
jonas@frantic-aerobics:~$Download the router configuration from the AWS console. Navigate to VPC and select Site-to-site VPN connection on the left-hand list. Pick the connection we just created and download the config as a text file
That’s it. The AWS side is done for now. We’ll need to add return routes from the VPC to the on-prem networks later but for now we can continue on to the Mikrotik configuration
Mikrotik configuration
Open the downloaded router configuration text file and SSH to the Mikrotik router. I use RouterOS 6.49.6 for this guide (latest at time of writing). An AWS VPN uses two tunnels. We have to configure both but will disable one of them later. Mikrotik doesn’t support dual active tunnels to AWS.
Create the IP addresses for the VPN tunnels. Search from the top of the file and look for “Customer gateway Inside Address”. The first 169.254.x.x IP will be for Tunnel 0. A second IP will be listed further down for Tunnel 1. We use a /30 subnet mask for the tunnel IPs.
Use your router outside interface. Mine is “sfp-sfpplus1” for this example
[admin@MikroTik] > ip address add address=169.254.88.206/30 interface=sfp-sfpplus1
[admin@MikroTik] > ip address add address=169.254.19.154/30 interface=sfp-sfpplus1
[admin@MikroTik] >
[admin@MikroTik] > ip address print
Flags: X - disabled, I - invalid, D - dynamic
 #   ADDRESS            NETWORK         INTERFACE
 0   ;;; defconf
     192.168.2.254/24   192.168.2.0     bridge
 1   10.42.0.254/24     10.42.0.0       vl420
 2   10.70.1.254/24     10.70.1.0       vl701
 3   10.70.2.254/24     10.70.2.0       vl702
 4   10.80.0.254/24     10.80.0.0       vl800
 5   10.70.3.254/24     10.70.3.0       vl703
 6 D 192.168.0.3/24     192.168.0.0     sfp-sfpplus1
 7   169.254.88.206/30  169.254.88.204  sfp-sfpplus1
 8   169.254.19.154/30  169.254.19.152  sfp-sfpplus1
[admin@MikroTik] >
Add the IPsec peers
[admin@MikroTik] > ip ipsec peer add address=15.152.91.202 local-address=192.168.0.3 name=AWS-VPN-Peer-0
[admin@MikroTik] > ip ipsec peer add address=15.152.99.137 local-address=192.168.0.3 name=AWS-VPN-Peer-1
Add the IPsec identities (secrets for the two tunnels)
[admin@MikroTik] > ip ipsec identity add peer=AWS-VPN-Peer-0 secret=<tunnel-0-secret-or-key>
[admin@MikroTik] > ip ipsec identity add peer=AWS-VPN-Peer-1 secret=<tunnel-1-secret-or-key>
Add new or update the default IPsec profile and proposal
[admin@MikroTik] > ip ipsec profile set [ find default=yes ] dh-group=modp1024 dpd-interval=10s dpd-maximum-failures=3 enc-algorithm=aes-128 lifetime=8h
[admin@MikroTik] >
[admin@MikroTik] > ip ipsec proposal set [ find default=yes ] enc-algorithm=aes-128 lifetime=1h
[admin@MikroTik] >
Update the BGP instance settings
[admin@MikroTik] > routing bgp instance set default as=65010 redistribute-connected=yes redistribute-static=yes router-id=<your-onprem-public-ip>Add the VPN tunnel BGP Peers (one will be disabled later)
[admin@MikroTik] > routing bgp peer add hold-time=30s keepalive-time=10s name=BGP-AWS-VPN-Peer-0 remote-address=169.254.88.205 remote-as=65011
[admin@MikroTik] > routing bgp peer add hold-time=30s keepalive-time=10s name=BGP-AWS-VPN-Peer-1 remote-address=169.254.19.153 remote-as=65011
[admin@MikroTik] >
Add any networks you wish to advertise to the VPC over the VPN
[admin@MikroTik] > routing bgp network add network=192.168.2.0/24
[admin@MikroTik] > routing bgp network add network=10.70.1.0/24
[admin@MikroTik] > routing bgp network add network=10.70.2.0/24
[admin@MikroTik] > routing bgp network add network=10.70.3.0/24
[admin@MikroTik] >
Set the firewall rules. One for the VPN tunnel CIDR range and one for the VPC CIDR (172.31.0.0/16 in this example)
[admin@MikroTik] > ip firewall nat add action=accept chain=srcnat dst-address=169.254.0.0/16
[admin@MikroTik] > ip firewall nat add action=accept chain=srcnat dst-address=172.31.0.0/16
View the NAT rules
[admin@MikroTik] > ip firewall nat print
Flags: X - disabled, I - invalid, D - dynamic
 0    chain=srcnat action=masquerade out-interface-list=WAN

 1    chain=srcnat action=accept dst-address=169.254.0.0/16

 2    chain=srcnat action=accept dst-address=172.31.0.0/16
[admin@MikroTik] >
This won’t do. The WAN rule need to come last. Change the order using the “move” command
[admin@MikroTik] > ip firewall nat move 1 0
[admin@MikroTik] > ip firewall nat print
Flags: X - disabled, I - invalid, D - dynamic
 0    chain=srcnat action=accept dst-address=169.254.0.0/16

 1    chain=srcnat action=masquerade out-interface-list=WAN

 2    chain=srcnat action=accept dst-address=172.31.0.0/16
[admin@MikroTik] > ip firewall nat move 2 1
[admin@MikroTik] > ip firewall nat print
Flags: X - disabled, I - invalid, D - dynamic
 0    chain=srcnat action=accept dst-address=169.254.0.0/16

 1    chain=srcnat action=accept dst-address=172.31.0.0/16

 2    chain=srcnat action=masquerade out-interface-list=WAN
[admin@MikroTik] >
Create IPsec policies for the two VPN tunnels
[admin@MikroTik] > ip ipsec policy add dst-address=169.254.88.205 src-address=169.254.88.206 proposal=default peer=AWS-VPN-Peer-0 tunnel=yes
[admin@MikroTik] > ip ipsec policy add dst-address=169.254.19.153 src-address=169.254.19.154 proposal=default peer=AWS-VPN-Peer-1 tunnel=yes
Now the tunnel status should have changed to up. Verify from the AWS CLI
jonas@frantic-aerobics:~$ aws ec2 describe-vpn-connections | jq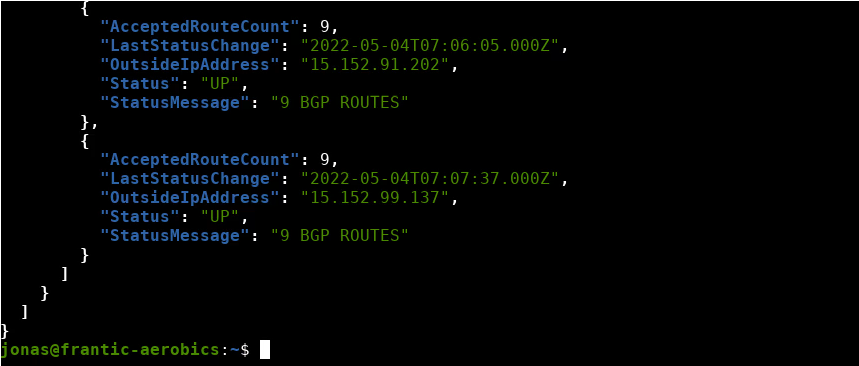
Disable one of the tunnels
[admin@MikroTik] > routing bgp peer print
Flags: X - disabled, E - established
 #  INSTANCE     REMOTE-ADDRESS     REMOTE-AS
 0 E default     169.254.88.205     65011
 1 E default     169.254.19.153     65011
[admin@MikroTik] >
[admin@MikroTik] > routing bgp peer disable numbers=1
[admin@MikroTik] >
[admin@MikroTik] > routing bgp peer print
Flags: X - disabled, E - established
 #  INSTANCE     REMOTE-ADDRESS     REMOTE-AS
 0 E default     169.254.88.205     65011
 1 X default     169.254.19.153     65011
[admin@MikroTik] >
Add the final IPsec policy for the VPC network CIDR. Be sure to pick the tunnel Peer (0 or 1) which is still up.
[admin@MikroTik] > ip ipsec policy add dst-address=172.31.0.0/16 src-address=0.0.0.0/0 proposal=default peer=AWS-VPN-Peer-0 tunnel=yes
[admin@MikroTik] >
That’s it. Good job. The Mikrotik is now fully configured. All that is left is to add a return route to the on-premises networks from the VPC
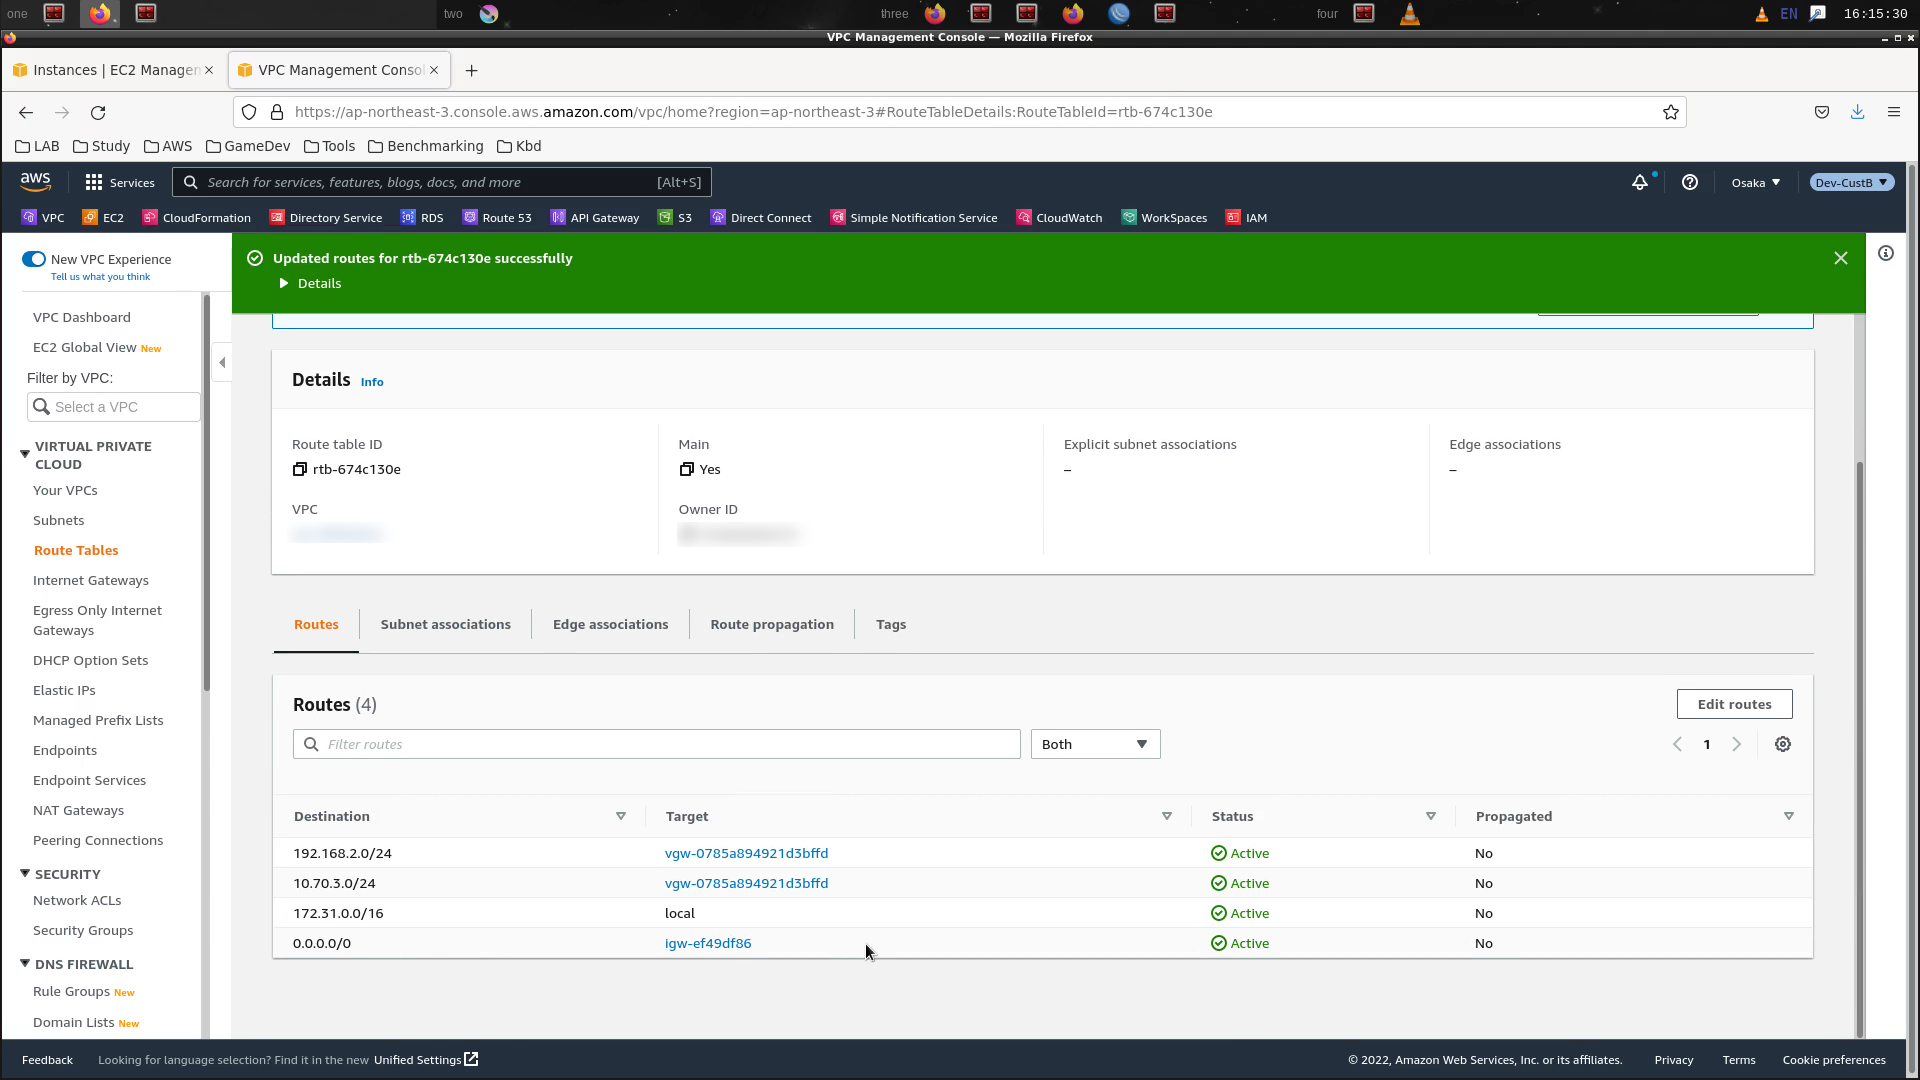
Access the routing table for your VPC subnet and add return routes pointing to your VGW
Configuration complete. Time to test with a ping (be sure your security group for your EC2 instances have the correct ports open of course)
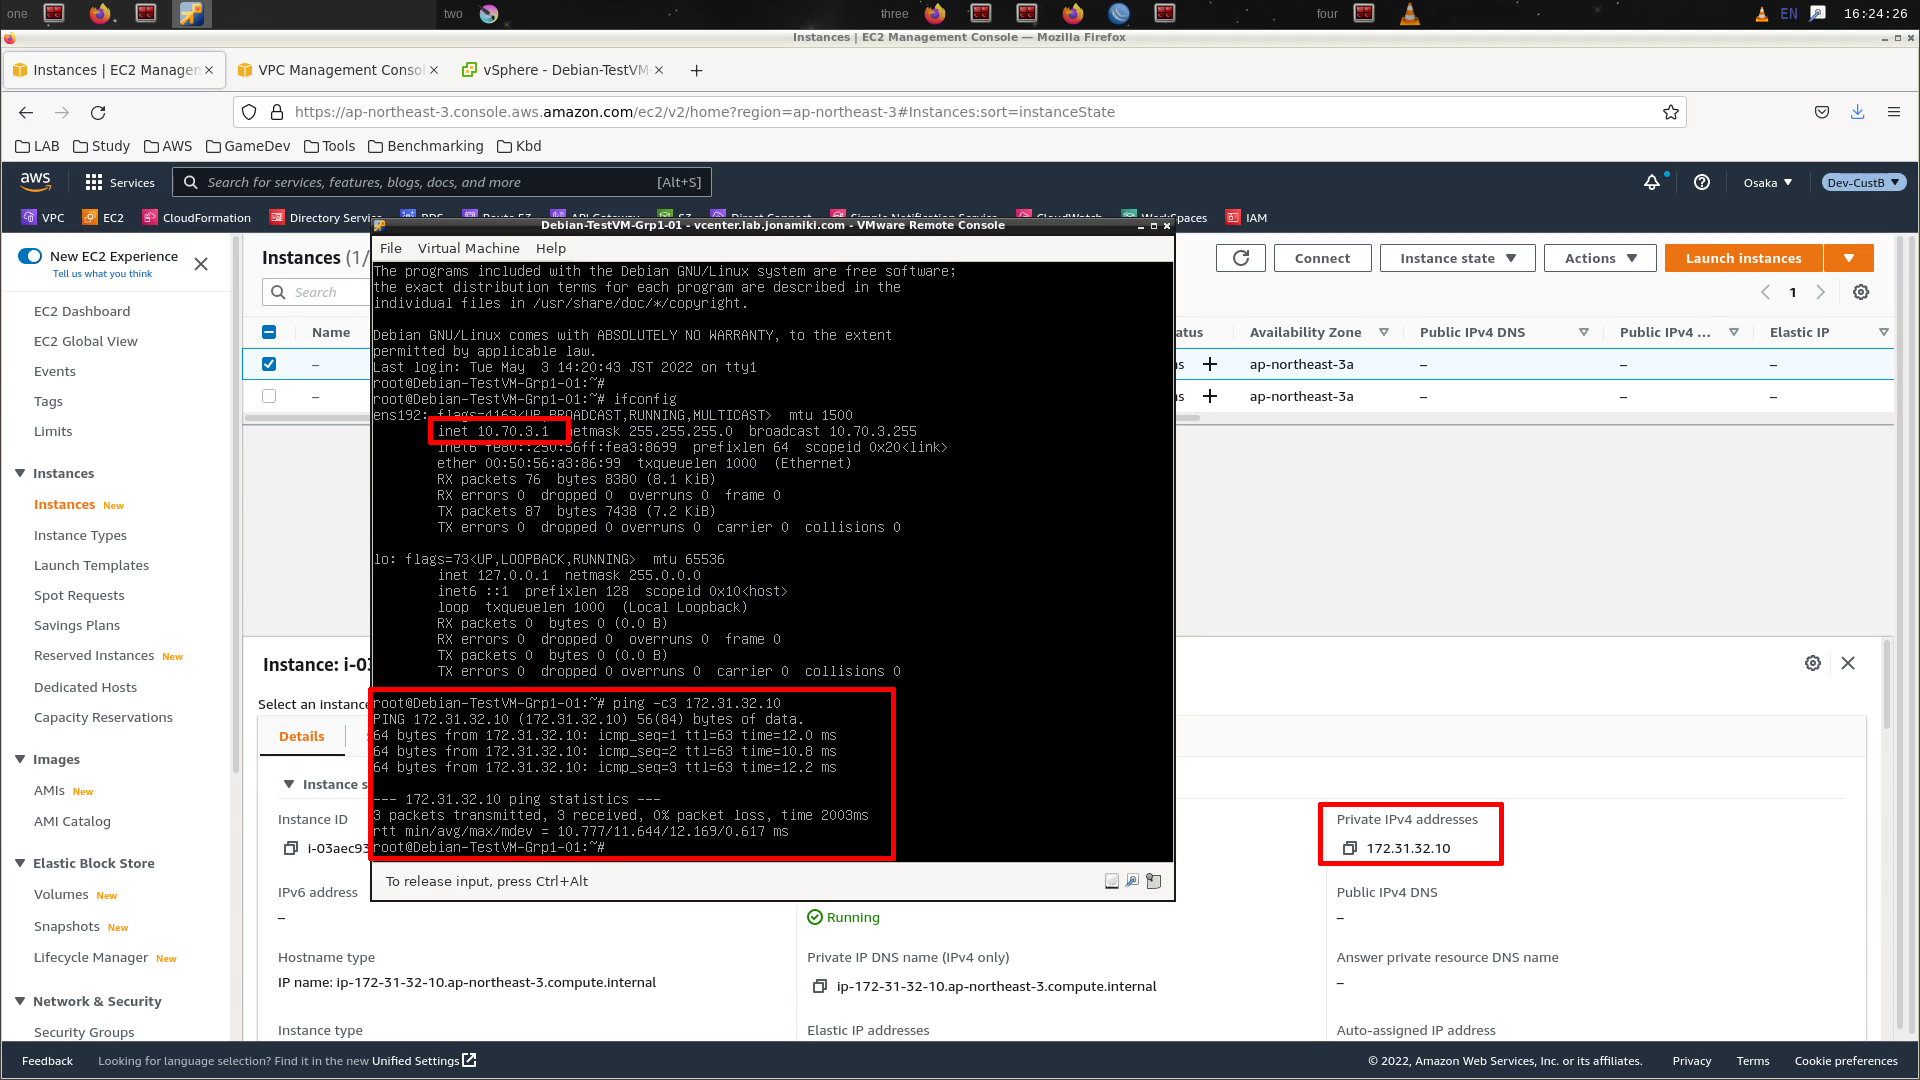
All works perfectly fine. Enjoy your new VPN!