Summary
Did you ever wish you could host your own multi-player gaming servers with k8s? In that case I have great news, because in this post we’re covering how to deploy online multi-player game server containers with EKS Anywhere on Nutanix infrastructure.
Components
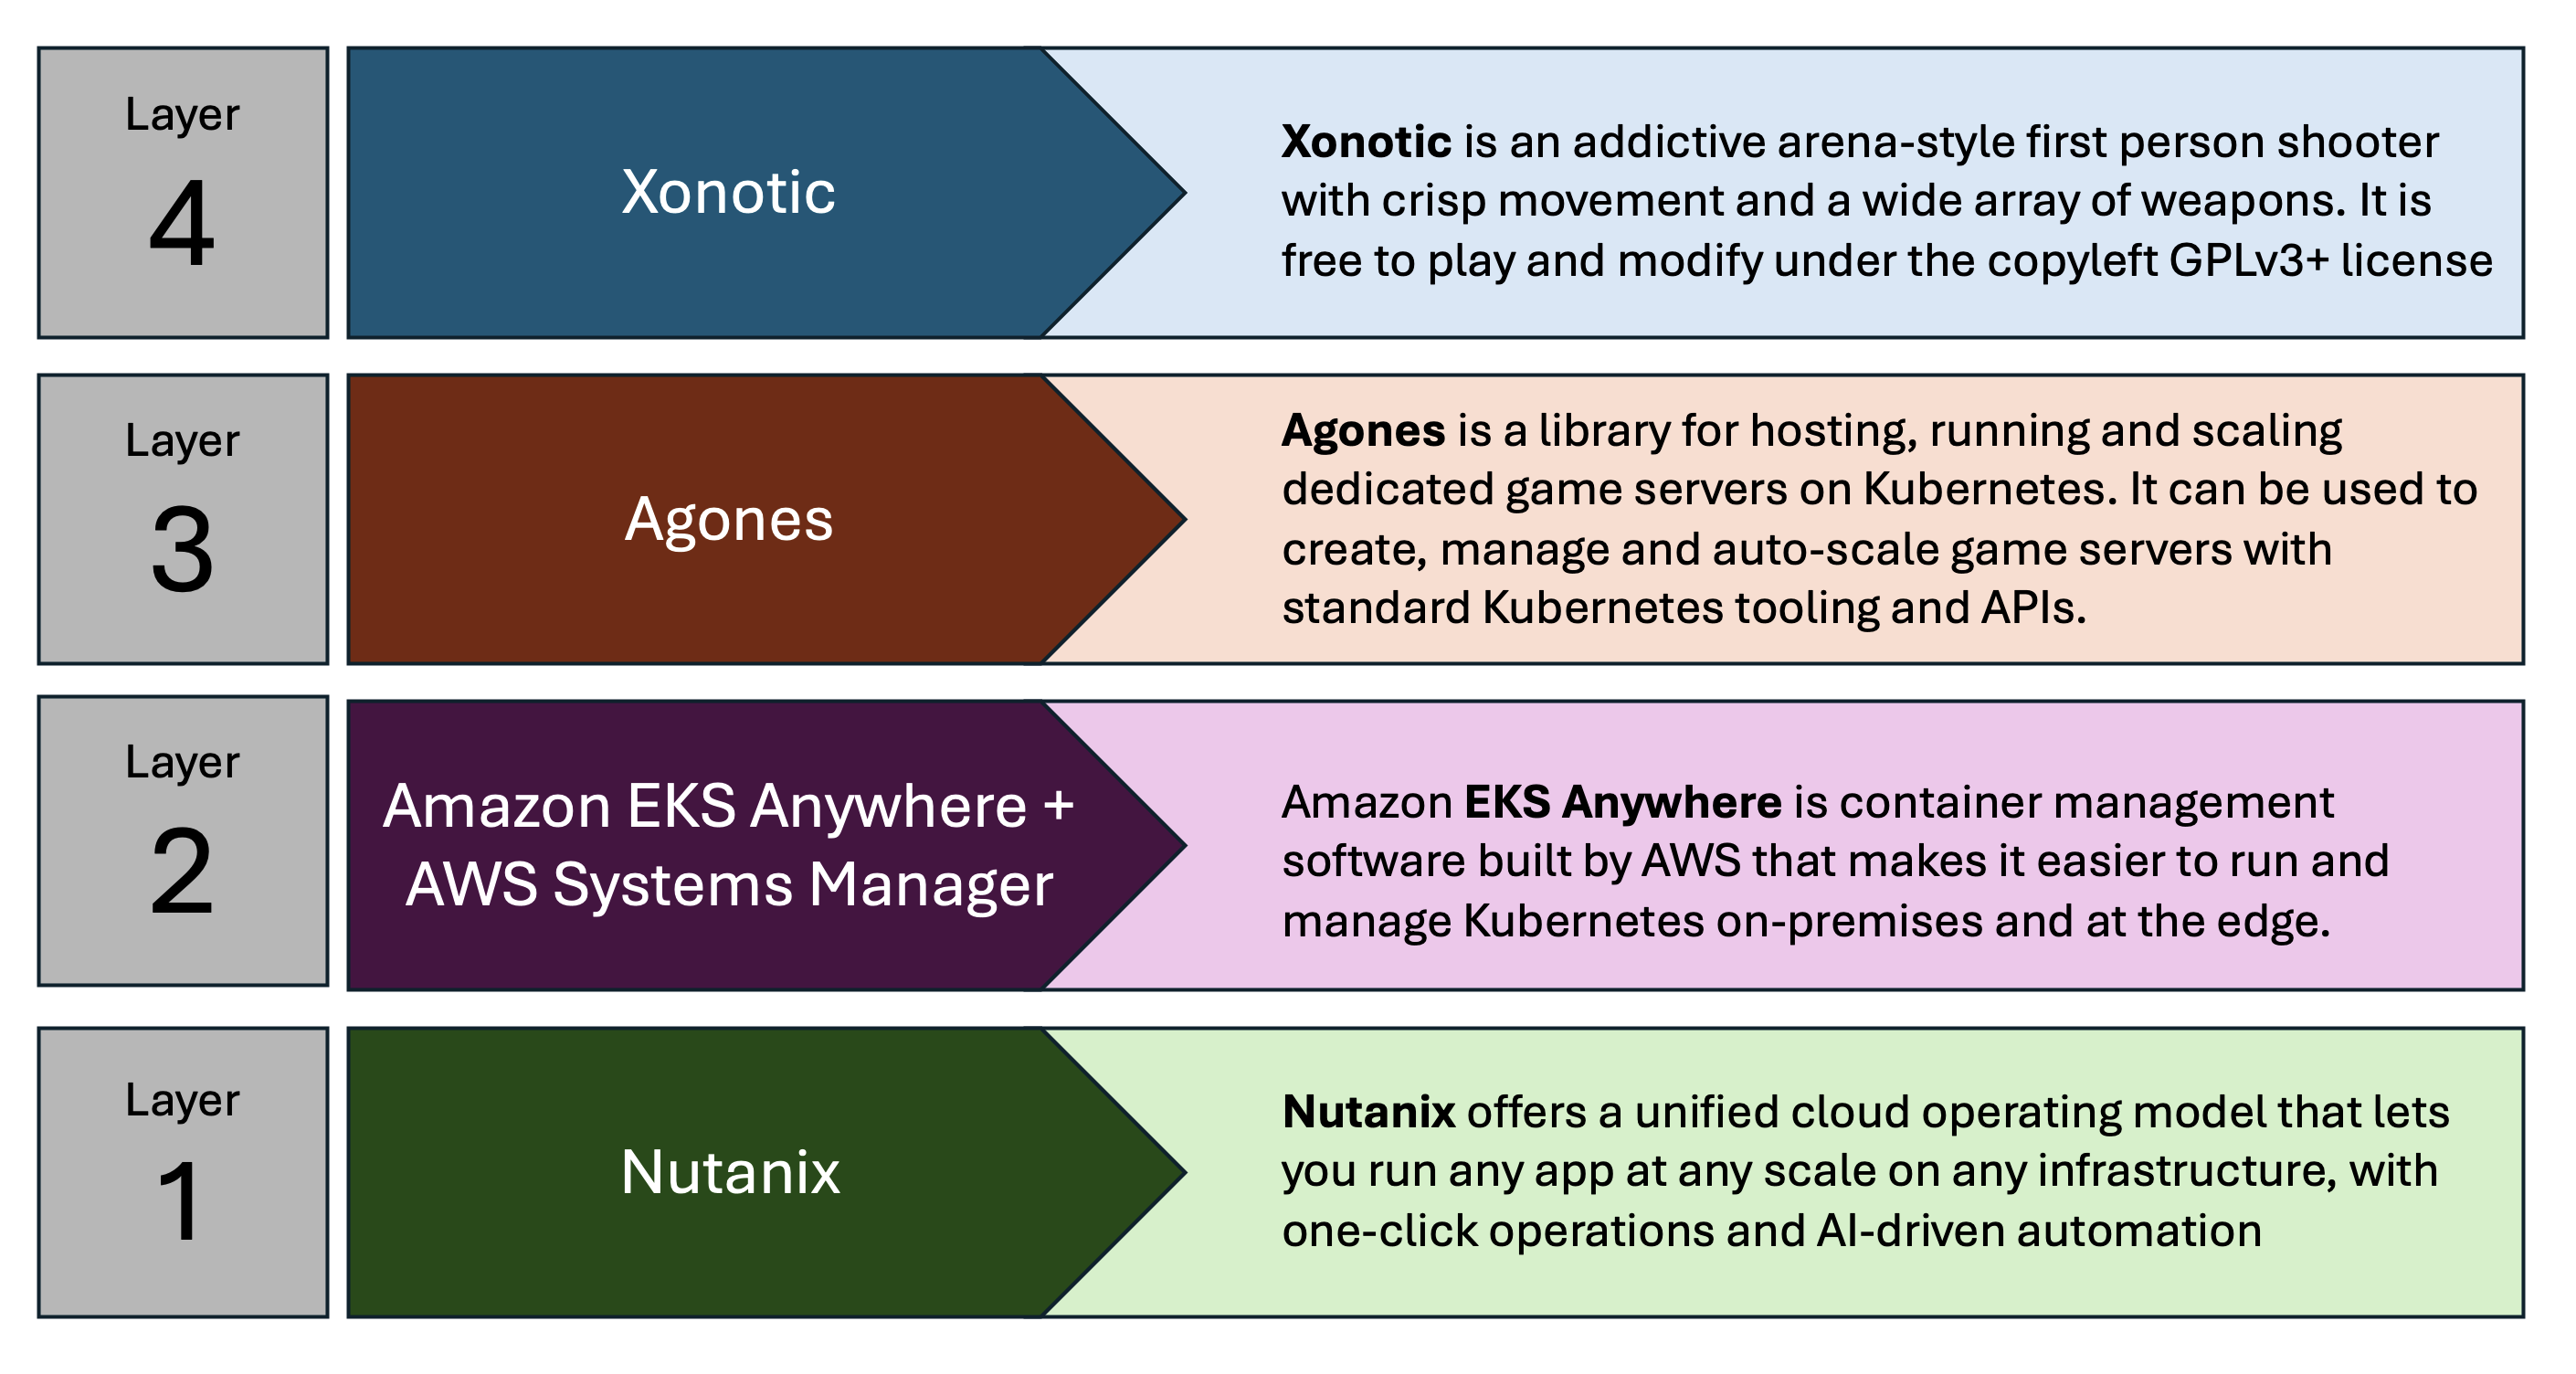
The game in question is Xonotic, which is a classic, fast-paced, multi-player shooting game based on the Quake engine. To deploy it we use Agones – a platform for running, scaling and orchestrate multi-player gaming containers on k8s.
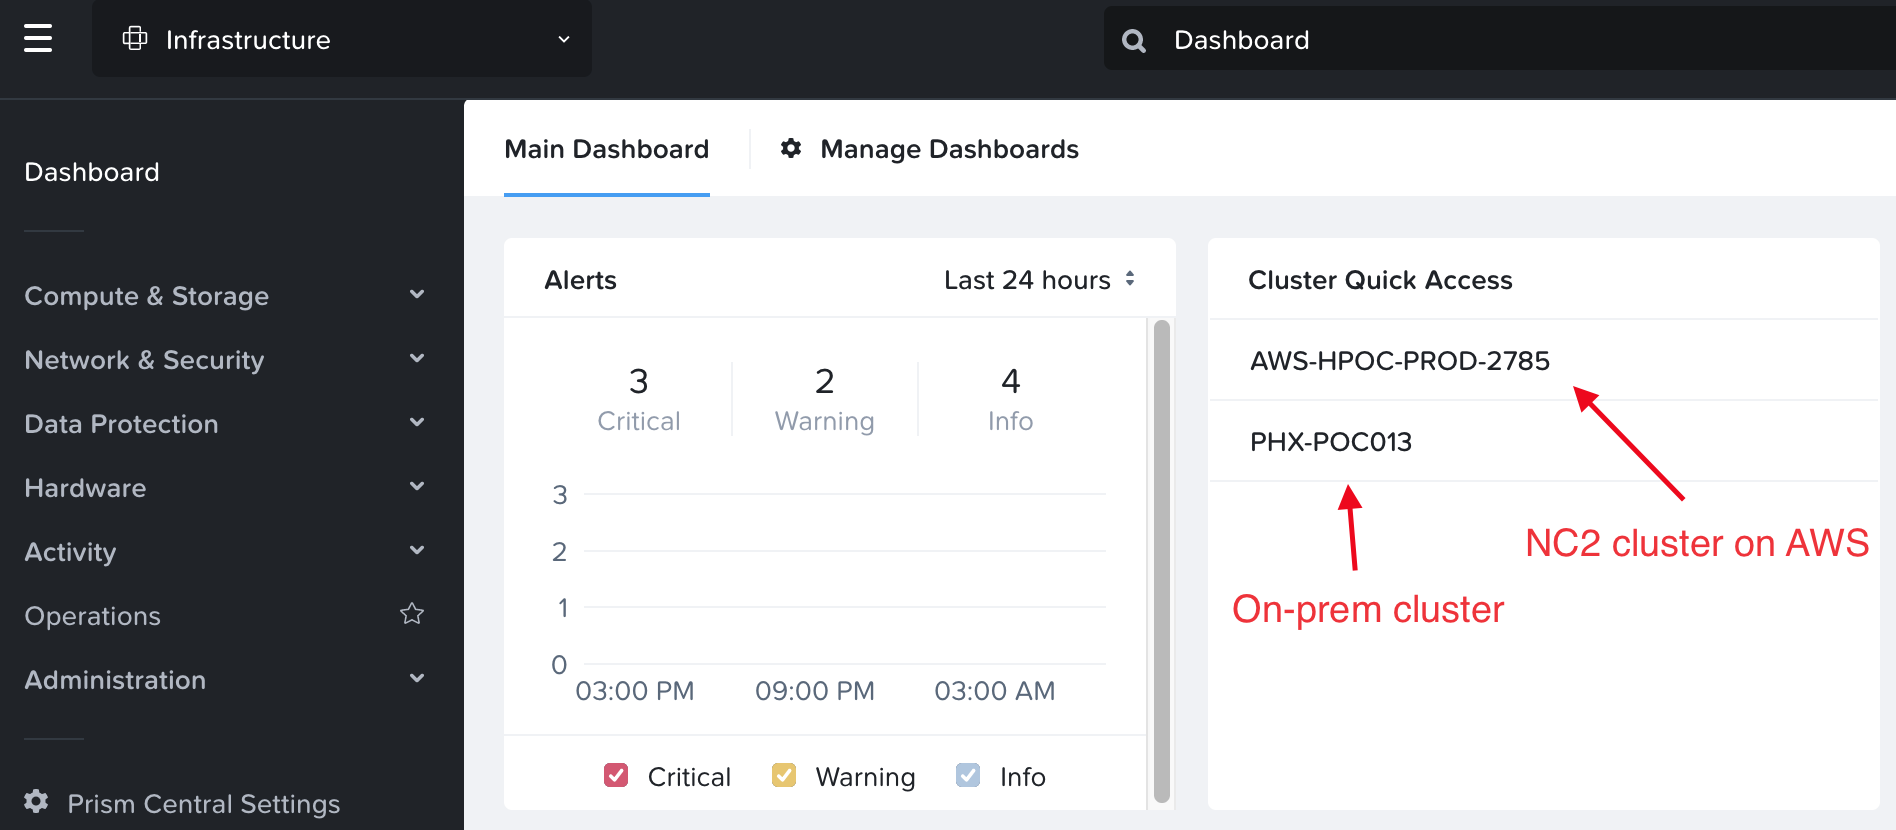
Agones, in turn, goes on top of EKS Anywhere which runs on a Nutanix cluster. In this case we have deployed a cluster in our Phoenix DC, which is also linked with a Nutanix NC2 cluster on AWS.
Nutanix clusters on-prem in Phoenix and in AWS are managed holistically through the Nutanix Prism Central management console. K8s management is done by registering the EKS Anywhere with the EKS service in AWS. K8s node management is done through SSM or Amazon Systems Manager.
Architecture
The two Nutanix clusters (on-prem and cloud) are linked via a Direct Connect line and can be managed holistically using private networking.
The gaming components are managed through standard the k8s toolset while EKS in the AWS console is used for monitoring of the cluster.
The k8s nodes run as virtual machines on Nutanix and each have the SSM (AWS Systems Manager) agent installed. This makes it possible to monitor the VMs, do patch management and even remote connectivity through the AWS console
Disclaimer: Inventory data from SSM can be sent to an S3 bucket, converted with Athena and then displayed in graphical form through Amazon Quicksight, as is shown to the right in the diagram. This guide doesn’t go through those particular steps, but they are well documented on the Amazon website.
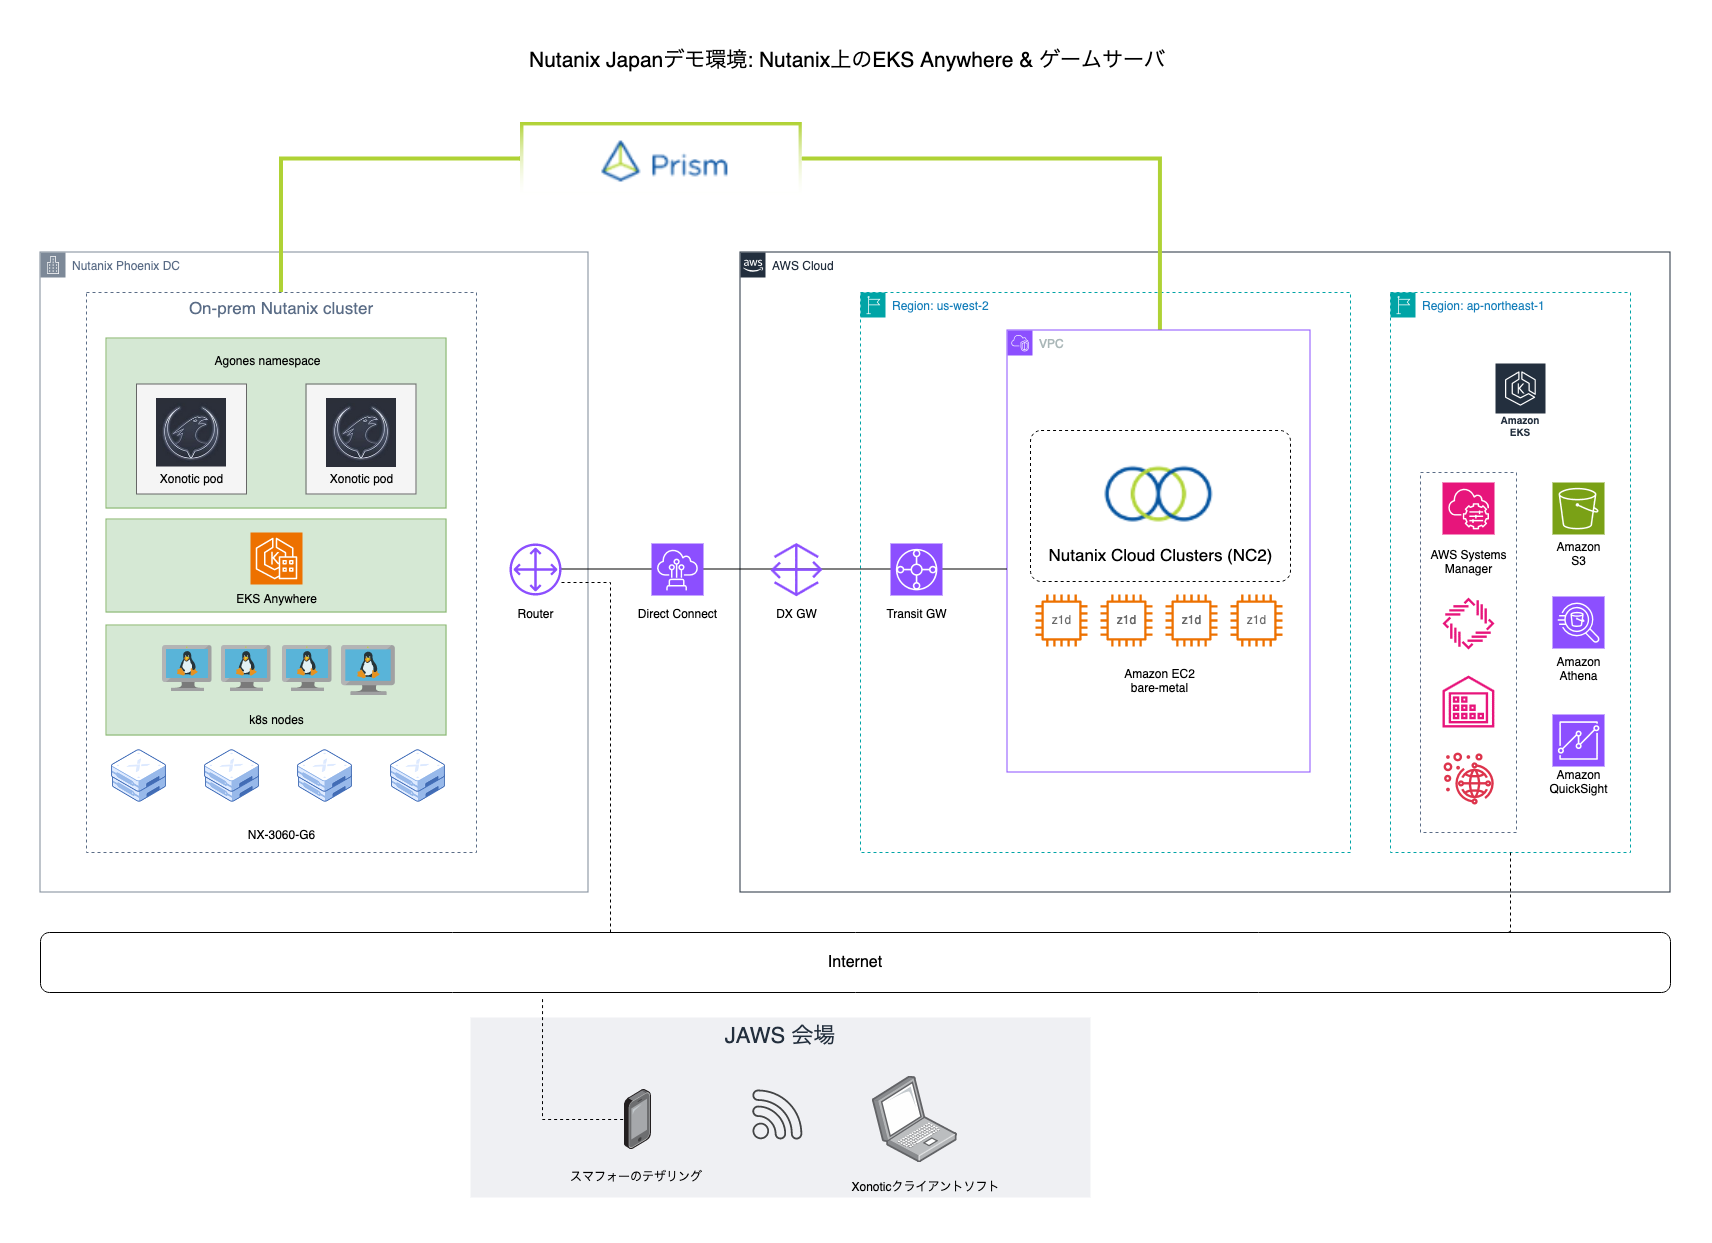
The EKS management and SSM connectivity is done to public AWS endpoints in this case, so it goes over the internet. It would also have been possible to do this over private networking through the DX connection, but I don’t have the IAM privileges to create anything new in the account NC2 is running in.
Overview of steps
The following steps will be covered while building the environment
| Step | Goal | Task |
|---|---|---|
| 1 | Holistic Nutanix cluster management | Prism Central download and configuration |
| 2 | Building EKS Anywhere node image #1 | Download and deploy Ubuntu 22.04 image |
| 3 | Building EKS Anywhere node image #2 | Create VM and follow image-builder steps |
| 4 | EKS Anywhere deployment | Run EKS Anywhere installer from Ubuntu |
| 5 | k8s cluster management | Register EKS Anywhere with AWS |
| 6 | k8s node management | Install SSM agent on EKS Anywhere nodes |
| 7 | Game platform orchestration | Installation of Agones platform |
| 8 | Game server deployment | Creation of Xonotic pods through Agones |
| 9 | Good-old fun! | Install the Xonotic client and go fragging! |
Step 1: Prism Central download and configuration
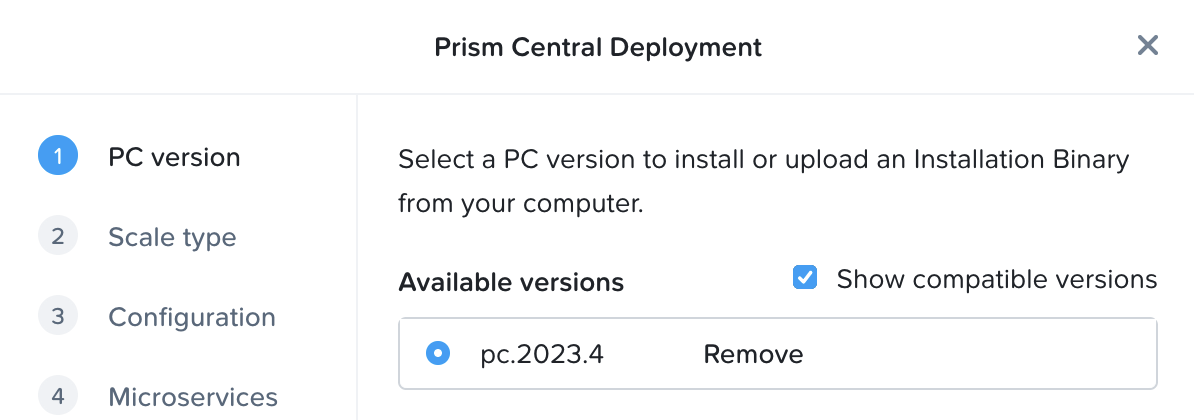
If not yet deployed, download and deploy Prism Central through the Prism Element UI as per the below.
Once Prism Central has been deployed, reset the admin password over the CLI. SSH to the Prism Central IP using the user “nutanix” and the password “nutanix/4u”. Reset the password using:
ncli user reset-password user-name=admin password=yourpasswordOn each cluster, register with Prism Central through the Prism Element UI. Once registered, the clusters show up in Prism Central as per the below
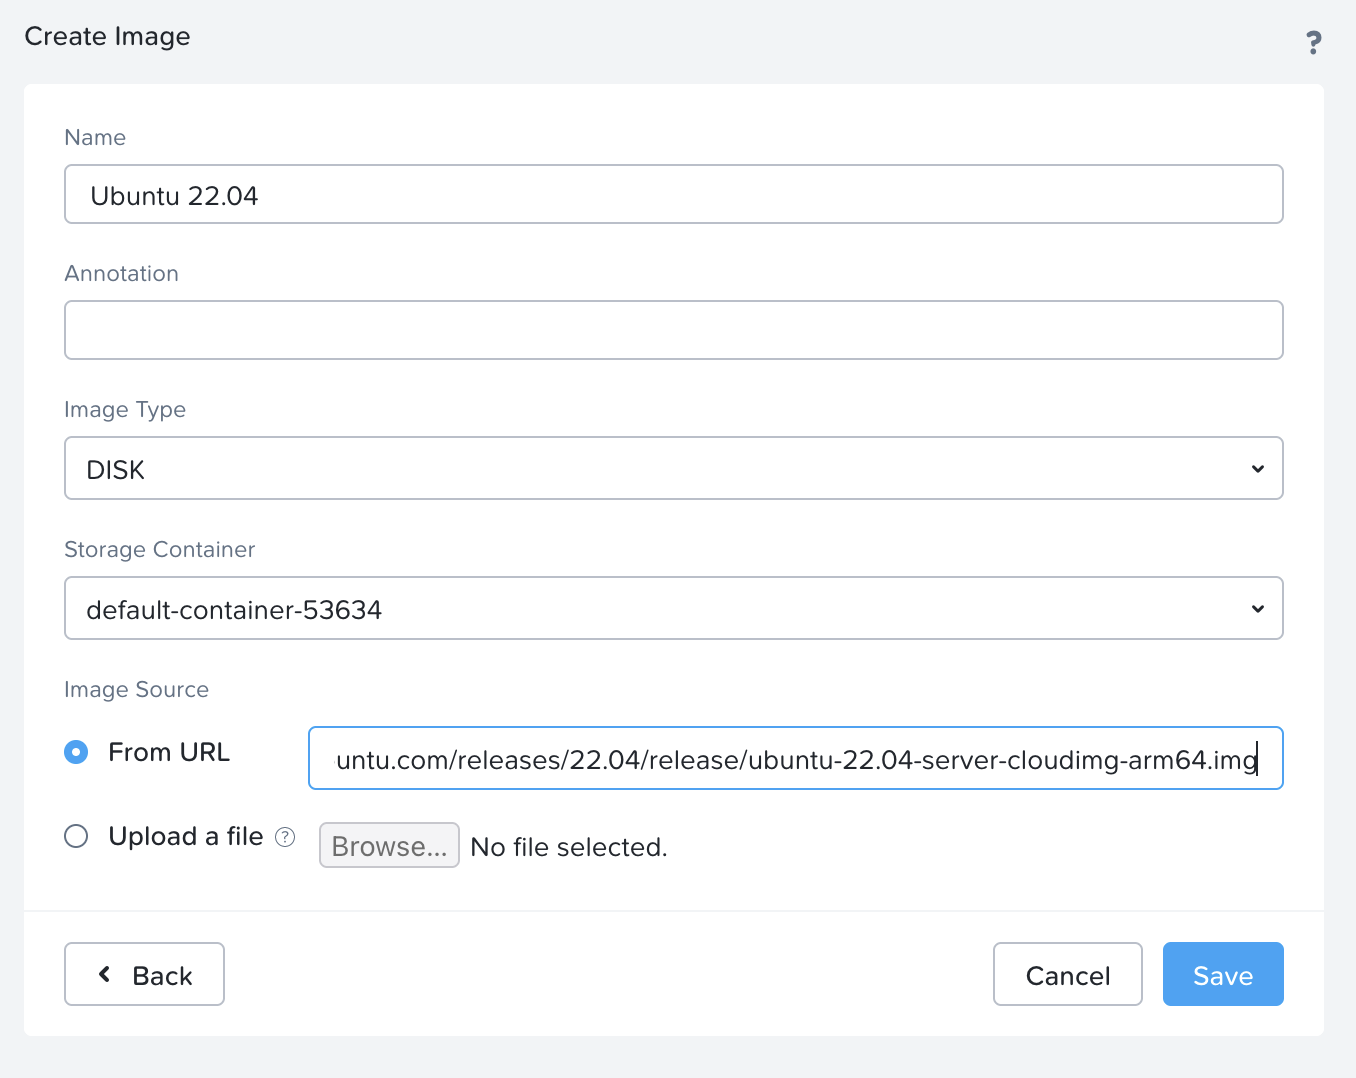
Step 2: Download and deploy Ubuntu 22.04 image
From the Ubuntu website, copy the URL to the Ubuntu image (Jammy Jellyfish) from here:
https://cloud-images.ubuntu.com/releases/22.04/release/
Be sure to pick the ubuntu-22.04-server-cloudimg-amd64.img and not the disk-kvm image as the kvm image won’t boot.
Add it as a DISK image from URL in the Nutanix web UI:
Step 3: Create VM and follow image-builder steps
Use the image to create a new Ubuntu VM.
- I used 2 CPUs with 2 cores each and 8 Gb of RAM.
- Delete the CD-ROM drive
- Add a NIC.
- Set the disk to clone from the image created above
- Set boot mode to UEFI rather than the default BIOS.
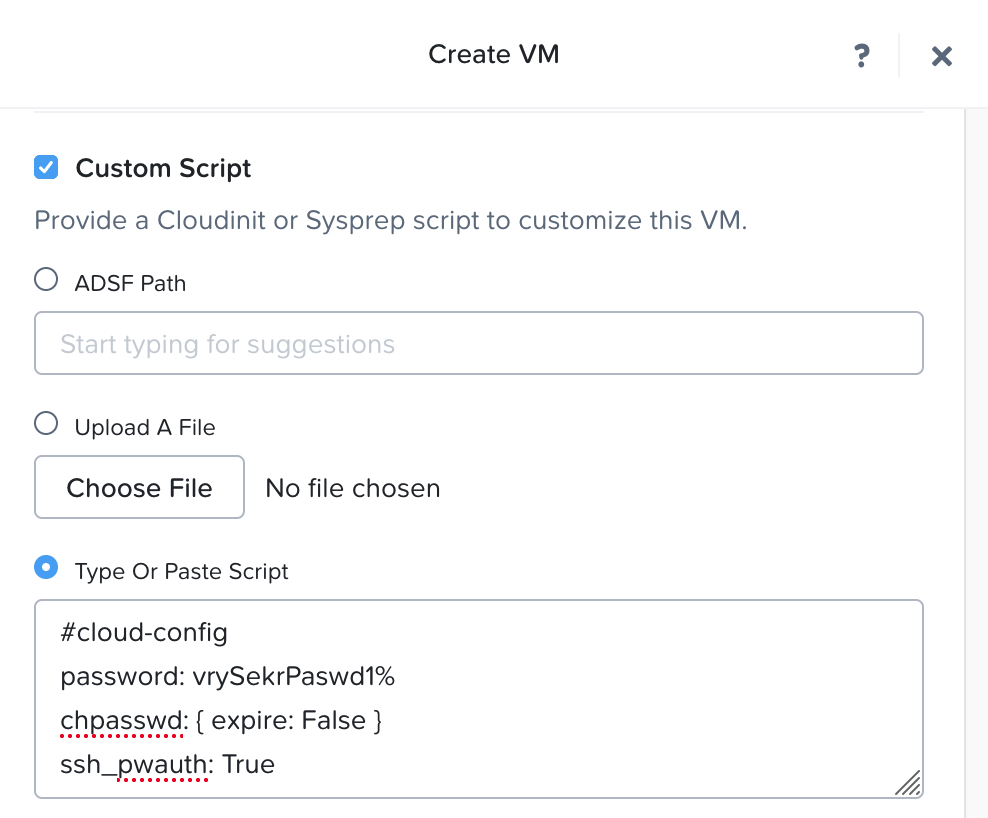
When given the option to add a Custom Script, add a cloud init snippet as per the below to enable SSH (with password rather than key) and set your password
#cloud-config
password: vrySekrPaswd1%
chpasswd: { expire: False }
ssh_pwauth: True
Disk update: You’ll note that the disk created from the image is very small – just 2.2 Gb. Changing the disk size during VM creation isn’t supported, but it can be made larger afterwards. Just accept the size for now and update the disk size once the VM shows up in the inventory. I set mine to 50 Gb.
Don’t start the VM just yet. First we want to add a serial port to the VM through the Nutanix CLI. SSH to any CVM in the cluster and issue the below command:
acli vm.serial_port_create <VM_NAME> index=0 type=kNullIn my case that looks like
nutanix@NTNX-16SM6B260127-C-CVM:10.11.22.31:~$ acli vm.serial_port_create ubuntu-k8s-image-builder index=0 type=kNull
VmUpdate: pending
VmUpdate: complete
nutanix@NTNX-16SM6B260127-C-CVM:10.11.22.31:~$
Now we can power on the VM and log in over SSH using the password set through the cloud init script.
For the image creation, there are official instructions from AWS here. However, I found that some of the official steps needed to be modified to work. Please refer to the below if you want to do the same as I used when creating the image:
As user “ubuntu” on the image-builder VM:
sudo adduser image-builder
sudo usermod -aG sudo image-builder
sudo su - image-builder
Now we have switched to the “image-builder” user and continue the process:
sudo apt install python3-pip -y
pip3 install --user ansible-core==2.15.9
export PATH=$PATH:/home/image-builder/.local/bin
cd /tmp
BUNDLE_MANIFEST_URL=$(curl -s https://anywhere-assets.eks.amazonaws.com/releases/eks-a/manifest.yaml | yq ".spec.releases[] | select(.version==\"$EKSA_RELEASE_VERSION\").bundleManifestUrl")
IMAGEBUILDER_TARBALL_URI=$(curl -s $BUNDLE_MANIFEST_URL | yq ".spec.versionsBundles[0].eksD.imagebuilder.uri")
curl -s $IMAGEBUILDER_TARBALL_URI | tar xz ./image-builder
sudo install -m 0755 ./image-builder /usr/local/bin/image-builder
cd
Now a “which image-builder” should show the binary installed in /usr/local/bin as per the below
image-builder@ubuntu:~$ which image-builder
/usr/local/bin/image-builder
Also, a “which ansible” should show it installed in the local user directory as follows:
image-builder@ubuntu:~$ which ansible
/home/image-builder/.local/bin/ansible

image-builder@ubuntu:~$ ansible --version
ansible [core 2.15.9]
Now we create the “nutanix.json” file to enable image-builder to use our Prism Central to create our k8s image
cat > nutanix.json
{
  "nutanix_cluster_name": "YOUR-CLUSTER-NAME",
  "nutanix_subnet_name": "YOUR-SUBNET",
  "nutanix_endpoint": "PRISM-CENTRAL-IP",
  "nutanix_insecure": "true",
  "nutanix_port": "PRISM-CENTRAL-PORT (DEFAULT 9440)",
  "nutanix_username": "admin",
  "nutanix_password": "PRISM-CENTRAL-PASSWORD"
}
Now we are ready to execute image-builder and create the image. In this case we create an image for version 1.28. This will take around 10 minutes to complete
image-builder build --os ubuntu --hypervisor nutanix --release-channel 1-28 --nutanix-config nutanix.jsonOnce complete you should be greeted with the following message:
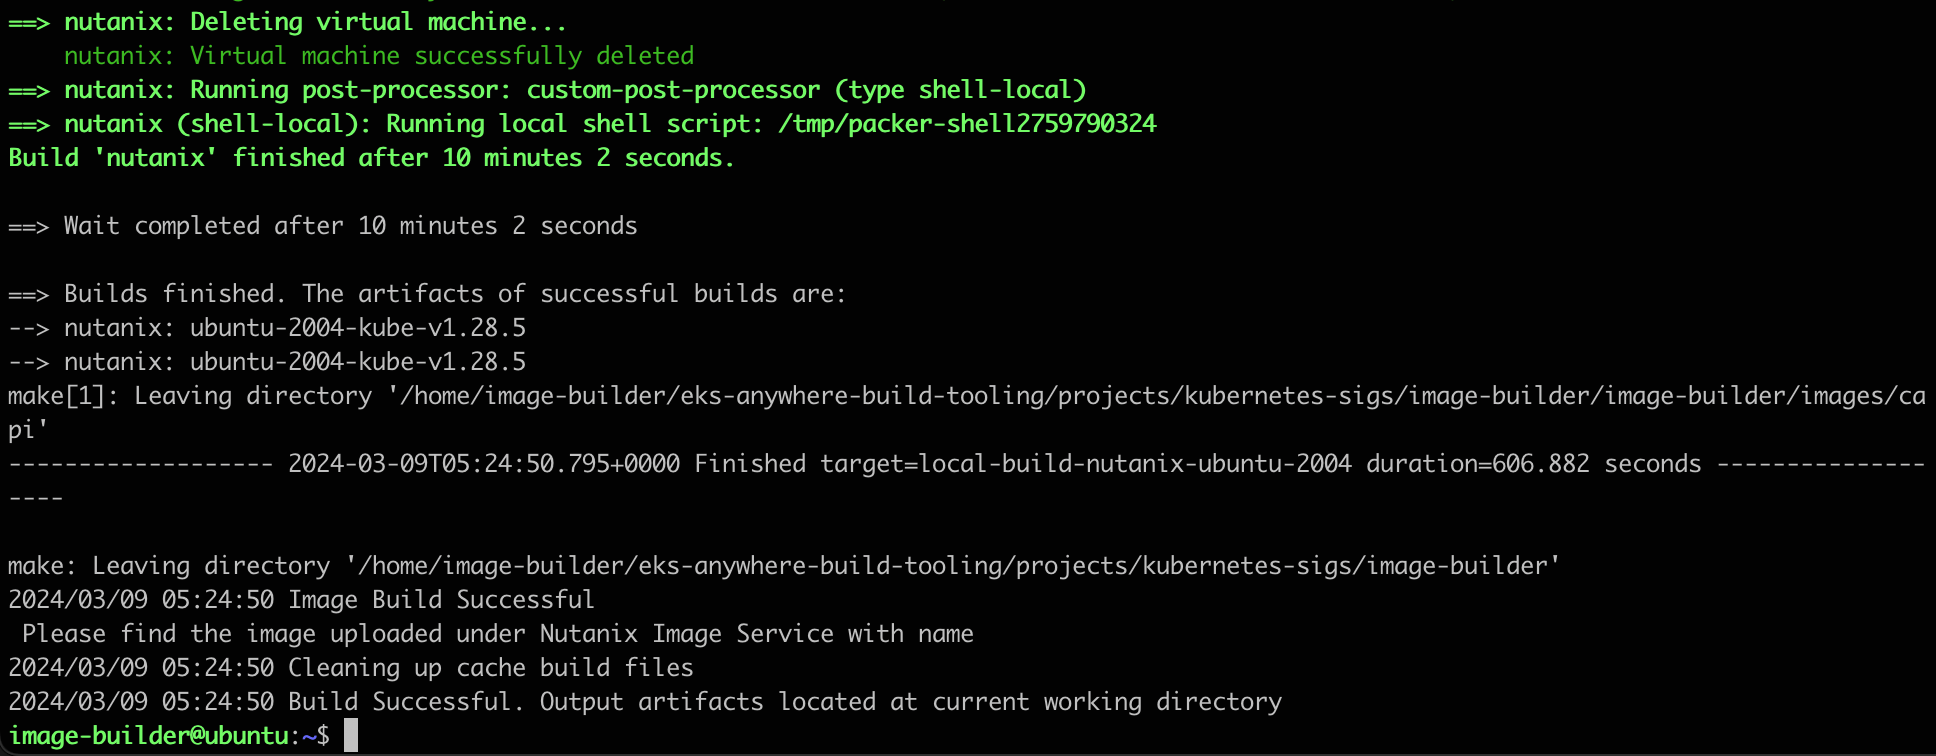
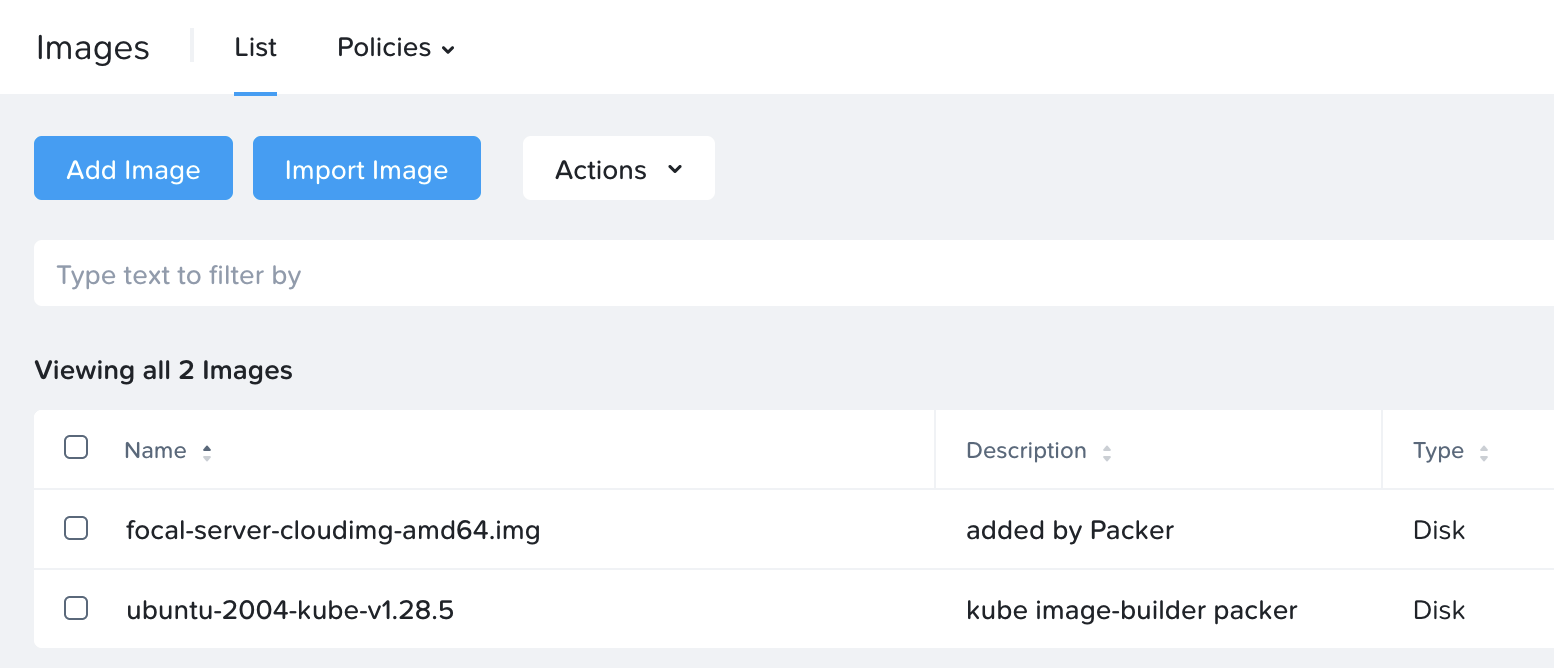
In the list of images in Prism, the new k8s image will show up as follows
Step 4: EKS Anywhere deployment
Now we have an image and are ready to start deploying EKS Anywhere …. well, almost. First we create a configuration file which then is used as the template for the deployment.
Install Docker:
Official instructions can be found here: https://docs.docker.com/engine/install/ubuntu/
After the install, add the “image-builder” user to the docker group so we can use docker without “sudo”
sudo usermod -aG docker image-builderLog out and back in again for the group change to take effect, then test as follows
image-builder@ubuntu:~$ docker ps -a
CONTAINER ID   IMAGE     COMMAND   CREATED   STATUS    PORTS     NAMES
Install eksctl, eksctl-anywhere and kubectl
Official instructions can be found here: https://anywhere.eks.amazonaws.com/docs/getting-started/install/
Create a cluster-config.yaml file
eksctl anywhere generate clusterconfig AWESOME-CLUSTER-NAME --provider nutanix > cluster-config.yamlEdit the cluster-config.yaml file to adjust to your local environment
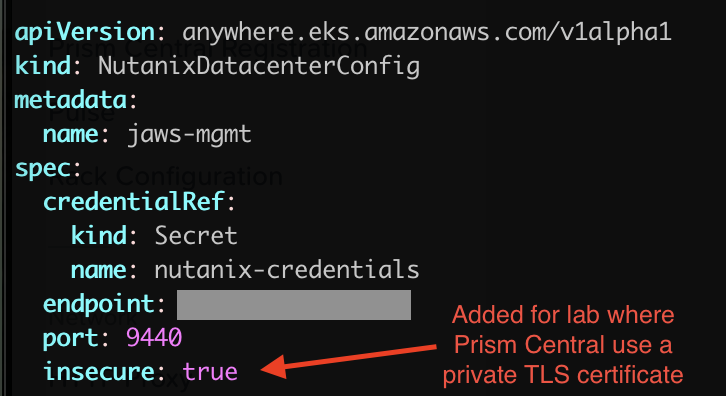
Update the cluster-config.yaml file created in the previous step to point to the Prism Central environment you’d like to use. For a lab environment you may also want to disable TLS certificate check. Official instructions for how to modify the file are listed here.
The entire file is too long to upload here, but the fields I’ve modified are:
| Key | Value |
|---|---|
| controlPlaneConfiguration.count | 3 |
| controlPlaneConfiguration.endpoint.host | Floating IP to use for control plane VM |
| kubernetesVersion | 1.28 (to match with the image built) |
| workerNodeGroupConfigurations.count | 3 |
| spec.endpoint | Prism Central IP / FQDN |
| spec.insecure | true (spec.insecure is a new entry) |
| spec.cluster.name | Prism Element cluster name |
| spec.image.name | Name of k8s image created earlier |
| spec.subnet.name | Name of subnet to use for k8s nodes |
| spec.users.name.sshAuthorizedKeys | Copy and paste your RSA SSH key here |
Quick screenshot showcasing the addition of the “spec.insecure” parameter for lab clusters without a valid SSH/TLS cert:
Deploying the cluster
First export the credentials to Prism Central as per the below:
image-builder@ubuntu:~$ export EKSA_NUTANIX_USERNAME="admin"
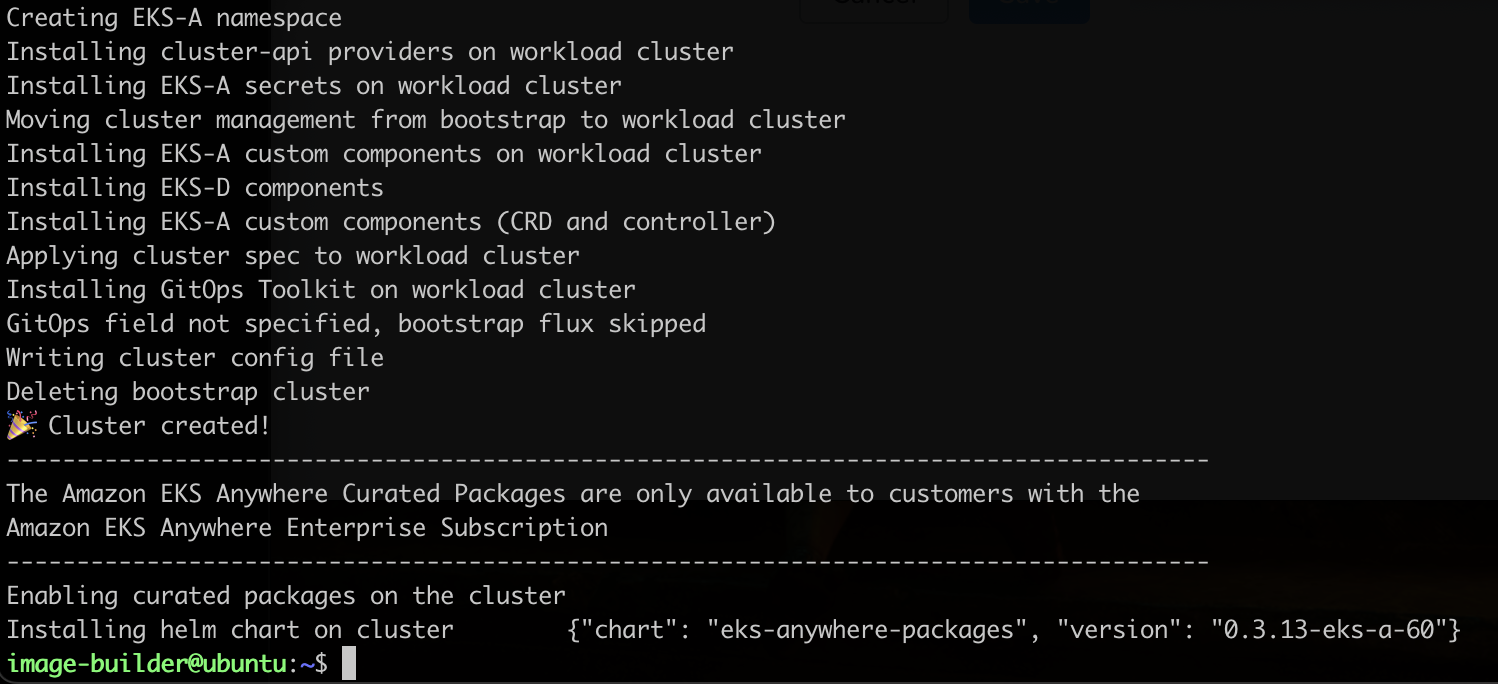
image-builder@ubuntu:~$ export EKSA_NUTANIX_PASSWORD="PRISM-CENTRAL-PWD"Now are are ready to deploy with the cluster-config.yaml file as our template
eksctl anywhere create cluster -f cluster-config.yamlAfter a successful deployment, the below will be shown:
Get the credentials for your cluster
export KUBECONFIG=${PWD}/YOUR-CLUSTER-NAME/YOUR-CLUSTER-NAME-eks-a-cluster.kubeconfigList the k8s nodes and their IP addresses
kubectl get nodes -o wide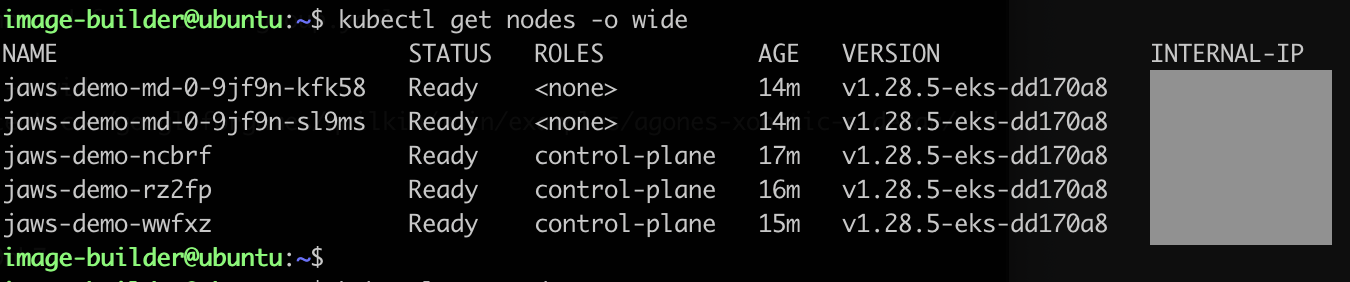
Step 5: Register EKS Anywhere with AWS
First we need the aws cli installed and configured with an access key and a secret access key
sudo apt install awscliThen configure with your credentials
aws configureGenerate the EKS connector configuration files
eksctl register cluster --name YOUR-CLUSTER-NAME --provider EKS_ANYWHERE --region YOUR-REGIONThis will generate three yaml files like so
image-builder@ubuntu:~/EKS-A$ ls -1
eks-connector-clusterrole.yaml
eks-connector-console-dashboard-full-access-group.yaml
eks-connector.yaml
image-builder@ubuntu:~/EKS-A$
Then apply the configuration files with kubectl
kubectl apply -f CONFIG-FILE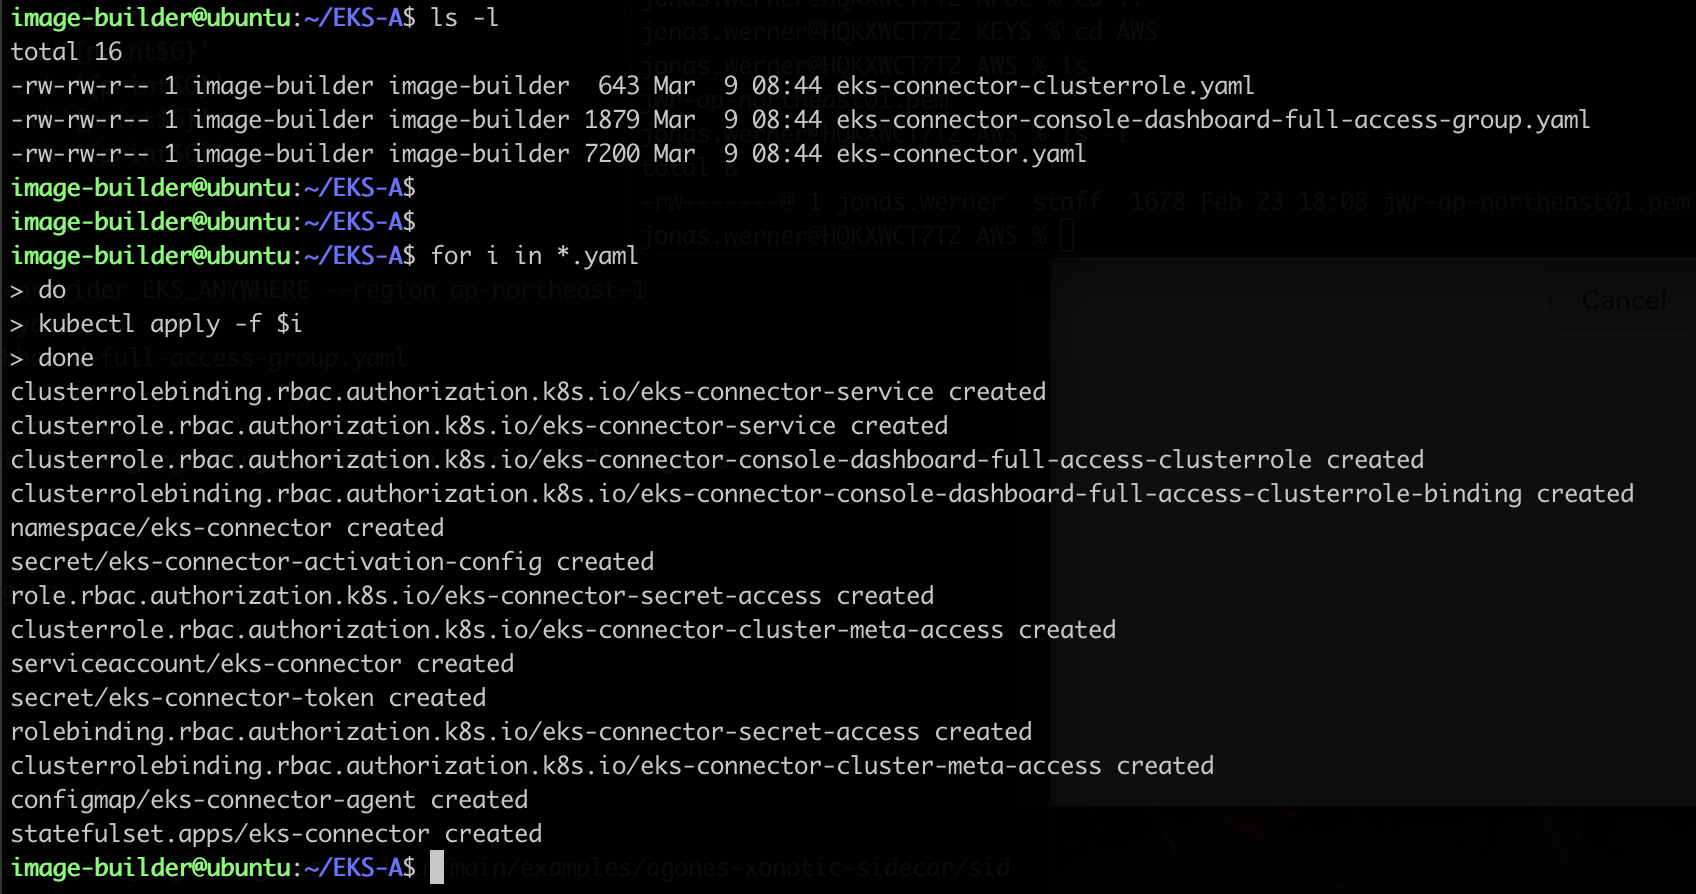
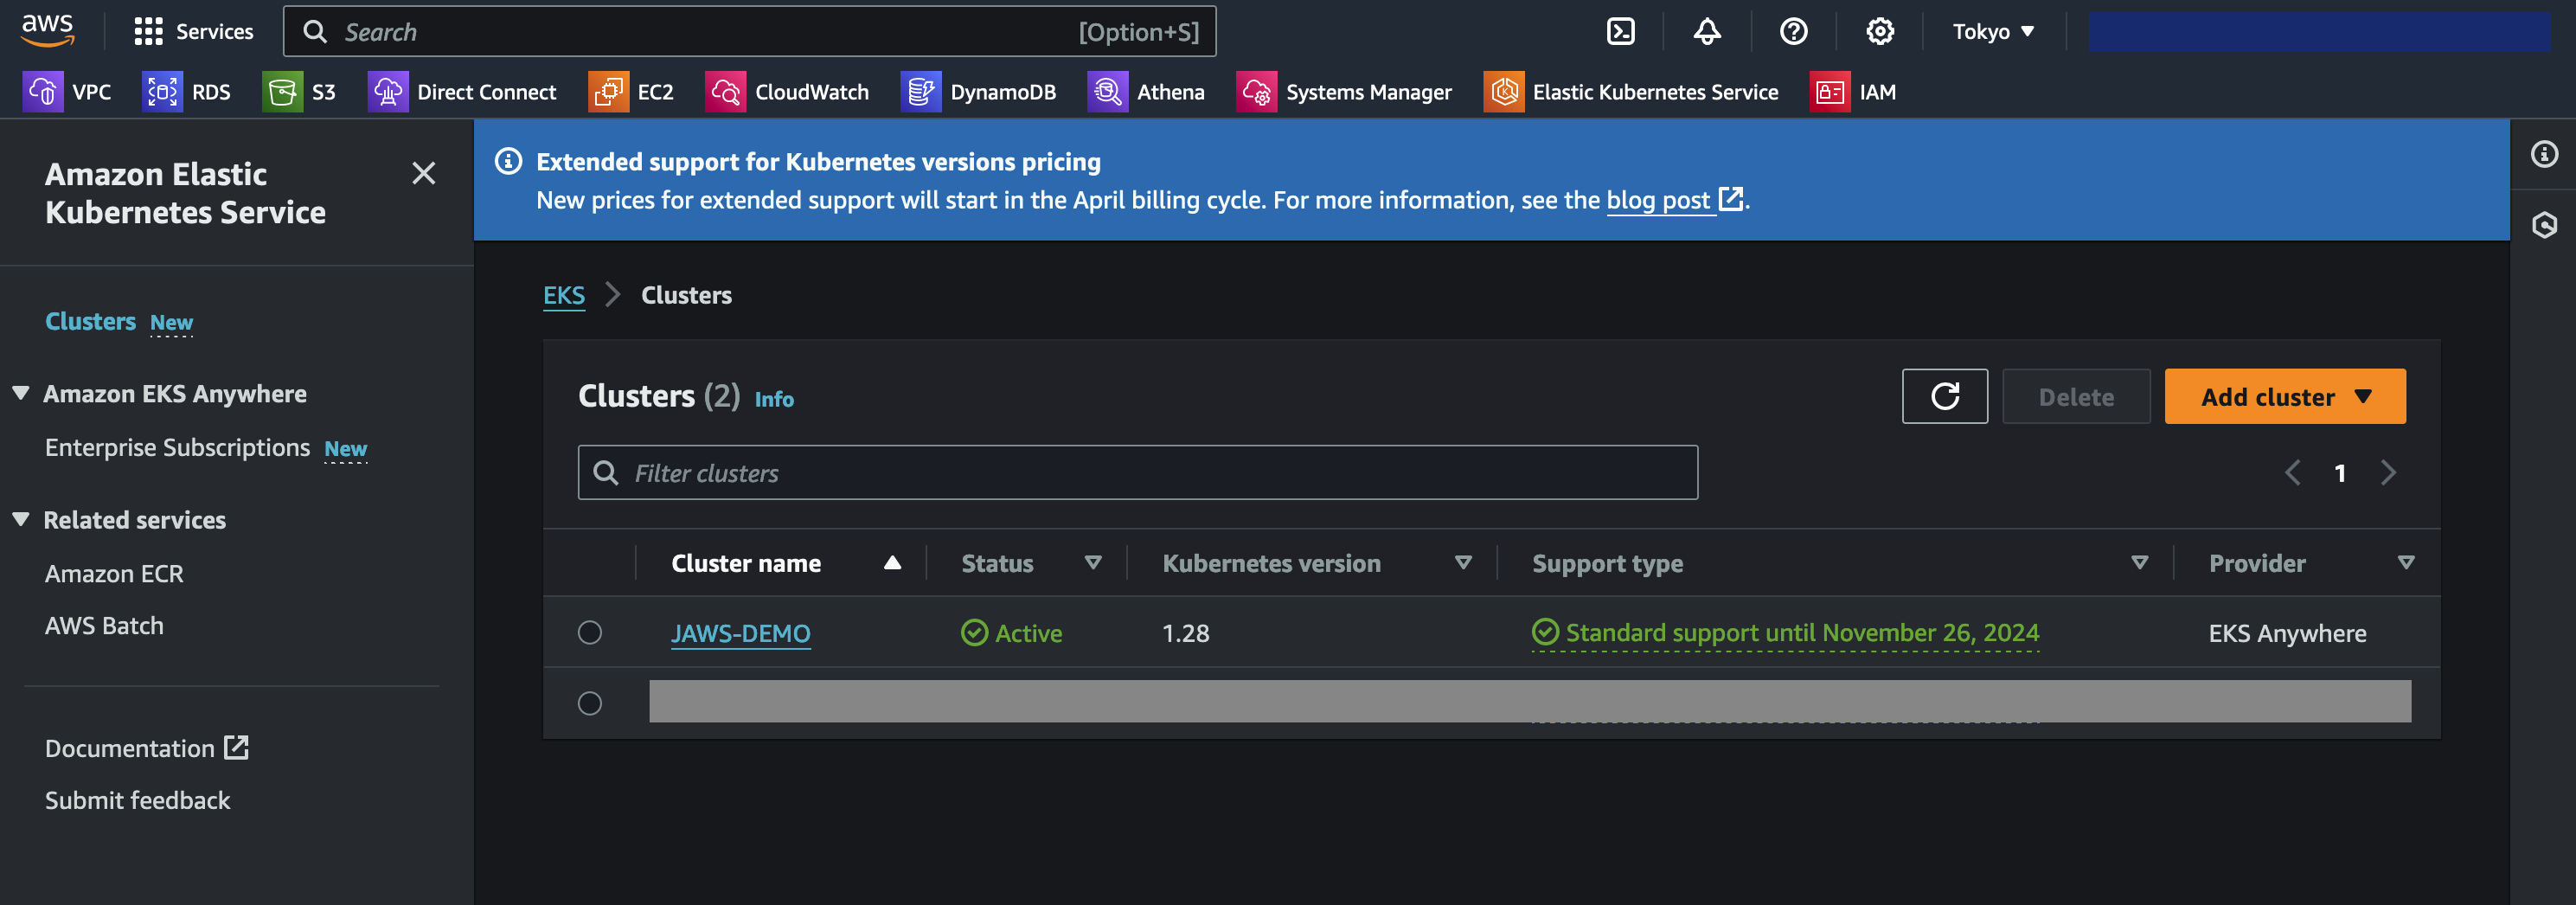
Access the AWS console, navigate to Amazon Elastic Kubernetes Service and verify that the cluster shows up as it should. Ensure you are in the region you selected when generating the yaml config files
Click the cluster name , go to the Resources tab and select Pods. Here you filter to find the Xonotic game pods as per the below

Step 6: Install SSM agent on EKS Anywhere nodes
With the AWS Systems Manager agent installed, it is possible to monitor the k8s cluster nodes, get their software inventory, do patch management, remote access and various other things
The first thing we do is to create a managed node activation in the AWS Console. Navigate to Systems Manager and select Hybrid Activations. Be sure to pick the right region.
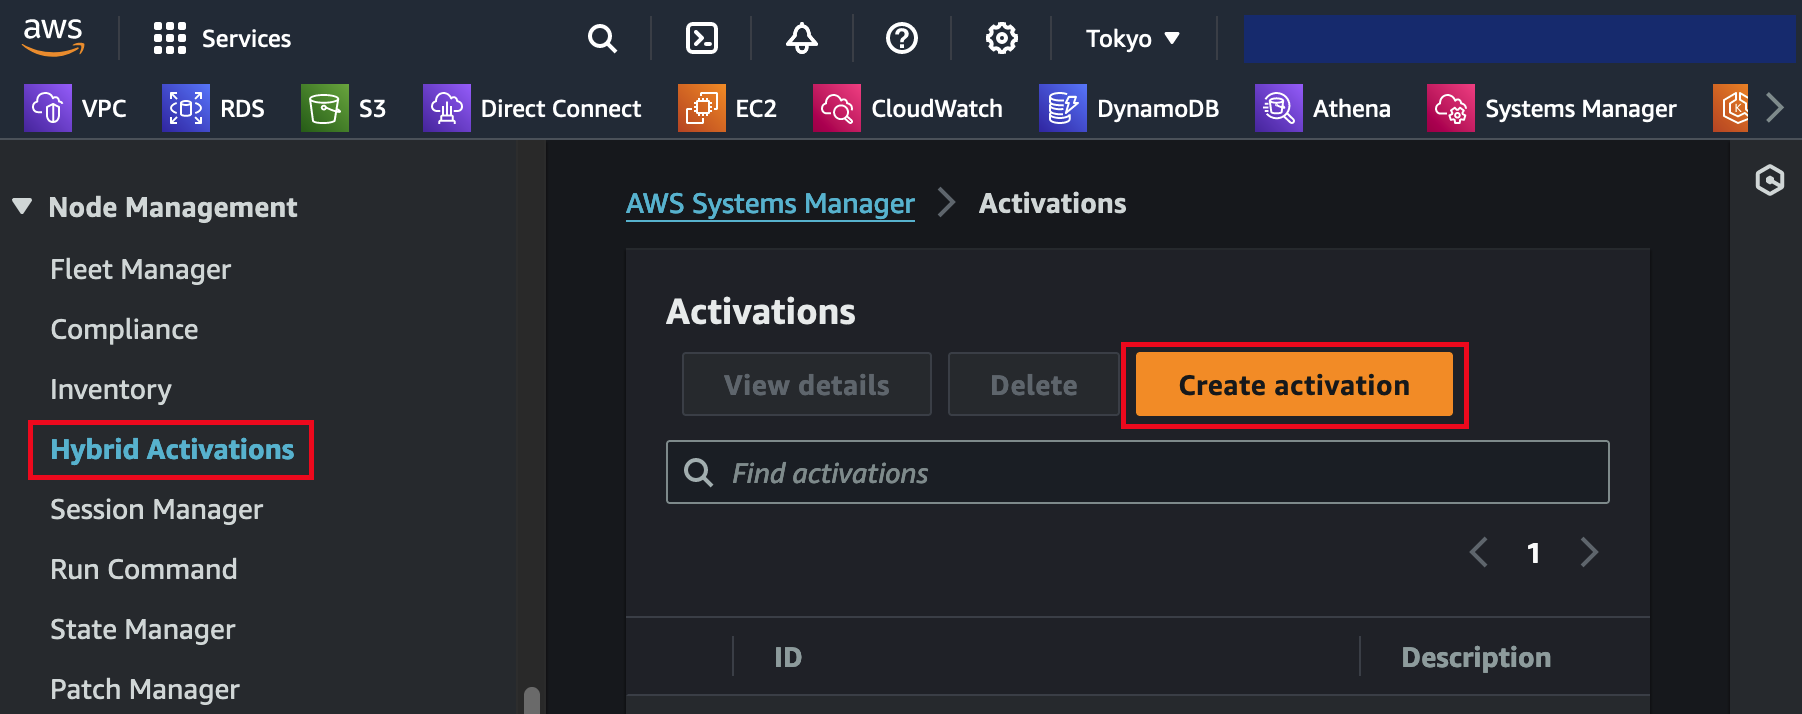
Save the resulting activation details as they are used when registering installing the SSM agent and registering the the k8s nodes
For the agent installation and registration, please follow the official guide here:
https://docs.aws.amazon.com/systems-manager/latest/userguide/sysman-install-managed-linux.html
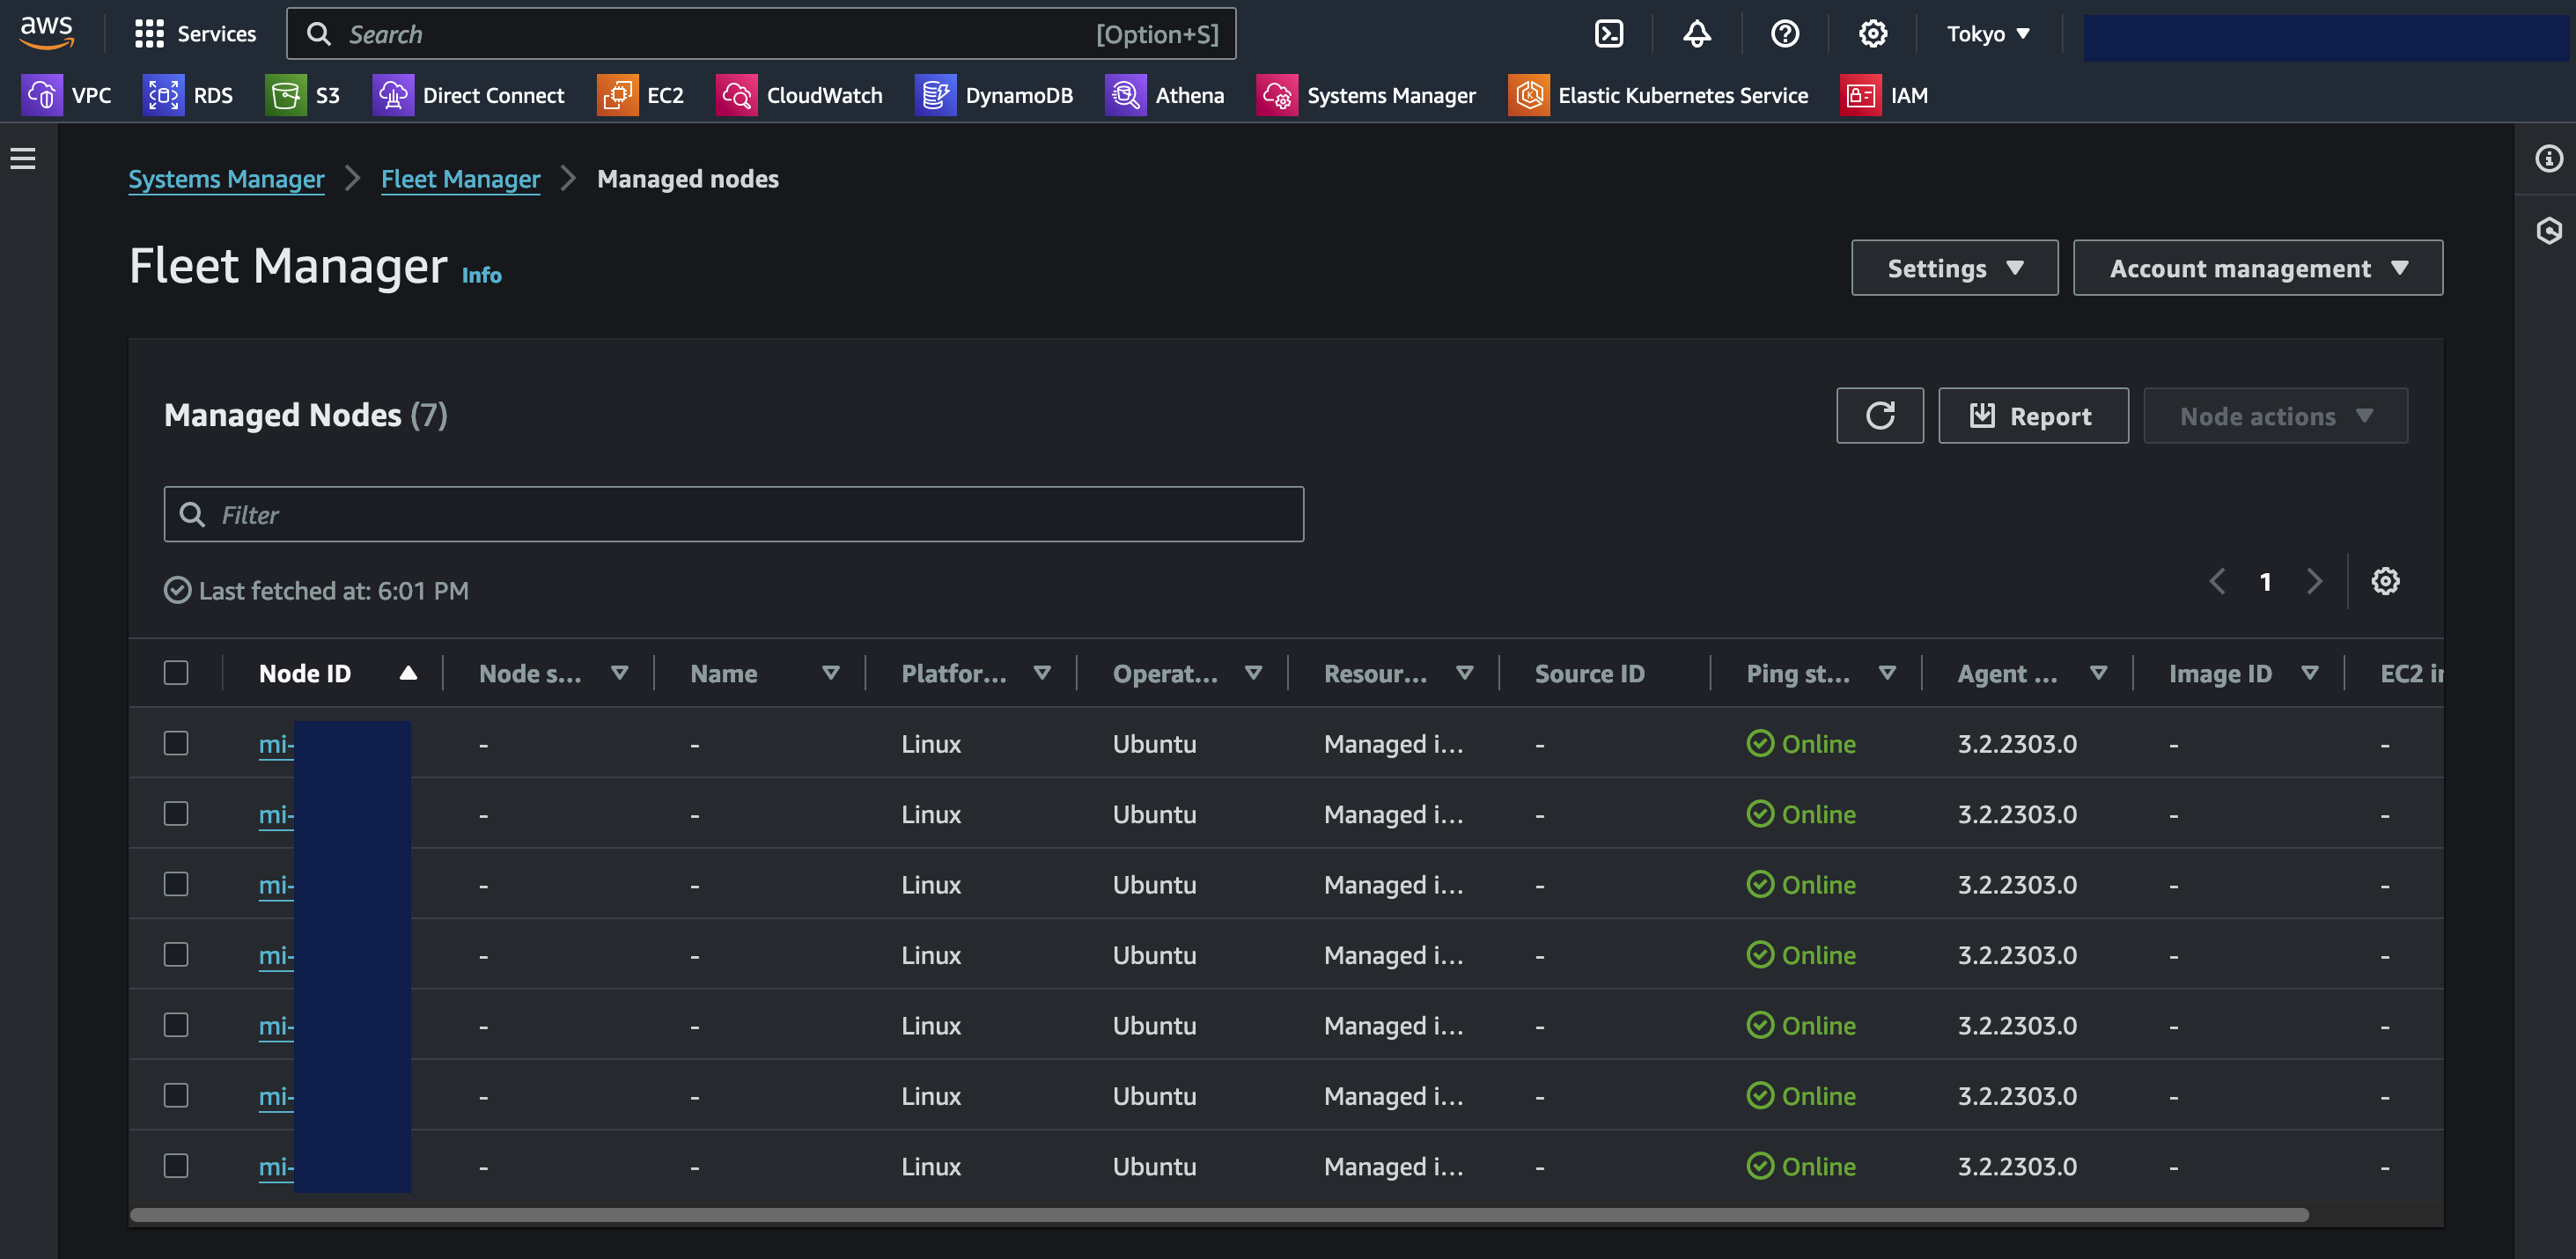
Once the agent is installed and registered, the nodes will show up in SSM as per the below
Step 7: Installation of Agones platform
First of all, install helm so we can use helm charts
sudo snap install helm --classicAdd the Agones repo, update and install
helm repo add agones https://agones.dev/chart/stable
helm repo update
helm install v1.38.0 --namespace agones-system --create-namespace agones/agones
Verify the Agones install by listing the pods
kubectl --namespace agones-system get pods -o wide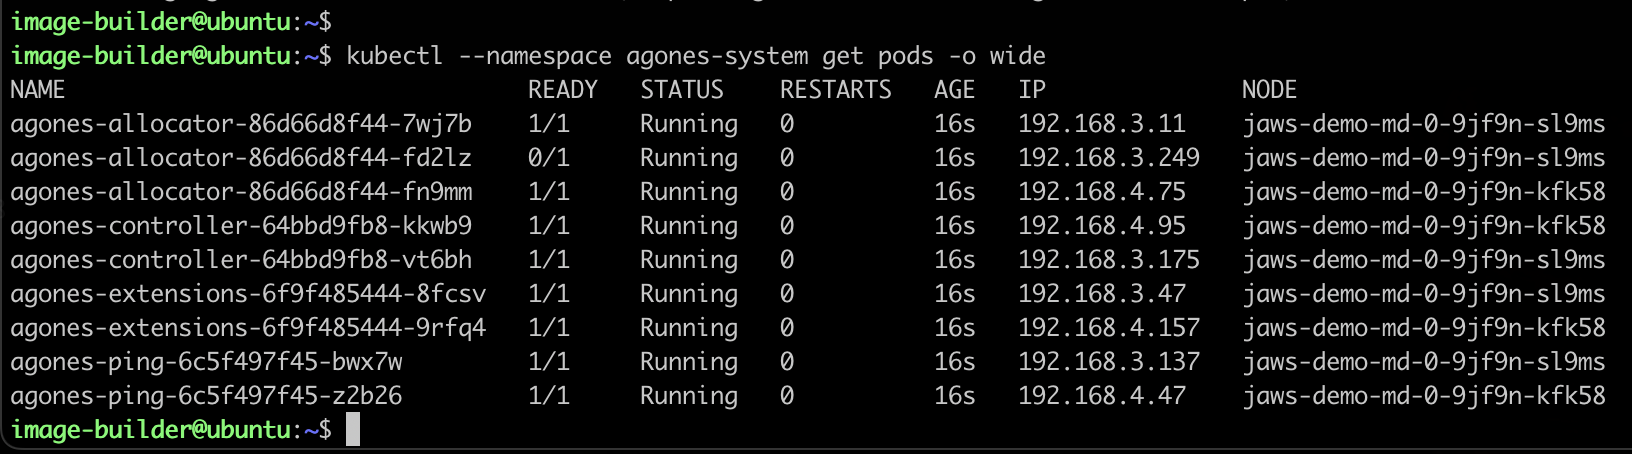
Step 8: Creation of Xonotic pods through Agones
Now when we have the Agones game orchestration platform running, all we need to do is to deploy the actual game containers into it thusly
kubectl apply -f https://raw.githubusercontent.com/googleforgames/quilkin/main/examples/agones-xonotic-sidecar/sidecar.yamlWe can now list the game servers
kubectl get gameservers
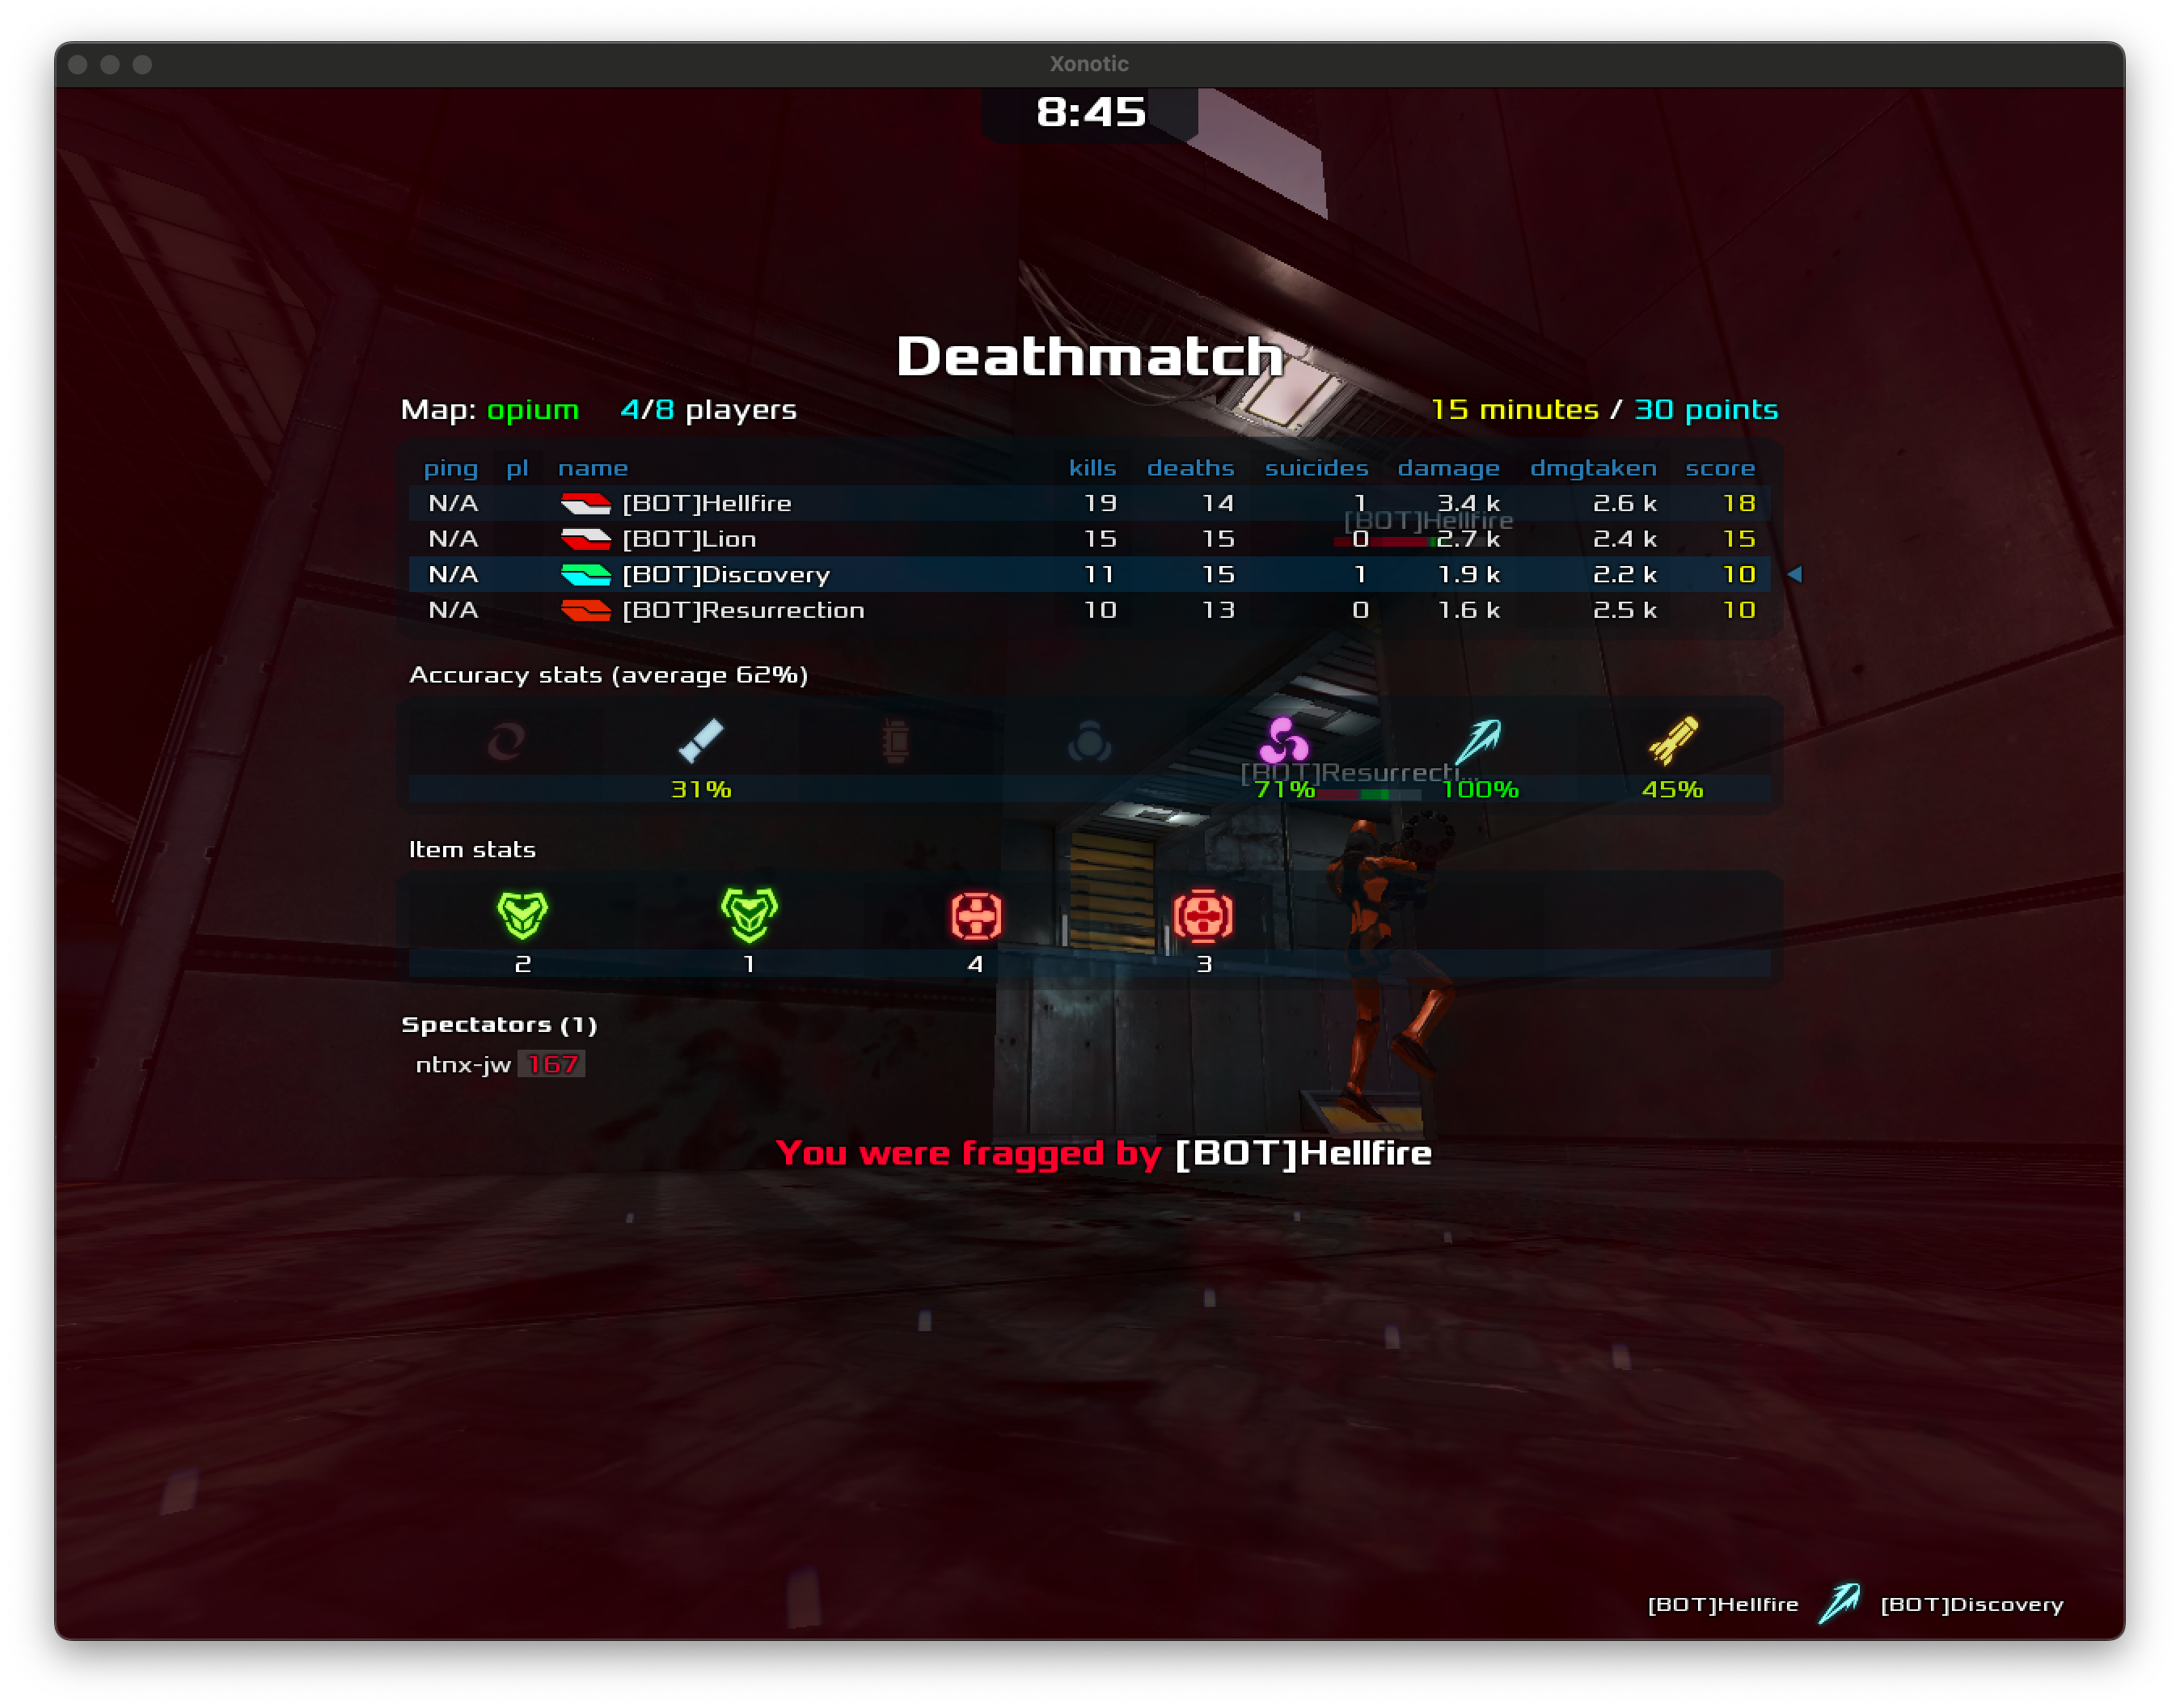
Step 9: Install the Xonotic client and go fragging!
The Xonotic game client is available for download here:
Mac users on Apple silicon can install the client with Brew
brew install xonoticStart the client, select multi-player and add the IP and port of your game server

Play the game!
Closing
This has been a somewhat lengthy guide on configuring k8s on top of Nutanix with the intent of running containerized game servers. Hopefully it has been informative. Originally I wanted to expand the section on SSM and other features on managing the cluster through AWS but thought this blog post was long enough already. Perhaps those areas will be worth re-visiting later on if there’s interest.
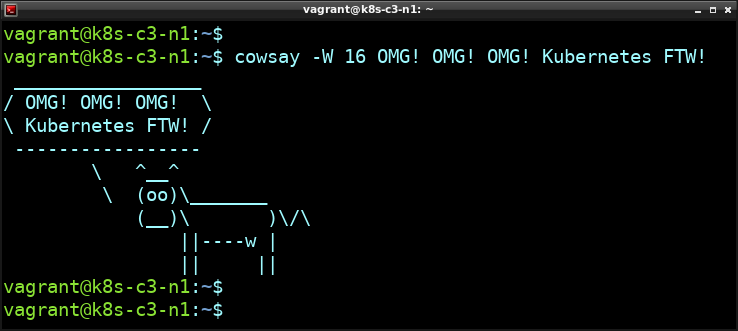
Happy Fragging!
Links and References
- https://cloud-images.ubuntu.com/releases/22.04/release/
- https://portal.nutanix.com/page/documents/kbs/details?targetId=kA00e000000CshJCAS
- https://image-builder.sigs.k8s.io/capi/providers/nutanix.html
- https://anywhere.eks.amazonaws.com/docs/osmgmt/artifacts/#building-node-images
- https://anywhere.eks.amazonaws.com/docs/getting-started/nutanix/
- https://anywhere.eks.amazonaws.com/docs/getting-started/nutanix/nutanix-spec/
- https://devopscube.com/eks-anywhere-cluster/
- https://googleforgames.github.io/quilkin/main/book/quickstarts/agones-xonotic-sidecar.html