Intel Movidius Neural Compute stick 2 – Machine Learning and Deep Learning inferencing in USB format(!)
Machine learning is now available on a stick! Well, not a normal stick from the forest but a USB stick. Currently testing the Intel Movidius 2 USB stick with our IoT edge devices. This thing is amazing! Now it’s possible to run neural networks with Tensorflow and Caffe without needing a GPU in the IoT device itself.
Why is this awesome? Because it removes the need for an expensive back haul from cameras and other edge devices to the core DC / Cloud. Instead of sending raw video across the network, just send the meta data resulting from analyzing the data on the IoT device itself.
This fits nicely in the Edge Computing arena and will be a great enhancement to essentially any edge device with a USB port. The intelligent edge is here!
[bluetooth]# connect FC:A8:9A:EF:A6:E4
Attempting to connect to FC:A8:9A:EF:A6:E4
[CHG] Device FC:A8:9A:EF:A6:E4 Connected: yes
Connection successful
[CHG] Device FC:A8:9A:EF:A6:E4 ServicesResolved: yes
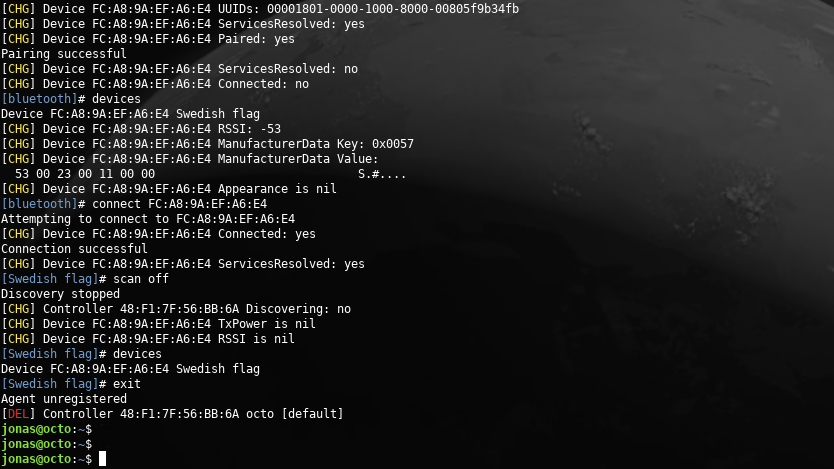
Stop the device scan:
[Swedish flag]# scan off
Discovery stopped
[CHG] Controller 48:F1:7F:56:BB:6A Discovering: no
[CHG] Device FC:A8:9A:EF:A6:E4 TxPower is nil
[CHG] Device FC:A8:9A:EF:A6:E4 RSSI is nil
Exit bluetoothctl:
[Swedish flag]# exit
Agent unregistered
[DEL] Controller 48:F1:7F:56:BB:6A octo [default]
Troubleshooting
This is an addition to the original post. I recently purchased an Elecom Bluetooth mouse (EX-G / M-XGS10BB) which can switch between two PCs. It paired OK but would then connect / disconnect in an eternal loop.
Symptoms:
[bluetooth]# connect C8:47:8C:09:DC:15
Attempting to connect to C8:47:8C:09:DC:15
Failed to connect: org.bluez.Error.Failed
[CHG] Device C8:47:8C:09:DC:15 Connected: yes
[CHG] Device C8:47:8C:09:DC:15 Connected: no
[CHG] Device C8:47:8C:09:DC:15 Connected: yes
[CHG] Device C8:47:8C:09:DC:15 Connected: no
[CHG] Device C8:47:8C:09:DC:15 Connected: yes
[CHG] Device C8:47:8C:09:DC:15 Connected: no
[CHG] Device C8:47:8C:09:DC:15 Connected: yes
[CHG] Device C8:47:8C:09:DC:15 Connected: no
How to fix it:
jonas@octo:~$ bluetoothctl
[bluetooth]# power on
Changing power on succeeded
[bluetooth]# trust C8:47:8C:09:DC:15
[CHG] Device C8:47:8C:09:DC:15 Trusted: yes
Changing C8:47:8C:09:DC:15 trust succeeded
[bluetooth]# agent off
Agent unregistered
[bluetooth]# quit
Building a Kubernetes cluster for the lab at home or at work doesn’t have to be complicated. Below are the steps to create a 3-node cluster (1 master + 2 workers).
Prerequisites:
Install three copies of Ubuntu 18.04. I used VirtualBox + Vagrant (and the image “ubuntu/bionic64”) to create mine. My nodes are named as follows:
k8s-c3-n1 (ip: 192.168.11.101)
k8s-c3-n2 (ip: 192.168.11.102)
k8s-c3-n3 (ip: 192.168.11.103)
Be sure to disable swap. Kubernetes won’t work if it’s enabled. This can be done by commenting out or removing the entry for swap in /etc/fstab followed by a reboot. Temporarily it can be turned off with “swapoff -a”.
Installing Kubernetes:
On all three nodes, download the Google apt key and add it:
Install kubeadm – also on all three nodes:
Installing Docker:
We also need Docker on all three nodes. Install it and enable the service as follows:
Configuring the master node:
On the master (k8s-c3-n1 in this case), enable the kubelet service:
Initialize the cluster:
Now let’s initialize the cluster with “kubeadmin init”. This is done on the master node. Note some detail about the two variables we need to provide:
The API server advertise address: If your hosts have multiple network cards, specify which IP address the API server should bind to. Make sure the nodes are all able to communicate on the network chosen here.
The pod network CIDR: The network you wish the pods to utilize. This appears to be arbitrary. I chose the 10.244.0.0/16 for my network.
The “kubeadmin init” will result in output similar to the below. Make note of the “kubeadmin join” string as it’s unique to your installation and we’ll need it whenever registering worker nodes:
Let’s finalize by running the commands as suggested in the “kubeadm join” output. This is done on the master node – same as we used for ‘kubeadmin join’.
Congratulations – Kubernetes is installed! However, there is still a little bit of work to be done. First installing a pod network and then adding our two worker nodes.
Adding the pod network:
We’ll use Flannel for this example. There are other network solutions available too, but this worked well for me in my lab, and it’s both quick and easy:
Joining the worker nodes:
Finally, let’s join our two workers to the master node by executing the “kubeadm join” string which was provided by our “kubeadm init” earlier.
On each of the two worker nodes, execute the “kubeadm join” string that is unique to your installation. For me it was as follows:
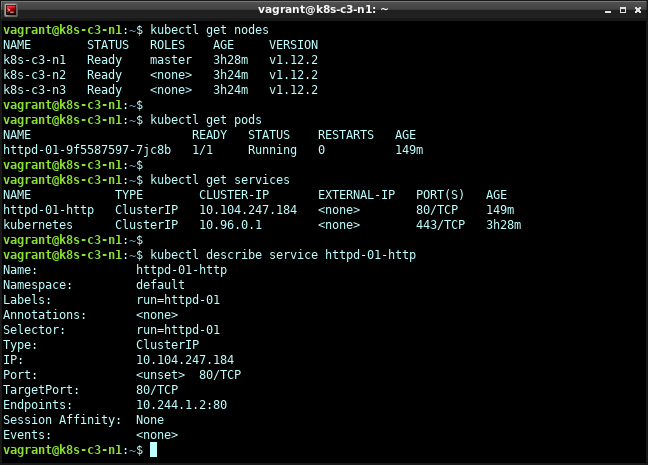
Let’s see if the three nodes are visible. On the master node, execute “kubectl get nodes”. Output should be similar to the below:
It may take around 30 sec to a minute for the workers to reach “Ready” status, but that’s it – Kubernetes is installed and ready.
We can now deploy containers / pods and they will be scheduled to run on the worker nodes. Note: There’s no load balancer or other fancy stuff installed by default so it’s pretty bare-bones 🙂
Deploy a test application:
Let’s verify that our cluster works by deploying a container with a web server.
On the master node (“k8s-c3-n1” in this example), deploy the “httpd” webserver using “kubectl run”. I picked the name “httpd-01” for this pod. This is arbitrary so feel free to use any name that makes sense in your installation.
We can now check that it’s running with “kubectl get pods”:
Since this is a web server we want to expose port 80 so it can be accessed. This creates a service which has to be named. I picked the name ‘httpd-01-http”, but chose any name that makes sense in your installation. Note that we’re referring to the name we gave our our pod at deployment: “httpd-01”.
Let’s find out more about our web server application / pod by using “kubectl get pods” and then “kubectl describe pod <pod id>”:
Among a lot of other information we can see it’s running on worker node “k8s-c3-n2”.
Let’s also get some information about the service we got when exposing port 80 earlier:
Here we can see the endpoint IP and port: “10.244.1.2:80”
Since we know it’s running on worker node “k8s-c3-n2”, let’s SSH there and verify that we can get the default webpage:
As shown in the output: “It works!”.
That goes both for the httpd container and for the Kubernetes cluster. Have fun!
Leveraging Google’s Tensorflow Machine Learning libraries for item recognition in images is fantastically easy to get going. The below Dockerfile will setup a container with everything required and allow the user to feed a URL to a file for classification:
Save the above into a file called “Dockerfile”.
Enter the directory where the Dockerfile is saved and build the Docker image:
Verify the Docker image:
Run the image. We’ll expose SSH on port 22 on the container as 2222 on the host:
Verify the local Docker gateway IP using the container ID (81f13360885f in this case – use “docker ps” to find out):
SSH and execute the image classification script (password: “tensorflow”):
This is the image we’ve pulled down:
And this is the classification result:
Not too bad 🙂 Tensorflow accurately detects that the image contains a scooter, a crash helmet and even sees the disk brake on the scooter! Try with any image URL to see what Tensorflow will classify your image as. Have fun!