NoOps: Fully automated self-service with ServiceNow, Jenkins and Ansible with Dell EMC PowerEdge servers

Moving from IT services Hell to Nirvana

Many organizations are struggling to keep up with the evolution IT is going through. Operations teams have to cover more ground than before and have to get used to manage complex workloads across multiple clouds as well as their own data centers and edge locations.

At the same time users are getting accustomed to the high service levels offered by the hyper-scalers like AWS, Azure and GCP where any request for IT infrastructure is fulfilled in seconds or minutes. Those are high standards for the local Ops team to live up to. Furthermore, if the lack of speed in fulfilling those requests when done to internal IT hold up development teams and thereby threaten to stall the business itself we have a real problem on our hands. How can this be solved in an efficient and and economical manner? 

Changing the game by automating the pipeline

Enter NoOps, or IT operations where automation fulfill the requests for IT services without the local Ops team having to get involved. This keeps the requesting user happy, the team that needs the services on schedule and the business itself on track. At the same time the Ops team can focus on more urgent tasks, like how to leverage IT to empower the business without having to struggle with keeping up with service requests from users. 

These IT changes can be anything from bare metal server changes to entire clusters including server, network, storage and virtualization or container orchestration layers.

Scope

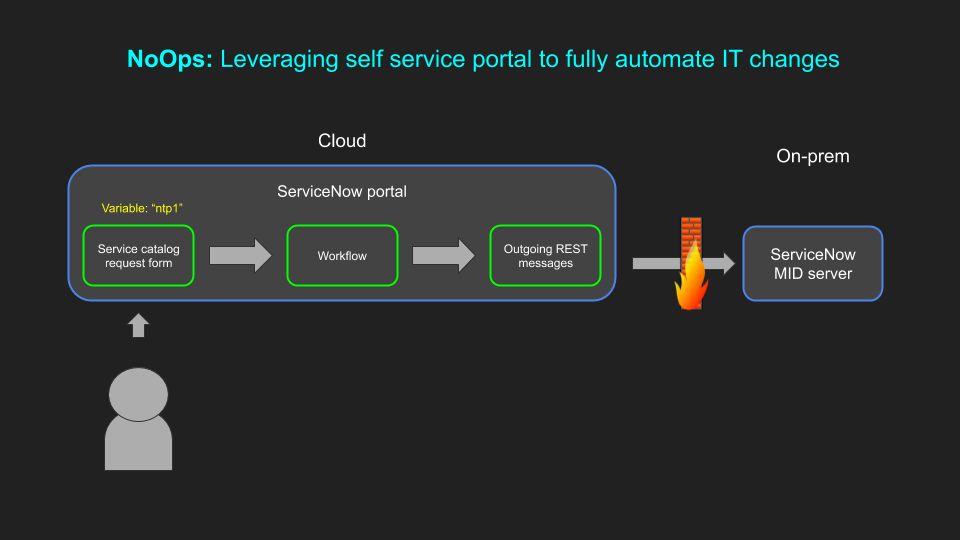
In this example we showcase how the tools listed below can be linked together to work as a user-initiated pipeline to change to a hardware setting. In this case we update a server NTP value, but anything is possible – including complex IT stacks

  • ServiceNow: User portal, approval flow, chargeback
  • ServiceNow MID Server: On-prem SNOW instance to traverse firewalls
  • Jenkins: Manages the CI/CD pipelines, the integration and orchestration of other tools, like Ansible
  • Ansible: Does the actual legwork in the execution of playbooks for set tasks. It accepts variables from the user passed in via Jenkins from ServiceNow
  • Dell EMC PowerEdge server: Used as the target of the automation framework in this use case

Architecture

Overall architecture from user to device

The moving parts of ServiceNow

What is out of scope and complementary guides

The guide doesn’t go through the setup of the individual solutions but the steps are described in great detail below:

ServiceNow Workflow script

ServiceNow Workflow script to capture the variable entered by the user:

var ntp1 = workflow.inputs.ntp1;

Finally, the YouTube video 🙂

Jenkins installation on Ubuntu 19.10 (eoan)

Jenkins isn’t part of the repositories for Ubuntu 19.10 but can be easily installed after adding it. Steps below:

Download and add the key

wget -q -O - https://pkg.jenkins-ci.org/debian-stable/jenkins-ci.org.key | sudo apt-key add -

Add the repo to the sources file

echo deb http://pkg.jenkins-ci.org/debian-stable binary/ | sudo tee /etc/apt/sources.list.d/jenkins.list

Update

sudo apt update

Install Java

sudo apt install openjdk-8-jdk

Install Jenkins

sudo apt install jenkins

Start the Jenkins service

sudo systemctl start jenkins

Access the Jenkins installation via a browser at: http://<ip_address>:8080

Admin password

Access the admin user password as per the below

cat /var/lib/jenkins/secrets/initialAdminPassword

Postman calls for EdgeX Foundry

Viewing data, creating rules and export topics in EdgeX foundry can easily be done in Postman. I’ve put together a small collection of REST calls which may be useful for those who are starting out with EdgeX Foundry and want to leverage Postman for the API interaction.

The API calls are based on the contents of this API walkthrough: https://nexus.edgexfoundry.org/content/sites/docs/staging/master/docs/_build/html/Ch-Walkthrough.html

In case the below “Run in Postman” link doesn’t work the collection can be downloaded and imported from here: link

Ansible with Dell PowerEdge servers

Automate everything and have more time left for coffee and ridiculously-sized donuts! PowerEdge servers and Ansible automation is a match made in silicon heaven (just ask Kryten!) Included are six videos covering everything from the ground up.

Installation steps for Ansible

To be used with the first video: The installation steps for Ansible as well as the OpenManage modules for PowerEdge can be downloaded from here: link

dnsmasq: failed to create listening socket for port 53: Address already in use

Ubuntu 19:10: systemd-resolved blocks port 53 and thereby preventing any service using port 53 (like dnsmasq) from starting

 Jan 29 03:31:58 ubuntupxe02 dnsmasq[2386]: dnsmasq: failed to create listening socket for port 53: Address already in use
 Jan 29 03:31:58 ubuntupxe02 dnsmasq[2386]: failed to create listening socket for port 53: Address already in use
 Jan 29 03:31:58 ubuntupxe02 dnsmasq[2386]: FAILED to start up
 Jan 29 03:31:58 ubuntupxe02 systemd[1]: dnsmasq.service: Control process exited, code=exited, status=2/INVALIDARGUMENT
 Jan 29 03:31:58 ubuntupxe02 systemd[1]: dnsmasq.service: Failed with result 'exit-code'.
 Jan 29 03:31:58 ubuntupxe02 systemd[1]: Failed to start dnsmasq - A lightweight DHCP and caching DNS server.

Verify that the port is used by systemd-resolve

jonas@ubuntupxe02:~$ sudo lsof -i -P -n | grep LIST
 systemd-r  784 systemd-resolve   13u  IPv4  19378      0t0  TCP 127.0.0.53:53 (LISTEN)
 sshd       859            root    3u  IPv4  23918      0t0  TCP *:22 (LISTEN)
 sshd       859            root    4u  IPv6  23920      0t0  TCP *:22 (LISTEN)
 apache2   1705            root    4u  IPv6  27900      0t0  TCP *:80 (LISTEN)
 apache2   1706        www-data    4u  IPv6  27900      0t0  TCP *:80 (LISTEN)
 apache2   1707        www-data    4u  IPv6  27900      0t0  TCP *:80 (LISTEN)

Stop the service

jonas@ubuntupxe02:~$ sudo systemctl stop systemd-resolved

Edit the systemd-resolved config file

 jonas@ubuntupxe02:~$ sudo vi /etc/systemd/resolved.conf
 jonas@ubuntupxe02:~$ cat !$ | grep DNS
 cat /etc/systemd/resolved.conf | grep DNS
 DNS=8.8.8.8
 FallbackDNS=
 MulticastDNS=no
 DNSSEC=no
 DNSOverTLS=no
 DNSStubListener=no
 jonas@ubuntupxe02:~$

Create symlink to /etc/resolv.conf

jonas@ubuntupxe02:~$ sudo ln -sf /run/systemd/resolve/resolv.conf /etc/resolv.conf

Start systemd-resolved service

jonas@ubuntupxe02:~$ sudo systemctl start systemd-resolved

Start dnsmasq

jonas@ubuntupxe02:~$ sudo systemctl start dnsmasq
jonas@ubuntupxe02:~$
jonas@ubuntupxe02:~$ sudo systemctl status dnsmasq
 ● dnsmasq.service - dnsmasq - A lightweight DHCP and caching DNS server
    Loaded: loaded (/lib/systemd/system/dnsmasq.service; enabled; vendor preset: enabled)
    Active: active (running) since Wed 2020-01-29 03:56:12 UTC; 6s ago
   Process: 1312 ExecStartPre=/usr/sbin/dnsmasq --test (code=exited, status=0/SUCCESS)
   Process: 1314 ExecStart=/etc/init.d/dnsmasq systemd-exec (code=exited, status=0/SUCCESS)

Verify that dnsmasq is now the user of port 53

jonas@ubuntupxe02:~$ sudo lsof -i -P -n | grep LISTEN
 sshd     823     root    3u  IPv4  23016      0t0  TCP *:22 (LISTEN)
 sshd     823     root    4u  IPv6  23018      0t0  TCP *:22 (LISTEN)
 apache2  874     root    4u  IPv6  22454      0t0  TCP *:80 (LISTEN)
 apache2  875 www-data    4u  IPv6  22454      0t0  TCP *:80 (LISTEN)
 apache2  876 www-data    4u  IPv6  22454      0t0  TCP *:80 (LISTEN)
 dnsmasq 1331  dnsmasq    5u  IPv4  28097      0t0  TCP *:53 (LISTEN)
 dnsmasq 1331  dnsmasq    7u  IPv6  28099      0t0  TCP *:53 (LISTEN)

Kudos to Nitin Gurbani for the solution