NC2 on AWS Pilot Lightクラスタ + Amazon S3を用いた災害復旧

オンプレミスからNutanix Cloud Clusters (NC2) on AWSへの災害復旧 (Disaster Recovery, DR) の設定は簡単で、事業継続性を確保する責任を負う方々に大きなメリットを提供します。Pilot Lightクラスタを利用することで、リカバリー時間目標 (RTO) が異なる2つのレベルのワークロードに対応しつつ、通常運用時のNC2クラスタサイズを最小化することでコストを削減できます。このDR設定は、Nutanix MST(Multicloud Snapshot Technology)を活用しています。

Pilot Lightクラスタを使用する理由

災害発生時にはすべてのワークロードが重要で回復が必要ですが、それぞれが異なる回復時間要件を持つ場合があります。短い回復時間を必要とするアプリケーションやサービスについては、Nutanixの組み込みDRツールを使用してオンプレミスから小規模なNC2 on AWSクラスタへのレプリケーションを設定してください。

一方、少し長めのRTOで問題ないワークロードの場合、Amazon S3にレプリケートすることで運用コストを削減できます。災害時には、これらのワークロードをS3からNC2 on AWSクラスタにリカバリーします。この方法は、通常運用時に小規模かつコスト効率の高いNC2 on AWSクラスタを維持し、S3からワークロードを回復する必要がある場合にクラスタをスケールアウトする柔軟性を提供します。

ゼロコンピュートオプション

さらに、NC2 on AWSを使用したゼロコンピュートDR戦略を構成することも可能です。この場合、NC2クラスタは存在せず、オンプレミス環境がAmazon S3にデータを直接レプリケートします。ただし、このトピックは別のブログ投稿で取り上げます。

ゼロコンピュートDRは、Pilot Lightよりも運用コストをさらに削減できます。NC2クラスタを展開する必要がないためです。しかし、災害発生時にNC2インフラストラクチャをプロビジョニングする必要があるため、RTOは長くなります。したがって、ゼロコンピュートは運用コストの観点では安価ですが、災害時の復旧クラスタの展開と構成に時間がかかるため、事業への影響コストが高くなる可能性があります。

ソリューションアーキテクチャ

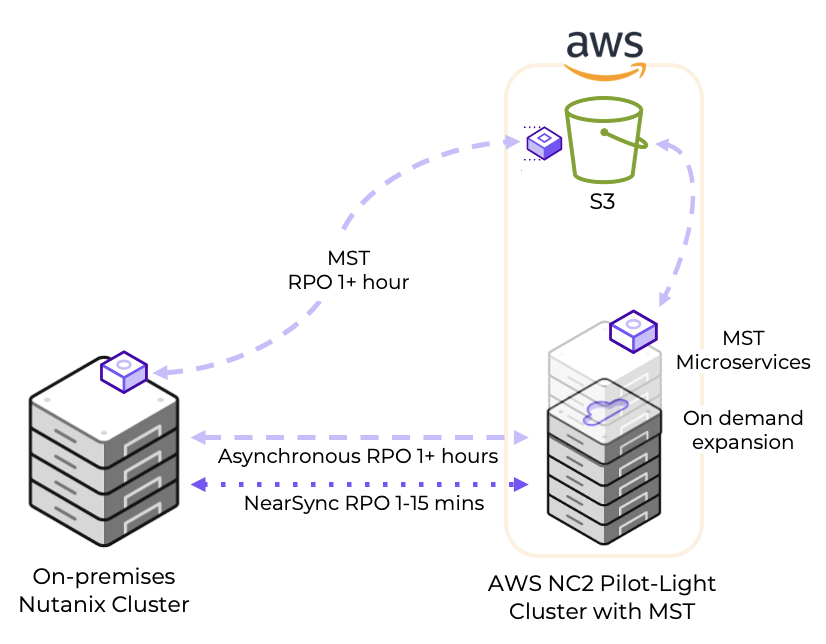
以下の図は、Amazon S3とNC2 on AWSクラスタの両方にレプリケートできる方法を示しています。それぞれ異なるRPO時間を持っています。

展開手順

Pilot Lightクラスタの構成は数時間で完了できます。本ブログ投稿では、以下のステップを通じて設定を進めました:

ステップ1: NC2 on AWSクラスタを展開し、DRを有効化

NC2ポータルで数回クリックするだけで、このプロセスを実行できます。既存のAWS VPCに展開するか、クラスタ展開中に新しいリソースを作成することが可能です。オンプレミスとの接続性がある既存のVPCを使用する場合、ルーティングがすでに構成されているため、セットアップがさらに迅速に進みます。

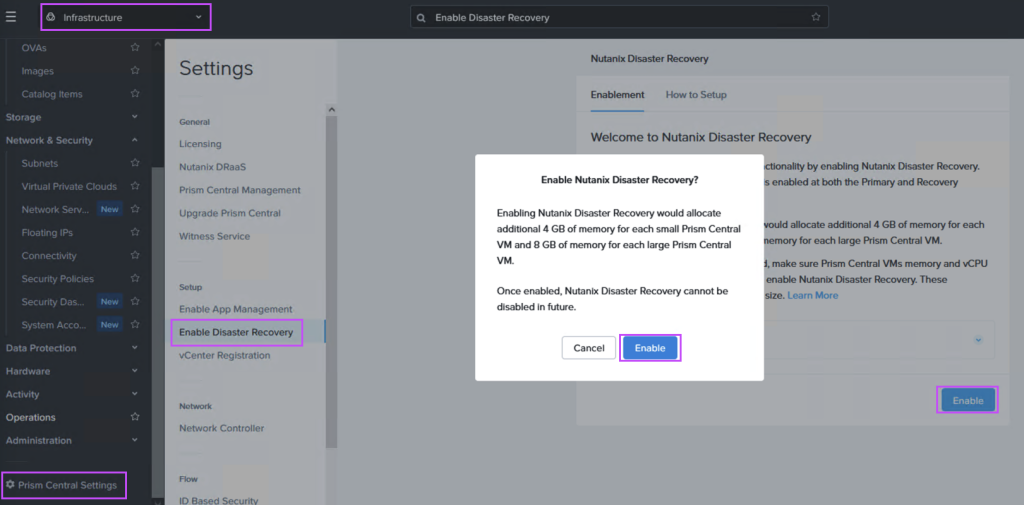
Prism Centralの設定メニューに移動し、以下のようにDisaster Recoveryを有効化してください:

ステップ2: オンプレミスとAWS間の接続性を追加(未設定の場合)

Direct ConnectまたはS2S VPNを構成し、オンプレミスのNutanixクラスタ環境とNC2 on AWSを保持するAWS VPCをリンクします。

ステップ3: レプリケートデータを保存するS3バケットを作成

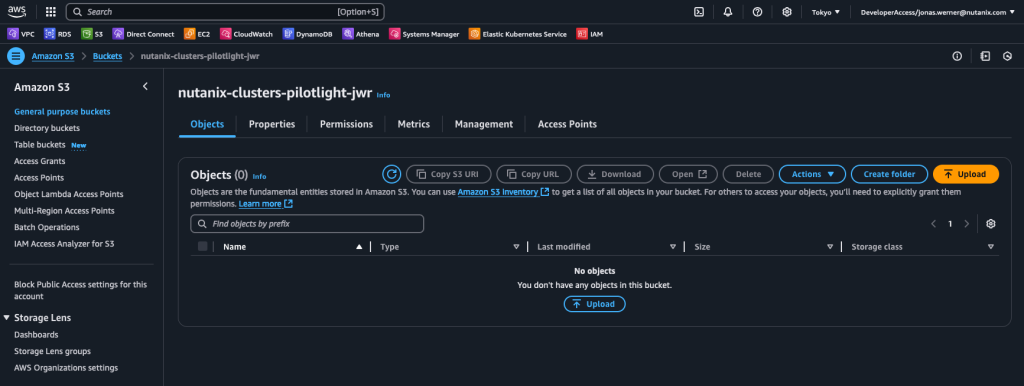
NC2 on AWS環境からアクセス可能なS3バケットを作成します。「nutanix-clusters」で始まる名前を付けることを推奨します。他のバケットと区別するために追加の名前を加えてください。この例では「nutanix-clusters-pilotlight-jwr」という名前を使用します。

作成されていない場合、このバケットへのフルアクセス権限を持つユーザーを作成し、アクセスキーとシークレットアクセスキーを記録してください。以下は、バケットへのフルアクセス権限を付与するポリシーの例です:

{
    "Version": "2012-10-17",
    "Statement": [
        {
            "Sid": "FullAccessForMstToSpecificS3Bucket",
            "Effect": "Allow",
            "Action": [
                "s3:*"
            ],
            "Resource": [
                "arn:aws:s3:::nutanix-clusters-pilotlight-jwr",
                "arn:aws:s3:::nutanix-clusters-pilotlight-jwr/*"
            ]
        }
    ]
}

ステップ4: NC2 on AWSのPrism CentralでMSTを構成

MSTは複数の仮想マシンをデプロイします。このデプロイには、AWSネイティブVPCのCIDR範囲内で3つのIPアドレスを指定する必要があります。

NC2がAWSネイティブネットワーキングで展開された場合、既存ネットワークのDHCP範囲外のIPアドレスを指定するか、Prism Centralコンソールを使用して新しいAWSネイティブサブネットを追加します。

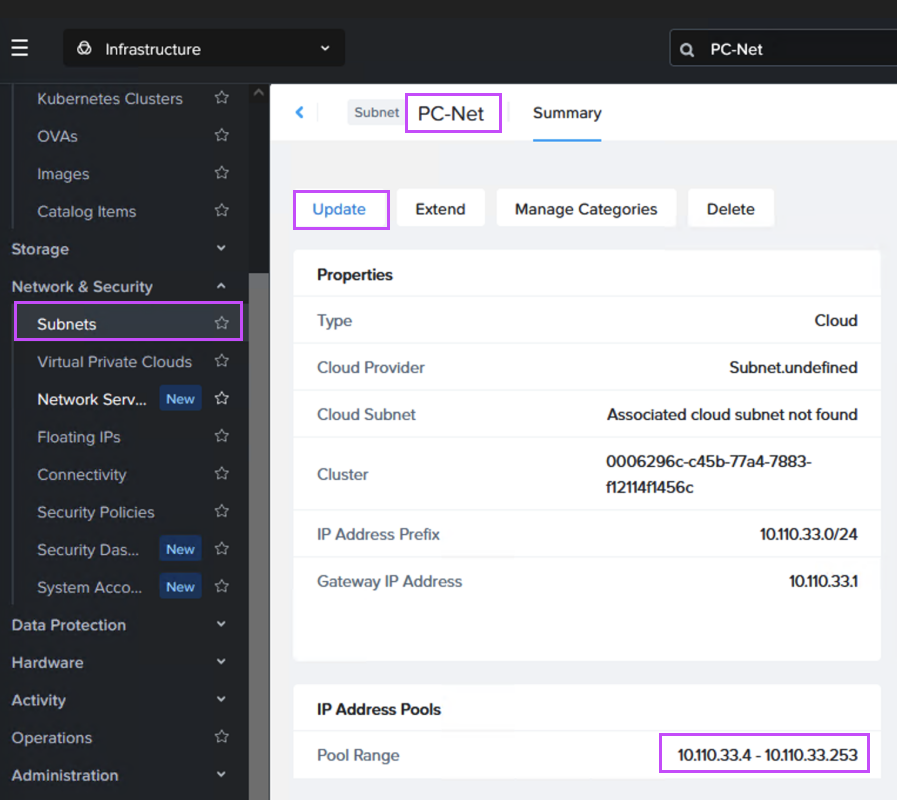
Flow Virtual Networking (FVN) を使用して展開された場合、「PC-Net」のDHCP範囲を縮小してMST用のスペースを確保するのが最も簡単です。ここでは、最後のIPアドレスを”10.110.33.253”から”10.110.33.200”に変更しています。確保するIPアドレスを使用している仮想マシンが存在しないことを確認してください。

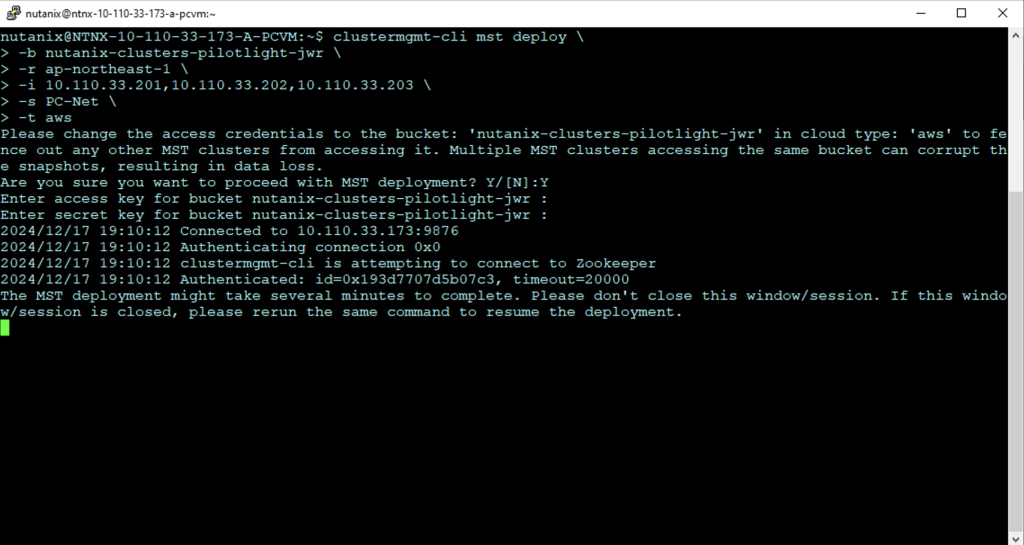
Prism Centralで「nutanix」ユーザーを使用してSSHまたはコンソールウィンドウを開き、以下のコマンドを入力してデプロイを開始します:

clustermgmt-cli mst deploy \
-b <BUCKET NAME> \
-r <AWS REGION> \
-i <IP#1>,1<IP#2>,<IP#3> \
-s <NC2 NETWORK NAME> \
-t <BUCKET TYPE (aws or ntx_oss)>

例:

clustermgmt-cli mst deploy \
-b nutanix-clusters-pilotlight-jwr \
-r ap-northeast-1 \
-i 10.110.33.201,10.110.33.202,10.110.33.203 \
-s PC-Net \
-t aws

デプロイが開始され、以下のように進行状況が表示されます。プロンプトが表示されたら、S3バケットにアクセスする権限を持つユーザーのAWSアクセスキーとシークレットアクセスキーを入力してください。

ステップ5: オンプレミスのPrism CentralとNC2のPrism Centralをリンク

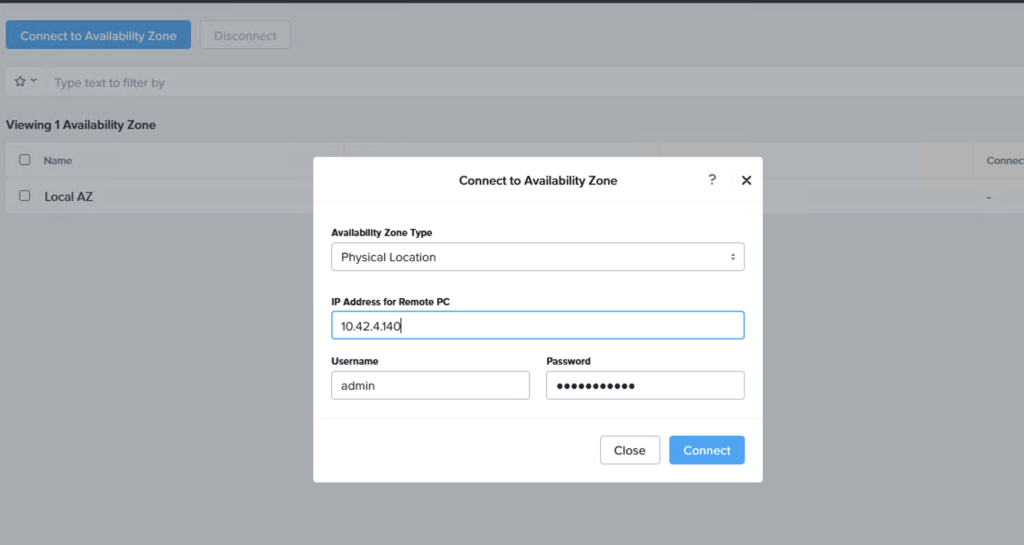
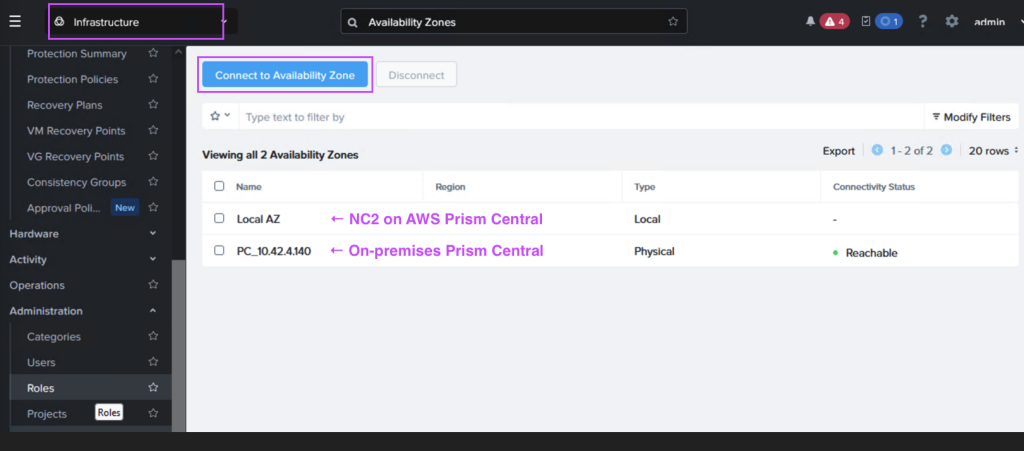
オンプレミスまたはNC2のPrism Centralで、「Administration」 > 「Availability Zones」に移動し、別のPrism Centralインスタンスをリモート物理サイトとして追加します。

ステップ6: 保護ポリシーとDRプランを作成

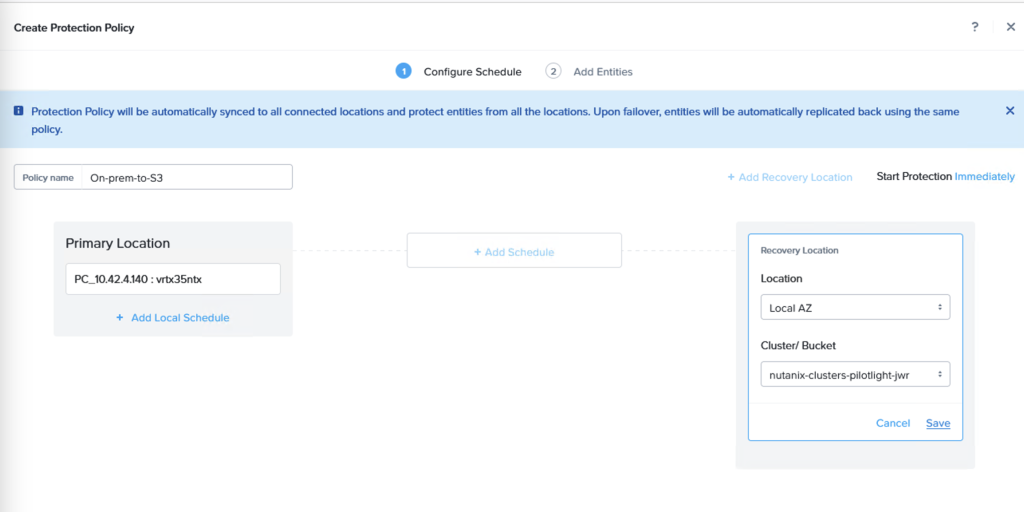
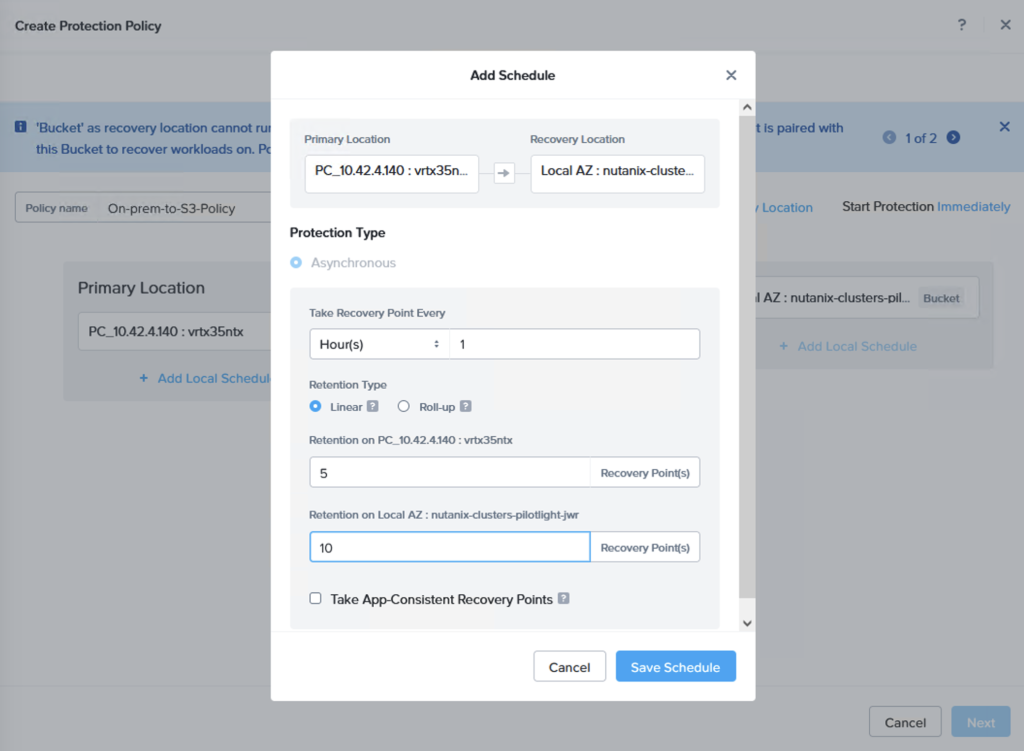
Prism Centralコンソールで「データ保護」 > 「保護ポリシー」に移動します。ここから、新しい保護ポリシーを作成します。オンプレミスのクラスタをソースに、Amazon S3バケットをターゲットとして指定します。

レプリケーションスケジュールを設定し、最大36個のスナップショットを保持するリニアスナップショット、または最大1か月のデータ保持が可能なロールアップを選択できます。

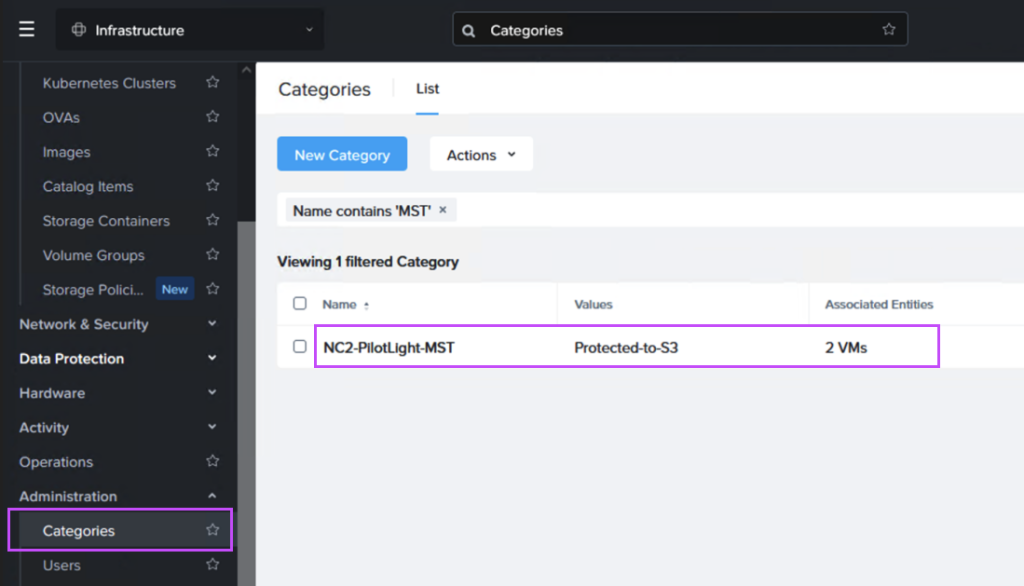
次に、リカバリプランを作成します。オプションとして、Amazon S3に送られるVMとNC2クラスタに直接レプリケートされるVMをグループ化するために、2つのカテゴリを作成します。以下は、S3にレプリケートされるVMグループのカテゴリ例です。

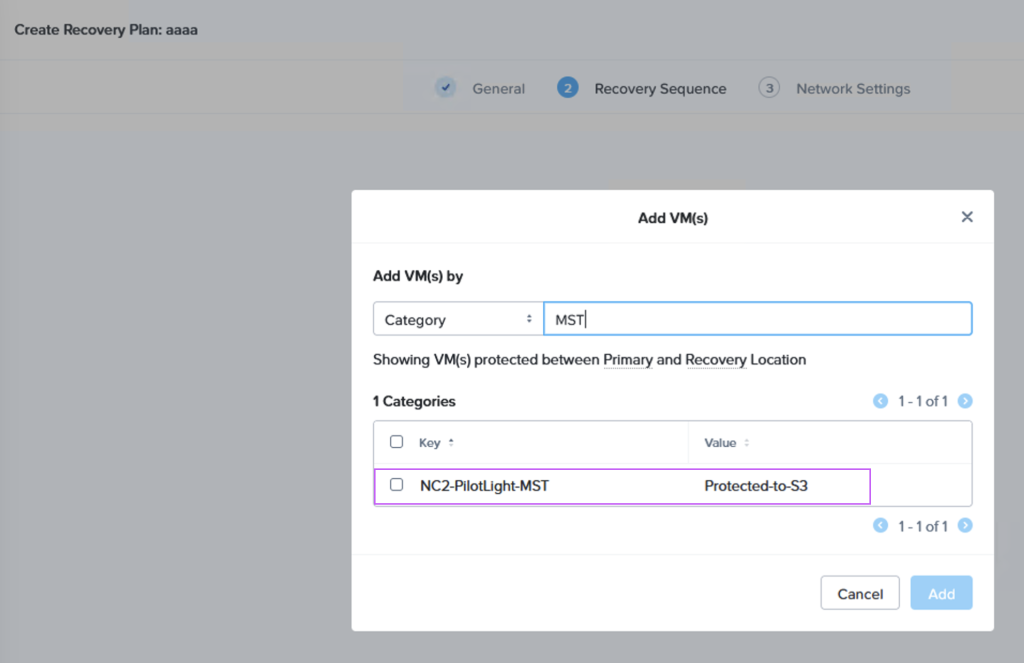
その後、「データ保護」 > 「リカバリプラン」に移動し、カテゴリを参照して、正しいVMが正しい場所にレプリケートされるよう設定します:

S3へのデータレプリケートを確認 + フェイルオーバー

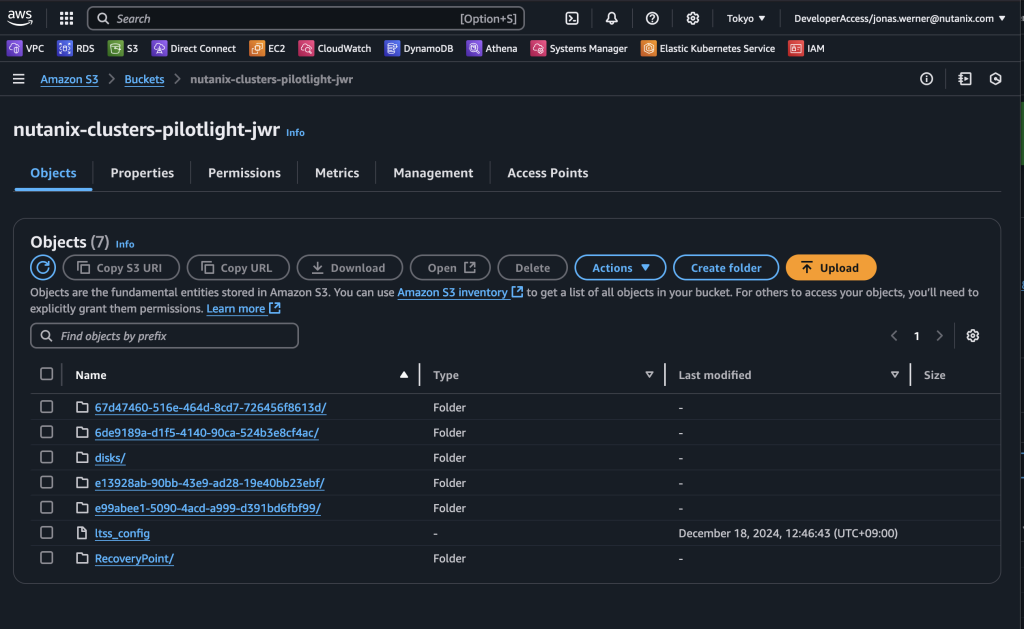
これでレプリケーションスケジュールが設定され、カテゴリを通じてターゲットVMが強調表示され、レプリケートされることが保証されます。S3バケットを確認することで、オンプレミスのクラスタからS3にスナップショットが送信されたことを確認できます。

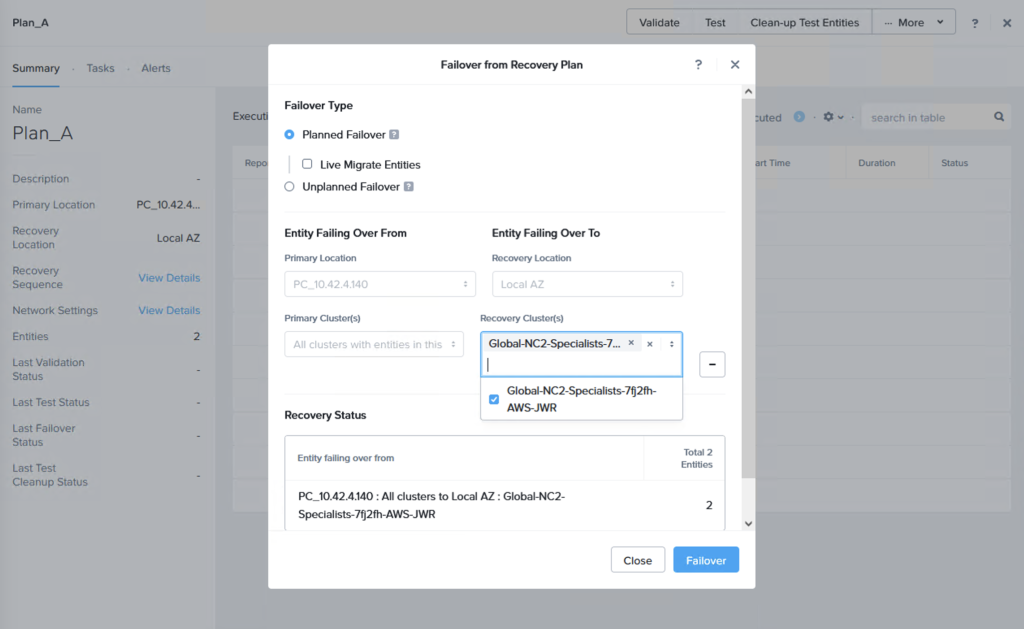
この時点でフェイルオーバー、またはテストを行い、レプリケートされたデータからの復旧が可能であることを確認できます。これを行う際、S3のデータからフェイルオーバーするため、VMを復旧するターゲットクラスタを選択する必要があります。「+ Add Target Clusters」をクリックし、以下のようにNC2 on AWSクラスタを選択します:

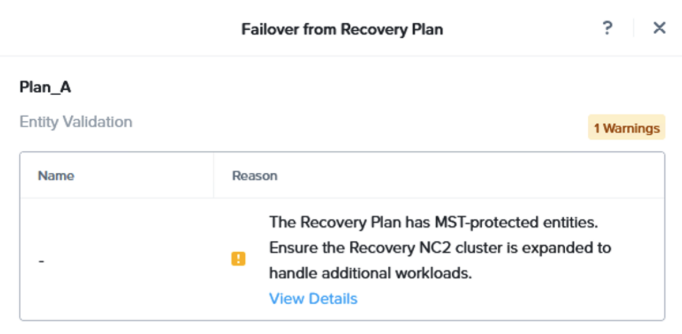
警告が表示され、S3から復元されるVMの流入を処理するためにNC2 on AWSクラスタに追加ノードを必要とする場合があることを強調されます。必要に応じて、NC2管理コンソールを使用してノードを追加することでクラスタを拡張します。

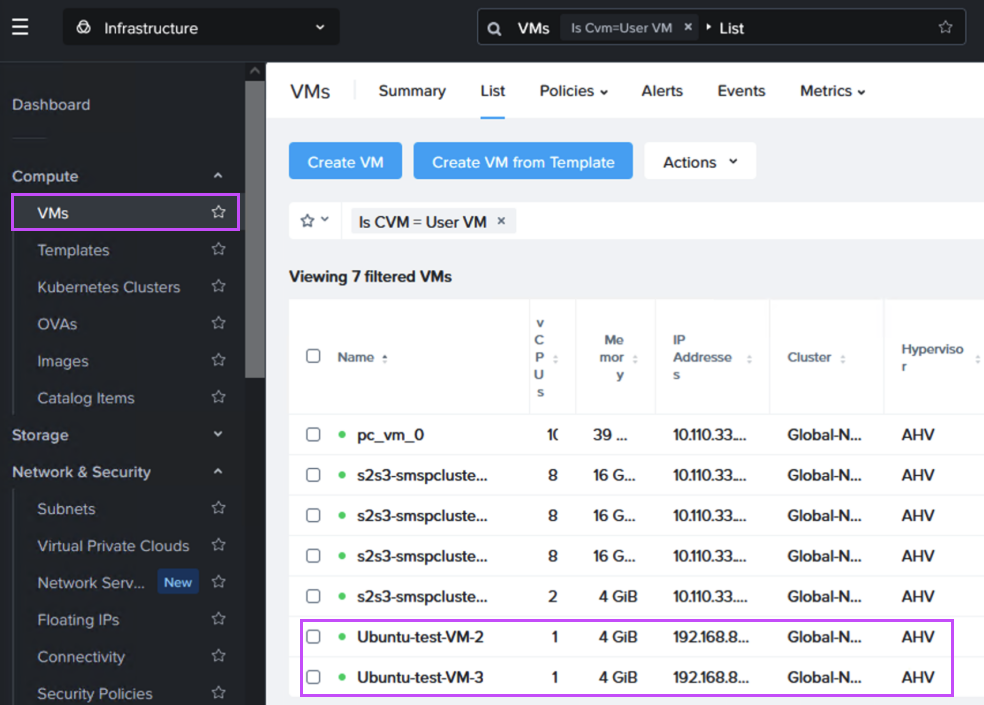
フェイルオーバー後、VMがNC2 on AWSで問題なく稼働していることを確認できます。

まとめ

この記事では、NC2 on AWSのPilot Lightクラスタを使用した災害復旧の設定方法についてガイドとデモンストレーションを行いました。詳細については、以下のドキュメントリンクを参照してください。この内容が分かりやすかったことを願っています。具体的な使用事例や環境についてさらに情報が必要な場合は、お近くのNutanix担当者にお問い合わせください。

リンクと参考資料

Disaster Recovery with NC2 on AWS Pilot Light cluster + Amazon S3

Configuring a Disaster Recovery (DR) from on-premises to Nutanix Cloud Clusters (NC2) on AWS is straight-forward and can provide significant benefits for those responsible for ensuring Business Continuity. With a Pilot Light cluster this can even be done for workloads with two different levels of Recovery Time Objective (RTO) while saving on costs by minimizing NC2 cluster size during normal operations.

This type of DR configuration leverages Nutanix MST, or Multicloud Snapshot Technology.

Why use a Pilot Light cluster?

Workloads can all be important and vital to recover in case disaster strikes, but may have different requirements when it comes to how quickly they must be back online again. For applications and services with short recovery time windows, simply configure replication from on-premises to a small NC2 on AWS cluster using the Nutanix built-in DR tools.

For workloads which are fine with a slightly longer RTO, save on running costs by replicating them to Amazon S3. In case of disaster those workloads can be recovered from S3 to the NC2 on AWS cluster. This brings benefits in the ability to keep the NC2 on AWS cluster at a small and cost-efficient size during normal conditions, with the ability to scale out the cluster if there is need to recover workloads from S3.

Zero-compute option

There is additionally possible to configure a Zero-compute DR strategy with NC2 on AWS in which there is no NC2 cluster and the on-premises environment replicate data directly into Amazon S3, however that will be covered in a separate blog post.

Zero-compute DR offers even lower costs than Pilot Light since there is no need to deploy an NC2 cluster unless there is a disaster. However, it will increase RTO because the NC2 infrastructure need to be provisioned. Therefore, Zero-compute is cheaper from a running-costs perspective, but may incur higher costs to the business during a DR event due to the longer time required to deploy and configure the recovery cluster.

Solution architecture

The below diagram shows how it is possible to replicate both to Amazon S3 as well as to the NC2 on AWS cluster. Both with different RPO times.

Versions used

For this deployment we use the following versions:

EntityVersion
NC2 on AWS Prism Centralpc.2024.3
NC2 on AWS AOS7.0
On-premises Prism Centralpc.2024.2
On-premises AOS6.8.1 (CE 2.1)

Deployment steps

Configuring a Pilot Light cluster can be done in just a few hours. For the purpose of this blog post we have gone through the following steps:

Step 1: Deploy an NC2 on AWS cluster and enable DR

This can be done with a few clicks in the NC2 portal. Either deploy into an existing AWS VPC or create new resources during cluster deployment. If an existing VPC with connectivity to on-prem is used it will make setting things up even faster since routing is already configured.

Navigate to the Prism Central settings menu and enable Disaster Recovery as shown:

Step 2: Add connectivity between on-prem and AWS (if not already configured)

Configure Direct Connect or a S2S VPN to link the on-premises Nutanix cluster environment with the AWS VPC holding NC2 on AWS.

Step 3: Create an S3 bucket to store replicated data

Create an S3 bucket which can be accessed from the NC2 on AWS environment. Make sure to give it a name starting with “nutanix-clusters”. You can add on something in addition to keep buckets separate. In this example we use “nutanix-clusters-pilotlight-jwr” as the bucket name.

If not already created, create a user with full access to this bucket and make note of the Access and Secret Access keys as they are used in the next step. An example of a policy which gives full access to our bucket can be found below:

{
    "Version": "2012-10-17",
    "Statement": [
        {
            "Sid": "FullAccessForMstToSpecificS3Bucket",
            "Effect": "Allow",
            "Action": [
                "s3:*"
            ],
            "Resource": [
                "arn:aws:s3:::nutanix-clusters-pilotlight-jwr",
                "arn:aws:s3:::nutanix-clusters-pilotlight-jwr/*"
            ]
        }
    ]
}

Step 4: Configure MST on Prism Central in NC2 on AWS

MST will deploy a number of Virtual Machines and this deployment requires us to provide three IP addresses on the AWS native VPC CIDR range.

If NC2 was deployed with AWS native networking, simply provide IP addresses outside of the DHCP range on one of the existing networks, or alternatively add a new AWS native subnet through the Prism Central console.

If NC2 was deployed with Prism Central and Flow Virtual Networking (FVN), the easiest way to do this is to shrink the automatically created “PC-Net” DHCP range to make some space for MST. We shrink ours from ending at “10.110.33.253” to end at “10.110.33.200”. Make sure the no VMs are using addresses in the space you are creating.

SSH or open a console window to Prism Central using the “nutanix” user and enter the below command to start the deployment:

clustermgmt-cli mst deploy \
-b <BUCKET NAME> \
-r <AWS REGION> \
-i <IP#1>,1<IP#2>,<IP#3> \
-s <NC2 NETWORK NAME> \
-t <BUCKET TYPE (aws or ntx_oss)>

For our example we use:

clustermgmt-cli mst deploy \
-b nutanix-clusters-pilotlight-jwr \
-r ap-northeast-1 \
-i 10.110.33.201,10.110.33.202,10.110.33.203 \
-s PC-Net \
-t aws

The MST deployment begins as shown. Enter the AWS access key and secret access key for the user with rights to the S3 bucket when prompted.

Step 5: Link the on-premises Prism Central with the NC2 Prism Central

In Prism Central (on-premises or NC2), navigate to “Administration” and “Availability Zones” and add the other Prism Central instance as a remote physical site.

Step 6: Create a Protection Policy and DR Plan

Through the Prism Central console, navigate to Data Protection and Protection Policies. From here, create a new Protection Policy with the on-premises cluster as source and the Amazon S3 bucket as target.

A replication schedule can be set and allows Linear snapshots for maximum of 36 snapshots or Roll-up where data can be retained for up to one month.

Next we create a Recovery Plan. Optionally, to facilitate grouping of those VMs which are destined for Amazon S3 and those destined to be replicated directly to the NC2 cluster, we create two categories to place them in. Below is the category for the VM group which is to be replicated to S3.

When we then go to Data Protection and Recovery Plans we reference our category to get the correct VMs replicated to the correct location, as follows:

Verifying that data is replicated to S3 + Failing over

Now the replication schedule is set and the target VMs are highlighted through categories to ensure they are replicated. By checking our S3 bucket we can verify that snapshots have been sent to S3 from the on-premises cluster.

We can now do a failover or just a test to see that it is possible to recover from the replicated data. When you do this, since we are failing over from data in S3, make sure to select the target cluster to which we want to recover the VMs. This is done by clicking “+ Add Target Clusters” and selecting the NC2 on AWS cluster as per the below:

You will get a warning highlighting that there may be a need to expand the NC2 on AWS cluster with extra nodes to handle the influx of VMs being restored from S3. If required, simply expand the cluster by adding nodes through the NC2 management console.

After failing over we can verify that our VMs are up and running in NC2 on AWS without issues.

Wrap-up

This has been a guide and demonstration of how easy it is to configure Disaster Recovery using a Pilot Light cluster with NC2 on AWS. Please refer to the links below for more detail in the documentation. Hopefully this has been easy to follow. Please feel free to reach out to your nearest Nutanix representative for more information and guidance for your specific use case and environment.

Links and references