L2 extension from on-prem VMware cluster to Nutanix Cloud Clusters (NC2) on AWS using Cisco CSR1000V as on-prem VTEP

This guide has been written in cooperation with Steve Loh, Advisory Solutions Architect, Network & Security at Nutanix in Singapore, gentleman extraordinaire and master of the Cisco Dark Arts.

Introduction

Organizations frequently choose to extend on-premises networks to the cloud as part of retaining connectivity between virtual machines (VMs) during migrations. This is called L2 or Layer 2 extension. With an extended network, VMs connected to the same subnet can communicate as usual even when some of them have been migrated to the cloud and others are still on-premises awaiting migration.

L2 extension is sometimes used on a more permanent basis when the same network segment contain VMs to be migrated as well as appliances which must remain on-prem. If the organization doesn’t want to change the IP addresses of any of these entities and still need part of them migrated, they might chose to maintain L2 extension of some subnets indefinitely. However, this is generally considered a risk and is not recommended.

Architecture diagram

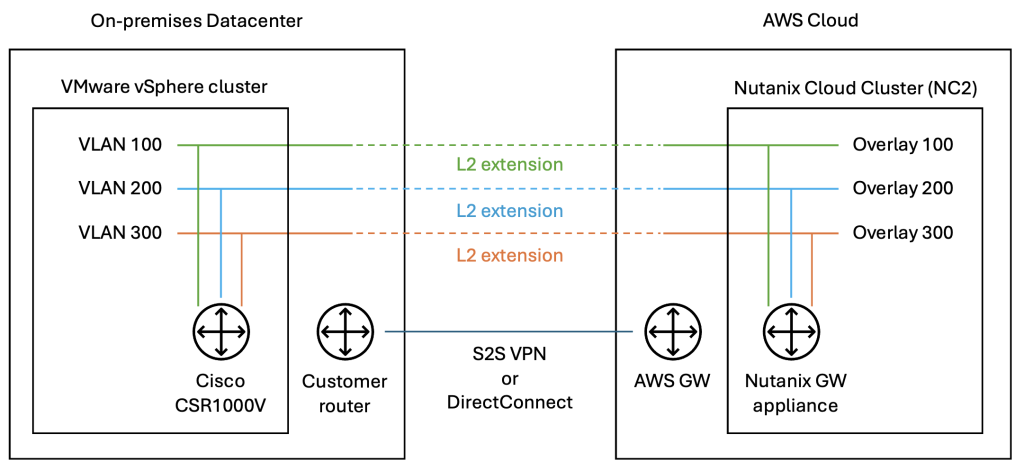
This is a graphical representation of the network stretch from on-prem VMware to Nutanix Cloud Clusters in AWS which is covered in this blog post. Other configurations are also possible, especially when Nutanix is also deployed on-prem.

Video of process

For those preferring watching a demo video of this process rather than reading the blog, please refer to the below.

Limitations and considerations

While L2 extension is a useful tool for migrations, please keep the following points in mind when deciding whether or not to utilize this feature:

  • L2 extension will complicate routing and thereby also complicate troubleshooting in case there are issues
  • L2 extension may introduce additional network latency. This takes the shape of trombone routing where traffic need to go from the cloud via a gateway on the on-premises side and then back to the cloud again. Nutanix Flow Policy Based Routing (PBR) may be used to alleviate this.
  • If routing is set to go via one default gateway either on-premises or in the cloud, if the network connecting the on-premises DC with the cloud environment has downtime, the VMs on the side without the default gateway will no longer be able to communicate with networks other than their own
  • The Nutanix L2 extension gateway appliance does not support redundant configurations at time of writing
  • A Nutanix L2 extension gateway can support up to five network extensions
  • A single Prism Central instance can support up to five Nutanix L2 extension gateways
  • Always keep MTU sizes in mind when configuring L2 extension to avoid unnecessary packet fragmentation. MTU settings can be configured when extending a network.
  • Even though VMs are connected to an extended network, if the current version of Move is used for migration, VM IP addresses will not be retained. A Move release in the near future will enable IP retention when migrating from VMware ESXi to NC2 on AWS.

Types of L2 extension

Various methods of extending a network exist. This blog will cover one of these cases – on-premises VMware with Cisco CSR1000V as VTEP to Nutanix Cloud Clusters (NC2) on AWS with a Nutanix gateway appliance.

On-premises VLANs or Flow overlay networks can be extended using Nutanix GW appliances to Flow overlay networks in NC2. It is also possible to extend using Nutanix VPN appliances in case the network underlay is not secure (directly over the internet). Finally, when the on-premises environment does not run Nutanix, using a virtual or physical router with VXLAN and VTEP capabilities is possible. This blog focuses on the last use case as it is a commonly discussed topic among customers considering NC2 and L2 extension.

Routing

When extending networks, the default gateway location and routing to and from VMs on an extended network become important to understand. Customers used to extending networks with VMware HCX or NSX Autonomous Edge are familiar with the concept of trombone routing over a default gateway located on-premises. With Nutanix it is possible to use Policy Based Routing (PBR) to control how routing should be performed for different networks. In many ways, Nutanix PBR offers more detailed tuning of routes than can be done with VMware MON in HCX.

A key difference between extending networks with HCX vs. with Nutanix is that with HCX the extended network appears as a single entity, although it exists on both sides (on-prem and cloud). The default gateway would generally be on-prem and both DHCP and DNS traffic would be handled by on-prem network entities, regardless if a VM was on-prem or in the cloud.

For L2 extension with Nutanix, things work a bit differently. The on-prem network will be manually recreated as an overlay network on NC2, with the same default gateway as the on-prem network but with a different DHCP range. The on-prem and cloud networks are then connected through a Nutanix GW appliance deployed as a VM in Prism Central.

Prerequisites

This guide assumes that an on-premises VMware vSphere 7.x environment and an NC2 version 6.8.1 cluster are already present. It also assumes that the on-prem and NC2 environments are connected over a L3 routed network, like a site-to-site (S2S) VPN or DirectConnect (DX). The two environments have full IP reachability and can ping each other.

In this case we are extending a VLAN which has been configured as a port group with VLAN tagging on standard vSwitches on the ESXi hosts.

Overview of steps

  1. Recreate the network to be extended using Flow overlay networking on NC2
  2. Deploy the Nutanix gateway appliance on NC2
  3. Deploy the Cisco CSR1000V in the on-premises VMware cluster
  4. Enable Promiscuous mode and Forged transmits on the vSwitch portgroup of the VLAN to be extended
  5. Register the CSR1000V routable IP address as a Remote Gateway in NC2
  6. Configure the CSR1000V IP leg on the VLAN to be extended and set up VNI and other settings required to extend the network
  7. Extend the network from NC2 with the CSR1000V as the on-prem VTEP

In the demo video included in this post we also perform a migration of a VM from on-prem to NC2 and verify connectivity with ICMP.

Step 1: Recreate the network to be extended using Flow overlay networking on NC2

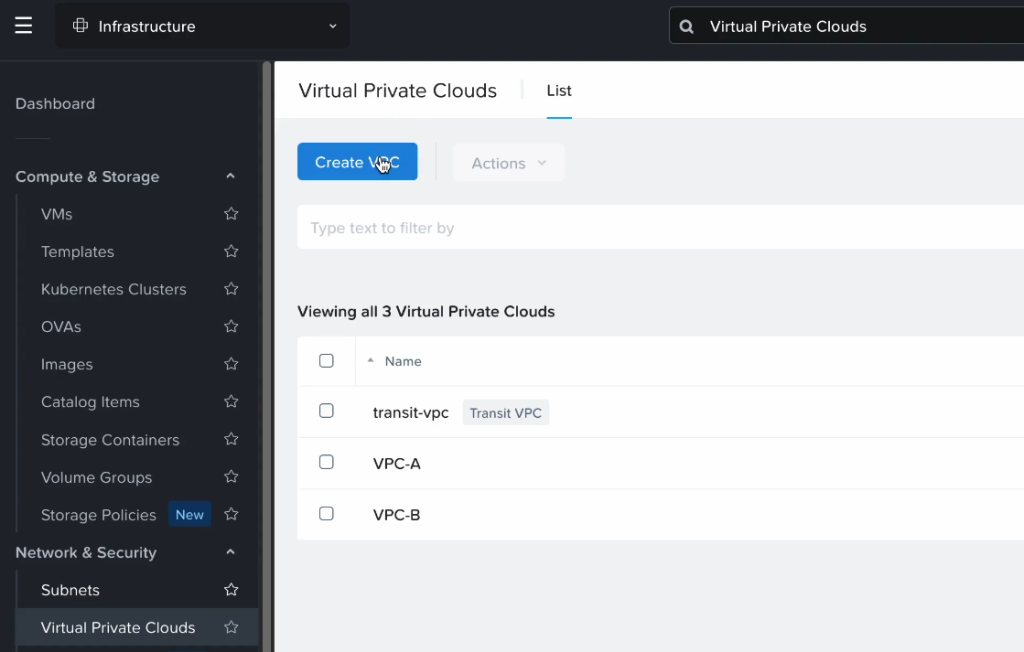
Access Prism Central, navigate to Network and Security. Select “Create VPC” to add a new Nutanix Flow VPC to hold the subnet we want to extend.

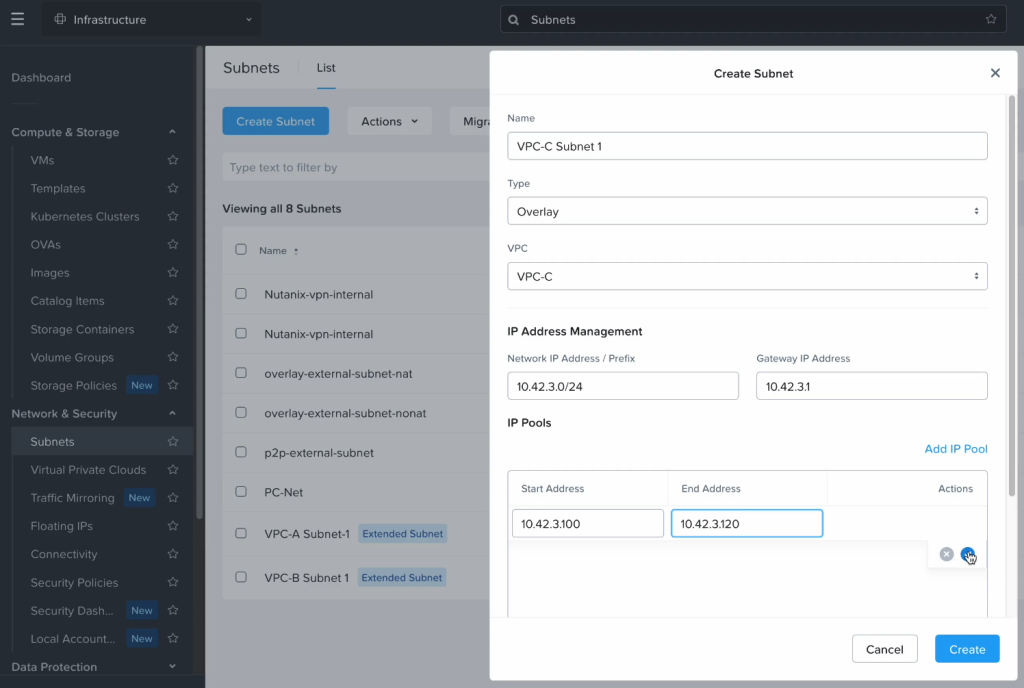
After the VPC has been created, go to Subnets and create a subnet in the newly created VPC with settings matching the network which will be extended. In this case we create “VPC-C” and a subnet with a CIDR of “10.42.3.0/24”. The default gateway is configured to be the same as on-prem but the DHCP range is set to not overlap.

Step 2: Deploy the Nutanix gateway appliance on NC2

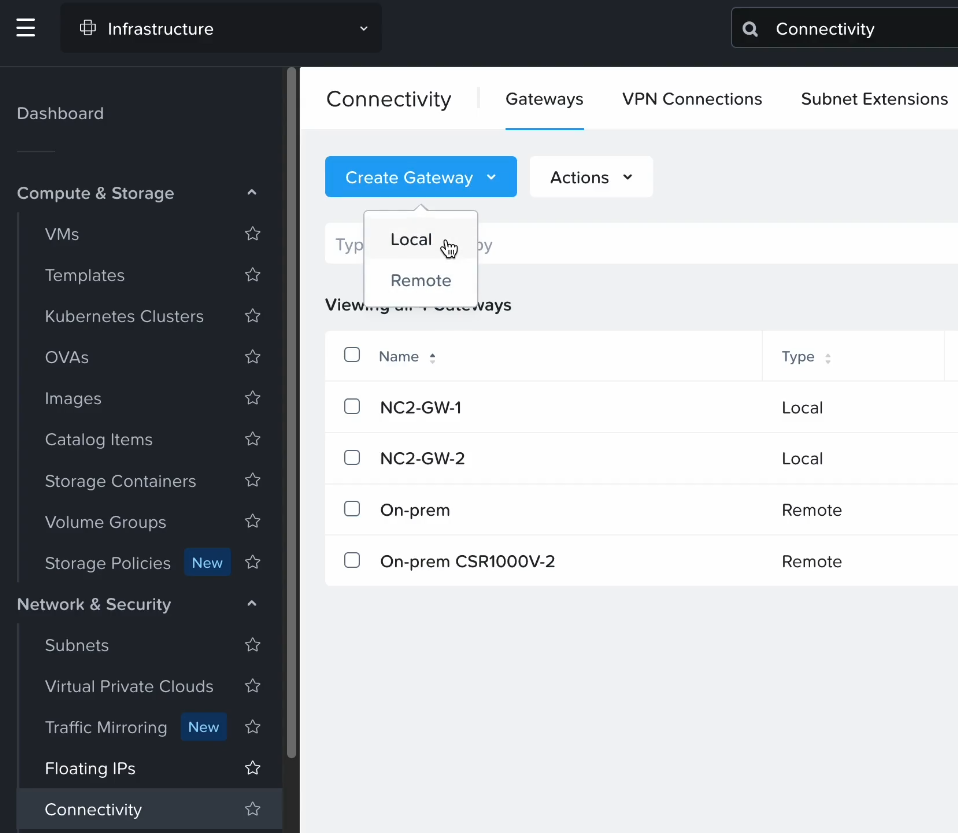
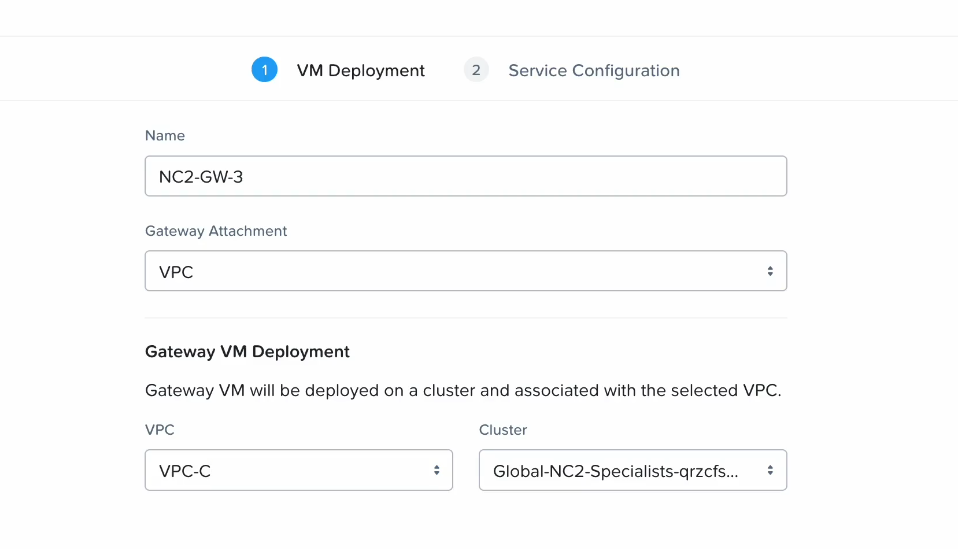
In Prism Central, navigate to “Network and Security” and select “Connectivity”. From here click “Create Gateway” and select “Local” to create the gateway on the NC2 side.

Add a name, set the Gateway Attachment to VPC and select the VPC which was just created in the previous steps.

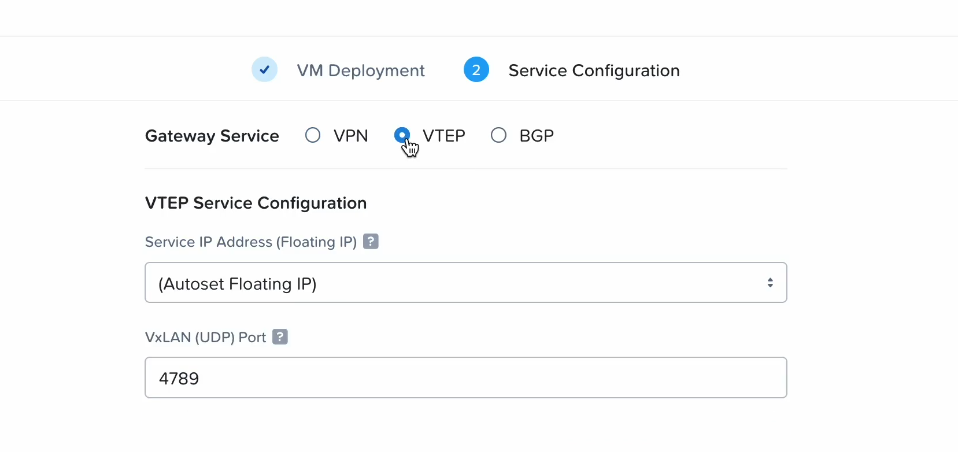
For Gateway Service, select VTEP and allow NC2 to automatically assign a Floating IP from the AWS VPC CIDR. This IP will be accessible from the on-prem environment and will be used as the anchor point for the L2E when configuring the CSR1000V in a later step

Note that a new VM (the gateway appliance) will automatically be deployed on the NC2 cluster by Prism Central.

Step 3: Deploy the Cisco CSR1000V in the on-premises VMware cluster

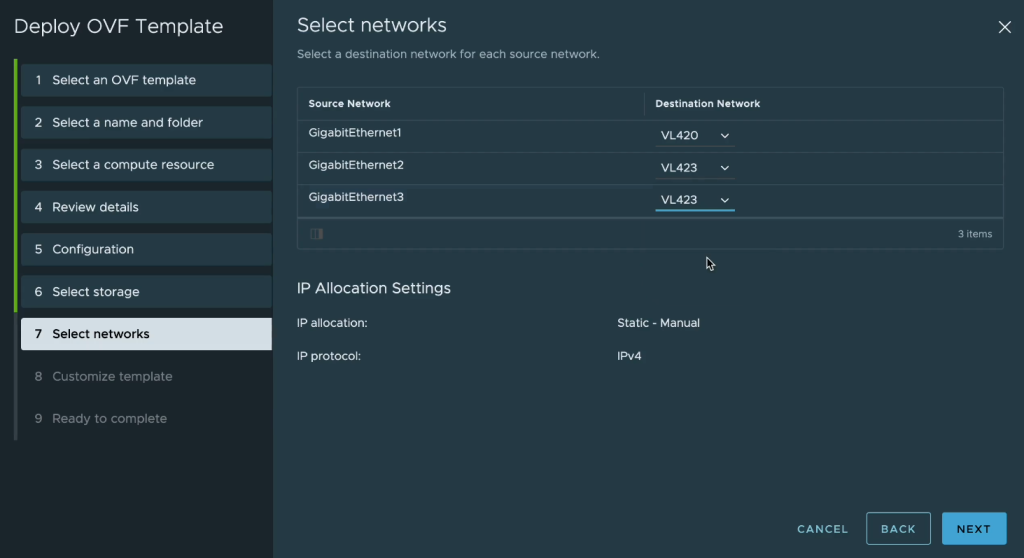
Deploy the Cisco appliance on the VMware cluster and select the first network interface to connect to the routable underlay network (IP connectivity to NC2) and the second and third interfaces to connect into the port group of the VLAN to be extended.

In this case VL420 is routable underlay network and VL423 the VLAN to be extended

Configure an IP address on the management network and make note of it as we will use it in a subsequent step. In this case we use “10.42.0.106” as the management IP address on VL420.

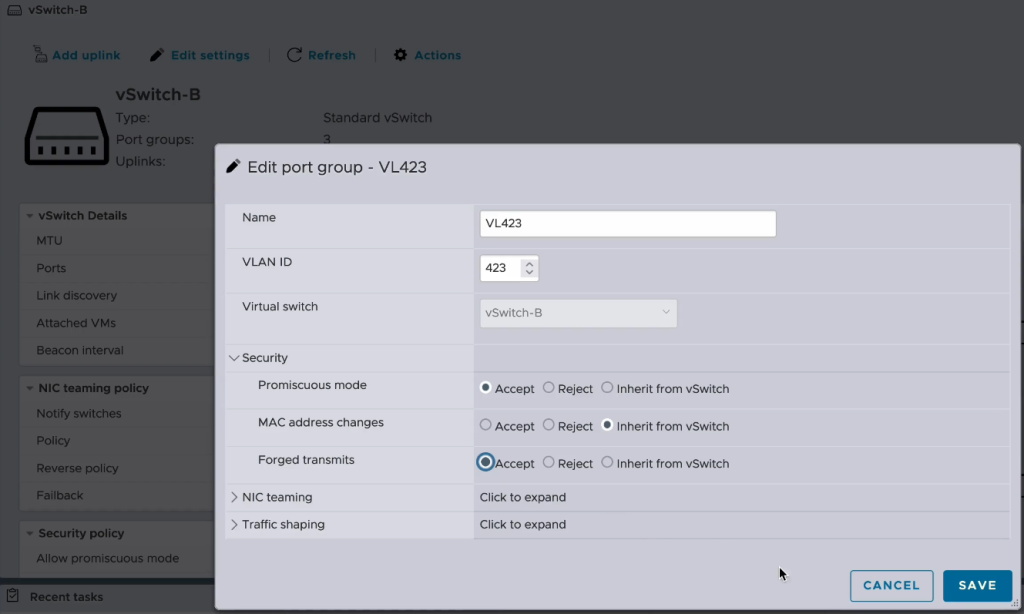
Step 4: Enable Promiscuous mode and Forged transmits on the vSwitch portgroup of the VLAN to be extended

In order to pass traffic from the on-premises network to the NC2 network it is necessary to enable Promiscuous mode and Forged transmits on the vSwitch port group on the VMware cluster. In this case we are using standard vSwitches.

Step 5: Register the CSR1000V routable IP address as a Remote Gateway in NC2

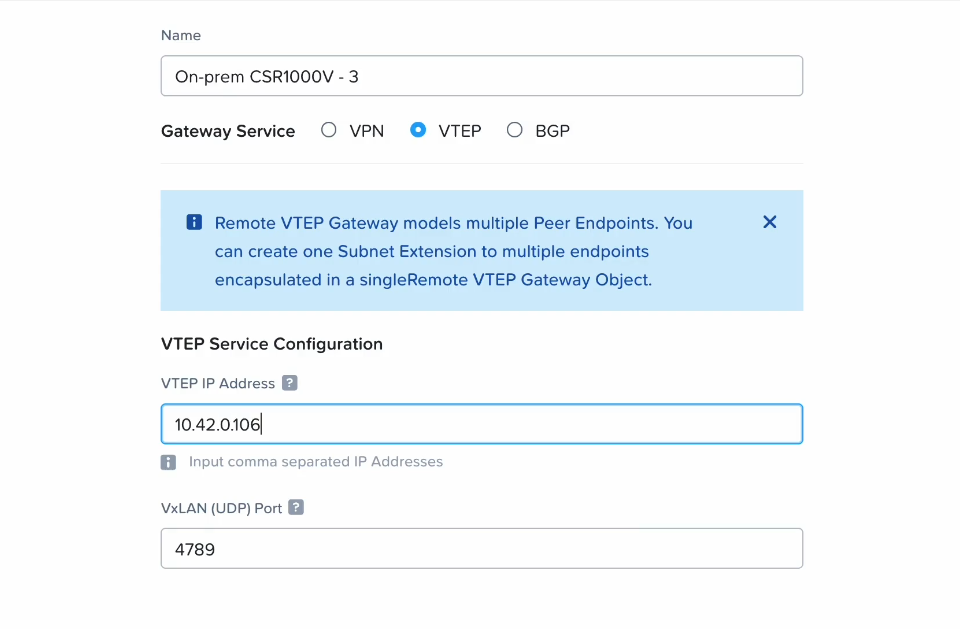
We need to create a representation of the on-premises CSR1000V appliance in NC2 so that we can refer to it when extending the network in a later step. This is essentially just a matter of adding in the IP address as a “Remote Gateway”.

In Prism Central, navigate to “Network and Security”, select “Connectivity” and “Create Gateway”. Select “Remote” and add the details for the on-prem Cisco appliance. Give it a name, select “VTEP” as the “Gateway Service” and add the IP address. Let the VxLAN port remain as “4789”.

Step 6: Configure the CSR1000V IP leg on the VLAN to be extended and set up VNI and other settings required to extend the network

In this step we do the configuration of the CSR1000V over SSH. To enable SSH you may need to to the following through the console for the virtual appliance first.

Enable SSH

en
conf t
username cisco password Password1!
line vty 0 4
login local
transport input ssh
end

Now when SSH is available, SSH to the appliance as the user “cisco” with password “Password1!” and complete the remaining configurations.

Configure interface in VLAN to be extended

Configure the 2nd interface to be a leg into the VLAN to be extended by giving it an IP address and enabling the interface

CSR1000V3#
CSR1000V3#conf t
Enter configuration commands, one per line.  End with CNTL/Z.
CSR1000V3(config)#
CSR1000V3(config)#int gi2
CSR1000V3(config-if)#
CSR1000V3(config-if)#ip address 10.42.3.2 255.255.255.0
CSR1000V3(config-if)#no shut

Configure NVE 1 and the VNI to be used + link with the NC2 gateway IP

For ingress-replication, use the Floating IP from the AWS VPC CIDR range which was assigned to the gateway appliance after deploying on NC2.

CSR1000V3#
CSR1000V3#conf term
Enter configuration commands, one per line.  End with CNTL/Z.
CSR1000V3(config)#
CSR1000V3(config)#
CSR1000V3(config)#int NVE 1
CSR1000V3(config-if)#no shutdown
CSR1000V3(config-if)#source-interface gigabitEthernet 1
CSR1000V3(config-if)#member vni 4300
CSR1000V3(config-if-nve-vni)#ingress-replication 10.70.177.192
CSR1000V3(config-if-nve-vni)#
CSR1000V3(config-if-nve-vni)#end
CSR1000V3(config-if)#end

Configure bridge domain and L2E via the 3rd interface (Gi3)

CSR1000V3#
CSR1000V3#conf t
Enter configuration commands, one per line. End with CNTL/Z.
CSR1000V3(config)#bridge-dom
CSR1000V3(config)#bridge-domain 12
CSR1000V3(config-bdomain)#member VNI 4300
CSR1000V3(config-bdomain)#member gigabitEthernet 3 service-instance 1
CSR1000V3(config-bdomain-efp)#end

CSR1000V3#conf t
Enter configuration commands, one per line. End with CNTL/Z.
CSR1000V3(config)#int
CSR1000V3(config)#interface giga
CSR1000V3(config)#interface gigabitEthernet 3
CSR1000V3(config-if)#no shut

CSR1000V3(config-if)#
CSR1000V3(config-if)#service instance 1 ethernet
CSR1000V3(config-if-srv)# encapsulation untagged
CSR1000V3(config-if-srv)#no shut
CSR1000V3(config-if-srv)#end
CSR1000V3#
CSR1000V3#

Configure a default route

We set the default route to go over the default gateway for the underlay we use to connect to AWS and NC2 on AWS

CSR1000V3#
CSR1000V3#conf t
Enter configuration commands, one per line.  End with CNTL/Z.
CSR1000V3(config)#
CSR1000V3(config)#
CSR1000V3(config)#ip route 0.0.0.0 0.0.0.0 10.42.0.1
CSR1000V3(config)#
CSR1000V3(config)#
CSR1000V3(config)#end

Step 7: Extend the network from NC2 with the CSR1000V as the on-prem VTEP

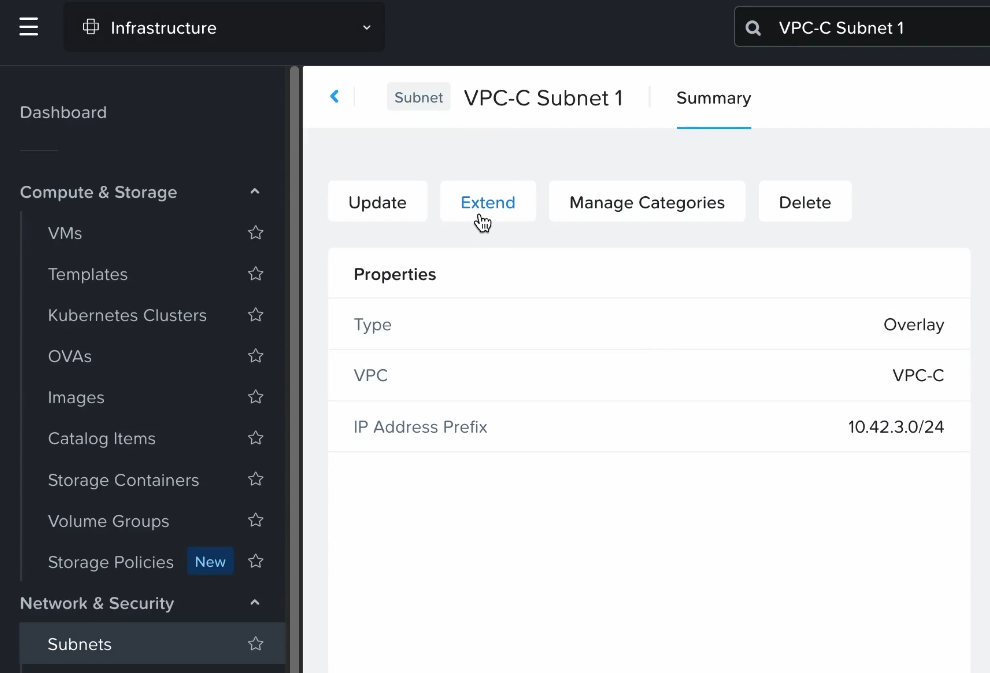
In Prism Central, navigate to “Network and Security” and select “Subnets”. From here we will create the network extension.

Click the subnet to be extended and then select “Extend”

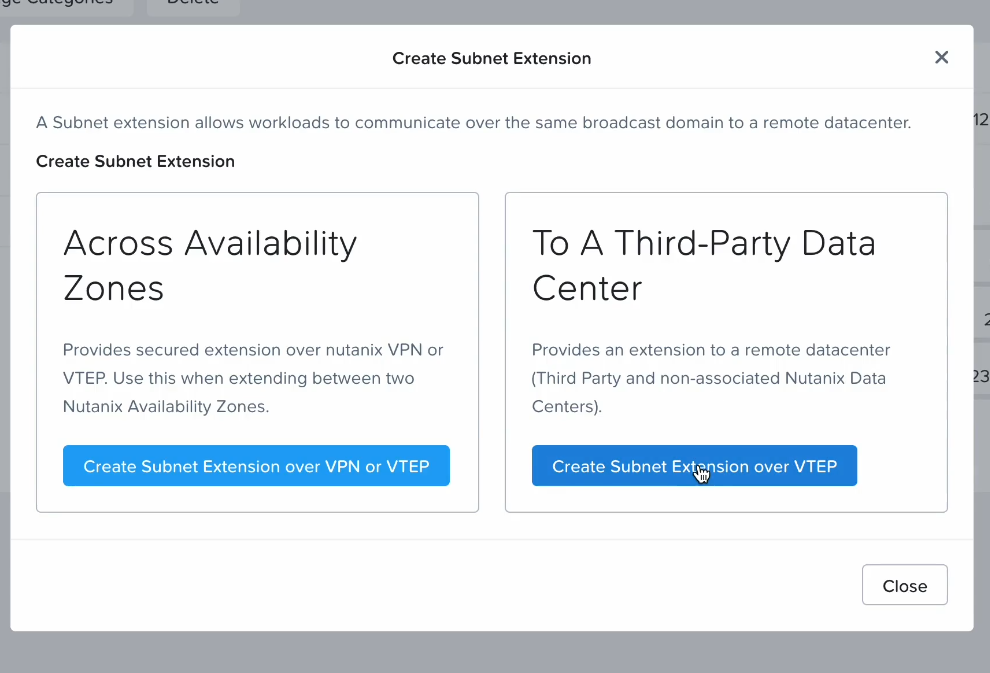
If we were extending a network between two Nutanix clusters we would select “Across Availability Zones” but in this case we extend from a pure VMware environment and a 3rd party (Cisco) appliance, so we select “To A Third-Party Data Center”.

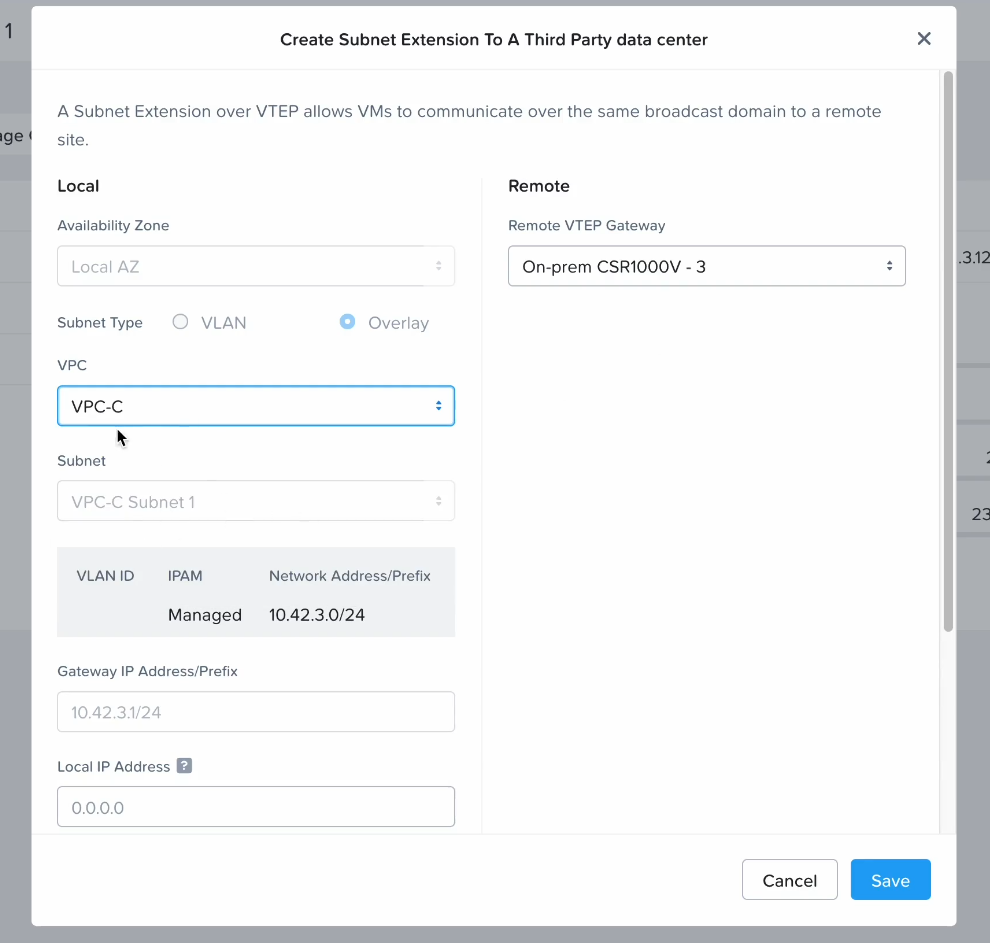
Select the CSR1000V as the remote VTEP gateway and the VPC which contains the subnet we want to extend.

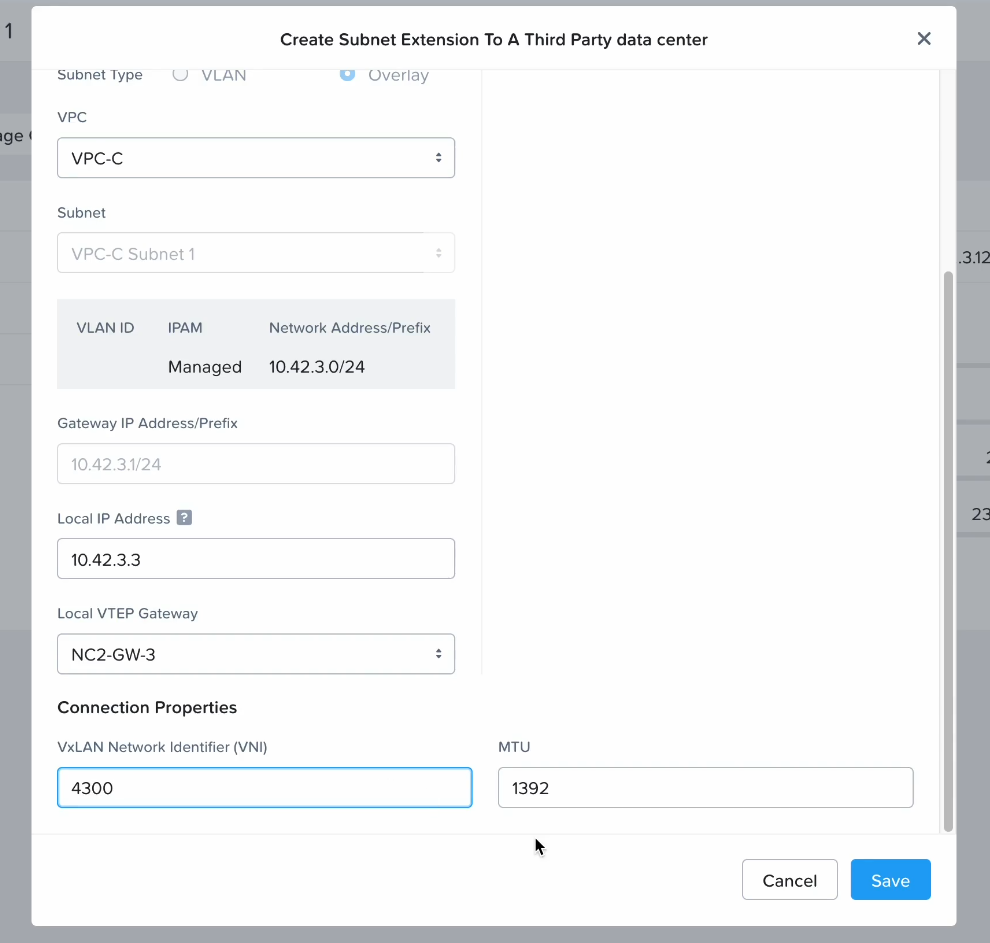
For “Local IP Address”, enter a free IP in the subnet to be extended. This will be the leg the Nutanix gateway appliance extends into that subnet.

Also set the VxLAN VNI we used when configuring the CSR1000V earlier. Adjust the MTU to ensure there is no packet fragmentation. The default is 1392 but this will vary depending on the connectivity provider between on-prem and the AWS cloud.

Configuration of the Layer 2 extension is now complete. In the following section we verify connectivity from on-prem to the cloud using the newly extended network.

Verifying connectivity

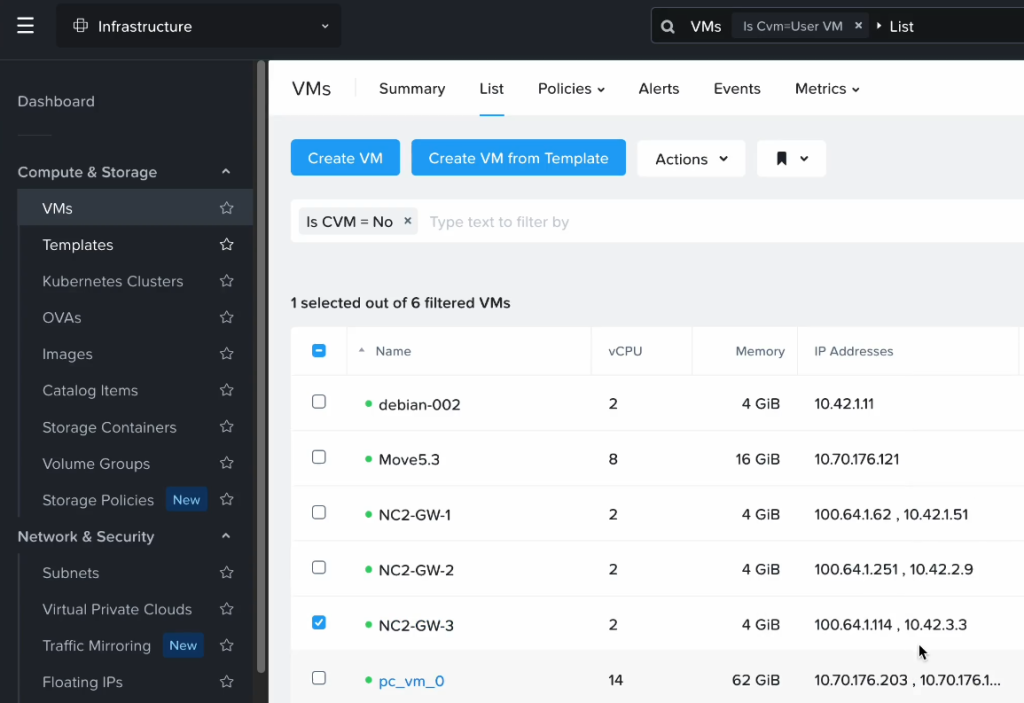
As a first step it’s good to ping the IP address in the extended network which is assigned to the Nutnix Gateway appliance. We can verify that the “Local IP Address” is configured for the gateway VM by navigating to “VM” in Prism Central and checking that “10.42.3.3” shows up as an IP for the gateway

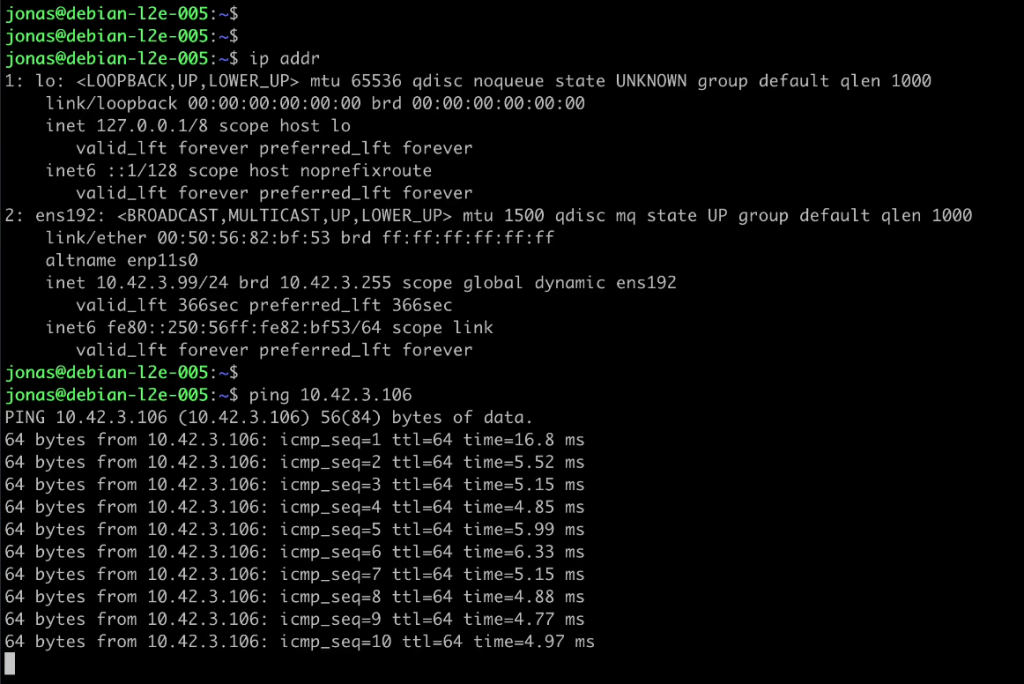
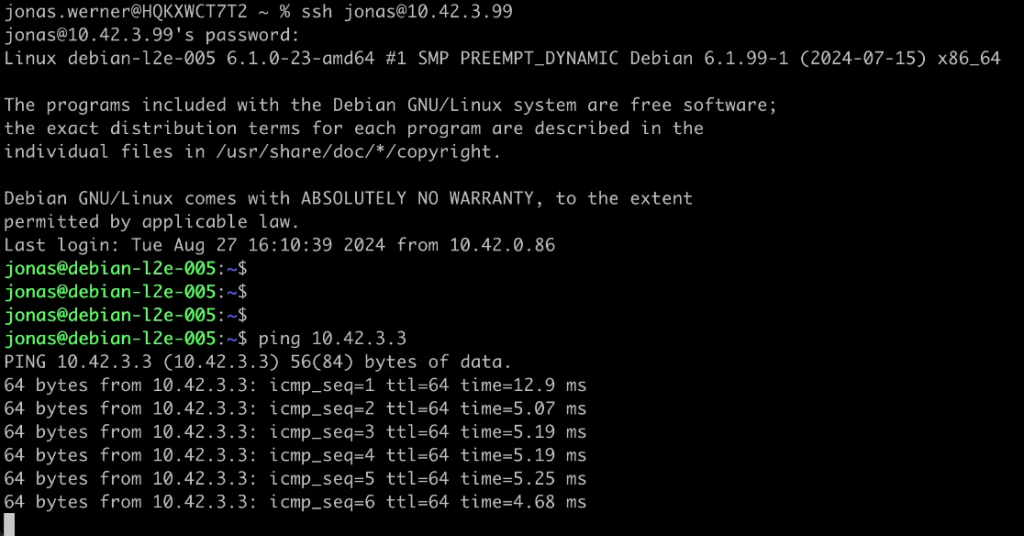
Pinging this IP address from a VM in the on-premises VMware environment shows that it can reach the gateway appliance across the extended network without problems. The local VM has an IP of 10.42.3.99, in the same VLAN which has been extended. Latency is about 5ms across the S2S VPN + L2 extension.

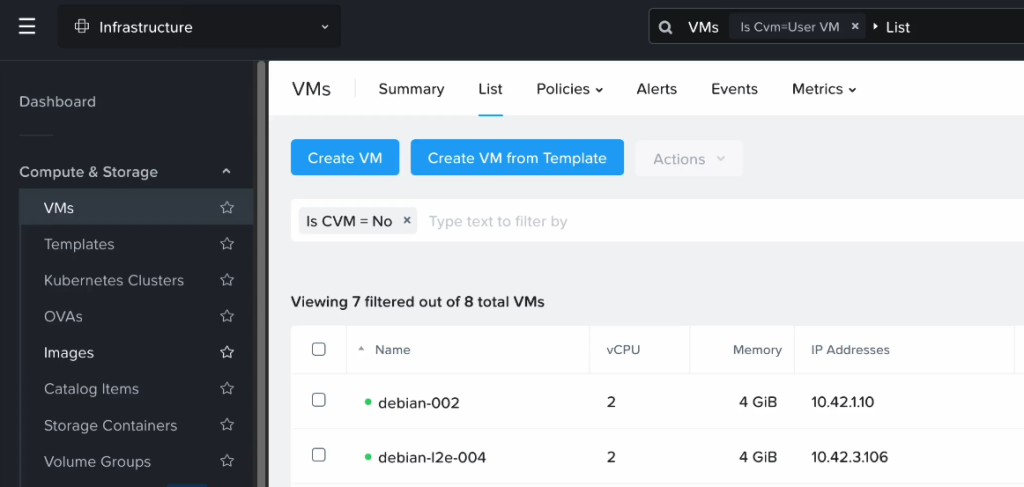
As a next step I have migrated a VM using Move from the on-prem VMware environment to NC2. After migration it was assigned an IP of “10.42.3.106” as per the screenshot below

Pinging this VM from on-prem also works just fine

Conclusion

That concludes the walkthrough of configuring L2 extension from on-premises VMware with Cisco CSR1000V to Nutanix Cloud Clusters (NC2). Hopefully this was helpful.

For reference, please refer to the below links to Nutanix and Cisco pages about L2 extension

Adding an AWS Elastic Load Balancer (ELB) to direct traffic between web servers on Nutanix Cloud Clusters (NC2)

One of the great things about running a virtualized infrastructure on NC2 on AWS is the close proximity to all the cloud native services. One of those highly useful services is the AWS ELB or Elastic Load Balancer.

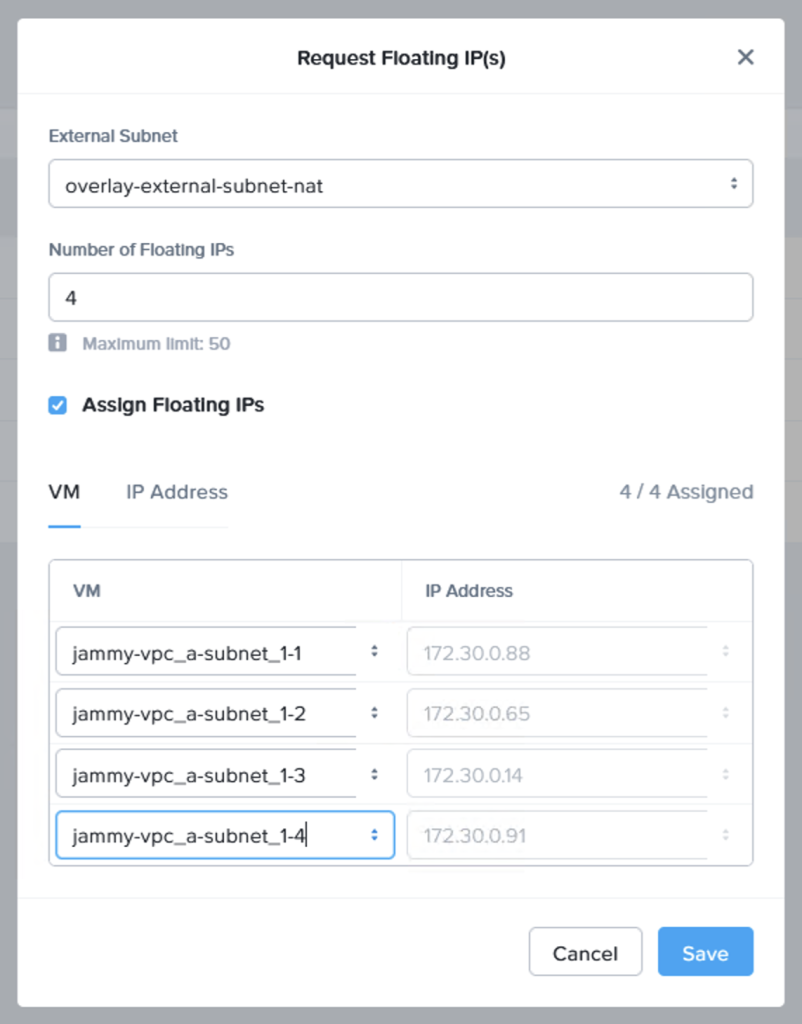
In this post we show how to get floating IP addresses from the VPC in which NC2 is located and to assign them to a number of web servers running as VMs on NC2. Then we create a Load Balancer target group and finally we create an Application Load Balancer (ALB) and attach it to the target group.

Architecture

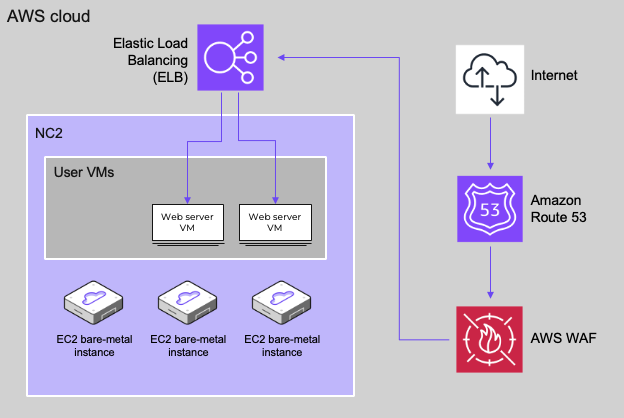
In this blog post we only cover the deployment of the web servers and the load balancer, however, Route 53 can also be leveraged for DNS and AWS WAF for security and DDOS protection purposes as illustrated below

Preparing some web servers

We first deploy a few test web servers. In this case the wonderfully named Jammy Jellyfish edition of Ubuntu Server as a cloud image. Feel free to download the image from here:

https://cloud-images.ubuntu.com/releases/22.04/release-20240319/ubuntu-22.04-server-cloudimg-amd64.img

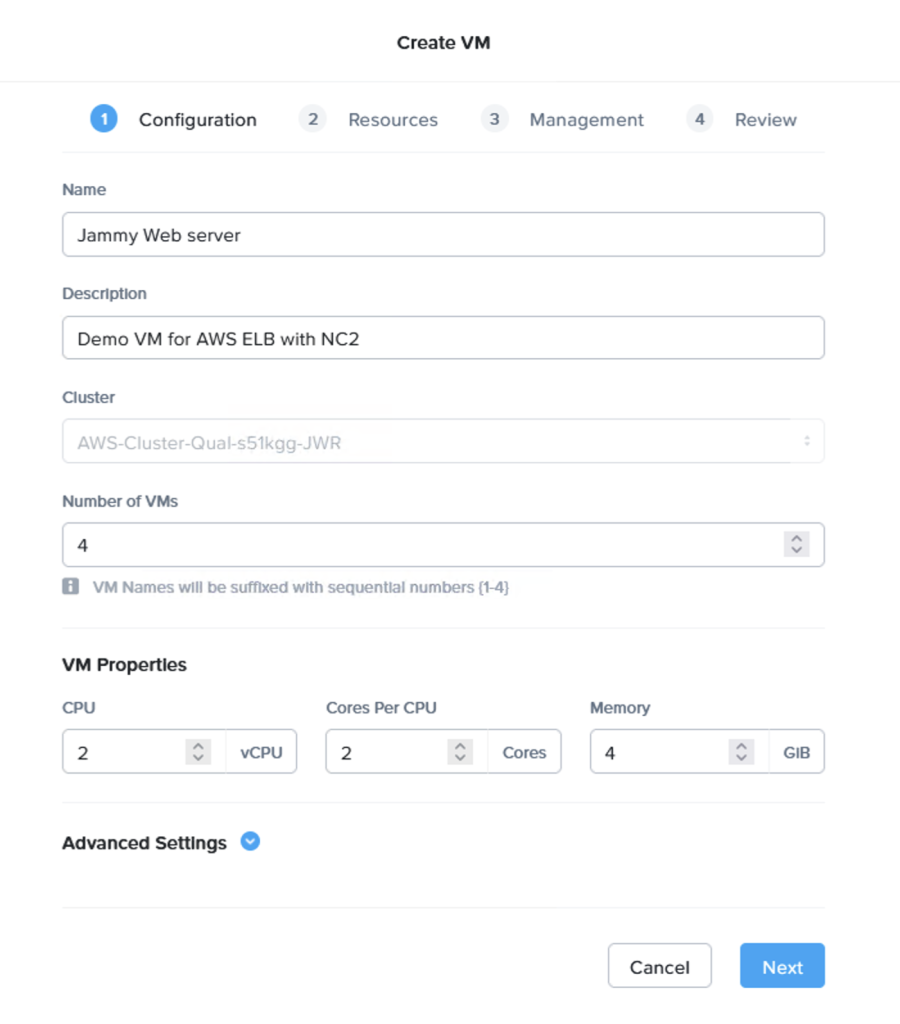
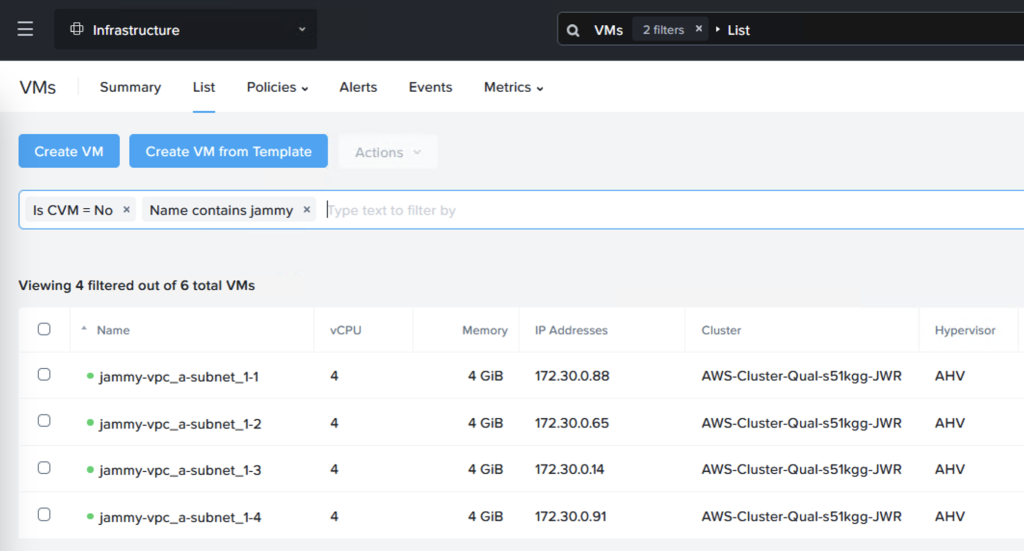
Prism Central makes it very easy to deploy multiple VMs in one go.

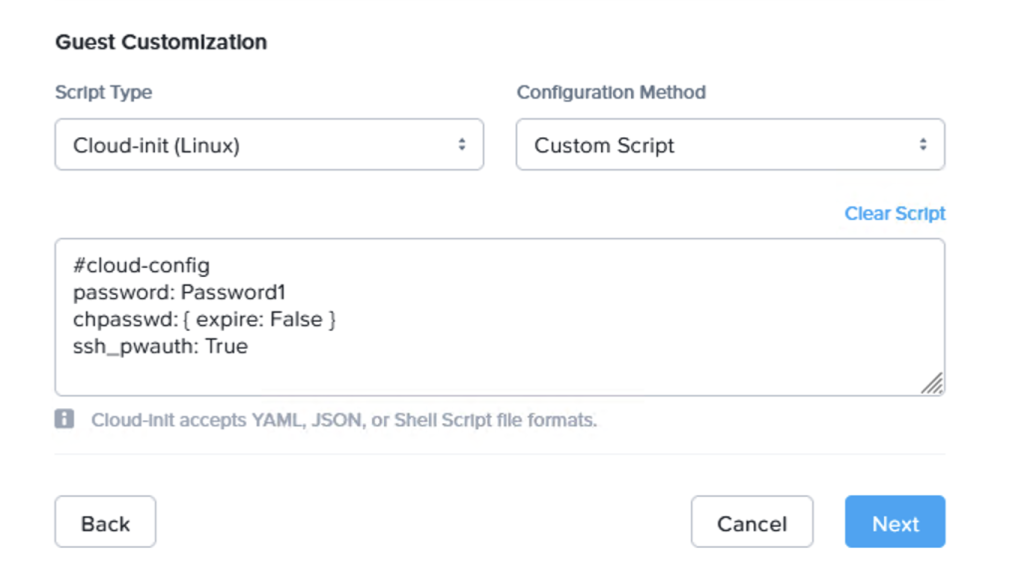
When deploying, make sure to use the cloud-init script to set the password and any other parts to make the VM usable after 1st boot:

#cloud-config
password: Password1
chpasswd: { expire: False }
ssh_pwauth: True

Now we have our VMs ready. I’ve installed the Apache web server to serve pages (apt install apache2) but feel free to use whatever works best in your setup.

I used the following index.html code to show the server ID

ubuntu@ubuntu:~$ cat /var/www/html/index.html
<!DOCTYPE html>
<html lang="en">
<head>
    <meta charset="UTF-8">
    <meta name="viewport" content="width=device-width, initial-scale=1.0">
    <title>Welcome</title>
    <style>
        body {
            display: flex;
            justify-content: center;
            align-items: center;
            height: 100vh;
            margin: 0;
            font-family: Arial, sans-serif;
            background-color: #f0f0f0;
        }
        .message-container {
            max-width: 300px;
            padding: 20px;
            text-align: center;
            background-color: #ffffff;
            border: 1px solid #cccccc;
            border-radius: 10px;
            box-shadow: 0 0 10px rgba(0, 0, 0, 0.1);
        }
    </style>
</head>
<body>
    <div class="message-container">
        <script>
            // Fetch the hostname
            document.write("Welcome to Server 1");
        </script>
    </div>
</body>
</html>

Configure floating IP addresses for the web servers

Next we request a few floating IP addresses from the VPC which NC2 is deployed into and then assign one IP each to our web servers. Luckily Prism Central makes also this very easy to do – in a single step! From “Compute & Storage”, select “Floating IPs” under “Network & Security”:

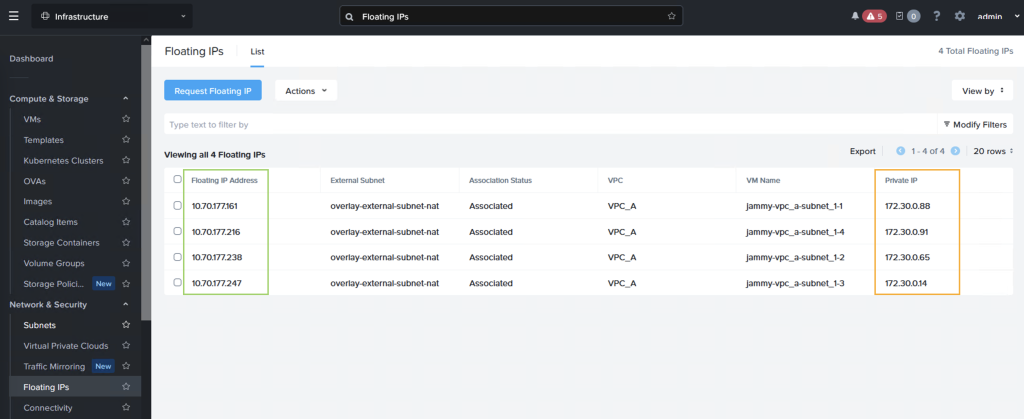
After assigning the IPs we can see that each VM have both an internal and an external IP address, where the “external” IP comes from the AWS VPC CIDR range

Creating an AWS LB target group

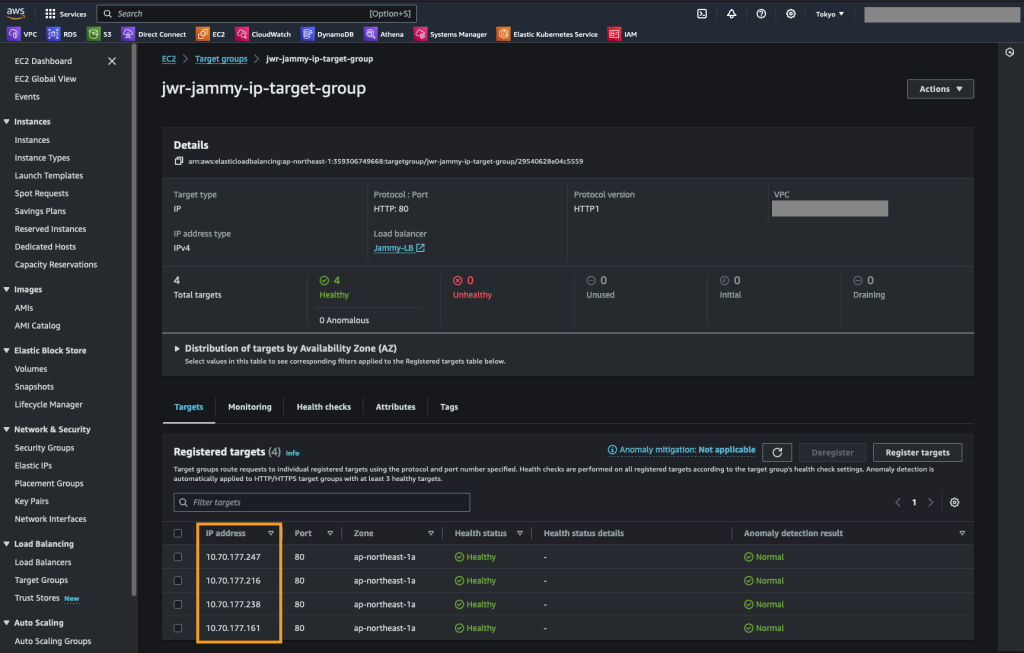
Next we create a target group for the AWS ALB which we deploy in the next step. The LB target group simply contain the Floating IP addresses we just assigned as well as a health check for the web root of these web servers.

We create an “IP address” target group and set the health check to be HTTP, port 80 and the path as “/” or the web root.

We then add the Floating IP addresses we created previously

Create the Application Load Balancer (ALB)

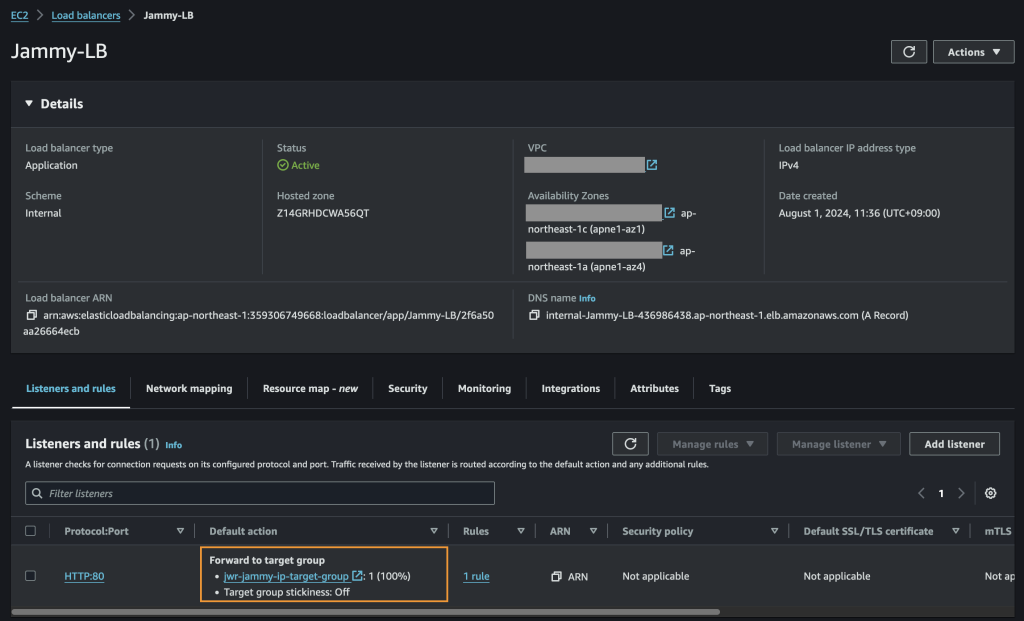
Finally we create the ALB and assign it to our target group

Test of the ALB

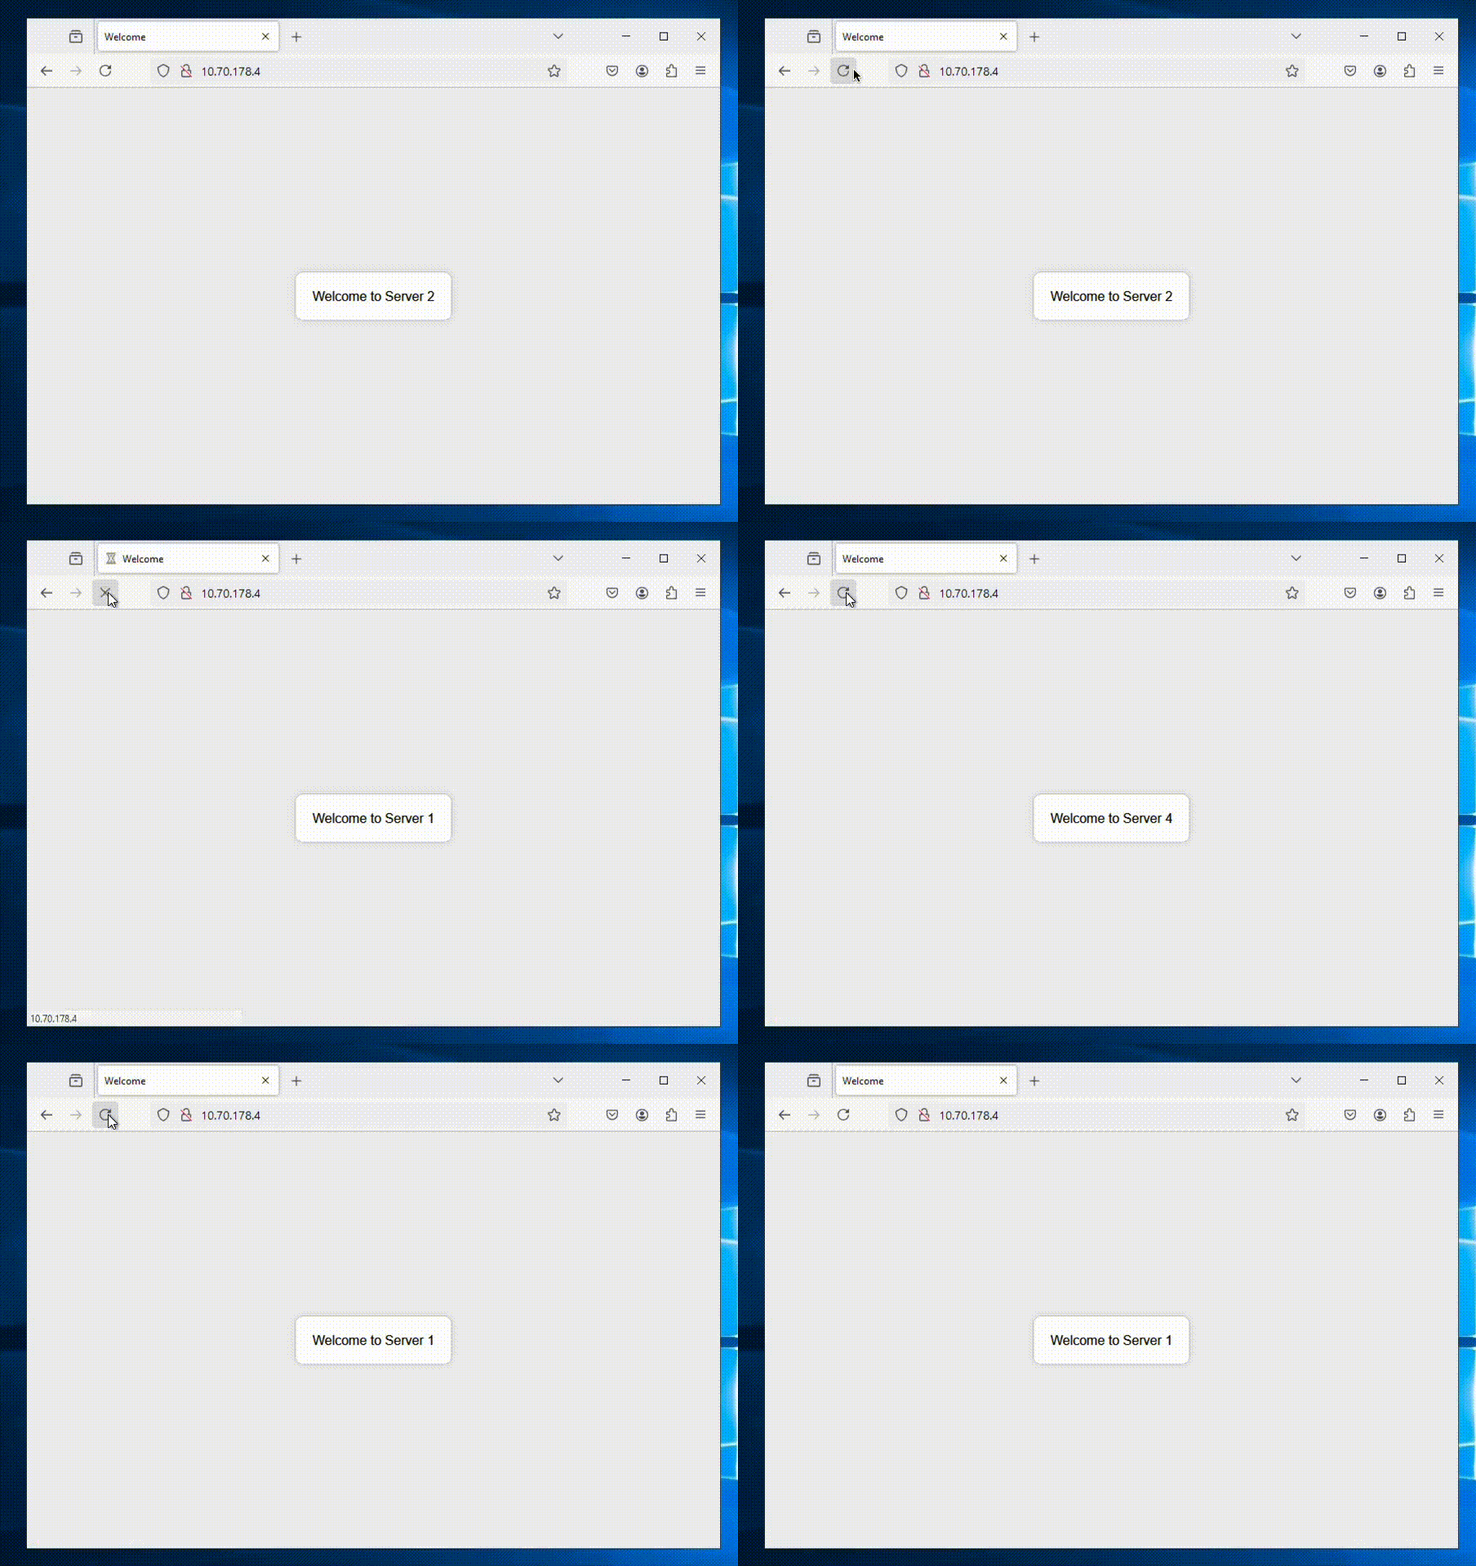
Now we’re all done and can access our ALB to see if it shows balances between the NC2 VMs as expected.

We’re getting a different web server each time we refresh the page – all good!

That’s all for now. Hope that was helpful and thank you for reading!

Migrating VMs from VMware Cloud on AWS (VMC) to Nutanix Cloud Clusters on AWS (NC2)

Summary

In this blog post we explore two ways to use Nutanix Move 5.3 to migrate Virtual Machines from an existing VMware Cloud on AWS (VMC) environment to Nutanix Cloud Clusters on AWS (NC2). This is done while preserving both IP and MAC addresses of the VMs being migrated.

The most straight forward method is to deploy NC2 into the Connected VPC. This is a VPC which is attached at time of deployment of the VMware Cloud on AWS environment and is owned by the customer. Alternatively, we can deploy NC2 into a completely separate VPC and connect to the VMware Cloud on AWS cluster through a VMware Transit Connect (VTGW).

Architecture overview

The two methods are illustrated below. Method 1 is recommended due to the ease of setup, simple networking and no data transfer charges. However, care need to be taken to ensure there is no overlap with any existing resources deployed into the Connected VPC. For example by creating new private subnets in the Connected VPC specifically for the NC2 deployment.

Method 2 covers migrating via a VMware Transit Connect (VTGW). Although it has additional routing considerations, this is also a fully viable option. In this example we peer the VTGW with a normal customer-controlled AWS Transit Gateway (TGW). Note that with Method 2 the VTGW can also connect directly to a VPC without the need for a TGW, but this will limit the routing options for the customer.

It’s important to keep in mind that both options can migrate VMs from VMC without changing IP or MAC addresses. Neither option require L2 Extension of user VM networks. This underlines the ease of which a migration like this can be done. There are of course some caveats. Refer to the VM networking section below for more detail.

Method 1: Migrate from VMC to NC2 deployed into the VMC Connected VPC
Method 2: Migrate VMs via VTGW into a separate or new VPC

VM networking

The whole migration can be done without L2 extension of VM networks. On the VMware Cloud on AWS side Virtual Machines in VMC are connected to overlay networks created with NSX-T using the VMC management console. These are represented by the “10.3.0.0/24” network in this example. The same CIDR ranges can be created as overlay networks by using Nutanix Flow on the NC2 cluster. Thereby, when VMs are migrated from VMC to NC2, they don’t need to change their IP or MAC addresses.

Note that if L2 Extension is not used, there is no communication between the overlay networks in NC2 and the overlay networks in VMC. Therefore, plan the migration so that VMs which need to communicate are moved together.

Also note that Flow does not advertise the overlay networks into the VPC route table. As long as VMware Cloud on AWS is attached to the connected VPC, the routes for the VMs will point to the active ENI created during the VMC cluster deployment. Destroying the VMC cluster will remove these ENIs and the corresponding routes from the Connected VPC route table.

Migration tool: Move

The Nutanix Move migration tool has with the recent 5.3 release added support for migrations from VMware Cloud on AWS. In this example, Move is deployed into the NC2 cluster. Both the VMC and the NC2 environments have been registered with Move and the inventories of both show up and are available for migration. More details in the Move deployment section below.

Method 1: Deploy NC2 into the Connected VPC

If there is enough space to deploy NC2 into the already existing Connected VPC in the customer account, this is the easiest and most straight-forward option. Connectivity and routing between the Connected VPC and the VMware Cloud on AWS environment is already configured as part of the VMC deployment. Do make sure that the CIDR ranges of any existing subnets are sufficient for deployment of NC2 and that there aren’t already resources deployed into those subnets which could interfere with the NC2 components. If the VPC CIDR range has space for new subnets, consider creating new private subnets to hold the NC2 deployment.

  • Benefits
    • No need to create new VPC and subnets
    • VPC is already connected to VMC and routing is configured
    • Data transfer is free of charge
    • High link / data transfer speed

  • Drawbacks
    • VPC may already be fully populated with resources
    • VPC may not have the correct CIDR ranges for NC2

Method 1: Steps to deploy

Simply sign up for NC2 or start a trial and deploy through the NC2 deployment wizard. Select the latest version – 6.8, to get Flow overlay networking and the centralized management through Prism Central included.

Note that NC2 can only be deployed into private AWS subnets and that internet connectivity need to be present. If no direct internet connectivity is available, proxy support is also available through the deployment wizard.

VMware Cloud on AWS automatically updates the default route table in the connected VPC with the routes to vCenter, ESXi and the user networks. However, if NC2 is deployed into a subnet which doesn’t use the default route table those routes won’t be present. Ensure the subnet NC2 is deployed into is updated with the routes to the VMware Cloud on AWS environment. Particularly the management subnet which holds vCenter and the ESXi hosts. Also, if necessary, update the security group on the active VMC ENI to allow access from the NC2 subnet.
After the NC2 cluster is deployed, follow the steps further down in this article to open the VMC firewall for vCenter and ESXi, deploy Move 5.3 on top of NC2 and register both the NC2 cluster and the VMC vCenter instance.

Method 2: Deploy NC2 into a separate VPC and migrate through a VTGW

If deploying NC2 into the Connected VPC is not possible or desirable, there is another option available. VMware Cloud on AWS supports creating a VMware Transit Connect (VTGW). The VTGW is a VMware-controlled Transit Gateway (TGW) – basically a regional cloud router. The VTGW can in turn be attached either directly to another VPC or peered with a customer controlled TGW. The TGW can then be attached to one or several VPCs of the customers choosing. Do keep cross-AZ and cross-region charges in mind when planning the architecture so that they can be minimized or avoided.

  • Benefits
    • Once set up, migration is straight forward
    • The customer can use any VPC for the NC2 deployment, including a new one
    • High link / data transfer speed

  • Drawbacks
    • Routing requires additional steps and knowledge
    • Data transfer is charged (roughly 2 cents/Gb)
    • Although this example use a TGW and a VTGW, data transfer charges do not end up being doubled. The peering attachment does not incur data transfer charges unless they go across AZs or regions.
    • (V)TGW attachments are charged (roughly 7 cents/h in ap-northeast-1)

Method 2: Steps to deploy: Create the VTGW

Unless already present, go to the AWS console and deploy a Transit Gateway (TGW) in the same region as VMC. Then, in the VMware Cloud on AWS management console, go to “SDDC groups” and deploy a new VTGW. Once deployed, navigate to the “External TGW” tab, click “Add TGW” and enter the account number and the ID of the customer TGW to connect to as well as the regions to use.

In the “Routes” box, enter the CIDR range of the VPC which NC2 is to be deployed into. In this example, “10.90.0.0/16”.

This will advertise the NC2 VPC CIDR to VMware Cloud on AWS and also create a peering attachment invitation from the VMware AWS account to the customer AWS account.

Method 2: Steps to deploy: Configure the TGW

The invitation to add the peering attachment can be accepted through “Transit Gateway Attachments” in the AWS console in the customer account.

While here, take the opportunity to add an attachment to the VPC into which NC2 will be deployed.

Accepting the peering invitation in the AWS console

In the customer AWS account, navigate to the Transit Gateway route table section, select the route table for the TGW peered with VMC and add the routes for the VMC networks. In this case “10.2.0.0/16”, “10.3.0.0/16” and “10.4.0.0/16”. Note that these are added as Static routes.

In addition we have the “10.90.0.0/16” network added via the VPC attachment. There is no need to add static routes for this network as it is propagated automatically.

Method 2: Steps to deploy: Configure the routes to the VMC cluster in the NC2 VPC

The final step for the routing is to add the routes for VMware Cloud on AWS into the route table(s) of the VPC which NC2 is to be deployed into. In our example, “10.2.0.0/16”, “10.3.0.0/16” and “10.4.0.0/16” are added as routes via the TGW attachment. “10.90.0.0/16” is our local network and there is a quad-zero route to the internet via a NAT GW.

This concludes the setup steps specific to Method 2. Please continue with the firewall settings, NC2 cluster deployment and Move installation below.

Firewall settings: Allow Move to access the VMC vCenter and ESXi hosts

Move requires access to the VMC vCenter instance and the ESXi hosts in order to migrate virtual machines. Through the VMware Cloud on AWS console, add a Management Gateway firewall rule to allow the NC2 VPC to access these resources.

  • Add the NC2 VPC CIDR range to an MGW inventory group
    • Navigate to “Networking & Security”
    • Click “Groups” under “Inventory”
    • Click “Management Groups” to edit the groups pertaining to the MGW
    • Add or modify a group and add the CIDR range of the VPC which NC2 is deployed into
      • To modify an existing group, click the 3-dot menu on the left of the group and select “Edit”
Adding the NC2 VPC CIDR range to an MGW inventory group
  • Add the MGW inventory group to the MGW firewall rules
    • Navigate to “Networking & Security”
    • Click “Gateway Firewall” under “Security”
    • Click “Management Gateway” to edit rules for the MGW
    • Update the rules for ESXi and vCenter by adding the MGW inventory group containing the NC2 VPC CIDR range with the action “Allow”
Adding the MGW inventory group to a MGW firewall rule allowing access to ESXi and vCenter from the NC2 VPC

Deploy the NC2 cluster

Sign up for NC2 or start a trial and deploy through the NC2 deployment wizard. Select the latest version – 6.8, to get Flow overlay networking and the centralized management through Prism Central included. When asked, select the VPC and the private subnets desired. In this case subnets in the “10.90.0.0/16” VPC.

After the NC2 cluster is deployed, deploy Move 5.3 on top of NC2 and register both the NC2 cluster and vCenter from the VMC environment.
Install Move and register NC2 and VMC

Download Move 5.3 from the download page: https://portal.nutanix.com/page/downloads?product=move

Follow the Move manual to deploy Move 5.3 on the NC2 cluster in AWS: https://portal.nutanix.com/page/documents/list?type=software&filterKey=software&filterVal=Move

VDDK upload: After Move is deployed, add the NC2 and VMC environments. After adding the VMC environment it will prompt for a VDDK file. This file can be downloaded from the VMware support site. The version used in this example is: “VMware-vix-disklib-7.0.3-19513565.x86_64”. Please use the Linux version.

Migrate the VMs to NC2

If IP retention is desired, use Flow in Prism Central to create an overlay VPC and subnet which matches the CIDR range of the NSX-T subnet in VMC from which the VMs will be migrated. In this example “10.3.0.0/24” is used.

Now the only thing remaining is to create a Migration Plan in Move where VMC is the source and NC2 is the target. Ensure to select the correct target network to ensure IP retention works as expected.

Wrap up

This has been an example of the steps required for migrating Virtual Machines from VMware Cloud on AWS (VMC) to Nutanix Cloud Clusters (NC2) without changing the IP or MAC addresses of the migrated VMs. For more information or for a demo, please reach out to your Nutanix representative or partner.

Additional resources

Running containerized game servers with EKS Anywhere on Nutanix

Summary

Did you ever wish you could host your own multi-player gaming servers with k8s? In that case I have great news, because in this post we’re covering how to deploy online multi-player game server containers with EKS Anywhere on Nutanix infrastructure.

Components

The game in question is Xonotic, which is a classic, fast-paced, multi-player shooting game based on the Quake engine. To deploy it we use Agones – a platform for running, scaling and orchestrate multi-player gaming containers on k8s.

Agones, in turn, goes on top of EKS Anywhere which runs on a Nutanix cluster. In this case we have deployed a cluster in our Phoenix DC, which is also linked with a Nutanix NC2 cluster on AWS.

Nutanix clusters on-prem in Phoenix and in AWS are managed holistically through the Nutanix Prism Central management console. K8s management is done by registering the EKS Anywhere with the EKS service in AWS. K8s node management is done through SSM or Amazon Systems Manager.

Architecture

The two Nutanix clusters (on-prem and cloud) are linked via a Direct Connect line and can be managed holistically using private networking.

The gaming components are managed through standard the k8s toolset while EKS in the AWS console is used for monitoring of the cluster.

The k8s nodes run as virtual machines on Nutanix and each have the SSM (AWS Systems Manager) agent installed. This makes it possible to monitor the VMs, do patch management and even remote connectivity through the AWS console

Disclaimer: Inventory data from SSM can be sent to an S3 bucket, converted with Athena and then displayed in graphical form through Amazon Quicksight, as is shown to the right in the diagram. This guide doesn’t go through those particular steps, but they are well documented on the Amazon website.

Overview of the architecture both on-prem and in the cloud. Pardon the Japanese script here and there -this was created for a Japanese event after all

The EKS management and SSM connectivity is done to public AWS endpoints in this case, so it goes over the internet. It would also have been possible to do this over private networking through the DX connection, but I don’t have the IAM privileges to create anything new in the account NC2 is running in.

Overview of steps

The following steps will be covered while building the environment

StepGoalTask
1Holistic Nutanix cluster managementPrism Central download and configuration
2Building EKS Anywhere node image #1Download and deploy Ubuntu 22.04 image
3Building EKS Anywhere node image #2Create VM and follow image-builder steps
4EKS Anywhere deploymentRun EKS Anywhere installer from Ubuntu
5k8s cluster managementRegister EKS Anywhere with AWS
6k8s node managementInstall SSM agent on EKS Anywhere nodes
7Game platform orchestrationInstallation of Agones platform
8Game server deploymentCreation of Xonotic pods through Agones
9Good-old fun!Install the Xonotic client and go fragging!

Step 1: Prism Central download and configuration

If not yet deployed, download and deploy Prism Central through the Prism Element UI as per the below.

Once Prism Central has been deployed, reset the admin password over the CLI. SSH to the Prism Central IP using the user “nutanix” and the password “nutanix/4u”. Reset the password using:

ncli user reset-password user-name=admin password=yourpassword

On each cluster, register with Prism Central through the Prism Element UI. Once registered, the clusters show up in Prism Central as per the below

Step 2: Download and deploy Ubuntu 22.04 image

From the Ubuntu website, copy the URL to the Ubuntu image (Jammy Jellyfish) from here:

https://cloud-images.ubuntu.com/releases/22.04/release/

Be sure to pick the ubuntu-22.04-server-cloudimg-amd64.img and not the disk-kvm image as the kvm image won’t boot.

Add it as a DISK image from URL in the Nutanix web UI:

Step 3: Create VM and follow image-builder steps

Use the image to create a new Ubuntu VM.

  • I used 2 CPUs with 2 cores each and 8 Gb of RAM.
  • Delete the CD-ROM drive
  • Add a NIC.
  • Set the disk to clone from the image created above
  • Set boot mode to UEFI rather than the default BIOS.

When given the option to add a Custom Script, add a cloud init snippet as per the below to enable SSH (with password rather than key) and set your password

#cloud-config
password: vrySekrPaswd1%
chpasswd: { expire: False }
ssh_pwauth: True

Disk update: You’ll note that the disk created from the image is very small – just 2.2 Gb. Changing the disk size during VM creation isn’t supported, but it can be made larger afterwards. Just accept the size for now and update the disk size once the VM shows up in the inventory. I set mine to 50 Gb.

Don’t start the VM just yet. First we want to add a serial port to the VM through the Nutanix CLI. SSH to any CVM in the cluster and issue the below command:

acli vm.serial_port_create <VM_NAME> index=0 type=kNull

In my case that looks like

nutanix@NTNX-16SM6B260127-C-CVM:10.11.22.31:~$ acli vm.serial_port_create ubuntu-k8s-image-builder index=0 type=kNull
VmUpdate: pending
VmUpdate: complete
nutanix@NTNX-16SM6B260127-C-CVM:10.11.22.31:~$

Now we can power on the VM and log in over SSH using the password set through the cloud init script.

For the image creation, there are official instructions from AWS here. However, I found that some of the official steps needed to be modified to work. Please refer to the below if you want to do the same as I used when creating the image:

As user “ubuntu” on the image-builder VM:

sudo adduser image-builder
sudo usermod -aG sudo image-builder
sudo su - image-builder

Now we have switched to the “image-builder” user and continue the process:

sudo apt install python3-pip -y
pip3 install --user ansible-core==2.15.9
export PATH=$PATH:/home/image-builder/.local/bin
cd /tmp
BUNDLE_MANIFEST_URL=$(curl -s https://anywhere-assets.eks.amazonaws.com/releases/eks-a/manifest.yaml | yq ".spec.releases[] | select(.version==\"$EKSA_RELEASE_VERSION\").bundleManifestUrl")
IMAGEBUILDER_TARBALL_URI=$(curl -s $BUNDLE_MANIFEST_URL | yq ".spec.versionsBundles[0].eksD.imagebuilder.uri")
curl -s $IMAGEBUILDER_TARBALL_URI | tar xz ./image-builder
sudo install -m 0755 ./image-builder /usr/local/bin/image-builder
cd

Now a “which image-builder” should show the binary installed in /usr/local/bin as per the below

image-builder@ubuntu:~$ which image-builder
/usr/local/bin/image-builder

Also, a “which ansible” should show it installed in the local user directory as follows:

image-builder@ubuntu:~$ which ansible
/home/image-builder/.local/bin/ansible

image-builder@ubuntu:~$ ansible --version
ansible [core 2.15.9]

Now we create the “nutanix.json” file to enable image-builder to use our Prism Central to create our k8s image

cat > nutanix.json
{
  "nutanix_cluster_name": "YOUR-CLUSTER-NAME",
  "nutanix_subnet_name": "YOUR-SUBNET",
  "nutanix_endpoint": "PRISM-CENTRAL-IP",
  "nutanix_insecure": "true",
  "nutanix_port": "PRISM-CENTRAL-PORT (DEFAULT 9440)",
  "nutanix_username": "admin",
  "nutanix_password": "PRISM-CENTRAL-PASSWORD"
}

Now we are ready to execute image-builder and create the image. In this case we create an image for version 1.28. This will take around 10 minutes to complete

image-builder build --os ubuntu --hypervisor nutanix --release-channel 1-28 --nutanix-config nutanix.json

Once complete you should be greeted with the following message:

In the list of images in Prism, the new k8s image will show up as follows

Step 4: EKS Anywhere deployment

Now we have an image and are ready to start deploying EKS Anywhere …. well, almost. First we create a configuration file which then is used as the template for the deployment.
Install Docker:

Official instructions can be found here: https://docs.docker.com/engine/install/ubuntu/

After the install, add the “image-builder” user to the docker group so we can use docker without “sudo”

sudo usermod -aG docker image-builder

Log out and back in again for the group change to take effect, then test as follows

image-builder@ubuntu:~$ docker ps -a
CONTAINER ID   IMAGE     COMMAND   CREATED   STATUS    PORTS     NAMES

Install eksctl, eksctl-anywhere and kubectl

Official instructions can be found here: https://anywhere.eks.amazonaws.com/docs/getting-started/install/

Create a cluster-config.yaml file

eksctl anywhere generate clusterconfig AWESOME-CLUSTER-NAME --provider nutanix > cluster-config.yaml

Edit the cluster-config.yaml file to adjust to your local environment

Update the cluster-config.yaml file created in the previous step to point to the Prism Central environment you’d like to use. For a lab environment you may also want to disable TLS certificate check. Official instructions for how to modify the file are listed here.

The entire file is too long to upload here, but the fields I’ve modified are:

KeyValue
controlPlaneConfiguration.count3
controlPlaneConfiguration.endpoint.hostFloating IP to use for control plane VM
kubernetesVersion1.28 (to match with the image built)
workerNodeGroupConfigurations.count3
spec.endpointPrism Central IP / FQDN
spec.insecuretrue (spec.insecure is a new entry)
spec.cluster.namePrism Element cluster name
spec.image.nameName of k8s image created earlier
spec.subnet.nameName of subnet to use for k8s nodes
spec.users.name.sshAuthorizedKeysCopy and paste your RSA SSH key here

Quick screenshot showcasing the addition of the “spec.insecure” parameter for lab clusters without a valid SSH/TLS cert:

Deploying the cluster

First export the credentials to Prism Central as per the below:

image-builder@ubuntu:~$ export EKSA_NUTANIX_USERNAME="admin"
image-builder@ubuntu:~$ export EKSA_NUTANIX_PASSWORD="PRISM-CENTRAL-PWD"

Now are are ready to deploy with the cluster-config.yaml file as our template

eksctl anywhere create cluster -f cluster-config.yaml

After a successful deployment, the below will be shown:

Get the credentials for your cluster

export KUBECONFIG=${PWD}/YOUR-CLUSTER-NAME/YOUR-CLUSTER-NAME-eks-a-cluster.kubeconfig

List the k8s nodes and their IP addresses

kubectl get nodes -o wide

Step 5: Register EKS Anywhere with AWS

First we need the aws cli installed and configured with an access key and a secret access key

sudo apt install awscli

Then configure with your credentials

aws configure

Generate the EKS connector configuration files

eksctl register cluster --name YOUR-CLUSTER-NAME --provider EKS_ANYWHERE --region YOUR-REGION

This will generate three yaml files like so

image-builder@ubuntu:~/EKS-A$ ls -1
eks-connector-clusterrole.yaml
eks-connector-console-dashboard-full-access-group.yaml
eks-connector.yaml
image-builder@ubuntu:~/EKS-A$

Then apply the configuration files with kubectl

kubectl apply -f CONFIG-FILE

Access the AWS console, navigate to Amazon Elastic Kubernetes Service and verify that the cluster shows up as it should. Ensure you are in the region you selected when generating the yaml config files

Click the cluster name , go to the Resources tab and select Pods. Here you filter to find the Xonotic game pods as per the below

Step 6: Install SSM agent on EKS Anywhere nodes

With the AWS Systems Manager agent installed, it is possible to monitor the k8s cluster nodes, get their software inventory, do patch management, remote access and various other things

The first thing we do is to create a managed node activation in the AWS Console. Navigate to Systems Manager and select Hybrid Activations. Be sure to pick the right region.

Save the resulting activation details as they are used when registering installing the SSM agent and registering the the k8s nodes

For the agent installation and registration, please follow the official guide here:

https://docs.aws.amazon.com/systems-manager/latest/userguide/sysman-install-managed-linux.html

Once the agent is installed and registered, the nodes will show up in SSM as per the below

Step 7: Installation of Agones platform

First of all, install helm so we can use helm charts

sudo snap install helm --classic

Add the Agones repo, update and install

helm repo add agones https://agones.dev/chart/stable
helm repo update
helm install v1.38.0 --namespace agones-system --create-namespace agones/agones

Verify the Agones install by listing the pods

kubectl --namespace agones-system get pods -o wide

Step 8: Creation of Xonotic pods through Agones

Now when we have the Agones game orchestration platform running, all we need to do is to deploy the actual game containers into it thusly

kubectl apply -f https://raw.githubusercontent.com/googleforgames/quilkin/main/examples/agones-xonotic-sidecar/sidecar.yaml

We can now list the game servers

kubectl get gameservers

Step 9: Install the Xonotic client and go fragging!

The Xonotic game client is available for download here:

https://xonotic.org/download/

Mac users on Apple silicon can install the client with Brew

brew install xonotic

Start the client, select multi-player and add the IP and port of your game server

Play the game!

Closing

This has been a somewhat lengthy guide on configuring k8s on top of Nutanix with the intent of running containerized game servers. Hopefully it has been informative. Originally I wanted to expand the section on SSM and other features on managing the cluster through AWS but thought this blog post was long enough already. Perhaps those areas will be worth re-visiting later on if there’s interest.
Happy Fragging!

Links and References

  • https://cloud-images.ubuntu.com/releases/22.04/release/
  • https://portal.nutanix.com/page/documents/kbs/details?targetId=kA00e000000CshJCAS
  • https://image-builder.sigs.k8s.io/capi/providers/nutanix.html
  • https://anywhere.eks.amazonaws.com/docs/osmgmt/artifacts/#building-node-images
  • https://anywhere.eks.amazonaws.com/docs/getting-started/nutanix/
  • https://anywhere.eks.amazonaws.com/docs/getting-started/nutanix/nutanix-spec/
  • https://devopscube.com/eks-anywhere-cluster/
  • https://googleforgames.github.io/quilkin/main/book/quickstarts/agones-xonotic-sidecar.html